Black Spots on Rose: Causes, Checks & Fixes
Quick answer
Black spots on Rose are usually black spot fungus (Diplocarpon rosae) from wet leaves and poor airflow. First step: remove spotted leaves into the bin-not compost-then water at the base only and thin crowded canes for airflow.
Black Spots on Rose: Causes, Checks & Fixes
This guide covers black spots on Rose. See also the general Black Spots guide, watering, and light pages for this plant.
Black Spots on Rose: Causes, Checks & Fixes
Quick answer
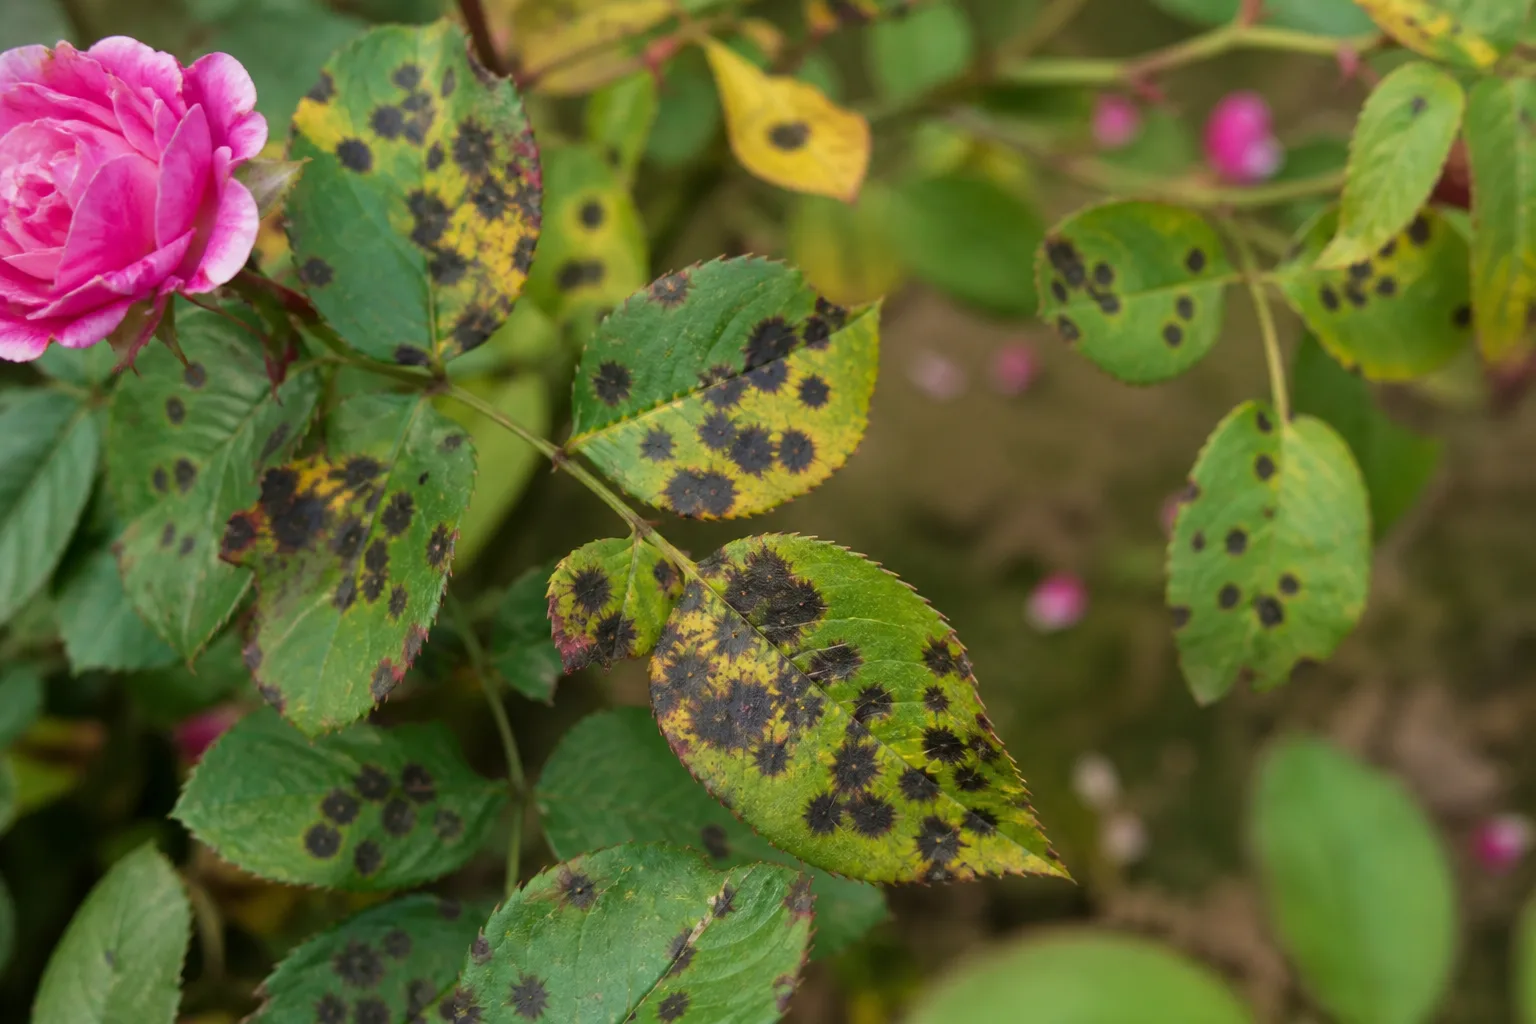
Black spots on rose leaves are usually black spot fungus caused by Diplocarpon rosae. Purple-black circular spots with yellow halos appear on upper leaf surfaces; infected leaves yellow and drop early, often leaving bare lower canes while buds still try to open at the tips. Wet foliage and stagnant air let spores germinate; splashing rain or overhead watering spreads them stem to stem.
First step: remove all spotted leaves into the bin-not compost. Switch permanently to base-only watering per our rose watering guide, and thin crossing interior canes so leaves dry faster after rain. Only after sanitation should you consider protectant fungicide on healthy tissue if spots keep appearing on new growth.
Black spot vs. leaf drop on Rose: This page is the disease-management guide for Diplocarpon rosae-spotting, sanitation, and spore control. If your bush is shedding leaves and you are unsure whether black spot, soggy roots, drought, or mites are to blame, start with the leaf drop on Rose guide for broader triage.
Why Rose gets black spots
Wet foliage and Diplocarpon rosae biology
Black spot is the most serious disease of roses. The fungus infects leaves and greatly reduces vigour; infected leaves develop black spots, turn yellow, and drop prematurely. Spores spread in splashing water and need wet leaf surfaces to infect-most humid summers provide enough moisture even when you water carefully at the base.
At least seven hours of continuous leaf wetness with temperatures above about 20°C (68°F) are needed for spore germination. That is why evening overhead watering, misting foliage, or dense canopies that hold dew overnight open the infection window on hybrid tea, floribunda, and patio roses.
Container balconies vs. in-ground borders
Container roses on sheltered balconies trap humidity between crossing canes and against walls-leaves stay wet long after the top of the bush looks dry. In-ground border roses have better natural drainage at the root zone but still suffer when sprinklers wet foliage or climbers are packed against fences with poor air movement.
The overwatering on Rose guide covers soggy root zones; black spot is a separate foliar disease, but wet leaves from overhead watering accelerate spotting even when soil moisture is correct. Both problems often appear together on stressed container roses.
Overwintering spores on debris and canes
The fungus spends winter on fallen leaves and in dormant infections on young stems and buds, producing spores in spring to infect young foliage. The black spot fungus overwinters in diseased canes and infected fallen leaves beneath plants. One missed autumn cleanup can reinfect spring growth before you notice the first spot.
What black spots look on Rose
Leaf symptoms
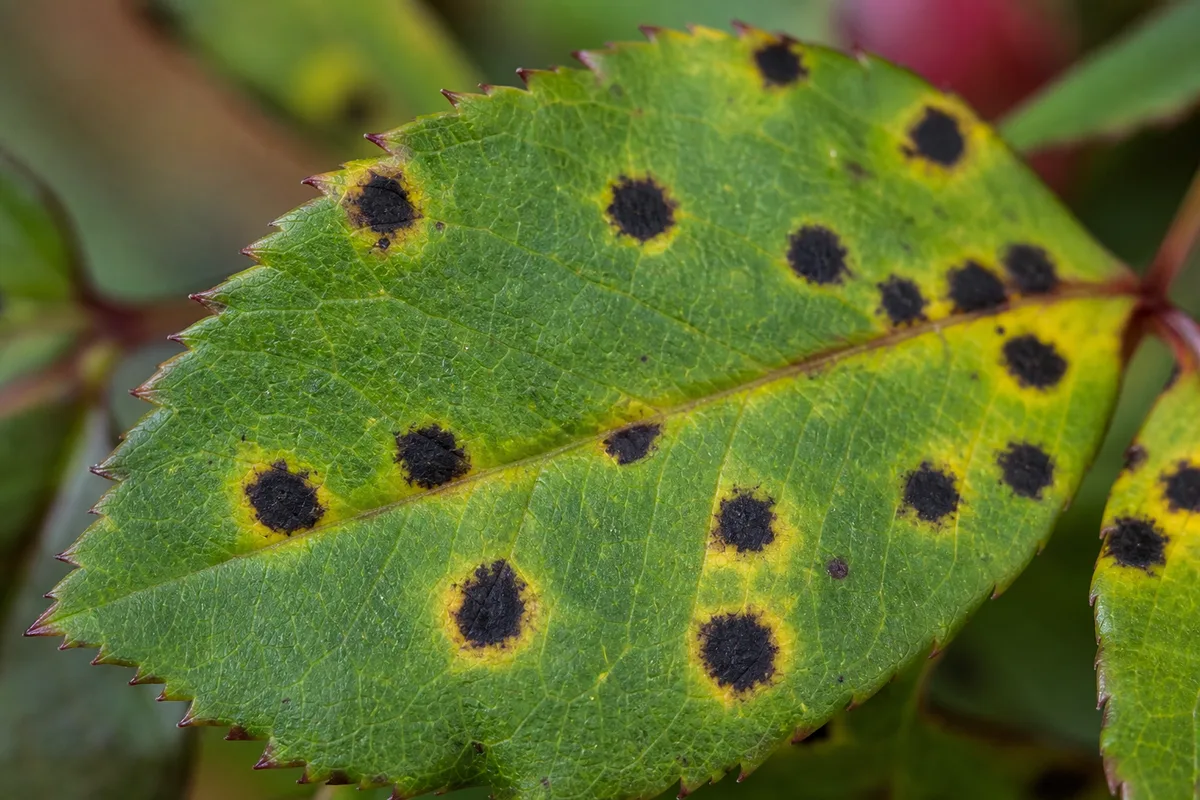
Black Spots symptoms on Rose - compare with healthy tissue on the same plant.
- Rapidly enlarging purplish or black patches on the upper leaf surface, often circular with diffuse margins
- Yellow tissue develops around spots; the leaf often drops even when only part of the blade is affected
- Multiple spots merge on heavily infected leaves until whole leaflets turn yellow and fall
- Infection usually begins on lower leaves and later spreads upward
Defoliation pattern on repeat-flowering types
On hybrid tea and floribunda roses, premature defoliation weakens the next flush of buds. You may see bare lower canes with foliage and flowers clustered near tips-a classic black spot silhouette. Premature defoliation decreases plant energy reserves and results in reduced flowering as well as greater susceptibility to winter damage.
Stem lesions in spring
Small black scabby lesions may appear on young stems in spring before full leaf-out. Prune out all stem lesions in spring before leaves appear as part of sanitation. These dormant infections are easy to miss if you only watch foliage.
What recovery looks like: Old spotted leaves stay blemished permanently. Clean new leaves and unspotted buds mean control is working. Badly affected plants can shed almost all their leaves; severely stripped bushes need weeks to months to refill.
How to confirm the cause
Work through these checks before you spray fungicide:
- Spot pattern - Purple-black circular spots with yellow halos on upper leaf surfaces point to black spot. Orange powdery pustules on undersides mean rose rust instead. White flour-like coating that rubs off is powdery mildew, not sunken necrotic spots.
- Recent moisture - Did spots appear or spread after rainy weeks, overhead watering, or evening hose spray? Black spot surges when leaves stay wet for hours.
- Leaf position - Check lower leaves first. Upward progression from the base supports black spot over uniform tip burn from drought.
- Watering habit - Review whether you wet foliage. Our rose watering guide recommends directing water at soil level only-never the leaves.
- Airflow - Are canes crowded against a wall, fence, or other pots? Crossing interior stems trap humidity even on sunny balconies.
- Fallen leaf scan - Pick up dropped leaves. Spots with halos on fallen tissue confirm active disease, not simple age-yellowing.
- Soil moisture - Probe 3–4 cm deep. Chronic sogginess with yellow leaves and no spots may be overwatering instead. Bone-dry wilt with crisp edges and no spots points to drought per our underwatering guide.
If lower leaves show enlarging dark spots after wet weather and you find halo margins, treat as black spot unless rust pustules or scorch patterns clearly dominate.
First fix for Rose
Remove all spotted leaves into the bin-not compost. Pick off leaves still on the plant and rake or collect fallen spotted debris from under the pot or around the base. Remove and dispose of diseased leaves as soon as symptoms are apparent; do not compost infected material.
This single sanitation step cuts the spore load immediately. Use clean pruners and wipe blades with rubbing alcohol between bushes if you manage several roses.
Switch permanently to watering at the base, not the foliage. Direct the hose or watering can at soil level only. Thin crossing interior stems so leaves dry faster after rain-open-centre pruning from our rose pruning guide improves airflow on bush types.
Do not start by stacking fungicide, hard pruning, and Rose repotting guide the same day. Hold nitrogen-heavy feed until new growth looks clean for two weeks; soft new tissue is more susceptible.
Step-by-step recovery
After the initial cleanup:
- Base water only, morning preferred - Water at soil level so foliage dries within a few hours. If you must wet leaves accidentally, do it early in the day per extension guidance.
- Thin crowded canes - Remove crossing interior stems and open the centre on bush roses. Better airflow shortens leaf wetness after rain.
- Prune spring stem lesions - Cut infected cane sections back to healthy wood before full leaf-out. Bag prunings; do not leave them on the ground.
- Autumn debris burial - In fall, collect and destroy fallen leaves or bury them under a thick winter mulch to reduce overwintering spores.
- Apply protectant fungicide if spread continues - If new leaves keep spotting after two weeks of dry foliage and sanitation, spray remaining healthy tissue with a labeled protectant. See the fungicide section below.
- Monitor new growth twice weekly - Check upper leaves and fresh buds for new spots. Expanding lesions on new tissue mean sanitation and drying were insufficient.
- Adjust watering rhythm - Match deep drinks to our watering guide-when the top 3–4 cm dries-not a calendar that keeps humidity high around wet leaves.
Recovery timeline
Sanitation stops new spore production from removed tissue immediately. Expect fewer new spots on upper leaves within two to three weeks once foliage stays consistently dry and airflow improves.
Existing black spots and yellowed leaves never revert to green. Judge success by clean new leaves and unspotted buds, not by the appearance of old damaged foliage.
Mild spotting on a few lower leaves after one rainy period: sanitation and base watering alone often suffice within two to three weeks.
Moderate defoliation with bare lower canes but firm wood and active buds: expect the next bloom flush to delay several weeks while the canopy refills.
Severe defoliation with most leaves gone: badly affected plants can shed almost all their leaves; canopy refill may take several weeks to a full season on heavily susceptible hybrid teas. Repeat-flowering types lose bloom quality until new clean wood develops.
During extended rainy periods, expect to repeat protectant applications on label schedule if you choose chemical control.
Lookalike symptoms to rule out
| Symptom pattern | Likely cause | Key difference from black spot |
|---|---|---|
| Purple-black spots with yellow halos on upper leaves; early leaf drop | Black spot (Diplocarpon rosae) | Circular necrotic spots after wet weather; starts lower, moves up |
| Orange or black powdery pustules on leaf undersides | Rose rust | Pustules on undersides, not purple halos on upper surface |
| White flour-like coating on leaves and stems | Powdery mildew | Rubbable white powder, not sunken black lesions |
| Crisp dry brown edges or tips without halos | Sun scorch or drought | Uniform margin burn; soil dry 3–4 cm down; no spot enlargement after rain |
| Yellow lower leaves, wet soil for days, no spot pattern | Overwatering | No purple-black lesions; may follow daily watering in cool weather |
| Yellow leaves with green veins on alkaline soil | Yellow leaves nutrient or pH stress | Chlorosis pattern, not fungal halos after wet weeks |
| Fine stippling, bronzing, webbing on undersides in hot dry weather | Spider mites | Insect damage in dry heat, not splash-borne fungal spots |
What not to do
Do not wet leaves to “cool” the plant in summer heat-that feeds black spot. Do not leave fallen spotted leaves under the pot or in borders; spores overwinter there.
Do not compost infected rose leaves or canes-Diplocarpon rosae survives in debris and reinfects next season.
Do not stack fungicide, hard pruning, and repotting the same day. Stressed roses need one intervention at a time.
Do not expect fungicide to heal existing spots. Fungicides will not cure infected leaves, but if applied regularly, will prevent infection of new leaves.
Do not push heavy nitrogen while black spot is active. Wait until new growth stays clean for two weeks before resuming feed per our fertilizer guide.
How to prevent black spots on Rose
Water at the base when the top 3–4 cm dries. Follow the rhythm in our rose watering guide-deep drinks at soil level, never wet foliage on purpose. Roses need at least six hours of direct sun for best health; dim corners slow drying and weaken tissue.
Prune for open centres. Remove crossing canes each winter or after bloom flushes so air moves through the bush-see our pruning guide for technique on hybrid tea, floribunda, and shrub types.
Clean up in autumn. Rake and destroy fallen leaves. Bury debris under mulch or bag it for disposal-not the compost heap.
Space container pots for airflow on balconies. One crowded row of pots creates a humidity tunnel even in Rose light guide.
Choose resistant cultivars where pressure is chronic. Planting resistant cultivars is the most effective long-term strategy; modern landscape and shrub roses often outperform susceptible hybrid teas, though new fungus strains can overcome bred resistance over time.
Scout weekly from spring onward. Remove the first spotted leaves before spores splash to upper growth and buds.
When to worry
Treat as urgent when black spot spreads through most of the canopy within two weeks, the bush loses leaves twice in one growing season, or bare canes coincide with peak bloom season on a repeat-flowering hybrid tea. Repeated defoliation weakens roses for winter and cuts flowering.
Act quickly if canes soften at the graft or base-that is crown or root failure, not a foliar spot problem. Fine webbing with stippling in hot dry weather points to spider mites, not black spot.
Mild spotting on a few lower leaves after one rainy stretch is manageable with sanitation alone-no panic if upper growth and buds stay clean.
Chronic multi-year black spot on a highly susceptible cultivar may warrant replacing the bush with a resistant landscape rose or accepting a regular protectant spray schedule through humid months.
Protectant fungicide (when cultural fixes are not enough)
Cultural sanitation and dry foliage are always the foundation. When susceptible roses keep spotting on new leaves despite good habits-or when humid weather persists-protectant fungicides on healthy tissue can prevent new infection.
Some popular roses are so susceptible that they may require fungicide application every 7–14 days to produce acceptable flowers. Complete coverage of both tops and bottoms of leaves is important, and reapply after heavy rain or overhead watering.
Common home-garden active ingredients labeled for rose black spot include captan, chlorothalonil, myclobutanil, tebuconazole, and triforine-always verify the product label lists black spot and follow local regulations. Preventive applications should start before symptoms appear on susceptible varieties in spring and continue through the growing season while weather stays conducive.
Organic options such as sulfur or neem oil may help in mild pressure; UC IPM notes preventive fungicides including sulfur and neem where weather favors severe disease. None of these products restore already necrotic spots-only protect new growth.
If you prefer to avoid synthetics, focus on resistant cultivars, rigorous sanitation, and open-centre pruning; accept that highly susceptible hybrid teas in humid climates may not stay spot-free without chemicals.
Conclusion
Black spots on roses are usually Diplocarpon rosae-a wet-weather fungal disease that starts on lower leaves, weakens repeat-flowering types through early defoliation, and overwinters on fallen debris and canes. Confirm by halo spots after moisture, rule out rust, mildew, and scorch, then remove infected leaves first and keep foliage dry through base watering and pruning for airflow. Old spots never heal; watch new leaves and blooms for proof the outbreak is under control. For broader leaf-loss triage, see leaf drop on Rose; for dry-foliage watering rhythm, see rose watering.
When to use this page vs other Rose guides
- Rose watering guide - Use for routine moisture checks before assuming black spots is the main issue.
- Rose problems hub - Browse all 7 common issues on this species.
- Leaf Drop on Rose - Different entry point when symptoms overlap with black spots.