Pilea Moon Valley Repotting: When, How & Recovery
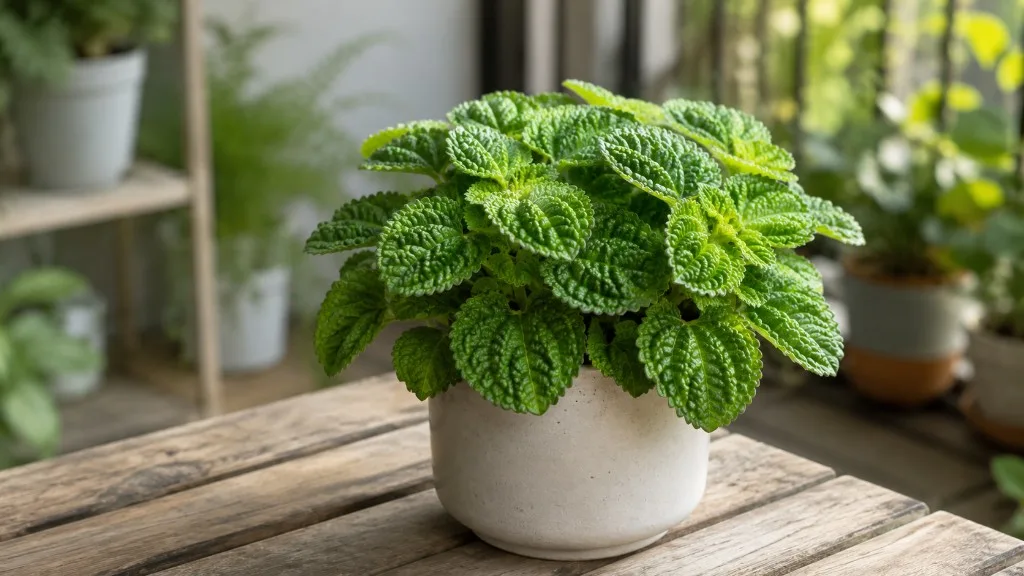
Pilea Moon Valley Repotting: When, How & Recovery
Pilea Moon Valley Repotting: When, How & Recovery
Pilea Moon Valley (Pilea mollis ‘Moon Valley’) is not a generic fibrous-root houseplant you can yank from its pot and park in any fresh mix. The crater-textured leaves show stress within days when roots are cramped, stems snap during rough handling, or dry HVAC air pulls moisture from puckered ridges before new roots can take up water. If your mound wilts after a routine upgrade, the problem is usually not “transplant shock” in the abstract - it is repotting a humidity-loving Urticaceae herb the same way you would a drought-tolerant succulent.
This guide covers when Moon Valley actually needs a new pot, how to move it one size up without bare-rooting healthy specimens, which mix to use (the same recipe defined on the soil guide), and how to keep 50–60%+ humidity steady through the recovery window. You will also get terrarium-specific notes, pinching timing, and the mistakes that turn a compact mound into a weeks-long sulking project.
Why Moon Valley Repotting Is Different
Moon Valley evolved on the humid forest floor of northeastern Colombia and northern Venezuela, where filtered light, warm air, and steady moisture support small understory herbs. Indoors, that biology translates into a plant that tolerates repotting well only when you respect three traits the Missouri Botanical Garden documents for Pilea mollis ‘Moon Valley’: high humidity preference, fragile stems, and a compact mounding habit to about 12 inches tall.
Humid tropical origin and visible leaf stress
Unlike smooth-leaf houseplants that hide drought stress, Moon Valley’s puckered ridges and sunken valleys dry unevenly. After repotting, when fine root hairs are disturbed and water uptake pauses, the leaf margins are often the first casualties - crisp bronze tips that will not green up again even after the plant recovers. That is why humidity support during recovery matters as much as pot size and mix choice. The Royal Horticultural Society notes that Pilea involucrata - the friendship plant group that includes the ‘Moon Valley’ cultivar - prefers slightly more humidity than many pileas, with a terrarium or pebble tray as ideal support.
Moon Valley also rarely flowers indoors, per Missouri Botanical Garden, so the generic “do not repot while flowering” boilerplate does not apply to most home specimens. Your repot timing should follow root condition and active growth, not bloom stage.
Fragile stems and the compact mound habit
Missouri Botanical Garden warns that Moon Valley stems are fragile and break easily - a fact that changes how you grip the plant during unpotting. Yanking by the foliage or twisting a stiff root ball often snaps stems at the soil line, creating entry points for stem rot that the same source lists as a documented problem on Pilea mollis. The cultivar is more upright and mounding than the trailing species type, which means you are preserving a shaped dome, not just giving a vine more room. Compare that to Pilea peperomioides on a taller stem: coin-leaf pilea repots focus on pups and vertical stability; Moon Valley repots focus on humidity, gentle handling, and compact shape.
When Pilea Moon Valley Needs Repotting
Moon Valley does not need annual repotting by default. A typical rhythm is every one to two years, or when root and soil signals outpace the calendar. Illinois Extension lists reliable indicators for any houseplant: roots through drainage holes, roots on the soil surface, a root-filled soil mass, smaller new leaves, and wilting between normal waterings. For Moon Valley specifically, add two cultivar clues: water runs straight through without soaking the root mass, and the textured mound becomes unstable or lopsided in a nursery pot that looked fine six months ago.
Signs your mound is ready for a new pot
Lift the pot and inspect the bottom first. Circling white roots peeking through holes mean the plant has used the volume it was given. Slide the plant partway out - if the root ball holds a perfect pot-shaped mold with little visible mix on the sides, you are looking at binding that will eventually stall the tight mound shape Moon Valley is grown for. Top-dressing - refreshing only the top 2–3 cm of mix - can buy time in early spring if roots are not yet circling at the bottom, but it will not fix a dense mat that blocks water absorption.
Do not repot because one leaf yellowed. Yellowing with wet mix and soft stems points to overwatering or poor drainage; yellowing on a dry, stable mound may mean underwatering. Fix the environmental trigger first unless roots are clearly the bottleneck. The diagnostic order from the overview guide still applies: soil moisture, then light, then humidity, then pests - repot only when the root zone or exhausted mix is the limiting factor.
Best Time of Year to Repot
Spring through early summer is the safest window, when Moon Valley is in active growth and room temperatures support root recovery. Illinois Extension notes repotting is best when the plant is actively growing, typically in spring or early summer. Rising day length and warmer indoor conditions let new white root tips colonize fresh mix before winter slowdown arrives.
Early summer remains workable if you missed spring. Avoid repotting during the hottest, driest week in a home without air conditioning - heat plus disturbed roots plus low humidity produces more leaf crisping than the same repot in moderate conditions. Winter repotting is a backup plan only: severe root-binding with repeated wilting, active rot requiring trim and fresh mix, or a broken pot. If you must repot in winter, use a modest size increase, keep temperatures above about 16°C (60°F), and extend the humidity recovery period because growth is slow and wet mix sits longer unused.
Tools, Pot Size & Soil Mix
Gather a new pot, fresh mix, clean scissors, a chopstick or pencil, a watering can, and - for Moon Valley specifically - a humidity tray or humidifier ready before you start. Work on a stable surface where you can support the base of stems with one hand while the other handles the root ball.
Choosing the right pot size and material
The single most important decision is diameter, not decorative appeal. Illinois Extension’s Good Growing guidance recommends a container about two inches (5 cm) larger in diameter than the current one; selecting an excessively large volume can lead to root rot on Pilea Moon Valley because the plant cannot use the available water. For Moon Valley in a 10 cm nursery pot, move to 12–13 cm. From 15 cm, go to 17–18 cm. Jumping from a 12 cm starter to a 20 cm decorative pot is how compact mounds develop stem rot in sodden lower mix.
Every long-term pot needs drainage holes. Clemson HGIC emphasizes containers with bottom drainage and trays to catch excess water - advice that matters doubly for a plant Missouri Botanical Garden flags for stem rot risk. Plastic retains moisture longer, helpful in dry homes if you tend to underwater. Terracotta breathes and dries faster - useful if you overwater. Match material to your habits and the watering rhythm you already use.
The repot mix Moon Valley actually needs
Do not reach for vague “indoor potting mix matched to drainage needs.” Moon Valley wants what the soil guide defines and Missouri Botanical Garden describes as a peaty, soil-based potting mix with enough structure to stay moist but not sodden:
- 80–85% quality all-purpose indoor potting mix
- 15–20% perlite for drainage and air around roots
- Target pH 6.0–7.0
Blend dry ingredients in a tub before repotting so perlite distributes evenly. Avoid garden soil, unamended cactus mix, and spent mix that smells sour or dries in hard sheets. If white salt crust coats the old surface, scrape the top inch away during repot, as Illinois Extension recommends for salt buildup, before backfilling with fresh material.
Step-by-Step: How to Repot Pilea Moon Valley
Repotting Moon Valley is straightforward if you minimize root exposure time and set up humidity before you unpot. Plan 30–45 minutes and keep pets away from spilled mix (see pet safety below).
Step 1: Water lightly 24 hours before repotting so stems are turgid and the root ball holds together. Illinois Extension recommends hydrating before repotting; soggy or bone-dry balls both make clean removal harder on brittle stems.
Step 2: Pre-moisten fresh mix slightly. Add a small mound to the bottom of the new pot - no thick gravel “drainage layer,” which can create a perched water table.
Step 3: Support the base of stems with one hand. Turn the pot on its side and slide the plant out. Squeeze flexible nursery pots; run a knife around rigid pots. Never pull by the foliage.
Step 4: Inspect roots and stems. Trim brown, mushy tissue with clean scissors. Check stem joints and leaf undersides for mealybugs and spider mites - Missouri Botanical Garden lists both as problems on Pilea mollis, and repotting is the easiest moment to treat before pests spread.
Step 5: Tease only the outer circling roots at the bottom and sides so they point outward. Keep most of the original root mass and old mix intact on healthy plants.
Step 6: Set the plant at the same depth it grew before. Illinois Extension stresses repotting at the same depth as the old pot. Burying brittle stems deeper invites rot.
Step 7: Backfill with fresh mix, working soil between roots with a chopstick. Firm lightly - enough to remove large air gaps, not enough to compact perlite into concrete.
Step 8: Water thoroughly until excess runs from holes. Empty the saucer within 30 minutes.
Step 9: Place the plant in Pilea Moon Valley light guide, out of direct sun, for 7–10 days. Direct sun on freshly disturbed roots accelerates ridge-tip desiccation.
Step 10: Hold fertilizer for three to four weeks while roots settle. Resume the light feeding schedule from the fertilizer guide only after new growth looks normal in size and color.
Preparing the plant and teasing roots gently
The goal of root teasing is to redirect growth, not to destroy the root ball. Bare-rooting a healthy Moon Valley by washing away every particle of old soil strips fine root hairs that absorb water - especially risky on a cultivar that sulks when mix dries hard and air humidity drops. Keep the interior root mass intact while freeing the outer circling layer.
If roots are densely matted at the bottom, you may slice 1–2 cm off the lowest mat with a clean knife to stimulate new white tips - standard houseplant practice per Illinois Extension’s guidance to cut or unwind circling roots. Avoid removing more than one-third of total root mass unless you are rescuing rot. Because stems break easily, brace the crown with your palm while teasing - twisting the plant by its foliage is how mounds lose their shape in one snap.
Common Repotting Mistakes on Moon Valley
Oversized pots top the list. Extra mix without extra roots stays wet at the bottom while the top looks dry, encouraging the stem rot Missouri Botanical Garden documents. Stick to one size up even if the mound looks small in the new pot - Moon Valley is meant to stay compact.
Bare-rooting or over-washing removes water-absorbing hairs and extends recovery in dry rooms. Tease, do not scrub.
Rough handling of fragile stems snaps crowns and opens rot pathways. Support the base; work at table height.
Repotting into dry air without a humidity plan produces curled, crisp leaf margins that permanent damage cannot reverse. Set up a pebble tray or humidifier before you unpot.
Immediate fertilizing after repot burns tender root tips in fresh mix. Wait for new textured leaves.
Winter repotting without cause adds stress when the plant is not pulling water actively. Delay unless roots or rot demand it.
Using pots without drainage holes - even in terrariums, the planted section needs a way for excess water to leave the root zone or stem rot follows.
Recovery Timeline & Humidity After Repot
Mild transplant shock - slight wilting or a pause in new leaves - usually clears within one to two weeks if humidity and moisture stay steady. Full root re-establishment takes four to six weeks in warm, bright conditions. New leaves with normal crater texture and bronze-green color are the clearest success signal; older damaged margins will not heal, so judge recovery on fresh growth.
Humidity is the variable most growers skip. Missouri Botanical Garden recommends high humidity, including humidified rooms or a bed of wet pebbles. After repotting, target 50–60% relative humidity minimum - the same range the overview guide uses - with preference for the upper half while roots are rebuilding.
Reliable recovery tools:
- Pebble tray with water kept just below the pot bottom
- Small humidifier run consistently near the plant
- Plant grouping on one shelf to share transpiration
- Bright bathroom or kitchen shelf if light is adequate
Avoid misting puckered leaves as your primary strategy - brief surface moisture does little for room humidity and can leave water in leaf valleys. Keep Moon Valley away from AC vents and winter heating drafts that strip moisture precisely when roots are weakest. Adjust watering per the watering guide: lighter volume for the first two to three weeks, checking the top 2–3 cm before each drink rather than soaking on a calendar.
Pinching & Shape After Repot
Missouri Botanical Garden advises pinching stem tips as needed to keep the plant compact - guidance that pairs directly with repotting because fresh root room often triggers leggy spring growth if light is marginal. Wait until the plant shows stable turgor and new growth - typically two to three weeks after a routine spring repot - before pinching multiple stems. If one stem stretched badly in low light before repot, you may pinch that stem sooner while leaving the rest of the mound alone.
Use clean scissors or fingernails just above a leaf node. Remove leggy stems and permanently damaged leaves, not the entire crown in one session. Pinching redirects energy to lateral sprouts that restore the tight dome Moon Valley is sold for. Full shaping detail lives on the pruning guide.
Repotting in Terrariums vs Open Containers
Missouri Botanical Garden lists Moon Valley as good for terrariums - a natural fit because enclosed humidity reduces post-repot crisping. The trade-off is root crowding in shallow glass. Open-room pots dry faster and show binding sooner; terrariums hold moisture longer and may need repotting less often but with less root disturbance when you do upgrade.
For open terrariums or dish gardens, slide the root ball out gently and move to a container only slightly larger, using the same perlite-amended mix. Avoid burying stems deeper when building topography in a shallow dish. For closed or nearly sealed terrariums, watch for stagnant air and mildew on textured leaves - slight ventilation often works better than a fully sealed jar. When upgrading a terrarium specimen, prefer same-size refresh with new mix if roots are not circling, rather than jumping to a much deeper container that changes the humidity balance the planting was designed around.
How Repotting Fits Your Moon Valley Care Routine
Repotting resets soil structure and the watering rhythm. For the first month after a move, think of care as stability, not stimulation: steady bright indirect light, consistent humidity, cautious watering, no fertilizer. Link repotting to the rest of the cluster so you do not contradict yourself - the overview covers species context, the soil guide owns mix ratios, the watering guide owns dry-down checks, and the pruning guide owns pinching and shape.
First repot from a 10–12 cm nursery pot is often the most consequential upgrade: roots have been circling since the shop, and the mound will look fuller within a month if humidity stays high. If you brought Moon Valley home recently, quarantine and learn the pot’s dry-down speed before repotting unless mix is sour or pests are visible - stacking repot, relocation, and fertilizer on week one is how textured pileas sulk.
Pet and Child Safety During Repot Work
Moon Valley is widely listed as non-toxic to cats and dogs under the ASPCA friendship-plant entry used for this plant group. That makes repotting less stressful for pet owners than with many popular foliage plants, but non-toxic is not edible. Large ingestions can still cause mild stomach upset, and spilled mix, pruned roots, and fertilizer dust are not meant for animals or toddlers to explore.
Keep pets and small children away from the work area while roots are exposed. Wash hands after handling cut tissue and old soil. If a pet eats a substantial amount of leaf material and shows persistent vomiting or diarrhea, contact your veterinarian.
Conclusion
Pilea Moon Valley repotting succeeds when you treat Pilea mollis ‘Moon Valley’ as the humidity-sensitive, brittle-stemmed mound it is - not a interchangeable template houseplant. Repot every one to two years in spring, move one pot size up with the 15–20% perlite mix from the soil guide, tease circling roots gently without bare-rooting, and run 50–60%+ humidity through the first month while withholding fertilizer. Pinch leggy stems once new growth stabilizes, inspect for mealybugs and spider mites while roots are exposed, and adjust terrarium repots with shallow-container constraints in mind.
Get pot size, handling, and humidity right and Moon Valley rewards you with fresh crater-textured leaves and a tighter dome within weeks. Oversize the container, wrench fragile stems, or repot into dry winter air without support and the same plant will crisp at the margins while you wonder why “easy care” pilea advice failed. Read the roots, support the crown, and link the routine to the rest of your Moon Valley cluster - that is how this URL earns its place beyond the overview page.
When to use this page vs other Pilea Moon Valley guides
- Pilea Moon Valley overview - Start here for whole-plant context before deep-diving this topic.
- Pilea Moon Valley problems hub - Jump to symptom-specific fix guides when this care topic does not resolve the issue.
- Root Rot on Pilea Moon Valley - Escalate here when repotting adjustments are not enough.