Peperomia Hope Propagation: Stem & Leaf Guide
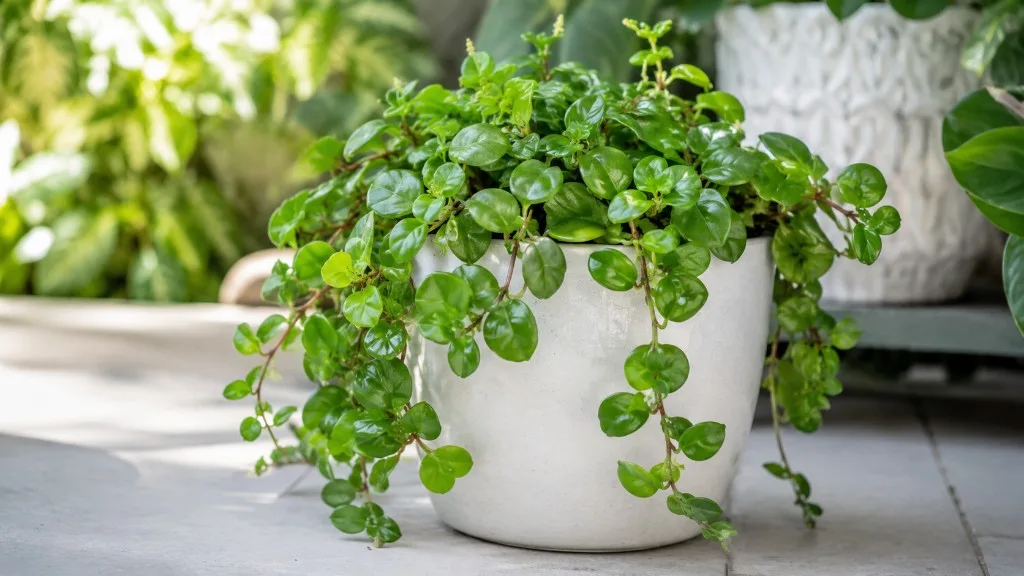
Peperomia Hope Propagation: Stem & Leaf Guide
Peperomia Hope Propagation: Stem & Leaf Guide
Peperomia Hope propagation is one of the most approachable projects in indoor plant care because the plant is built for restart. Peperomia Hope - widely sold as Peperomia tetraphylla ‘Hope’, four-leaf peperomia, or acorn peperomia - is a trailing hybrid in the Piperaceae family with fleshy round leaves clustered along thin stems. The Missouri Botanical Garden documents it as a cultivar resulting from a cross between Peperomia deppeana (seed parent) and Peperomia quadrifolia (pollen parent). Those parent species evolved as compact tropical epiphytes, and the hybrid inherited their willingness to root from severed stem tissue and from leaves still attached to a viable petiole. You are not fighting the plant’s biology when you propagate it; you are cooperating with a species group that naturally colonizes bark and leaf litter by anchoring wherever living tissue meets moisture and air.
The two home methods that work reliably are stem cuttings with nodes and leaf cuttings with petiole. Stem cuttings are faster, produce fuller plants sooner, and are the best use of material from routine pinching or leggy-stem pruning. Leaf cuttings are slower but remarkable - a single round leaf with its stalk intact can eventually produce a tiny new plant at the base of the petiole. What separates success from a mushy failure is almost always anatomy and moisture discipline, not propagation skill. This guide walks through every decision: where to cut, how to root in water or soil, how to turn trimmings into free plants, how to read rooting progress, and what to do when a cutting stalls or rots.
What Makes Peperomia Hope So Easy to Propagate
Peperomia Hope behaves like a semi-succulent trailing epiphyte rather than a thirsty foliage plant. The stems store water, the round leaves hold moisture in their thickened tissue, and the root system stays compact relative to the visible vine length. That physiology matters because propagation cuttings tolerate brief drying at the wound while they callus, yet they rot quickly when submerged too deeply or left in stagnant water with foliage below the surface. Compared with finicky houseplants that demand division of a crowded root ball or precise tissue-culture conditions, Peperomia Hope rewards a minimal toolkit: sharp sterilized scissors, a small pot or clear jar, perlite-heavy mix, and patience.
The plant is also pet-safe, which the ASPCA lists as non-toxic to dogs and cats. That makes sharing rooted cuttings with friends who have curious pets a low-stress gift - one more reason propagation feels easy in practice, not just in theory. If you have ever rooted a pothos in a glass of water, the rhythm will feel familiar. The difference is that Peperomia Hope’s stems are thinner and snap if handled roughly, so gentle handling and clean cuts matter more than brute force.
Why Stem Cuttings With Nodes Work Best
Stem cuttings with at least one node are the highest-success method for Peperomia Hope propagation because each node is a growth point where roots and new shoots can emerge. Unlike a leaf blade floating alone in water, a stem segment already contains the architecture for a small trailing plant - leaves for photosynthesis, nodes for rooting, and the genetic clone of the parent cultivar. You are not hoping random tissue regenerates; you are activating tissue the plant evolved to restart from.
Stem cuttings also root faster than leaf cuttings in most home setups. Clemson Extension recommends three- to five-inch stem cuttings with lower leaves removed, rooted in Peperomia Hope light guide. Growers commonly report visible roots within two to four weeks during active growth, sometimes sooner in warm bright conditions. A cutting with two nodes gives you insurance: if the top leaf wilts slightly while roots form, the lower node can still push roots independently. For anyone who wants a presentable small plant within a month or two, stem cuttings are the clear first choice.
Turning Pruning Trimmings Into New Plants
Here is the practical angle that makes Peperomia Hope propagation feel almost free: routine maintenance generates propagation material. When you pinch leggy stems to encourage bushier growth, when you shorten vines that have gone bare near the crown, or when a trailing tip snaps during handling, those trimmings are not waste if they include healthy nodes. Inspect each piece before composting it. A three- to five-inch segment with two sets of round leaves and at least one exposed node after you remove the lowest leaf pair is propagation-ready.
The trimmings workflow changes how you think about pruning. Instead of a chore that produces garbage, pinching becomes a quiet multiplication project. Keep a small jar of water or a tray of moist propagation mix nearby when you groom the parent plant, and set viable cuttings aside immediately. Fresh tissue taken from an actively growing vine roots faster than woody bare stems sitting at the back of the pot. If you already planned to tidy the plant for aesthetics, propagation adds no extra damage - it redirects clippings into new plants.
Understanding Nodes and Petioles Before You Cut
Propagation fails most often because the grower cuts the wrong tissue. A pretty leaf with no node will not become a vine. A leaf pulled off flush with the blade, leaving no petiole, may root adventitiously in rare cases but usually just shrivels. Spending thirty seconds identifying anatomy before you cut saves weeks of waiting for tissue that was never viable.
What a Node Looks Like on Peperomia Hope
On Peperomia Hope, a node is the slightly thickened point along the stem where a cluster of round leaves attaches. The internode - the bare stem between leaf clusters - is often short, which makes the plant look like leaves stack in groups of three or four. That dense arrangement is exactly why the cultivar looks so full in hanging baskets, and it is also why node identification takes a close look. Run your finger along the stem: the node sits where the petioles join the main stem, sometimes with a faint ridge or slightly different coloration.
When you take a stem cutting, at least one node must contact the rooting medium or water while leaves stay above the surface. For water propagation, remove the lowest leaf cluster so a node sits below the waterline without any foliage submerged. For soil propagation, bury the node lightly in moist mix while the remaining leaves stay in open air. A cutting that is all stem with leaves only at the tip but no submerged or buried node may stay green for weeks and never root. If you are unsure, choose a segment with two nodes and strip the lower leaves - redundancy beats optimism.
Why the Petiole Matters for Leaf Cuttings
The petiole is the slender stalk connecting the round leaf blade to the stem. In Peperomia Hope propagation by leaf, the petiole is not optional decoration - it is the rooting organ. New plantlets and roots typically emerge from the base of the petiole where it meets the soil, not from the center of the leaf disc. That is why a clean snap that leaves the petiole attached to the leaf, but separates the petiole from the main vine, is the correct harvest.
Think of the petiole as a short cutting in its own right. It should be at least a quarter-inch long, firm, and free of blackening or mush. Leaves with petioles torn flush to the blade can be pinned in soil for experiment, but success rates drop sharply. If you want leaf propagation to be more than a science project, select mature healthy leaves and cut the petiole cleanly with sterilized scissors rather than twisting. A clean cut reduces crushing damage that invites rot at the most critical tissue point.
When to Propagate Peperomia Hope
Timing does not make propagation impossible, but it changes speed and stress. Peperomia Hope roots at almost any time of year indoors, yet cuttings taken during active growth establish faster and need less babysitting than cuttings taken while the parent is barely moving.
Best Season for Faster Rooting
Spring and early summer are the strongest windows for Peperomia Hope propagation because lengthening days and warmer ambient temperatures align with the plant’s natural growth push. The Missouri Botanical Garden recommends propagating by stem or leaf cuttings in spring. Root initials form faster when soil and water temperatures stay roughly between 70°F and 80°F (21°C to 27°C), which many homes already reach in bright rooms during those seasons. You do not need a greenhouse - a stable indoor shelf away from AC blasts is enough.
Autumn and winter propagation still works if the parent is healthy and your space stays warm. Expect timelines to stretch toward the longer end of the two-to-four-week range, and expect cuttings to sit seemingly unchanged before roots appear. That pause is normal, not failure. Avoid taking material during the coldest weeks if your room drops below 65°F (18°C) at night; slow metabolism at low temperatures invites rot before roots form because the cutting cannot dry and heal at the wound at a useful pace.
Signs Your Parent Plant Is Ready
The parent plant should be firm, hydrated, and pest-free before you remove tissue. Leaves should look plump, not wrinkled from chronic underwatering or squishy from chronic overwatering. Check the crown and stem bases for mealybugs or scale, because propagation transfers those problems directly to new jars and pots. If the plant is recovering from root rot on Peperomia Hope, shipping stress, or a recent repot, wait until you see fresh active tips before cutting.
Active tip growth is the best green light. When new leaves unfurl along trailing stems and the soil dries on a predictable rhythm, the plant has energy to spare for wound healing and for powering cuttings through the rootless phase. A leggy vine with healthy tips but bare lower stems is still excellent propagation stock - you are simultaneously correcting shape and harvesting nodes. A wilted plant with wet soil is poor stock; fix the parent’s environment first, then propagate from the recovered growth.
How to Propagate Peperomia Hope With Stem Cuttings
Stem cuttings are the method to learn first. Once you can reliably root a node-bearing segment in water or soil, leaf cuttings become an optional experiment rather than a necessity.
Taking Clean Stem Cuttings With at Least One Node
Start with sterilized scissors or pruning shears. Wipe blades with rubbing alcohol or flame them briefly. A clean cut reduces bacterial invasion at the wound, which matters on thin succulent stems that seal slowly. Select a healthy vine and cut a segment three to five inches long with at least one node, ideally two. Make the cut just below a node so the lowest node on the cutting sits near the cut end.
Remove the lowest leaf cluster so no leaves will sit underwater or underground. Keep one or two leaf clusters at the top for photosynthesis. If the cutting feels long and floppy, you can remove the topmost leaves too - the cutting roots from nodes, not from leaf count, and reducing transpiration stress helps when roots are absent. Let the cut end air-dry for one to two hours before soil planting if your home is humid; in very dry air, thirty minutes is often enough. Water propagation can start immediately after cutting because the open wound is not buried in wet mix.
Rooting Stem Cuttings in Water
Water propagation is the most visual method and works well for Peperomia Hope when you keep the setup clean. Clemson Extension notes that some peperomia species root easily in water when cuttings receive bright, indirect light. Place the cutting in a clear glass or jar with room-temperature water deep enough to submerge the bare node while all leaves stay above the waterline. Set the jar in bright indirect light - a north or east window, or a few feet back from a south window.
Change the water every three to five days to keep oxygen available and limit bacterial film. Stagnant water is the main reason peperomia cuttings rot in jars. Within two to four weeks in warm active-season conditions, you should see white root initials from the submerged node. Wait until roots reach about one inch long before potting unless you see strong new growth that clearly signals readiness. Pot into moist well-draining mix, water lightly, and keep humidity slightly elevated for the first week while soil roots establish.
Water propagation has trade-offs worth naming plainly. It is excellent for monitoring progress and for using trimmings immediately without mix on hand. It can produce roots adapted to water that need careful transition to soil. Minimize shock by potting when roots are substantial, keeping the first soil week evenly moist but not soggy, and avoiding fertilizer until the plant steadies.
Rooting Stem Cuttings in Soil
Soil propagation is often more reliable long-term because roots form in the medium they will live in. Fill a small nursery pot with a fast-draining mix - roughly equal parts indoor potting compost and perlite suits Peperomia Hope well, matching Missouri IPM recommendations for porous peperomia culture. Moisten the mix before planting so it is damp but not dripping. Poke a narrow hole, insert the cutting so at least one node is buried, and firm the mix lightly around the stem without compacting it into concrete.
Place the pot in bright indirect light. Optional rooting hormone containing indole-3-butyric acid can speed root formation on slow cuttings, but it is not required for healthy Peperomia Hope material. If you use it, dip the cut end and buried node zone per product label, then plant. To raise humidity, tent the pot loosely with a clear plastic bag with a few small vents, or sit the pot in a propagation box. Do not seal wet air around the cutting indefinitely - a few vent holes prevent mold.
Keep the mix lightly moist, never waterlogged. Test with a finger near the stem: it should feel like a wrung-out sponge, not mud. Roots typically form in two to four weeks. Test readiness with a gentle tug: slight resistance means roots have anchored. No resistance after six weeks in warm conditions may mean the node was not buried, the mix stayed too dry, or the cutting was weak from the start.
How to Propagate Peperomia Hope With Leaf Cuttings
Leaf cuttings are the slower, more patient branch of Peperomia Hope propagation. They reward growers who want to multiply from a single perfect leaf or who enjoy watching a new plantlet emerge from tissue that looks too small to carry a whole vine.
Selecting Leaves With Intact Petioles
Choose mature, unblemished leaves from the middle of a healthy vine rather than the oldest yellowing lower leaves or the youngest still-expanding tips. Clemson Extension advises removing a leaf with at least an inch of petiole (leaf stem) for leaf-cuttings propagation. The harvest should look like a lollipop on a stick - round leaf, firm petiole, clean cut at the petiole base.
Lay leaves on a dry surface for an hour if the cut end looks wet and crushed. A dry cut end resists soil fungi better. Do not remove the leaf blade to reduce transpiration; the petiole needs the leaf’s photosynthetic output while it roots. Multiple leaf cuttings can go in one shallow tray, but space them so leaves do not touch and trap humidity pockets that encourage mold.
Planting Leaf Cuttings in Moist Soil
Use a shallow pot or seed tray with the same perlite-light mix as stem cuttings. Insert each petiole vertically into the mix so the base is buried about a quarter-inch to half-inch deep, with the leaf blade resting on the surface or supported slightly above it. Some growers lay the leaf flat with the petiole buried at a shallow angle; both orientations can work, but vertical petiole planting keeps the rooting point in consistent moisture.
Maintain high humidity without soaking the leaf. A clear humidity dome or inverted cloche works well if vented daily. Keep temperatures warm and light bright but indirect. Leaf cuttings may take four to eight weeks or longer to show a new plantlet at the petiole base, and some leaves will root but fail to push a shoot. That lower success rate is normal - leaf propagation is a bonus method, not a production line.
When you see a small new leaf cluster or obvious root anchoring at the petiole base, pot the new plantlet gently into its own small container. Leave the original propagation leaf attached until it yellows naturally; it is feeding the young plant. Transition watering toward the parent’s routine: let the mix approach dry between waterings once the new plant has several leaves of its own.
Aftercare for Newly Rooted Peperomia Hope
New plants need steadier, simpler conditions than established vines. For the first two to three weeks after potting from water or from a propagation tray, keep bright indirect light consistent and avoid moving the pot between rooms with different temperatures. Water when the top of the mix dries, using a light soak that drains fully. Peperomia Hope’s compact root system punishes oversized pots that stay wet - choose a container only slightly larger than the root mass.
Hold fertilizer until you see new growth that is clearly the plant’s own, not residual push from the parent cutting’s stored energy. A half-strength balanced liquid feed once in the second month is enough. Pinch the tip lightly when the new vine has three or four leaf clusters if you want a bushier habit early; Peperomia Hope responds well to soft pinching once rooted. If you propagated to fill a hanging basket, plant two or three rooted cuttings in one pot for a fuller cascade rather than waiting for a single vine to branch.
Watch for transplant shock signs: slight wilting, paused growth, or one dropped leaf. Usually that resolves if you stop fussing - no repeated Peperomia Hope repotting guide, no heavy watering “to help,” no direct sun to compensate. New firm leaves are the metric that matters. When the plant adds leaves on a steady rhythm, treat it like the mature care routine on your watering and light pages.
Common Propagation Mistakes and How to Fix Them
Most failures trace back to a short list of causes. Mapping symptoms to fixes saves cuttings when action is early and saves you time when it is not.
Rotting stem in water usually means leaves were submerged, water was not changed, or the jar sat in hot direct sun. Remove mushy tissue immediately, recut to healthy green stem if needed, and restart with only the node underwater in fresh water. Rotting stem in soil means the mix was too wet, too dense, or the node was buried too deep without airflow. Let the mix dry slightly, improve drainage with more perlite on the next attempt, and avoid sealing humidity domes without ventilation.
Shriveling cuttings with dry mix point to underwatering during the rootless phase - the leaf still transpires. Increase light humidity around the cutting without soaking the mix. Green cuttings with no roots after six weeks often lacked a buried node, were taken from weak parent tissue, or sat in cold dim conditions. Verify node contact, warm the setup, and replace the cutting from healthier stock rather than waiting indefinitely.
Leaf cuttings that mold had excessive sealed humidity or wounded petioles. Vent the dome daily, reduce leaf-to-leaf contact, and select cleaner cuts next round. Pest outbreaks on new plants came from an infested parent. Treat the parent, quarantine new pots, and wipe jars and tools before reusing. Propagation is not a rescue tool for sick plants - it is a multiplier for healthy ones.
Conclusion
Peperomia Hope propagation rewards growers who respect two simple anatomical facts: stems need nodes, and leaves need petioles. Stem cuttings from healthy vines - including the trimmings you already generate when pinching leggy growth - root readily in clean water or perlite-light soil within a few weeks in warm bright conditions. Leaf cuttings take longer but offer a satisfying path to new plants from single round leaves when the stalk stays intact. Match moisture to the rooting phase, keep leaves out of submerged water, change jar water regularly, and pot new roots into small well-draining containers rather than oversized hanging baskets.
Once you have rooted one cutting, the workflow becomes repetitive in the best way. Prune for shape, root the viable nodes, and build trailing baskets without buying more plants. That is the real reason Peperomia Hope has a reputation as an easy propagator - not because it demands expert technique, but because its hybrid epiphyte biology meets patient home growers halfway.
When to use this page vs other Peperomia Hope guides
- Peperomia Hope overview - Start here for whole-plant context before deep-diving this topic.
- Peperomia Hope problems hub - Jump to symptom-specific fix guides when this care topic does not resolve the issue.