Peperomia Hope Repotting: When, How, and Mistakes to Avoid
Peperomia Hope Repotting: When, How, and Mistakes to Avoid
Peperomia Hope Repotting: When, How, and Mistakes to Avoid
Peperomia Hope (Peperomia deppeana × quadrifolia ‘Hope’) is one of those houseplants that rewards patience and punishes enthusiasm. Its coin-shaped, semi-succulent leaves and trailing stems look delicate, but the real sensitivity sits below the soil line - a shallow, gentle root system inherited from epiphytic peperomia lineages that in nature often cling to bark and leaf litter in Central and South American forests. Repotting is not a yearly chore for Peperomia Hope overview. It is an occasional reset you perform when the mix fails, roots outgrow a snug container, or you want to move a cascade into a hanging basket. Get the timing, pot shape, and handling right, and the plant settles in within weeks. Rush it in winter, drop it into a deep oversized pot, or bare-root it aggressively, and you may spend a month watching leaves yellow while you wonder what went wrong.
Why Peperomia Hope Needs a Different Repotting Approach
Most houseplant repotting advice assumes a plant wants room to spread - a bigger pot, fresh soil, and freedom for roots to roam. Peperomia Hope repotting works on different logic. This hybrid - a cross between Peperomia deppeana and Peperomia quadrifolia per the Missouri Botanical Garden - combines parents adapted to airy, fast-draining root zones. Indoors, that translates into a plant that performs slightly better when slightly root-bound, as long as the mix still drains and breathes. The roots stay close to the surface; they do not dive deep searching for moisture the way a fiddle-leaf fig or monstera might.
That biology drives every repot decision. You are not upgrading to a mansion - you are giving the root zone a modest refresh in a container that dries evenly. A pot that is too deep creates a column of wet soil beneath roots that will never reach it. A pot that is too wide holds excess mix the small root mass cannot dry quickly, which is how root rot starts in an otherwise easy-care plant. Clemson Extension notes peperomias can remain in the same pot for several years when soil drains well; the RHS recommends repotting roughly every two to three years, or when roots crowd drainage holes. Treat repotting as maintenance, not growth acceleration. The trailing stems will extend whether or not you jump two pot sizes - what changes is whether the root zone stays airy enough to support those stems.
How Often to Repot Peperomia Hope
Peperomia Hope repotting frequency is best measured in years, not seasons. For a healthy plant in a well-draining mix, every two to three years is the standard interval cited by extension and botanical sources. Some specimens go three years or more without complaint if you top-dress annually, water with a drench-and-dry rhythm, and the pot still drains within a minute of watering. Faster-growing plants in bright light with regular feeding may hit the two-year mark sooner; slow growers in moderate light may sit comfortably longer.
Infrequent repotting is a feature, not neglect. Peperomias across the genus share compact root systems and a tolerance - even preference - for snug quarters. Moving Hope too often disrupts the fine root hairs that absorb water and nutrients, triggers unnecessary transplant shock, and resets the Peperomia Hope watering guide you have already calibrated. If the plant looks full, trails nicely, and the soil dries on your normal schedule, resist the spring urge to repot everything on the shelf. Ask instead whether any repot trigger (roots escaping, chronic wet mix, salt-crusted surface) is actually present. When none are, a top-dress - scraping out the top inch of old mix and replacing it with fresh perlite-heavy soil - often delivers the benefit of new substrate without the stress of a full move.
Signs Your Peperomia Hope Is Ready for a New Pot
Not every slow week means repot time. Peperomia Hope slows naturally in low light, cool rooms, and winter dormancy. Repot when structural problems in the root zone or container align, not when a single leaf droops after a missed watering. Two or more of the following signs together make a convincing case for a full repot in the next active growth window.
Root-Bound and Drainage Signals
Lift the nursery pot or slide the plant partly out of its container to inspect the bottom. Roots circling the base, weaving across the drainage hole, or peeking through mesh liner slots indicate the plant has used the available volume. Pair that visual with performance clues: water runs straight through in seconds without moistening the core, or conversely the mix stays damp for more than two weeks after a normal watering because decomposition and compaction have collapsed air pockets. A sour smell, persistent fungus gnats despite dry surface soil, or white salt crust on the mix surface also suggest the substrate - not the roots themselves - has aged out of usefulness. These are the clearest signs Peperomia Hope needs repotting, and they matter more than calendar dates.
When Stalled Growth Means the Mix, Not Light
Hope that sits in good Peperomia Hope light guide, receives appropriate water, and still produces smaller new leaf clusters or no new growth for an entire active season may be root-bound or starving in exhausted mix. Compare against last year: if stem length and leaf size both plateau while a neighbor peperomia in similar conditions grows steadily, inspect roots before buying a grow light or doubling fertilizer. Overfeeding a root-bound plant worsens salt stress without fixing the underlying constraint. Conversely, do not repot a plant that stalled because it moved to a dim corner or because winter shortened daylight - fix the environment first, wait two to three weeks, then reassess. Repotting solves container and substrate limits, not every growth pause.
Best Time to Repot: Spring and Early Summer
Spring repotting aligns with Peperomia Hope’s active growth phase - spring is the best repot window for peperomias - when lengthening days and warmer ambient temperatures push new stems and leaves. March through June - adjusted for your hemisphere and indoor heating patterns - gives roots the longest runway to colonize fresh mix before growth slows in fall. Early summer remains acceptable if you missed spring and the plant shows urgent signs like severe root circling or rot. The goal is to repot while the plant can repair fine root damage and produce new white root tips within weeks.
Watering frequency often increases slightly after spring repot because new mix holds moisture differently and root mass has not yet filled the pot. That is normal. Plan your repot for a week when you can monitor soil moisture daily rather than before a two-week vacation. If you propagate Hope from stem cuttings, spring repotting also pairs well with gentle division of multi-stem clumps, though division is optional - this plant roots easily from cuttings, so splitting is rarely necessary for multiplication.
Why Winter Repotting Backfires
From late fall through winter, Peperomia Hope enters a reduced-growth phase in most homes. Shorter photoperiods and cooler windowsill temperatures slow metabolism. Repotting during dormancy forces the plant to allocate energy to root repair when it would otherwise rest. The result is often prolonged wilting, leaf drop on lower stems, and a higher risk of rot because winter watering already runs on a slower dry-back interval and fresh mix in a larger pot stays wet even longer. Reserve winter repotting for emergencies only: active root rot with mushy stems, severe pest infestation in the soil (rare for this plant), or a pot that physically cracked and threatens stability. Even then, keep the new container the same size or only marginally larger, use the driest appropriate mix, and place the plant in the brightest stable spot you have without direct sun.
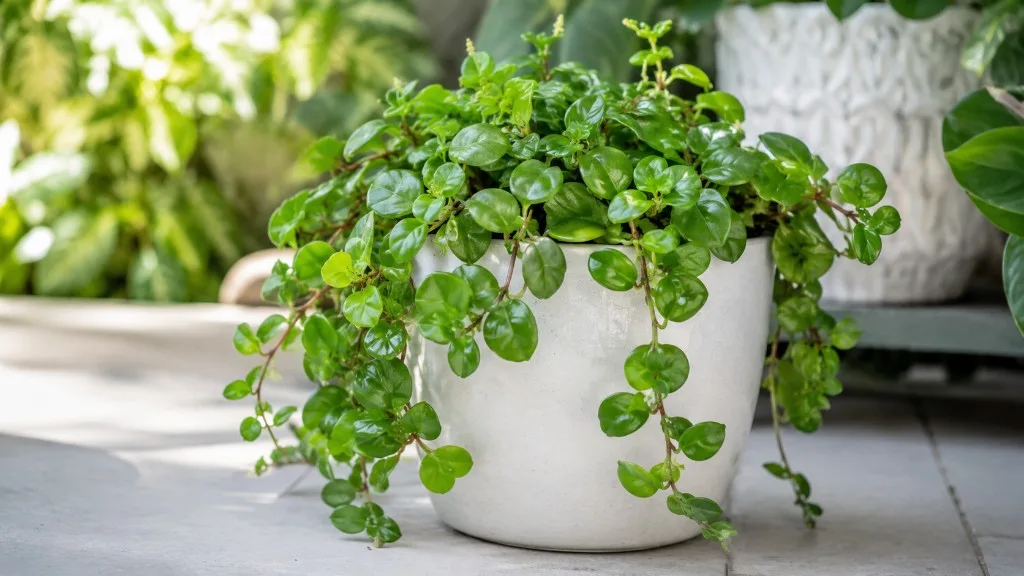
Choosing the Right Pot: Shallow Pots and Hanging Baskets
Container shape matters as much as diameter for this species. Shallow pots and hanging baskets both respect the epiphytic root habit; standard deep nursery pots do not. When shopping, look for pots wider than they are tall, with at least one drainage hole and preferably several. Materials that breathe - terracotta, unglazed ceramic, coir-lined wire baskets - help the shallow root zone dry evenly. Glazed ceramic and plastic work fine if the mix is airy and you adjust watering; they simply forgive less error.
Azalea Pots and Wide-Shallow Containers
Azalea pots (also called bulb pans) are the unsung hero for Peperomia Hope on a shelf or tabletop. Their squat profile matches the root depth peperomias actually use, so the perched water table sits closer to where roots live and excess moisture exits faster during drainage. A 6-inch azalea pot often suits a mature Hope better than a 6-inch standard pot that adds two inches of useless depth. Wide-shallow containers also improve stability for trailing stems that cascade over the rim - a top-heavy basket on a narrow base tips easily. When repotting from a deep pot into a shallow one, you may use the same rim diameter with less vertical soil volume; that is acceptable and often healthier than upgrading both width and depth.
Hanging Basket Drainage and Weight
Peperomia Hope hanging baskets show off the plant’s best habit: stems spilling in every direction with minimal staking. Choose a basket with a sturdy hook rating - a mature, well-watered Hope can weigh several pounds, and wet coir adds more. Use a nursery liner with drainage holes inside decorative baskets that lack them; never plant directly into a hole-free cachepot. Coir or moss-lined wire baskets dry quickly, which suits Hope’s roots but means you will water more often in summer - factor that into post-repot monitoring. After repotting into a hanging basket, leave the plant on a table for three to five days while it acclimates before hanging it at full height, so you can catch wilt or drainage issues without juggling a heavy basket overhead.
How Big Should the New Pot Be?
The safe rule for Peperomia Hope pot size is one size up - roughly 2 to 5 cm (1 to 2 inches) wider in rim diameter than the current pot, with no increase in depth if you can avoid it. Moving from a 4-inch to a 5-inch or 6-inch pot is typical. Jumping from a 4-inch to an 8-inch “so I won’t have to repot again” creates a wet soil zone that dwarfs the root system and invites rot before roots colonize the volume. If the plant is severely root-bound but still small overall, prioritize width over depth: a wider azalea pot beats a deeper standard pot of the same volume.
Visual proportion guides help. Choose a pot only a few centimetres larger than the rootball so the foliage mound does not swim in empty, slow-drying soil - the same snug-sizing principle extension guides recommend for peperomias generally. For Hope specifically, err toward the snug side. You can always repot again in two to three years; you cannot quickly undo a rotted root system in an oversized container.
The Best Soil Mix When Repotting Peperomia Hope
Repotting is the right moment to replace degraded mix with a fast-draining, airy blend. Peperomia Hope stores water in its fleshy leaves and stems; its roots expect oxygen between waterings. A peat- or coco-based potting mix amended with perlite and orchid bark for porosity is a reliable starting point - the Missouri Botanical Garden recommends adding perlite to standard mixes for Hope. Add extra bark or pumice if your home runs humid or you tend to water heavily. Target a slightly acidic mix (roughly pH 6.0–7.0), though porosity and dry-back speed matter more than exact pH.
Do not reuse old mix from the previous pot, especially if fungus gnats, compaction, or rot were present. Do not substitute garden soil or heavy cactus mix alone - garden soil suffocates indoor containers, and straight cactus mix may dry too fast for a plant that is not a true desert succulent. Pre-moisten new mix slightly before repotting so dry peat repels water and leaves air pockets after the first drench. A handful of worm castings or compost in the blend adds gentle organic matter without the salt load of immediate fertilizer - save bottled feed for after roots settle.
Step-by-Step: How to Repot Peperomia Hope Gently
Gentle roots and brittle trailing stems define the handling standard. This is not a tree you can shake loose from a bucket. Work slowly, support the foliage mass, and preserve as much of the existing root ball structure as practical while still removing circling outer roots and spent mix.
Prepare the Plant the Day Before
Water lightly the day before repotting - not a full soak. Slightly moist roots hold together; bone-dry peat crumbles and wet mud clings in sheets. Gather a clean new pot, fresh mix, scissors sterilized with rubbing alcohol, newspaper or a repotting mat, and a chopstick for settling soil. If moving to a hanging basket, pre-assemble the liner and verify drainage. Clear a workspace low enough that trailing stems will not snag on the way down; a 12-inch mature Hope can reach two feet of stem length.
Free the Root Ball Without Breaking Stems
Step 1: Tip the pot and support the plant at the base with one hand while sliding the container off with the other. If it resists, squeeze flexible nursery pots or run a knife around the rim - never yank by stems.
Step 2: Hold the root ball over your mat. Tease circling roots at the bottom and outer edge with fingers or the chopstick. Remove no more than the outer 10–20% of mix; avoid bare-rooting unless rot requires it.
Step 3: Trim brown, mushy, or hollow roots with clean scissors. Healthy peperomia roots are pale, firm, and often hair-fine. A few dark outer roots on an otherwise healthy plant are normal aging.
Step 4: Place a shallow layer of fresh mix in the new pot. Set the plant so the crown sits at the same depth as before - burying stems invites rot at the soil line.
Step 5: Fill around the sides, tapping the pot gently to settle mix without compacting. Leave a half-inch rim for watering.
Step 6: Water until drainage runs clear, discard saucer water, and return the plant to bright indirect light - not direct sun, which stresses fresh roots.
Step 7: Hold fertilizer for three to four weeks minimum. Roots need time to heal before processing salts.
Expect minor wilt for a few days. New growth within two to four weeks confirms success.
Common Repotting Mistakes With Peperomia Hope
The same errors appear repeatedly on forums and in wilted plants brought back from the brink: oversized pots, deep containers, aggressive bare-rooting, immediate heavy feeding, and winter timing without emergency justification. Each mistake shares a mechanism - excess moisture around underdeveloped roots or broken fine root hairs that cannot absorb water, which looks like underwatering even while the core mix stays wet.
Oversized Pots and the Wet Soil Zone
An oversized pot is the most damaging routine mistake. The plant appears to need room because stems trail far, but stem length does not equal root volume. Excess soil holds water the root ball never touches, staying anaerobic for days. Roots then suffocate, turn mushy, and the plant collapses. If you already repotted into too large a container, do not repot again immediately - that compounds shock. Instead, water sparingly at the root ball center, ensure maximum light without scorch, and consider removing a portion of the upper unused mix if the plant is stable enough to tolerate minor disturbance. Prevention beats rescue: one size up, shallow profile, airy mix.
Other mistakes worth avoiding: bare-rooting strips absorbent hairs and extends recovery; fertilizing within the first month burns healing tissue; cachepots without drainage trap runoff after the post-repot drench; repotting during bloom (Hope’s flower spikes are insignificant, but still divert energy - minor issue); and compressing mix with heavy hand pressure, which mimics compaction you just removed.
After Repotting: Water, Light, and Recovery Timeline
Post-repot care is conservative. Water when the top inch of mix feels dry - often less frequently than before because new perlite-heavy soil dries faster on the surface while the interior stays evenly moist. Do not interpret surface dryness as a call for daily watering; probe depth. Bright indirect light supports photosynthesis without desiccating leaves in direct sun.
Transplant shock on Peperomia Hope typically shows as slight wilting, one or two yellowing lower leaves, or a pause in new growth for one to two weeks. Full root re-establishment takes four to six weeks in spring; winter recovery runs longer. New leaves emerging at normal size and color are the best success signal - older damaged leaves will not green up again, but replacement foliage means the root zone works. Maintain temperatures between 65°F and 86°F (18°C to 30°C); cold drafts after repotting extend shock. Resume your normal Peperomia Hope watering rhythm once new growth appears and the pot weight feels predictable again. Resume diluted balanced fertilizer at half strength after the first month if the plant looks actively growing.
For pet households, Peperomia Hope is listed as non-toxic to cats and dogs by the ASPCA, which makes post-repot cleanup less stressful if a pet investigates spilled mix.
Conclusion
Peperomia Hope repotting is a low-frequency, high-precision task. Repot every two to three years in spring or early summer, only when roots circle, mix fails, or you are upgrading display format to a shallow pot or hanging basket. Go one size up, never deep and wide at once, use perlite-heavy airy soil, and handle gentle roots with minimal disturbance. Skip fertilizer for a month, water conservatively while roots settle, and judge success by new growth - not by how quickly the plant fills a oversized container. When drainage still works and stems trail happily, top-dress instead of repotting. Hope earns its name when you respect its epiphytic roots: less intervention, better containers, and timing that follows the plant’s spring rhythm rather than the calendar on your phone.
When to use this page vs other Peperomia Hope guides
- Peperomia Hope overview - Start here for whole-plant context before deep-diving this topic.
- Peperomia Hope problems hub - Jump to symptom-specific fix guides when this care topic does not resolve the issue.
- Root Rot on Peperomia Hope - Escalate here when repotting adjustments are not enough.