Yellow Leaves on Norfolk Island Pine: Causes, Checks & Fixes
Quick answer
Yellow needles on Norfolk Island Pine (*Araucaria heterophylla*) are a stress signal on soft branchlet clusters-not true leaves. First step: note which whorl tier is yellowing, then stick your finger 2–3 cm into the mix and read humidity at canopy height before you fertilize or repot.

Yellow Leaves on Norfolk Island Pine: Causes, Checks & Fixes
This guide covers yellow leaves on Norfolk Island Pine. See also the general Yellow Leaves guide, watering, and light pages for this plant.
Yellow Leaves on Norfolk Island Pine: Causes, Checks & Fixes
Quick answer
Searchers say “yellow leaves,” but on Norfolk Island Pine (Araucaria heterophylla) the tissue turning color is soft, awl-shaped needles on horizontal branch whorls-not broad leaves. This subtropical conifer grows in symmetrical tiers around a central trunk; yellowing usually tells you which whorl failed first, not a single universal cause.
First step: note whorl position, then check soil moisture and canopy humidity. Only the lowest whorl fading slowly often means normal lower-branch loss in dim light. Limp yellow needles on wet soil points to root stress-see overwatering on Norfolk Island pine. Pale, stretchy upper whorls far from windows fit insufficient light. Yellow tips progressing to brown in a heated room overlap with brown tips on Norfolk Island pine and low humidity.
Do not fertilize or repot until you know whether the mix is wet or dry and whether forced air is hitting foliage. Full species context: Norfolk Island pine overview.
Needles vs. leaves - what is turning yellow
Norfolk Island pine is not a true pine-it belongs to the ancient conifer family Araucariaceae and carries saber-like needles in overlapping herringbone rows on tiered branches. Each horizontal whorl holds several branchlets; the oldest whorl sits lowest, and the newest growth emerges at the apex. When owners report “yellow leaves,” they usually mean needle clusters on one or more whorls changing from deep green to yellow-green, dull straw, or limp chartreuse.
That whorl architecture matters for diagnosis. A rosette houseplant yellows from the bottom leaf layer outward; Norfolk Island pine drops entire lower tiers when shaded or stressed-a pattern Illinois Extension links to dry air, dry soil, or poor light indoors. Misreading normal lower-whorl senescence as root rot leads to unnecessary Norfolk Island Pine repotting guide; missing whole-tree yellowing on soggy soil delays urgent root inspection.
What yellow needles look like on Norfolk Island Pine
Match your tree to one of these common patterns before changing care:
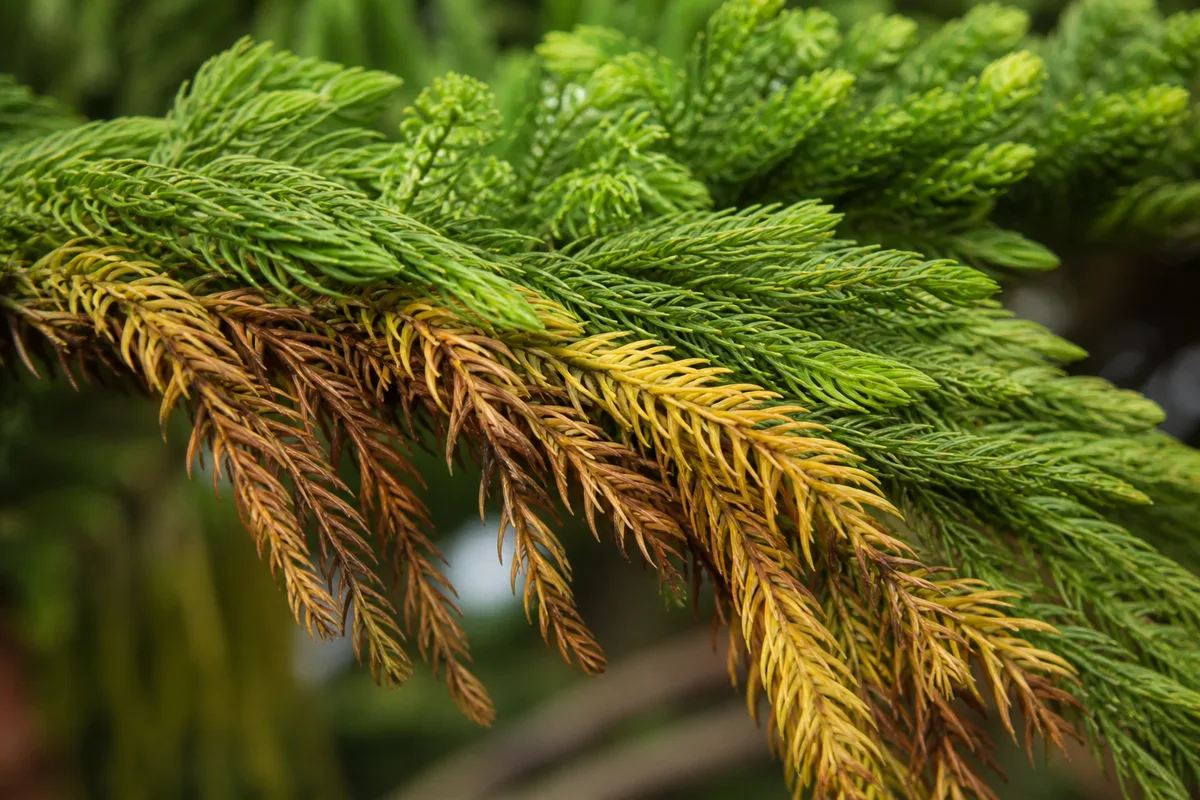
Yellow Leaves symptoms on Norfolk Island Pine - compare with healthy tissue on the same plant.
Lower whorl only - often normal or light-related:
- The bottom horizontal tier turns dull yellow-green over weeks or months while upper whorls stay deep green
- Needles feel dry but attached; the branch may drop entirely once senescent
- Common when the tree sits in medium light and lower branches receive little direct flux
- Indoor specimens may lose lower branches as they mature without indicating root failure
Limp yellow needles on wet soil - root stress:
- Multiple whorls yellow at once; needles lose turgor and feel soft, not crispy
- Pot feels heavy; mix stays cool and damp at 2–3 cm depth for many days
- Sour smell, fungus gnats, or surface mold may appear
- Pairs with overwatering or advancing root rot-not a humidity-only fix
Pale yellow-green upper whorls with long gaps - insufficient light:
- Newest tiers look chartreuse or washed out; branches elongate with wide spaces between whorls
- Tree leans toward the brightest window
- Lower whorls may drop faster as the crown stretches toward light
- See not enough light on Norfolk Island pine when stretch dominates
Crisp yellow progressing to brown tips - dry air or underwatering:
- Outer needle tips yellow first, then tan-brown, often on the side facing a heat vent or fireplace
- Pot may feel light with dusty dry mix at depth-cross-check underwatering
- Heating-season timing with RH below 40% at canopy height fits environmental stress-see brown tips for margin-focused recovery
Fine stippling with dull yellow-gray needles - pests:
- Pale dots on needle undersides, occasional webbing in dry heat
- Yellowing may be patchy across whorls rather than symmetrical tier loss
- Cross-check spider mites on Norfolk Island pine before assuming fertilizer deficiency
Why Norfolk Island pine needles turn yellow
In native coastal habitat, this tree grows in humid, bright conditions with steady moisture-not the hot dry microclimate above a winter radiator. Yellow needles indoors usually trace to one or more of these species-specific triggers:
Normal lower-whorl ageing in medium light. As the crown grows, shaded lower tiers receive less photosynthetic return. The tree sheds them slowly. This is expected on mature indoor specimens and differs from sudden multi-tier collapse.
Overwatering in cool, dim winter rooms. Growth slows when light drops, but many owners keep summer watering frequency. Mix stays wet, roots suffocate, and needles yellow while soil is soggy. Illinois Extension notes that overwatering can lead to branch loss on Norfolk Island pine.
Insufficient light after purchase or holidays. Norfolk Island pines need Norfolk Island Pine light guide with some morning sun. NC State Extension warns that plants moved to lower light without acclimation may display leaf drop and loss of lower branches; prolonged dim conditions produce pale, stretched upper growth.
Dry winter air and heat vents. PlantTalk Colorado lists excessive needle discoloration as a sign of too little humidity, inconsistent watering, or drafts from furnaces and air conditioners. Norfolk Island pine prefers about 50 percent humidity indoors-well above typical heated-home levels.
Underwatering on small holiday pots. Retail trees in 2.5–5 inch containers dry within days in bright, heated rooms. Chronic drought yellows needles before whorls crisp entirely.
Salt or fertilizer stress. Heavy feeding on dry soil or accumulated hard-water salts can yellow needle margins. Do not treat unexplained yellowing with more fertilizer.
How to confirm the cause
Work through this numbered checklist before repotting, fertilizing, or pruning heavily:
- Whorl map - Which tier yellowed first? Lowest only suggests ageing or shade; upper pale whorls suggest light; many tiers at once suggests water or root trouble.
- Soil moisture at 2–3 cm depth - Dry and dusty with a light pot confirms drought. Cool, damp, or soggy for days confirms wet-root risk.
- Pot weight - Lift the container. A heavy pot days after watering with yellow limp needles supports overwatering.
- New apex color - Plump deep-green central leader with only lowest whorl fading often means manageable ageing. Dull apex on wet soil means urgent root review.
- Hygrometer at canopy height - Read RH near top whorls, not on the floor. Below 40% in winter with yellow-tipped needles supports dry-air stress.
- Placement audit - Note distance to heat vents, radiators, fireplaces, AC louvers, and cold window glass. Asymmetric yellowing on one side maps to a draft or heat source.
- Season and display history - Did yellowing start within weeks of turning on central heat or after a holiday mantel placement?
- Pest check - Tap a branch over white paper; inspect needle undersides with a hand lens for stippling or webbing.
Lookalike symptoms to rule out
| What you see | Likely cause | Differentiating check |
|---|---|---|
| Lowest whorl fades slowly; upper tiers green | Normal ageing or shade | Firm trunk; soil moisture balanced; months-long timeline |
| Limp yellow needles; wet heavy pot | Overwatering / root stress | Soggy mix; sour smell; multiple tiers affected |
| Pale stretchy upper whorls; lean toward window | Insufficient light | Long gaps between tiers; not primarily wet soil |
| Yellow tips → brown margins; dry winter room | Low humidity or underwatering | Light pot or RH below 40%; see brown-tips guide |
| Stippling + webbing on undersides | Spider mites | Mites visible; patchy dull gray-green needles |
| Yellow after heavy feeding; white soil crust | Salt / fertilizer burn | Feed history; flush only if crust supports it |
First fix for Norfolk Island pine yellow needles
Identify whether soil is wet or dry, then correct the dominant stressor-do not stack treatments.
If the top inch of mix is wet and the pot feels heavy, pause watering until that layer dries. Move the tree out of direct heat-vent paths into bright indirect light so evaporation can recover. Do not fertilize. If yellowing spreads while soil stays soggy, inspect roots-start with overwatering and root rot workflows.
If the top inch is dry and the pot feels light, water thoroughly until a little water exits the drainage hole and discard saucer runoff within fifteen minutes per PlantTalk Colorado guidance. Then pull the pot away from radiators and check canopy humidity.
If only the lowest whorl is fading slowly with balanced moisture and a green apex, do not repot or feed. Improve light on the shaded side with rotation, or accept gradual lower-tier loss on a floor tree in medium light.
Do not repot on day one unless root rot is confirmed. Do not apply Epsom salts or heavy fertilizer on yellowing conifers without ruling out overwatering first.
Step-by-step recovery
After the first fix, work through recovery in order:
- Stabilize placement - Bright indirect light with some morning sun; rotate weekly if light comes from one direction. Keep daytime temperatures roughly 60–72°F (16–22°C) and avoid hot or cold drafts per PlantTalk Colorado.
- Match watering to dry-down - Water when the top inch of soil is dry, then soak. Stretch intervals in cool, dim winter months when the mix dries slowly.
- Raise humidity to about 50% at canopy height - Humidifier, pebble tray, or grouped plants per Illinois Extension; pair with draft protection from vents.
- Increase light if upper whorls are pale and stretched - Move closer to an east window or add a grow light; sudden jumps from dim shops to harsh south sun can bleach foliage yellow.
- Treat pests only if confirmed - Rinse needle undersides and use labeled soap or oil if mites persist after humidity improves.
- Remove fully dead whorls last - Snip spent brown tiers only after new growth looks stable; never prune the central leader for cosmetic yellowing.
Recovery timeline
Norfolk Island pine is a slow whorl-flush grower-often three to six inches per year indoors. Expect:
- Week 1–2: Yellowing stops spreading after watering, light, and humidity corrections
- Week 3–6: New needle clusters at branch tips look greener and plumper
- Month 2+: Fresh whorls extend normally at the apex; old yellow needles remain cosmetic until they drop
Fully yellow needle tissue does not re-green. Judge success by firm wood, stable soil moisture, and green new growth at the central leader-not by old tiers reversing color. If entire tiers brown from the trunk outward while soil stays wet, escalate to root-rot inspection rather than waiting for spring flush.
What not to do
Do not increase watering because needles look yellow when soil is already moist-that deepens root stress. Do not fertilize a yellowing tree to “green it up” during winter dormancy. Do not repot into a larger container to “help drying” unless root rot is confirmed. Do not rely on calendar watering from summer when winter light slows evaporation. Do not prune the central leader to remove yellow upper needles.
According to the ASPCA, Norfolk Island pine is non-toxic to cats and dogs-yellowing is a care signal, not a pet-poison emergency. Contact your veterinarian if a pet shows persistent vomiting after chewing many needles.
How to prevent yellow needles next time
Before heating season, place a hygrometer at canopy height and keep the tree several feet from vents year-round. Run a humidifier when indoor RH drops below 50% near the top whorls. Water when the top inch dries-not on a fixed weekly schedule-and empty saucers after every soak.
When buying or receiving a holiday Norfolk Island pine, plan permanent bright placement with humidity support before decorating near a fireplace. After December, move promptly to a stable cool room rather than a dim hallway. Reduce or pause fertilizer outside active growth (roughly March through September) per Illinois Extension.
When to worry vs. when to wait
Wait and monitor when only the lowest whorl fades slowly over months, the central leader stays green and firm, soil moisture is balanced, and no pests are present. Improve light rotation and humidity modestly; judge new apex growth over four to six weeks.
Act within days when multiple tiers yellow simultaneously, soil stays waterlogged, the trunk softens at the base, or mite webbing spreads unchecked. Those patterns can combine environmental stress with root failure or pest damage.
Conclusion
Yellow needles on Norfolk Island pine look frightening on a symmetrical indoor tree, but whorl position narrows the cause quickly. Read soil moisture and canopy humidity first, map yellowing to lower-tier ageing versus whole-tree stress, and match the fix to wet roots, dry air, light, or pests. Trim or remove spent tiers only after new growth proves conditions are stable. For sustained dry-air management and tip scorch overlap, pair this triage page with brown tips and low humidity guides on the same species hub.
When to use this page vs other Norfolk Island Pine guides
- Norfolk Island Pine watering guide - Use for routine moisture checks before assuming yellow leaves is the main issue.
- Norfolk Island Pine problems hub - Browse all 4 common issues on this species.
- Root Rot on Norfolk Island Pine - Different entry point when symptoms overlap with yellow leaves.