Spider Mites on Mint: Causes, Checks & Fixes
Quick answer
Spider mites on Mint cause pale stippling and fine webbing in hot, dry air. First step: isolate the pot and rinse leaf undersides with a forceful stream of lukewarm water.
Spider Mites on Mint: Causes, Checks & Fixes
This guide covers spider mites on Mint. See also the general Spider Mites guide, watering, and light pages for this plant.
Spider Mites on Mint: Causes, Checks & Fixes
Quick answer
Spider mites on Mint (Mentha spicata and other garden mints) show up as pale speckling, dull bronzing, and fine silk on soft herb leaves-often before you notice anything wrong on top. The usual culprit indoors is the two-spotted spider mite (Tetranychus urticae), an arachnid that thrives in warm, dry air exactly like the microclimate above a kitchen windowsill in winter.
First step: isolate the pot and rinse every leaf underside with a forceful stream of lukewarm water. That single action knocks off live mites and eggs, limits spread to neighboring herbs, and buys time to confirm the diagnosis before you reach for sprays.
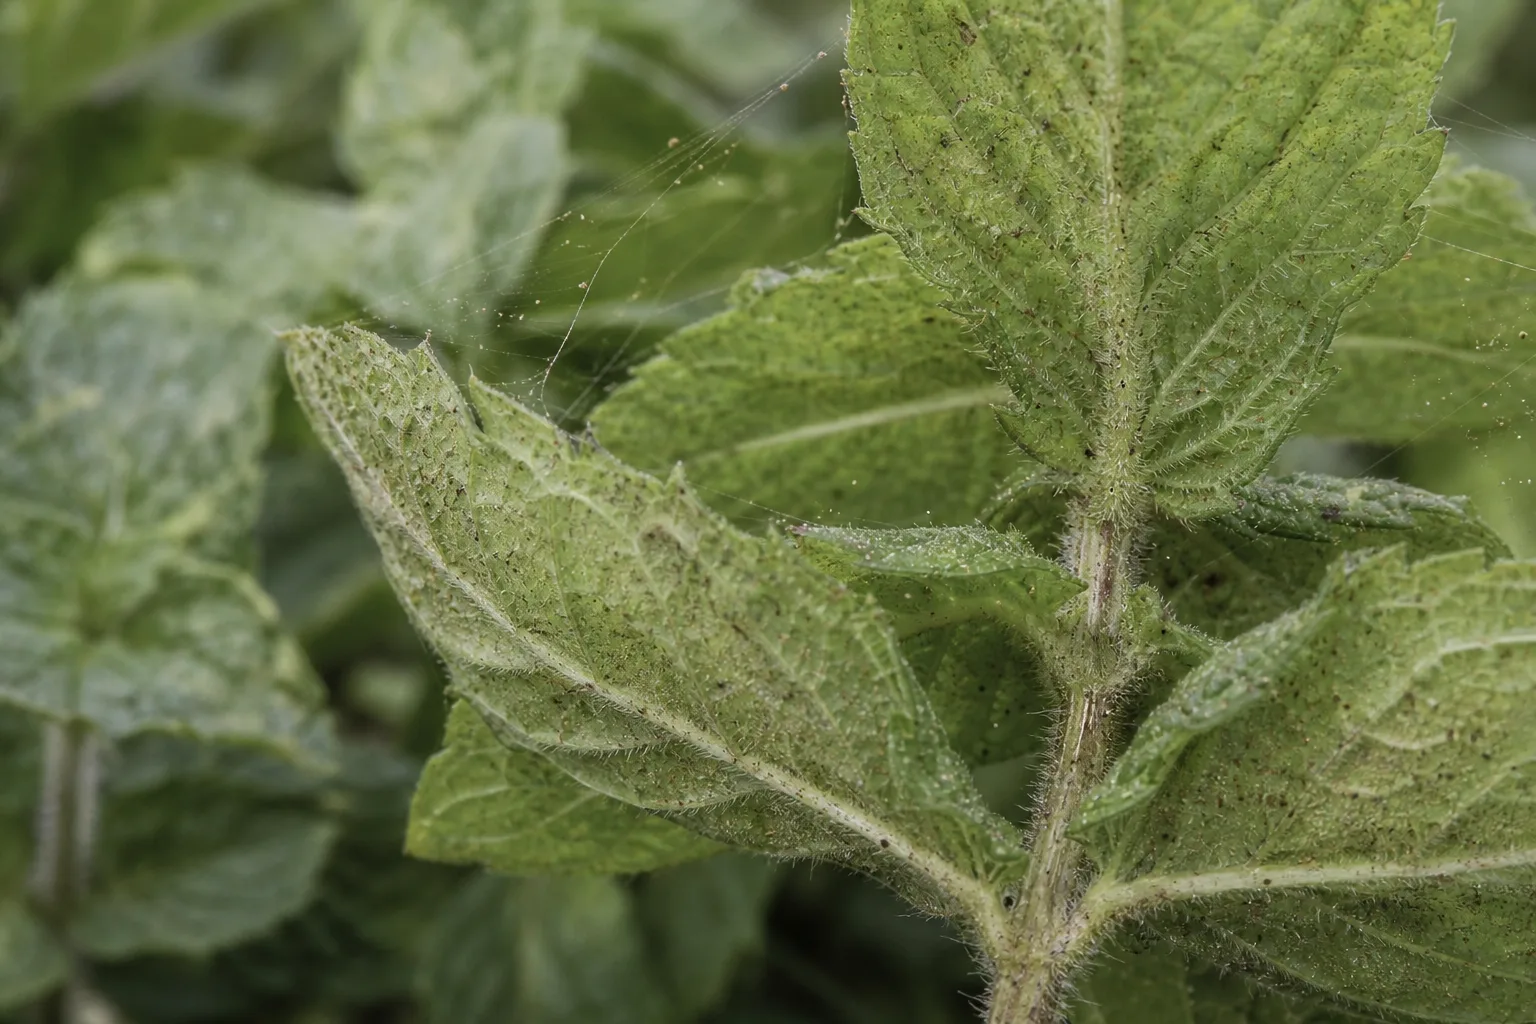
What spider mites look like on Mint
Mint leaves are thin and soft, so mite damage appears quickly and can look like a nutrition or watering problem at first glance.
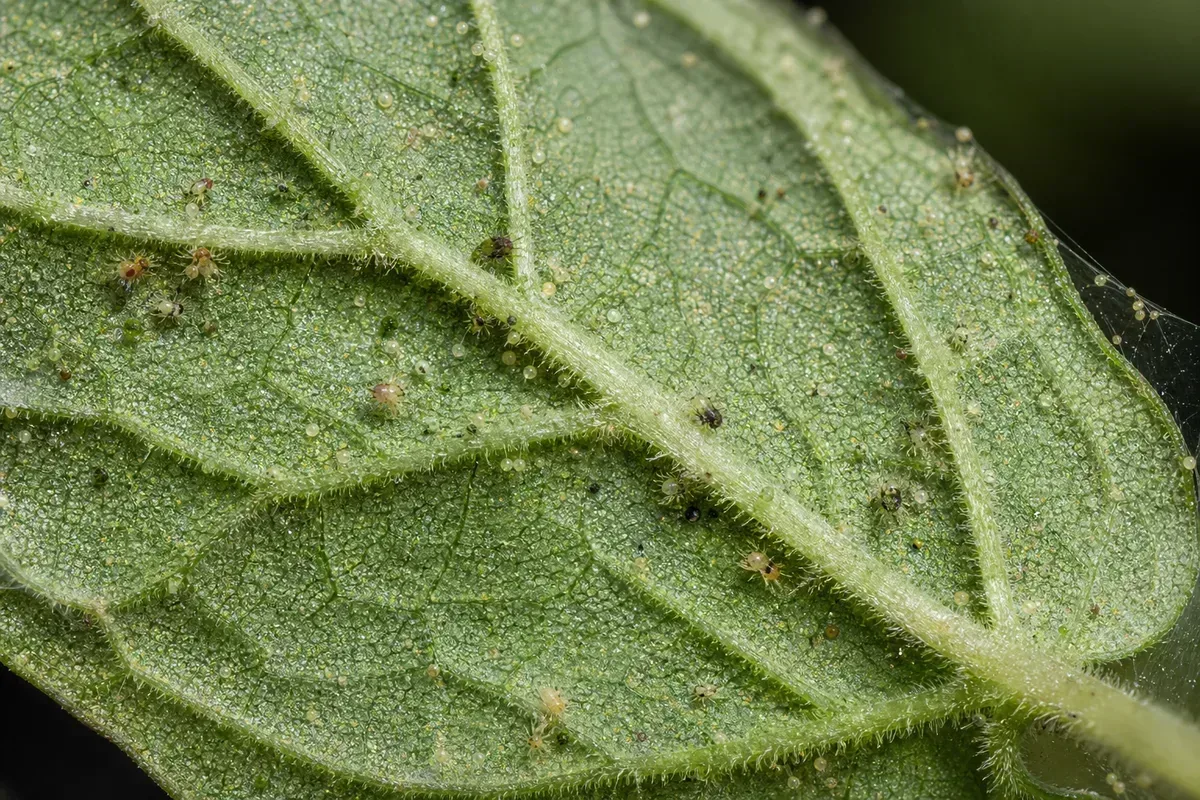
Spider Mites symptoms on Mint - compare with healthy tissue on the same plant.
Typical signs on spearmint, peppermint, and container mint include:
- Tiny yellow or white flecks across the upper leaf surface-the classic stippled look from punctured cells
- Leaves turning dull, dusty, or bronze as feeding continues; severely hit foliage may crisp and drop
- Fine webbing at leaf joints, stem tips, or along petioles-often visible only with side light or magnification
- Slowed regrowth on shoots you would normally harvest every week; new tips may look pale or stunted
- No sticky residue-unlike aphids or mealybugs, spider mites do not leave honeydew
Because mint produces fresh tips constantly, mites often colonize newest harvestable growth first. That makes weekly harvest checks a reliable early-warning system if you look at undersides, not just the glossy top surface.
Why Mint gets spider mites
Mint wants steady moisture in the root zone but tolerates moderate humidity (50–70%). Spider mites do the opposite-they reproduce fastest when air is hot and dry. The mismatch shows up in real homes:
- Winter windowsills where sun heats leaves while central heating dries the air
- Herb shelves above radiators or ovens-warm, dusty, and rarely rinsed
- Crowded kitchen gardens where pots touch and mites walk stem to stem
- Recently moved outdoor mint brought inside without quarantine-outdoor colonies ride in on undersides
Mint’s fast, nitrogen-rich growth does not cause mites, but it gives them lots of tender leaf area to feed on once conditions favor them. Dusty foliage on plants that are never rinsed also makes it easier for populations to hide and multiply unnoticed.
Stressed mint-root-bound, drought-stressed, or sitting in a dark corner-shows damage faster because the plant has less reserves to replace stippled leaves. Healthy, well-watered mint can still get mites; dry air is the main accelerator, not weak roots alone.
How to confirm the cause
Work through these checks before treating. You want to separate spider mites from lookalikes that hit mint for different reasons.
- Paper tap test - Hold a suspect leaf over white paper and tap the underside firmly. Tiny moving specks (pinpoint size) strongly suggest mites. Static debris alone does not.
- Webbing check - Look at stem joints and leaf undersides with a hand lens or phone macro. Silk threads plus stippling confirm mites; stippling alone may be early feeding.
- Moisture and roots - Press a finger 1–2 cm into the mix. Soggy soil with yellow lower leaves fits overwatering on Mint, not mites. Dry, light pot weight with wilt fits drought.
- Sticky or curled tips - Sticky new shoots with clustered insects point to aphids, not mites. Mealybugs show white cottony patches in leaf axils.
- Rust pustules - Orange, yellow, or black powdery spots on undersides mean mint rust (Puccinia menthae), a fungus-not webbing.
- Adjacent plants - Inspect basil, rosemary, and other herbs on the same shelf. Mites spread plant to plant; a single mint with uniform yellowing and no speckling pattern is less likely to be mites.
Confirmed diagnosis requires stippling plus either moving specks or webbing on multiple leaves-not yellow leaves alone.
First fix for Mint
Move the pot away from other herbs and rinse all foliage thoroughly.
Use a sink sprayer, shower head, or strong mister set to a firm stream. Angle sprays up into leaf undersides-that is where mites and eggs concentrate. Repeat the rinse two or three times per session, letting water run off between passes. Wash your hands and any snips afterward so you do not carry mites to clean plants.
Do not apply fertilizer, repot, or spray oils on the same day as your first discovery. Confirm active mites after the rinse, then move to repeat treatments if speckling spreads or webbing returns within a few days.
Step-by-step recovery
After the initial rinse, follow this order based on severity:
- Improve the local environment - Move mint out of direct heat drafts. Grouping pots can raise humidity slightly, but do not crowd leaves so they stay touching. A pebble tray or humidifier nearby helps; misting alone is a minor, temporary bump.
- Repeat water rinses - For light infestations, rinsing every two to three days for two weeks may be enough. Focus on undersides and new tips.
- Apply insecticidal soap if mites persist - Use a product labeled for spider mites on edible plants. Coat undersides until runoff; soaps only kill on direct contact and leave no residual protection, so missed mites survive. Repeat every five to seven days for at least three cycles to catch newly hatched mites.
- Consider horticultural oil as an alternative - On mint that is not in blazing direct sun, a labeled horticultural or plant-based oil can smother mites on contact. Test one leaf first-soft herb foliage can burn if oil is applied in hot sun or too strong a mix.
- Prune heavily infested shoots - Cut out stems coated in webbing and bag them before discarding. That lowers pest load and improves spray coverage on what remains. Do not compost infested clippings indoors.
- Hold the harvest - Wait until the label’s re-entry or harvest interval passes before eating leaves from treated plants. When in doubt, harvest from stems you rinsed only with plain water and keep sprayed sections for ornamental recovery.
Skip broad-spectrum insecticides on kitchen mint unless a label explicitly allows food crops. Some products kill predatory mites and can flare spider mite numbers after an initial knockdown.
Recovery timeline
Old stippled leaves rarely return to solid green. They may stay speckled or bronze even after the colony is gone. Measure success by:
- No new webbing on fresh tips within seven to ten days
- Clean new growth emerging from nodes within two to three weeks
- Stable harvest rhythm returning-enough clean leaves to pinch without seeing moving specks
If new shoots still emerge stippled after three soap cycles and regular rinsing, the infestation is active or reinfestation is occurring from a nearby host plant.
Lookalike symptoms on Mint
| What you see | Likely cause | How to tell it apart |
|---|---|---|
| Uniform yellow lower leaves, wet soil | Overwatering / root stress | No stippling pattern; no webbing; caudex or stem base may feel soft |
| Orange pustules on undersides | Mint rust | Powdery spots, not silk; spreads in humid wet foliage |
| Curled, sticky new tips | Aphids | Visible colonies; honeydew; ants on pot |
| White cotton in axils | Mealybugs | Waxy blobs; not fast stippling |
| Brown crispy edges, dry soil | Drought / heat stress | No moving specks; whole margins burn, not fine dots |
| Gray-white leaf coating | Powdery mildew | Wipes off as powder; no mites on paper tap |
Mistakes to avoid
- Stopping after one rinse or one spray - Mite eggs hatch on a cycle; a single treatment rarely clears a colony.
- Spraying only the tops of leaves - Mites live and lay eggs on undersides; top-only coverage wastes product.
- Using homemade dish-soap mixes on edible mint - They burn soft foliage and are not labeled for food crops.
- Harvesting immediately after spraying - Respect label intervals on herbs you plan to eat.
- Ignoring neighboring pots - Basil and other Lamiaceae herbs on the same shelf often share the infestation.
- Applying horticultural oil in hot midday sun - Leaf scorch on mint is common; treat in morning or evening.
- Assuming high humidity alone cures an outbreak - Humidity slows reproduction but does not remove an established colony without rinsing or contact sprays.
How to prevent spider mites on Mint
Prevention on kitchen mint is mostly about environment and inspection, not pesticides:
- Rinse foliage weekly in dry seasons-especially winter-when you water. Mint handles gentle washing well when the pot drains freely afterward.
- Keep mint in bright light (4–6 hours direct sun or strong supplemental light) without baking it against a single-pane window above a heat vent.
- Quarantine new herbs for two weeks before placing them beside established mint.
- Harvest regularly and inspect undersides when you pinch-early colonies are easiest to rinse away.
- Maintain steady moisture without waterlogging; stressed, dusty plants in dry pockets invite faster visible damage.
- Space pots so leaves do not touch; mites crawl short distances between touching foliage.
Outdoor mint in summer often stays cleaner because rain and predatory insects keep mites in check. Re-check plants when you bring pots back indoors in fall.
When to worry
Escalate or discard if:
- Webbing covers most of the plant and returns within days of thorough rinsing
- Multiple herbs on one shelf show stippling despite isolation attempts
- New growth stays distorted after three properly timed soap or oil cycles
- The plant is mostly bronze with few healthy stems-starting fresh from a clean division or new pot may cost less effort than saving an exhausted root ball
Mint is vigorous. A severely webbed pot can often be replaced by dividing clean rhizome sections from a less-affected edge, rinsing them well, and potting in fresh mix-provided the core stock is not entirely encased in silk.
Conclusion
Spider mites on mint are a dry-air pest problem, not a mystery disease. Confirm them with stippling plus moving specks or webbing on undersides, then isolate and rinse first. Repeat rinses or labeled insecticidal soap on a five- to seven-day schedule until new tips grow in clean. Old leaves may stay speckled, but harvestable mint can recover within a few weeks when humidity improves and you stay consistent with treatment.
When to use this page vs other Mint guides
- Mint watering guide - Use for routine moisture checks before assuming spider mites is the main issue.
- Mint problems hub - Browse all 40 common issues on this species.
- Curling Leaves on Mint - Different entry point when symptoms overlap with spider mites.
- Leaf Drop on Mint - Different entry point when symptoms overlap with spider mites.
- Slow Growth on Mint - Different entry point when symptoms overlap with spider mites.