How to Propagate Java Fern: Rhizome & Plantlets
How to Propagate Java Fern: Rhizome & Plantlets
How to Propagate Java Fern: Rhizome & Plantlets
Java Fern propagation is one of the most forgiving projects in freshwater aquascaping. Microsorum pteropus - the species sold simply as Java Fern in most aquarium shops - multiplies through two reliable vegetative methods: rhizome division, which gives you several medium-sized plants immediately, and adventitious plantlets, the miniature ferns that sprout along mature leaf margins and tips. Neither method requires CO₂ injection, special fertilizers, or a greenhouse. You need a healthy parent plant, clean scissors, and the discipline to keep the rhizome above substrate instead of burying it.
This guide covers the full workflow for both techniques: understanding rhizome anatomy, choosing the right method for your tank goals, knowing when plantlets are mature enough to detach, attaching new starts to driftwood or rock without rot, and caring for divisions through the slow establishment phase. You will also learn why brown parent leaves should often stay attached, how turtle-tank sourcing changes the prep steps, and which mistakes - buried rhizomes, premature plantlet pulls, excessive glue - cause the failures that make beginners think Java Fern is difficult when it is actually one of the most cooperative aquarium plants available.
If symptoms persist, see the Black Spots on Java Fern guide.
Why Java Fern Is One of the Easiest Aquarium Plants to Multiply
Java Fern belongs to Polypodiaceae/27914), a family of ferns that naturally colonize rocks, wood, and stream margins across Southeast Asia. In the wild, it grows as an epiphyte - anchored to surfaces, not rooted in soil. That growth habit is the key to understanding propagation. Java Fern does not behave like a stem plant you trim and replant, and it does not propagate like a crypt you divide at the crown in gravel. It spreads by extending its horizontal rhizome and by producing adventitious plantlets on aging fronds.
The species is slow to moderate in growth rate, tolerates low to moderate light, thrives across a wide pH range (6.0–8.0), and accepts soft through hard water without complaint. Dennerle lists 22–28°C/27914) as the practical temperature range, with adventitious plantlets and rhizome division as the standard propagation pathway. Those parameters mean propagation succeeds in low-tech community tanks, shrimp breeding setups, and many turtle aquariums - environments where faster plants demand more maintenance than beginners want to provide.
What the rhizome, roots, and adventitious plantlets actually are
Before you cut anything, identify the three structures that matter.
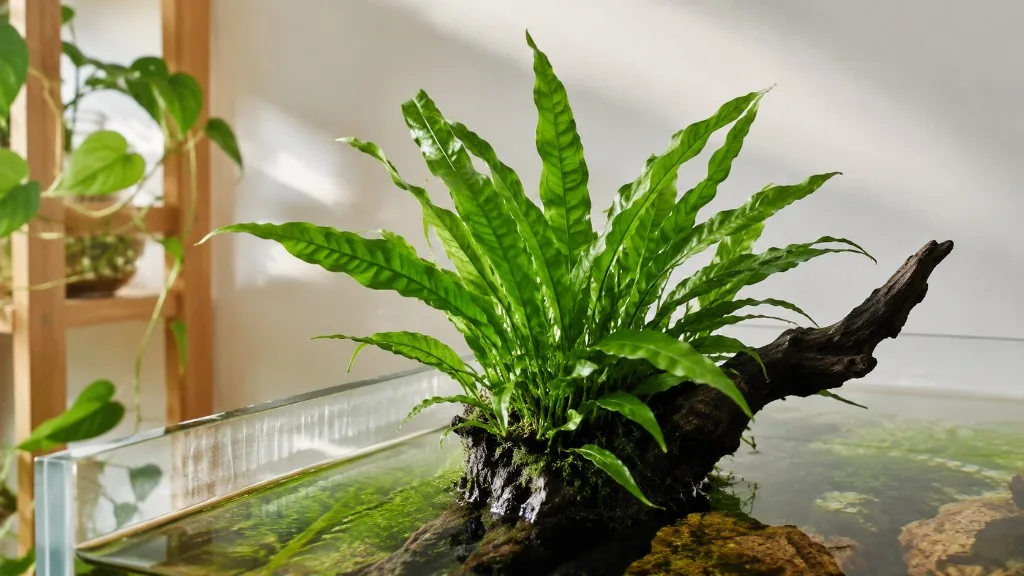
The rhizome is the thick, horizontal, stem-like axis from which leaves emerge. It is usually green to dark green, firm, and visibly distinct from the fine black hair roots that hang below it. Leaves sprout upward from the rhizome top; roots dangle downward to grip surfaces and absorb nutrients from the water column. The rhizome is the plant’s engine. Every propagation method ultimately depends on keeping rhizome tissue alive and exposed.
The black hair roots are not the propagation handle. They attach the plant to hardscape and supplement nutrient uptake, but cutting or damaging roots alone does not create a new plant. When you divide a rhizome, some roots should remain attached to each section because they speed establishment, yet the rhizome with attached leaves is the non-negotiable minimum.
Adventitious plantlets - sometimes called baby ferns or daughter plants - are tiny copies of the parent that form on mature fronds, most often at leaf tips and along edges. They begin as small bumps, develop miniature fronds, then grow their own root threads while still connected to the parent leaf. This is the fern’s natural reproductive strategy: as an older frond senesces, it donates resources to offspring that will colonize a new surface. In aquariums, you can let plantlets detach on their own or harvest them once they show independent structure.
The rule that governs every propagation outcome: never bury the rhizome in substrate. Burying exposes rhizome tissue to anaerobic, debris-filled conditions that trigger rot. Tropica and every serious aquascaping reference agree - Java Fern and its close cousin Anubias must have the rhizome above gravel, sand, or soil. Roots may touch substrate; the rhizome itself must not.
Rhizome Division versus Leaf Plantlets: Which Method to Choose
Both methods work. The choice depends on how quickly you want usable plants, how large your parent fern is, and whether you prefer active intervention or passive waiting.
Rhizome division is the fastest way to produce several established-looking plants in one session. If you have a mature Java Fern with a rhizome several inches long and multiple frond clusters, you can cut it into two, three, or more sections and attach each section to a different piece of hardscape the same day. Each section already has full-sized leaves and functional roots, so it photosynthesizes at meaningful capacity immediately after attachment.
Leaf plantlet propagation is the patient path that costs almost nothing in plant material. You wait for the parent to generate offspring on its fronds, then detach plantlets once they carry two to three small leaves and visible root threads. Plantlets start tiny - sometimes under a centimeter - and take weeks to months to reach a noticeable size, but the parent plant can produce many of them over time without you sacrificing frond mass through cutting.
Speed, size, and outcome differences between the two methods
Rhizome division trades parent plant size for instant multiplication. A large specimen becomes several medium specimens. If you only own one small Java Fern with a rhizome under two inches and three to four fronds, division is premature - you risk leaving each section with insufficient leaf area to sustain itself through the establishment period. Wait until the rhizome develops multiple growth points, identifiable as clusters of fronds emerging along the horizontal axis.
Plantlet propagation trades time for minimal risk to the parent. The mother fern keeps its rhizome intact while contributing genetically identical offspring. Mature plants under stable conditions routinely produce plantlets on older fronds, especially when light and nutrients are adequate but not excessive. If your goal is a gradual background fill or a shrimp tank carpet of small ferns on scattered stones, plantlets are ideal. If you need three usable plants for a new scape this weekend, divide the rhizome.
A practical combined strategy works well: divide an overgrown rhizome to reset the parent shape, then leave remaining fronds in place to generate plantlets over the following months. Aquarists running low-tech tanks often discover that plantlet propagation becomes self-sustaining once the first generation matures - a single purchased fern can populate multiple tanks over a year without further purchases.
When Your Java Fern Is Ready to Propagate
Timing is less about calendar dates than plant structure and tank stability. Java Fern propagated during melt events, immediately after shipping, or in a tank with unstable ammonia spikes will fail regardless of technique.
Signs of maturity before you cut anything
For rhizome division, the plant is ready when:
- The rhizome is at least 5–8 cm (2–3 inches) long with visible segments between frond clusters
- You can identify two or more growth points, each with at least three to four healthy fronds
- The rhizome tissue is firm and green, not mushy, blackened, or slimy
- The parent has been in your tank at least two to four weeks after purchase, long enough to acclimate
For plantlet harvest, the plantlets are ready when:
- Each plantlet shows two to three miniature fronds that look like a scaled-down parent, not a single bump
- Fine root threads are visible at the plantlet base
- The plantlet detaches with gentle pressure or snips cleanly without tearing the parent frond excessively
- The parent frond may be aging or developing brown patches - this is normal and often coincides with plantlet formation
Do not harvest plantlets that are still single green nubs with no frond differentiation. They rarely survive separation because they lack the photosynthetic surface and root initials to support independent metabolism. Patience here is not optional. Hobby references consistently recommend waiting until plantlets resemble tiny independent ferns, not mere bumps.
Avoid propagating when the parent shows active Java fern melt - widespread translucent spotting, disintegrating frond tissue, or rhizome softening. Melt is a stress response to environmental shock, often linked to sudden light increases, poor water quality, or buried rhizomes. Fix the underlying condition first, let new healthy growth emerge, then propagate from recovered tissue.
Tools and Tank Setup Before You Start
Gather tools before removing the plant from its attachment point. Air-dried rhizomes and wilted fronds are more fragile than submerged tissue.
Essential tools:
- Aquarium scissors or sharp stainless snips - dedicated to tank use, rinsed in tank water
- Stainless steel tweezers for positioning small plantlets
- Cotton thread or dark fishing line for temporary hardscape attachment
- Cyanoacrylate super glue gel labeled aquarium-safe - optional, useful for larger rhizome sections
- A small container of tank water for holding cuttings during work
- Driftwood, lava rock, or stone with textured surfaces for grip
Optional but useful:
- A quarantine tub or grow-out tank for new divisions, especially in turtle setups
- Plant weights or mesh frames for positioning multiple plantlets on a back wall
- A magnifying glass for inspecting tiny plantlet roots
Prepare the receiving tank before you cut. Stable parameters matter more than perfection: consistent temperature within the 20–28°C range, zero ammonia and nitrite, and moderate flow that delivers nutrients without battering delicate fronds. Java Fern does not need CO₂. Low-tech tanks propagate it successfully every day.
If you propagate in the main display tank, choose attachment sites with low to moderate light and away from algae-prone direct beam zones. New divisions and plantlets establish faster under gentler light. You can relocate them later once roots grip hardscape firmly.
For turtle aquariums, add a quarantine rinse step before introducing any propagated material to the display tank. Use plants from clean aquarium trade sources, rinse thoroughly in dechlorinated water, and inspect for snails, pesticides, or copper-based treatments. Turtle keepers often run a separate grow-out tub so grazing does not eliminate new starts faster than they can attach.
How to Propagate Java Fern by Rhizome Division
Rhizome division is a single-session technique. Work submerged or with the plant briefly lifted into a shallow dish of tank water - never let the rhizome dry out on a countertop.
Step-by-step rhizome cutting and sectioning
- Remove the plant from hardscape carefully. If thread or glue holds the rhizome, cut thread with scissors rather than yanking. Pry glued sections gently; rhizome tissue tears easily.
- Study the rhizome orientation. Identify growth direction - new fronds emerge from the leading edge; older sections may show denser root mass. Plan cuts between frond clusters, not through the middle of a cluster.
- Sterilize your scissors. Rinse blades in tank water. Some aquarists wipe with dilute hydrogen peroxide between cuts when dividing a valuable specimen; this reduces bacterial transfer between sections.
- Cut cleanly between growth points. Each section needs at least three to four fronds and a portion of healthy rhizome with attached roots. Two fronds can work on a robust rhizome section, but three to four provides a safer energy reserve during establishment.
- Inspect each section immediately. Discard any piece with black, mushy rhizome tissue or translucent melt patches. Keep only firm green sections.
- Return sections to tank water within seconds. Submerge in a holding container while you prepare attachment materials.
Avoid creating tiny divisions with one frond and a half-centimeter rhizome chip unless you are experimenting with surplus material. Small sections survive occasionally, but failure rates climb sharply when leaf area cannot support root regeneration.
Attaching divided rhizomes to driftwood and rock
Attachment holds the rhizome against a surface until roots grip naturally. Three methods dominate the hobby.
Cotton thread or fishing line is the most forgiving method. Position the rhizome where you want it - typically in a crevice or along the grain of driftwood - and wrap thread around rhizome and hardscape two to four times. Tie a snug knot without crushing tissue. Thread rots away in a few weeks; by then roots usually anchor. Fin and Flux emphasizes wrapping loosely enough to avoid cutting into the rhizome as it swells slightly during growth.
Cyanoacrylate super glue gel works for larger sections. Apply a thin bead of gel to rock or wood, press the rhizome into the bead for 30–60 seconds, and hold until the bond sets. Use glue on the underside of the rhizome only - never coat the top where fronds emerge. Aquarium Co-Op demonstrates pressing roots into a glue line while keeping the rhizome body exposed. Glue is less ideal for tiny plantlets because a dab can smother small rhizome tissue; thread is safer for micro-starts.
Wedge-and-weight placement suits flat stones in low-flow shrimp tanks. Nestle the rhizome in a natural depression and place a small stone weight on the root mass - not on the rhizome itself - until attachment completes.
After attachment, return the hardscape to the tank in its final position. Minimize repositioning during the first two weeks. Each move breaks fragile new root connections.
How to Propagate Java Fern from Adventitious Plantlets
Plantlet propagation rewards observation. The work is mostly waiting, then a careful thirty-second detachment.
Recognizing plantlets that are ready to harvest
Plantlets progress through visible stages. Early bumps along a frond edge are not ready - they lack independent structure. Intermediate plantlets show one or two tiny fronds but no roots; leave them attached. Mature plantlets display a rosette of two to three small fronds, a discernible miniature rhizome area, and visible root threads hanging below.
Parent fronds often yellow or brown as plantlets develop. This looks alarming to new aquarists but is frequently normal. The senescing frond transfers nutrients to attached offspring. Aqua Flora Aqua Fauna advises leaving brown parent leaves in place while plantlets mature rather than trimming them prematurely. Remove the parent frond only after plantlets detach or are harvested and the leaf is fully spent.
Some plantlets detach spontaneously when mature, drifting until they snag on wood, sponge filters, or substrate edges. You can let nature run this course in low-maintenance tanks. In curated scapes, manual harvest gives you control over placement.
Detaching and mounting tiny plantlets without damage
- Choose a mature plantlet meeting the frond and root criteria above.
- Grip the parent frond with one hand to stabilize it.
- Snip or gently pull the plantlet at its base using tweezers or scissors. A clean snip beats a tear that damages parent and offspring.
- Transfer immediately to a dish of tank water.
- Attach with thread to a small stone, mesh square, or piece of driftwood. Wrap one gentle loop around the plantlet base - micro rhizome tissue bruises easily under tight binding.
- Place in low to moderate light with gentle flow.
Plantlets are resilient relative to their size, but they establish slowly. Expect four to eight weeks before visible new frond expansion, and two to four months before the plantlet reads as a small but unmistakable Java Fern to casual observation. Growth rate depends on light, nutrients, and cultivar - Windelov and Needle Leaf forms often appear slower than standard broad-leaf Java Fern.
For mass plantlet production, anchor a stainless steel mesh or plastic craft mesh to the back glass, tie multiple plantlets in a grid pattern, and wait. Over months the back wall fills with a Java Fern mat - a technique popular in breeding tanks where simplicity outweighs aquascaping competition aesthetics.
Aftercare for New Java Fern Starts
Propagation does not end at attachment. Establishment is the phase where most failures appear, usually because the rhizome was buried, light was too intense, or water quality shifted.
Light, water chemistry, and nutrients in the first month
Light: Keep new divisions and plantlets under low to moderate intensity for the first two to four weeks. Direct high light combined with nutrient imbalance can trigger melt on stressed tissue. A shaded area under larger plants, a mid-tank zone with indirect LED exposure, or a dimmer tank section works well.
Water chemistry: Maintain stable temperature (20–28°C), pH within the 6.0–8.0 range, and zero ammonia or nitrite. Java Fern tolerates hard water; sudden large water changes with parameter swings stress recovering plants more than stable slightly-imperfect parameters.
Nutrients: Java Fern absorbs nutrients primarily from the water column through its fronds and rhizome surface. Liquid fertilizers at low-to-moderate dose support new growth in planted tanks. When plantlets form on parent fronds/27914), adequate water-column nutrients help prevent parent-leaf breakdown during the handoff to offspring. This is interpretation backed by practical aquascaping experience rather than a controlled trial, but the observation matches what many propagators see: plantlet-heavy fronds last longer when the tank is not nutrient-starved.
Flow: Moderate circulation delivers nutrients without shredding small plantlets. Avoid pointing powerheads directly at freshly attached micro-starts.
Inspection rhythm: Check attachments at day 3, day 7, and day 14. Re-tie loose sections. Remove algae by gentle brushing if it appears on fronds - new starts photosynthesize poorly under algae coating.
Growth expectations: Rhizome divisions may show new frond emergence within two to three weeks in a healthy tank. Plantlets take longer. Neither method produces instant bushy coverage. Java Fern’s slow to moderate growth rate is a feature for low-maintenance tanks, not a defect in your technique.
Common Propagation Mistakes and How to Avoid Them
Burying the rhizome is the number one killer. Gravel, sand, aquasoil - the medium does not matter. Covered rhizome tissue rots. If you want a planted-substrate look, attach Java Fern to a stone and set the stone on top of substrate so the rhizome stays elevated.
Harvesting plantlets too early produces floaters that brown out within days. Wait for fronds and roots. The parent plant is not on a deadline.
Creating divisions that are too small leaves each section without enough leaf mass to power root recovery. Three to four fronds per rhizome section is the safe baseline.
Using too much glue on plantlets smothers tissue. Reserve glue for larger rhizome sections; use thread for micro-starts.
Propagating during melt or immediately after shipping stacks stress on stress. Acclimate the parent, confirm new healthy growth, then cut.
Ignoring algae on new starts limits photosynthesis at the worst possible moment. Gently remove hair algae with a soft brush or relocate to slightly lower light until established.
Skipping quarantine in turtle or sensitive livestock tanks introduces risk from treated nursery stock. Rinse, inspect, and optionally grow out separately before display-tank introduction.
Assuming roots in rock wool from the shop are rhizomes. Tissue-culture and potted Java Fern often arrives with roots embedded in wool. Peel wool away gently, expose the rhizome, and attach the rhizome - not the wool mass - to hardscape.
Propagating Java Fern in Turtle Tanks and Mixed-Species Setups
Turtle keepers value Java Fern because it tolerates grazing better than many soft plants, attaches to hardscape turtles cannot uproot easily, and is widely described as non-toxic in aquatic turtle care sources. Propagation in these tanks adds sourcing and placement constraints beyond standard community aquariums.
Source plants from aquarium trade suppliers, not garden centers selling terrestrial ferns or pesticide-treated nursery stock. Rinse all propagated material thoroughly. Avoid plants exposed to copper medications, snail treatments, or outdoor pond water with unknown contaminant loads.
A separate grow-out tub - a plastic container with a sponge filter, heater, and simple LED - lets rhizome divisions and plantlets attach undisturbed. Once fronds reach a size that survives occasional nibbling, transfer the hardened wood or stone into the turtle display. Turtles that eat plants faster than they grow benefit from this two-stage approach; the grow-out tub functions as a backup nursery.
In mixed fish-shrimp-turtle setups, propagate on stones you can move rather than permanently glued driftwood. Mobility lets you rescue new starts if grazing intensifies. Shrimp and plecos generally ignore establishing Java Fern, but large herbivorous fish may nip tender new fronds.
Java Fern Cultivars and Variety-Specific Propagation Notes
Microsorum pteropus has several commercial cultivars. Propagation methods are identical; growth pace and plantlet frequency vary.
Standard Java Fern (broad fronds) produces plantlets reliably on mature leaves and divides easily along thick rhizomes. This is the reference form for all timing guidance in this guide.
Windelov Java Fern features branched, lace-like frond tips. Rhizome division works the same. Plantlets may appear at branched tips; wait for distinct miniature branching before harvest. Growth can feel slower because frond surface area per photosynthetic unit is more complex.
Trident Java Fern has narrow, forked fronds. It propagates by division and plantlets but often produces fewer plantlets than standard forms. Rhizome health is paramount - thin rhizomes on small specimens should grow longer before division.
Narrow Leaf and Needle Leaf forms suit smaller tanks. Divisions should stay larger relative to plant size - aim for four fronds minimum because individual leaves carry less photosynthetic area.
Philippine Java Fern and other regional variants follow the same rhizome and plantlet rules. Confirm you have a true Microsorum pteropus cultivar rather than a lookalike such as Bolbitis, which has a different rhizome structure and propagation habit.
Conclusion
Java Fern propagation comes down to two paths - cut the rhizome or harvest leaf plantlets - united by one non-negotiable rule: keep the rhizome exposed and attached to hardscape until roots hold. Rhizome division delivers several usable plants in a single session when the parent is mature enough to spare frond clusters at each growth point. Plantlet propagation costs nothing but time, turning aging fronds into a steady supply of genetically identical offspring that slowly fill stones, mesh panels, and background wood.
Choose division when you need immediate coverage and own a rhizome with multiple growth points. Choose plantlets when you prefer gradual, low-risk multiplication. In both cases, work with clean submerged tools, attach with thread or a small glue dab on the rhizome underside only, and place new starts under low to moderate light in stable water. Avoid burying rhizomes, pulling plantlets before they show fronds and roots, and propagating during melt or shipping stress.
Done correctly, one purchased Java Fern can supply your current tank, a grow-out tub, a shrimp breeding project, and a turtle aquarium for years. The plant does the hard biological work - you provide patience, clean water, and a piece of driftwood worth gripping.
When to use this page vs other Java Fern guides
- Java Fern overview - Start here for whole-plant context before deep-diving this topic.
- Java Fern problems hub - Jump to symptom-specific fix guides when this care topic does not resolve the issue.