Dieffenbachia Repotting: When, How & Pot Size
Dieffenbachia Repotting: When, How & Pot Size
Dieffenbachia Repotting: When, How & Pot Size
Author: sai-ananth · Reviewed by: LeafyPixels Review Board (2026-06-15) · Methodology: Botanical and extension references plus practical indoor growing constraints before publication.
A top-heavy Dieffenbachia with several upright canes and dinner-plate leaves will tell you long before a calendar date does that its root zone is failing. Water shoots through the pot in seconds while the center of the root ball stays dry. New leaves open smaller than last season’s. The whole plant wobbles in lightweight mix even though the stems look firm. Those are not mysterious foliage problems - they are functional congestion signals from a fast-growing Araceae aroid whose roots have outpaced the container, the soil has collapsed, or both.
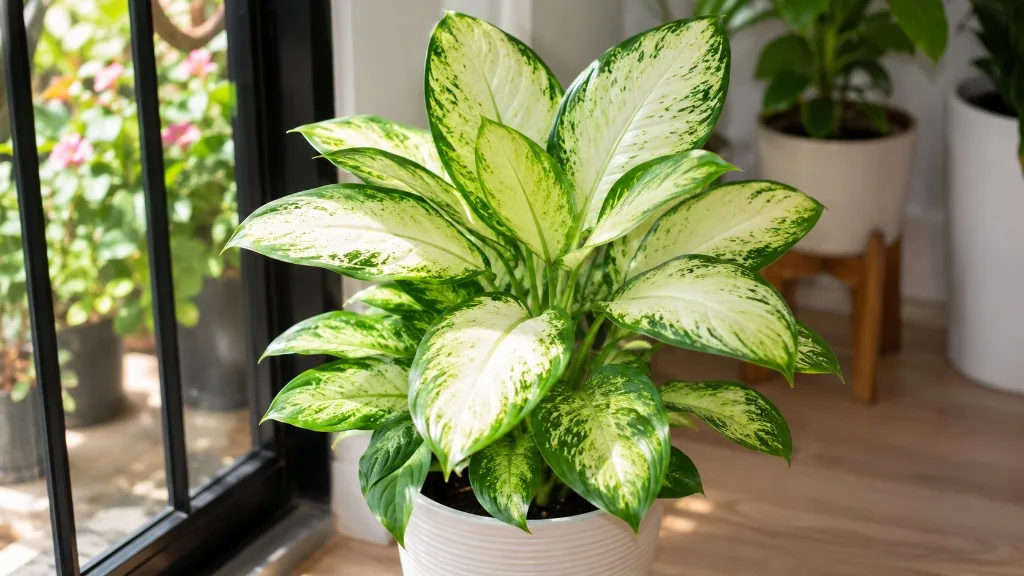
Dieffenbachia - dumb cane to most growers - is a tropical American genus that Clemson HGIC describes as reaching 2 to 10 feet depending on species and cultivar, with large patterned leaves on thick stems. Indoors, most specimens land in the 2 to 5 foot range with leaves 8 to 14 inches long. That upright, multi-stem habit makes Dieffenbachia one of the few common houseplants where stability and drainage matter as much as pot diameter: a tall canopy on a depleted root ball tips easily, and an oversized decorative pot after repotting is a direct path to root rot on Dieffenbachia.
This genus-level guide is the canonical repotting hub for Dieffenbachia. It covers when to repot (and when top-dressing is enough), how to size the next pot, what aroid mix to use, how to divide multi-stem plants, and how to recover without shock. If you grow a named cultivar with specific variegation needs, see the routing section near the end - Camille and Tropic Snow have dedicated repotting pages when cultivar-specific aftercare differs.
Dieffenbachia Repotting: Quick Answer
Inspect Dieffenbachia every spring, but repot only when evidence supports it: roots densely fill the container, water no longer penetrates evenly, growth stalls through a warm season, or active rot demands immediate action. For routine upsizing, move one nursery size up (about 1 to 2 inches wider in diameter), use fresh airy aroid mix, and time non-urgent work for spring through early summer when room temperatures sit in the plant’s comfort range of roughly 65 to 84°F (18 to 29°C) per NC State Extension. Fast growers in small pots may need attention every 12 to 18 months; mature plants in large containers often go two to three years between full repots if the mix stays functional. Wear gloves - sap contains calcium oxalate crystals toxic to pets and irritating to skin.
Why Repotting Is a Root-Zone Decision, Not a Calendar Date
Repotting fixes problems in the root environment, not leaf cosmetics by themselves. Yellow lower leaves, drooping, and brown tips can stem from overwatering on Dieffenbachia, cold drafts, low light, or pests - and upsizing a suffering plant without diagnosing the cause often accelerates decline. Legitimate repot triggers are narrower: roots have consumed usable soil volume, the mix no longer drains or rewets evenly, salt or anaerobic conditions have built up, or active root disease requires removing contaminated media immediately.
For Dieffenbachia specifically, the decision is complicated by how fast these aroids grow relative to how slowly peat and coco coir break down indoors. A plant that looked perfectly happy eighteen months ago can be running on structural air pockets along the pot wall while the center compacts - water channels down the sides, roots in the middle stay dry, and the grower compensates with more water that never reaches the right zone. That pattern is functional congestion: the pot may not look “root-bound” from above, but the root zone no longer works.
What Healthy Dieffenbachia Roots Need Underground
Araceae roots depend on air pockets in loose, organic substrate - the same forest-floor conditions Missouri Botanical Garden summarizes as rich, well-drained, loamy soil in bright filtered light. When fine peat particles compress through repeated watering, oxygen around the lower roots drops even if the surface looks fine. Dieffenbachia tolerates a moderately snug pot better than a chronically wet one, but there is a threshold where congestion stops penetration and growth stalls despite reasonable watering and light. Repotting resets drainage, air, and room for new root tips - not simply a bigger decorative vessel.
Functional Congestion vs. Failed Media: How to Diagnose
Before you reach for a larger pot, decide which problem you are solving. Root congestion means the root mass has outgrown the usable soil volume - circling at the bottom, lifting the ball, water running through. Failed media means the mix itself has broken down - sour smell, salt crust, shrinkage from pot walls, or water that sits on the surface - even when roots still fit comfortably. Conflating the two leads to unnecessary oversizing: a plant whose roots fit but whose mix has collapsed often needs a same-pot refresh, not a jump to the next nursery size.
Treat repotting as a response to functional impairment, not cosmetic untidiness. Mild circling at the outer edge of an otherwise healthy ball may be acceptable if water still penetrates evenly, new leaves open at normal size, and the mix dries on a predictable rhythm. Move when congestion interferes with hydration, drainage, stability, or continued growth - or when the media has failed regardless of root density.
Decision Table: Repot Now, Top-Dress, or Wait
| Situation | Root mass | Media condition | Best action |
|---|---|---|---|
| Healthy growth, mix drains well, roots fit with air at edges | Comfortable | Good | Wait - inspect again next spring |
| Surface mix degraded, roots still fit, no circling mat | Fits | Failing top layer | Top-dress - replace top 1–2 inches without upsizing |
| Roots circle bottom, water runs through, growth stalled in warm season | Congested | May be OK or degraded | Full repot, one size up - spring preferred |
| Roots fit but mix sour, compacted, or salt-crusted throughout | Fits | Failed | Same-pot refresh - new mix, same diameter |
| Mushy roots, sour smell, soft stem base | Diseased | Contaminated | Emergency repot now - trim rot, possibly smaller pot |
Use this table at your annual spring inspection. If two or more “repot now” or “same-pot refresh” signals align, schedule the work in the next suitable window. For full mix recipes and long-term soil care, see the Dieffenbachia soil guide.
Signs Your Dieffenbachia Is Root-Bound
A root-bound Dieffenbachia is one whose roots have filled the container so thoroughly that the root system, not just visible stems, limits normal function. A single exploratory root at a drainage hole does not prove the pot is full - look for several independent signals: drainage-hole activity, water behavior, drying speed, growth rate, and what the ball looks like when you slide the plant out on a tarp.
The clearest evidence appears at removal time. A congested plant often exits as a solid, pot-shaped mass with roots circling densely at the bottom and sides, little loose mix visible, and a mat covering the drainage hole from underneath. Roots may push through openings or lift the ball so it sits higher than six months ago. In extreme cases the nursery pot bulges or cracks.
Above the soil line, a top-heavy specimen that wobbles despite firm stems can mean roots no longer anchor in depleted mix - though wobble alone is not proof of binding; a tall single cane in lightweight mix wobbles for other reasons too. Combine physical root evidence with watering behavior before committing to a larger pot.
Healthy Dieffenbachia roots are generally firm and pale cream to light tan, though media stains them brown. Soft, black, hollow, or foul-smelling roots indicate rot and change the procedure - you are treating disease, not simply upsizing. Texture and smell matter more than color alone.
Water Behavior and Growth Slowdown
Water behavior often reveals congestion before roots exit the pot. Irrigation may run straight through within seconds while the center stays dry - channels along pot walls mean remaining mix no longer holds water evenly. Conversely, the same congested ball can stay wet too long in dim rooms because little fresh, airy mix remains to balance moisture. Both patterns mean the root zone is not functioning as it did when newly potted.
Growth slowdown is a clue only after ruling out simpler causes. Dieffenbachia naturally slows in cooler, dimmer months. If new leaves stay smaller than older ones, internodes stretch, or the plant produces almost no growth through an entire warm season despite medium to bright indirect light and appropriate watering, inspect the roots. Clemson HGIC recommends repotting in early spring when needed, with root-bound signs including roots at drainage holes and water pouring through rather than absorbing.
Salt crust on the soil surface, a persistent need to water far more often than a year ago, or mix that has shrunk away from the pot wall also support a repot decision - sometimes into the same cleaned pot with fresh media rather than a larger one.
How Often Dieffenbachia Needs Repotting
There is no universal interval for every Dieffenbachia in every home. A young plant in a warm, bright room may outgrow its container in 12 to 18 months. A mature specimen in a large pot with stable conditions and well-structured mix may go two to three years between full repots if you refresh the top layer periodically and growth stays vigorous. UF/IFAS Gardening Solutions notes that dieffenbachias grow rapidly and may need repotting when they become root-bound - frequency follows growth rate and pot size, not a fixed anniversary.
A better rhythm is inspect annually, repot only when evidence supports it. Each spring, before the main flush of growth, check drainage-hole activity, note how quickly mix dries after a thorough watering, and compare new leaf size to last season. If the plant is healthy and mix still drains and rewets predictably, skip the full repot and consider top-dressing.
Full repotting - removing the plant, loosening outer roots, replacing most or all mix, and possibly moving to a larger pot - is warranted when multiple root-bound signs align or when media has clearly failed. Partial refresh in the same pot is warranted when roots fit but mix has compacted or become salt-laden. Emergency repotting for root rot can happen any time of year and may require a smaller pot after pruning damaged roots.
Same Pot Refresh vs. One Size Up
These are different interventions. Same-pot refresh solves failed media while roots still fit: clean the container, remove degraded mix from the perimeter, trim only dead tissue, backfill with fresh airy substrate, and return the plant at the same depth. One-size-up repotting solves congestion: the root mass needs modest new volume and fresh mix around an expanding system.
Choose same-pot refresh when the decision table points to failed media with comfortable roots, or when you have just pruned substantial rot and need less soil volume around a reduced root system. Choose one size up when circling roots, water-channeling, and stalled warm-season growth align - typically a jump of 1 to 2 inches (2.5 to 5 cm) in rim diameter per Penn State Extension guidance for houseplants generally.
Avoid doing both unnecessarily: refreshing mix in an already oversized pot does not fix the wet-ring problem that causes rot. If the current pot is disproportionately large for the root mass, a downgrade with fresh mix may be safer than adding more soil volume.
Best Timing: Spring and Early Summer
For a healthy Dieffenbachia that needs routine upsizing or soil refresh, spring through early summer is the safest window. Rising temperatures, longer days, and active shoot growth coincide with faster root regeneration. Fresh mix around the ball dries and is colonized more predictably when the plant transpires actively and room temperatures sit in Dieffenbachia’s comfort range. Scheduling here gives the widest recovery margin before fall’s lower light and cooler indoor conditions.
Choose a week when you can monitor moisture daily and keep the plant out of direct sun, cold AC drafts, and heat vents. Avoid stacking repotting with other major changes the same day - new window placement, aggressive grow lights, or heavy fertilizer all compete with root repair. Let the plant settle in familiar bright indirect light with stable warmth first.
Emergency and Winter Exceptions
Season matters less than urgency. If mix smells sour, stems soften at the base, or roots are actively rotting, waiting until spring gives pathogens more time to spread. Emergency repotting should happen as soon as you identify the problem, even in winter. Aftercare becomes more conservative: close-fitting pot, remove only diseased tissue, stable warmth, and sparing water because low winter light slows moisture use.
Non-urgent winter repotting is usually a mistake. A root-bound but otherwise healthy plant can often wait until early spring if drainage still works and the plant is not declining. If you must repot in winter - for example, because a newly purchased plant sits in sodden, compacted shop mix - keep expectations modest. Recovery may take longer, and hold fertilizer until new growth resumes. Top-dressing in fall is gentler than a full winter repot when the plant only needs refreshed surface mix.
Choosing the Right Pot Size and Material
The right pot balances root volume, drainage, stability under a heavy leaf canopy, and your watering habits. It should hold the existing root ball with a modest margin for fresh mix, drain freely through holes in the base, and stand firmly without burying the stem deeper to fake stability. Decorative cachepots work as outer vessels, but the inner pot must drain and must not sit in collected runoff.
Measure the current container’s inside diameter at the rim. For routine repotting, select a pot approximately 1 to 2 inches wider - typically one nursery size up. Depth should match root ball height plus about an inch of bottom mix. Ensure at least one clear drainage hole; multiple holes improve flow in wide pots.
Oversizing is the most damaging repotting mistake for Dieffenbachia. Jumping from a 6-inch to a 12-inch pot leaves roots in a small central zone while a thick ring of fresh mix stays wet for days - especially in low light or cool rooms. Extra soil volume without extra root capacity mainly increases overwatering risk. Light, warmth, healthy roots, and balanced nutrition drive growth; a large pot does not.
If you want a dramatically larger display pot for aesthetics, use a cachepot that holds a properly sized draining inner nursery pot rather than planting directly into a volume the roots cannot manage.
| Material | Moisture behavior | Best for |
|---|---|---|
| Plastic nursery | Retains moisture longer; flexible for inspection | Consistent indoor conditions, moderate waterers |
| Unglazed terracotta | Dries faster through walls | Heavy-handed waterers, humid homes |
| Glazed ceramic | Similar to plastic; adds weight for stability | Tall multi-stem specimens needing anchoring |
Hole quality and your moisture-checking discipline matter more than the label on the pot.
Worked Example: 6-Inch to 8-Inch Upgrade
Imagine a 6-inch nursery pot (roughly 15 cm inside diameter) holding a three-stem Dieffenbachia about 3 feet tall. You slide it out in March and find roots circling the bottom in a dense mat, little loose mix visible, and water that runs through in under ten seconds. New leaves have been noticeably smaller than six months ago. The correct move is an 8-inch pot (about 20 cm) - one standard nursery size up, not a 10- or 12-inch decorative bowl.
Add enough damp mix to the 8-inch pot so the crown sits at the same depth as before. Loosen outer circling roots gently so some point outward. Backfill with airy aroid mix (see below). After a thorough watering and full drain, the pot should feel heavier but not waterlogged. Over the next four to six weeks, watch for a new leaf unfurling at normal size for your cultivar - that is the clearest success signal. If only smaller leaves appear or wilting worsens after week two, inspect for buried stem tissue or rot in an accidentally oversized container.
Soil Mix for a Successful Repot
Dieffenbachia needs mix that holds steady moisture without staying saturated - the same principle as ongoing soil care. A practical repotting blend starts with quality indoor potting mix and adds coarse amendments for porosity: perlite, orchid bark, or both. A workable starting ratio is roughly three parts potting mix to one part perlite, adjusted upward in coarse material if your home is dim, cool, or humid, or if you tend to water before checking dryness.
Some growers prefer an explicit aroid-style blend - for example, two parts potting mix, one part orchid bark, one part perlite - which mimics airy forest-floor conditions. Coco coir-based mixes work when amended generously; neither coir nor peat should be used alone without structural bark or perlite because both compact and become difficult to rewet after severe drying.
Target substrate pH near 6.0 to 7.0; most commercial indoor mixes sit close enough. Do not use garden soil in containers: it is too dense indoors and may introduce pests or pathogens. Pre-moisten components until evenly damp but not dripping; dry peat can repel the first watering and leave channels along the root ball wall.
If repotting because of root rot, discard all old mix. For healthy routine repots, removing most degraded media from the outer ball is enough; you do not need to wash every particle away.
Tools, Safety, and Calcium Oxalate Precautions
Gather the new pot (or pots if dividing), fresh mix, gloves, clean sharp shears, a tray or tarp, a chopstick or blunt dowel for backfill, and optional mesh over drainage holes if fine mix escapes. Clean reused pots with soap and water; disinfect shears, especially after contact with diseased plants. Prepare all division pots before exposing roots - they dry and stress quickly when left bare.
Wear gloves and keep children and pets away. Dieffenbachia sap contains calcium oxalate crystals; the ASPCA lists Dieffenbachia species as toxic to cats and dogs, causing oral pain, drooling, vomiting, and swelling if chewed. Sap can irritate sensitive skin and eyes. Bag trimmed tissue, wipe surfaces after repotting, and wash hands even if you wore gloves.
Water the plant the day before repotting if old mix is dry and brittle, so the ball holds together and roots snap less. If mix is already saturated or you suspect rot, do not add more water. Skip fertilizer for at least a week before the move; hold feeding after repotting as well.
Step-by-Step Dieffenbachia Repotting
Match root disturbance to the goal: minimal teasing for healthy balls, perimeter refresh for failed media, or surgical removal for rot. Healthy Dieffenbachia does not benefit from aggressive bare-rooting or shredding every circling root.
- Cover the drainage hole with mesh if fine mix escapes.
- Add enough damp mix to the new pot to set the final planting height.
- Tip the Dieffenbachia out while supporting the base of the stems.
- Inspect the root ball exterior and bottom.
- Loosen only tightly circling outer roots; remove loose, degraded media.
- Set the plant at the same depth it previously grew.
- Backfill around the ball in stages, settling mix gently.
- Water based on root health and current moisture; drain completely.
Keep stems centered unless natural habit makes a slight offset more stable. Do not bury bare cane deeply to solve wobble - persistently wet stem tissue rots. Use a temporary stake if needed rather than packing mix hard around the base.
Tip the pot sideways, hold the plant near the soil line, and squeeze or tap the container. Never yank individual leaves. For rigid pots, run a blunt knife around the inner edge. If roots grow through drainage holes, tease them back gently or cut only what is necessary to release the plant.
Place the root ball so the crown sits at the same level as before. Fill side gaps with damp mix, working it in with fingers or a chopstick without stabbing roots. If the ball was moderately dry before repotting and roots are healthy, a thorough watering after backfill helps integrate media - then drain fully. If the ball was saturated or you removed substantial rotten roots, wait until the root zone approaches appropriate dryness before watering deeply. Empty saucers and cachepots so the plant never sits in runoff.
Dividing Multi-Stem Dieffenbachia at Repot Time
Division is the cleanest way to propagate a mature multi-stem Dieffenbachia when you already plan to remove it from its pot. Spring repotting aligns with the best recovery conditions. Single-stem, tall cane specimens rarely divide cleanly at the base; for those, stem cuttings or air layering are usually better routes. Compact, multi-stem cultivars and clumping plants with basal offshoots divide most readily.
Division makes sense when you want more plants, a smaller footprint per pot, or a bushier display without waiting years for one specimen to fill out. It also makes sense when several stems share one root mass but the overall container is becoming unmanageably large - splitting can replace one oversized repot with two appropriately sized ones. Skip division if the plant is stressed from pests, recent cold damage, or active rot until baseline health returns.
With the plant out of its pot, brush away enough outer mix to see natural separation points. Look for basal offshoots with their own stems and visible roots, or clusters of canes that pull apart with moderate resistance while each section retains a fair share of roots. Each division needs at least one healthy stem and a functional root system. Use sterilized shears to cut connecting rhizome tissue when sections do not pull apart cleanly. Pot divisions immediately; do not leave balls exposed longer than necessary.
Not every Dieffenbachia produces basal shoots equally. If yours has grown as a single cane for years with no offsets, forcing a mid-cane split at the root ball is high-risk. Repot intact and propagate through stem sections if you want additional specimens.
Pot each division into a container only slightly larger than its root system. Excess soil around a small division holds moisture newly separated roots cannot manage. Place divisions in bright indirect light, stable warmth, and optional humidity near 60% if your home is very dry - though typical indoor humidity is usually adequate if watering is conservative. Hold fertilizer for at least four weeks. New growth is the reliable recovery signal.
Aftercare and Recovery Timeline
Mild transplant shock - slight wilting, one or two yellowing lower leaves, or a brief pause in new growth - is normal for one to two weeks after repotting. Keep the plant in familiar bright indirect light, avoid direct sun on stressed leaves, and resist fertilizing or overwatering your way out of the slump. Extra nitrogen on damaged roots worsens stress; soggy mix on a reduced root system worsens rot.
Check moisture with your finger or a chopstick before each watering. Fresh mix around an intact ball may dry on a different schedule than old compacted mix did. Hold fertilizer for at least four weeks after routine repotting - longer after division or significant foliage loss. Resume feeding only when new leaves open at normal size and color for your cultivar.
Full root re-establishment typically takes four to six weeks in warm, bright conditions. Damaged old leaves will not revert to perfect form; watch new growth instead.
Troubleshooting: Shock vs. Rot vs. Oversize Pot
| Symptom pattern | Likely cause | What to do |
|---|---|---|
| Mild wilt, 1–2 yellow lower leaves, firm stems, stable for 10–14 days | Normal transplant shock | Stable light, check-before-water, no fertilizer |
| Worsening wilt past week 2, sour smell, soft stem base, wet mix | Root rot / overwatering | Unpot, trim mushy roots, repot smaller with fresh mix |
| Plant stable but no new growth 6+ weeks, mix stays wet in center | Oversized pot | Consider downsize with refresh; adjust watering |
| Crispy new leaf edges after repot | Too much direct sun or low humidity | Move to bright indirect; optional humidity for variegated cultivars |
If wilting progresses beyond two weeks, stems soften, or sour smell returns, slide the plant out again and inspect for rot or buried stem tissue rather than assuming patience alone will fix the problem.
Case Walkthrough: March Repot Recovery
A grower repots a congested 8-inch Dieffenbachia on March 12 into a 10-inch pot with fresh aroid mix. Days 1–3: slight leaf droop, no watering beyond what the ball already holds. Days 4–7: top inch of new mix dries; one thorough soak, full drain. Days 8–14: lower leaf yellows and is removed; crown firms. Days 15–21: small new leaf begins unfurling at normal width. Days 22–35: second new leaf opens; watering rhythm stabilizes to roughly every seven days in a bright east room. Week six: resume half-strength fertilizer. Success metric: new leaves match pre-repot size - not perfection of older damaged foliage.
Cultivar Guides: Camille vs. Tropic Snow vs. Genus Hub
Use this genus page when you grow an unlabeled Dieffenbachia, a mixed collection, or any cultivar where general dumb cane biology applies - functional congestion triage, one-size-up rule, multi-stem division, and cachepot strategy are shared across the genus.
Switch to a cultivar repotting page when variegation sensitivity, specific height expectations, or post-repot light placement differ:
- Dieffenbachia Camille repotting - compact, cream-centered leaves; slower recovery if light drops after repot; ideal for smaller pots and bushy multi-stem specimens.
- Dieffenbachia Tropic Snow repotting - silver-veined large leaves; taller indoor habit; post-repot light and humidity notes tuned to heavy variegation panels.
Both cultivar guides link back here for shared Araceae biology. For species context, toxicity, and year-round care baselines, start with the Dieffenbachia overview.
Conclusion
After repotting Dieffenbachia, run this post-repot checklist rather than revisiting every section above:
- Light and placement: Keep bright indirect light stable for two weeks; no direct sun on stressed leaves; see the light guide if you must move the plant.
- Watering: Check mix before every drink; fresh perimeter soil may dry faster or slower than the old ball - follow the pot, not the calendar.
- Fertilizer: Hold feeding at least four weeks; resume only when new leaves open at normal size.
- Shock vs. emergency: Mild wilt for 10–14 days is normal; worsening soft stems or sour smell means unpot and inspect for rot or oversizing.
- Success signal: New leaf size returning to pre-repot norms - usually within four to six weeks in spring conditions - confirms the root zone is working again.
How this guide was reviewed: Recommendations were checked against Clemson HGIC Dieffenbachia, Clemson HGIC Indoor Plants Repotting, Penn State Extension Repotting Houseplants, UF/IFAS Gardening Solutions Dieffenbachia, NC State Extension Dieffenbachia seguine, Missouri Botanical Garden Plant Finder, The Spruce Dieffenbachia growing guide, and ASPCA Dieffenbachia toxicity. Cross-linked with LeafyPixels soil, watering, light, propagation, and overview guides.
When to use this page vs other Dieffenbachia guides
- Dieffenbachia overview - Start here for whole-plant context before deep-diving this topic.
- Dieffenbachia problems hub - Jump to symptom-specific fix guides when this care topic does not resolve the issue.
- Root Rot on Dieffenbachia - Escalate here when repotting adjustments are not enough.