Brown Tips on Dieffenbachia Camille: Causes, Checks & Fixes
Quick answer
Brown tips on Dieffenbachia Camille usually trace to dry indoor air crisping the pale cream panels, fluoride and chloride in tap water building up over months, or a pot-bound root zone that stays wet. First step: pick up the pot and slide your finger a full inch into the mix at the pot edge. If that layer is still cool and damp, do not water; if it is dry and the plant sits near a vent or AC stream, relocation is the fastest single fix.
Brown Tips on Dieffenbachia Camille: Causes, Checks & Fixes
This guide covers brown tips on Dieffenbachia Camille. See also the general Brown Tips guide, watering, and light pages for this plant.
Brown Tips on Dieffenbachia Camille: Causes, Checks & Fixes
Quick answer
Dieffenbachia Camille (Dieffenbachia seguine ‘Camille’) is the compact, cream-centered dumb cane - short upright canes with broad cordate leaves whose pale cream or yellow-white center panels sit inside a narrow green margin. The whole plant is toxic to cats, dogs, and humans because every cut surface bleeds sap loaded with calcium oxalate raphides that cause intense oral and skin irritation. That morphology is the diagnostic lens for brown tips on this cultivar: the pale cream panels carry far less chlorophyll than the green margins, so any stress that hits the leaf edge - dry air, fluoride, salt, harsh sun - shows up first as crispy tan tissue inside the cream zone, often weeks before the green margin reacts.
First step: lift the pot and slide your finger a full inch into the mix at the pot edge. That single check separates the two opposite mistakes - watering a root-bound Camille that is already wet, or relocating a thirsty one and missing the real problem. If the inch-deep layer is cool and damp, hold the watering can and start checking placement and water source instead. If it is dry and the pot sits near a vent, radiator, or AC supply register, relocation is the fastest single move.
For general symptom mechanics that apply to any indoor foliage plant, see the genus brown tips hub or the Dieffenbachia brown tips guide if you grow multiple dumb cane cultivars. The rest of this page is about Camille specifically - the cultivar whose cream-and-green variegation, slow recovery, and cane habit change how you read every brown tip you see.
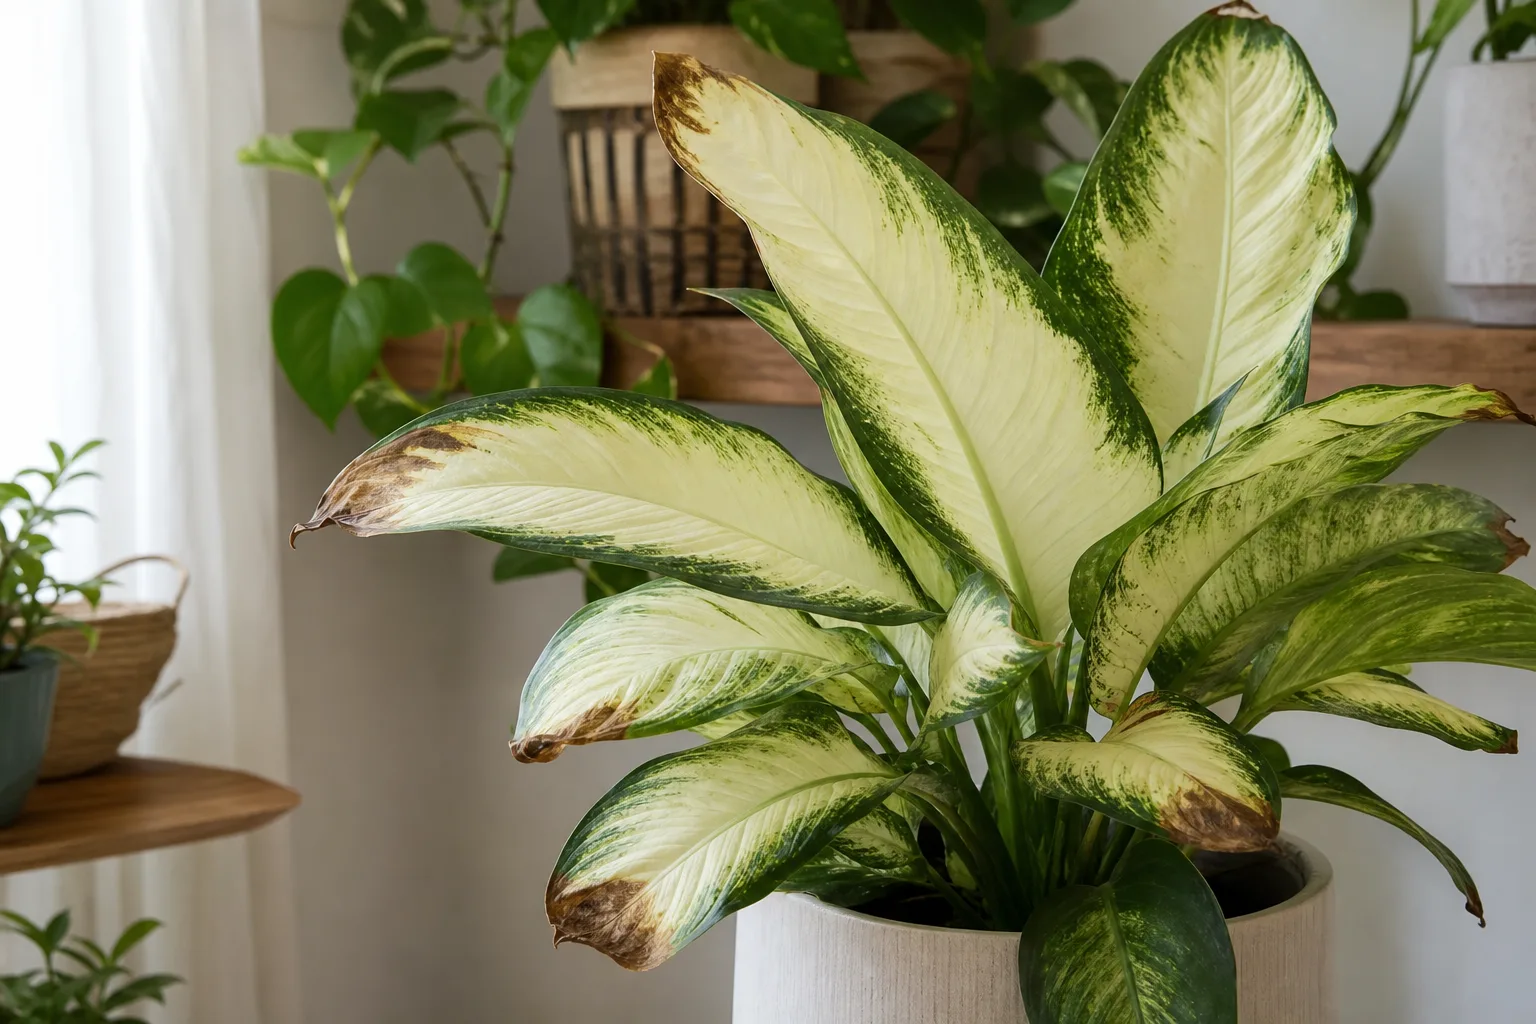
What brown tips look like on Dieffenbachia Camille
Camille carries broad, slightly cupped cordate leaves on short upright canes that rarely exceed 60 cm in interior conditions. Brown tips show up in patterns that match where the leaf was when the damage started.
Brown Tips symptoms on Dieffenbachia Camille - compare with healthy tissue on the same plant.
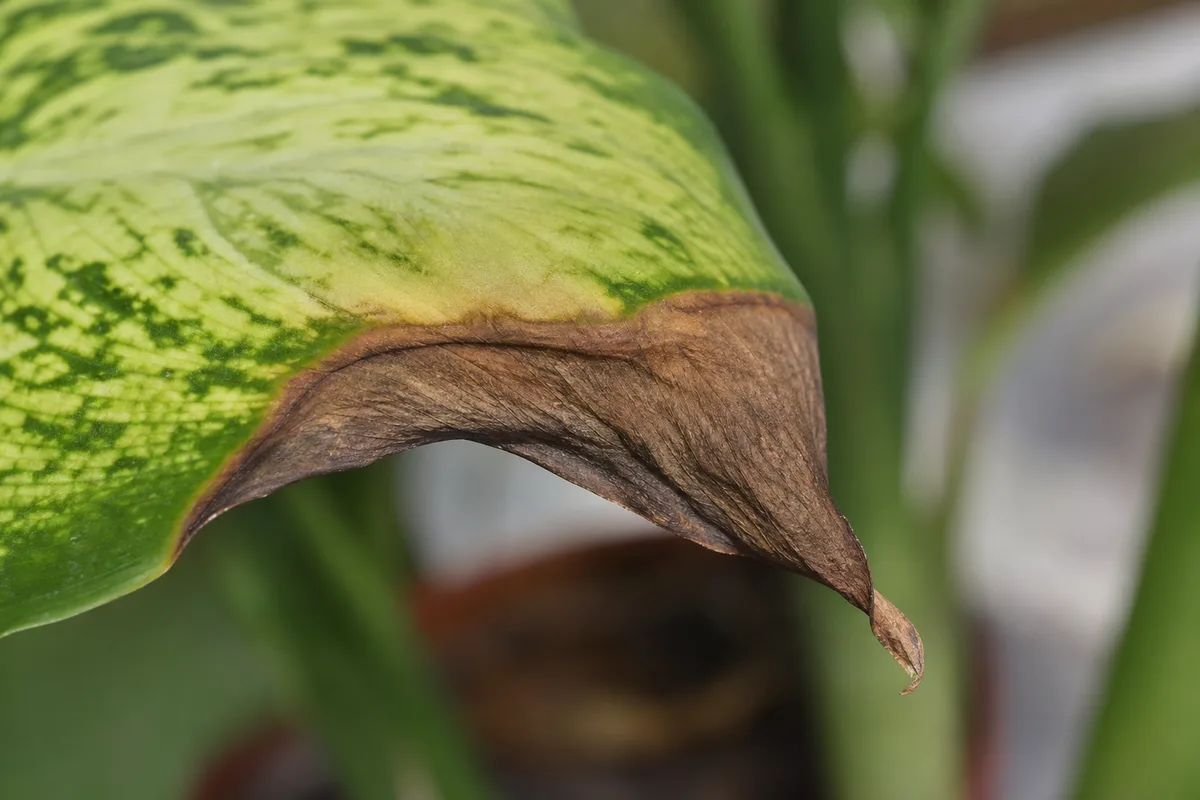
- Dry-air burn on cream panels - Oldest outer leaves develop dry, tan to light-brown crisping that runs along the cream center or stops at the leaf tip, while newer center leaves stay green with clean variegation. Tissue feels papery, never soft. The pot usually sits within a meter of a forced-air vent, a radiator, or a window where cold glass meets warm room air.
- Fluoride or chloride tip burn - Tips brown on newly unfurling center leaves within days of opening, sometimes with a narrow yellow halo between dead and live tissue. Damage is consistent across the cream and green zones, not concentrated in the pale area. Months of untreated municipal tap water or recent water-softener use are the usual setup. White crust on the soil rim or pot edge supports the diagnosis.
- Pot-bound or overwatered tip stress - Tips crisp while the mix stays wet and the pot feels heavy days after watering, and lower leaves may yellow, soften, or drop. Roots circling the drainage holes or pushing the rootball out of the pot mean the plant has run out of mix and oxygen, not water.
- Direct sun scorch on pale tissue - Camille needs bright filtered light to keep cream contrast, but unfiltered midday rays bleach and crisp cream panels faster than green margins. Bleached papery patches on the sun-facing half of the leaf differ from uniform dry tips on every leaf edge.
- Fertilizer salt buildup - White crust on the soil rim, leaf edges browning on multiple leaves at once, and damage that mimics fluoride but follows a recent feeding or repotting into a mix with starter fertilizer. Heavy feeding through fall and winter is a common trigger because dumb cane grows slowly in cool months and cannot use applied salts.
- Normal cosmetic aging - One or two oldest bottom leaves on the lowest cane section may show minor tip browning over months while the crown stays firm, variegation stays sharp, and new growth emerges clean. Low priority if watering, placement, and water source are already sound.
Worry when browning hits new center growth, spreads down most leaf margins at once, or pairs with a heavy pot and sour-smelling mix - not when a single old leaf near a winter vent shows a few millimeters of tan tip.
Why Dieffenbachia Camille gets brown tips
Cream variegation dehydrates faster than green tissue
Camille’s cream center panels contain much less chlorophyll than the surrounding green margin, and chlorophyll-poor tissue transpires water without the same photosynthetic payback. When indoor humidity drops or hot or cold airflow pulls moisture from the leaf surface, the cream zone is the first to dry - which is why brown patches show up inside pale panels while green margins still look fine. Many owners see brown inside the cream and assume the plant needs more water, then add water to a pot that is already wet. The fix is placement and humidity, not more irrigation.
This pattern differs from Aglaonema Silver Bay, where the silver splash sits on a tougher, broader lance-shaped leaf and the tips usually crisp from fluoride before humidity ever drops. Camille’s pale tissue is both larger and thinner, so dry-air damage shows up sooner and lower on the leaf.
Compact cane and slow recovery change the urgency
Camille is a compact, slow-growing cultivar - canes thicken over months rather than weeks, and a new leaf unfurls every few weeks in active growth, not every few days. That growth pace means a damaged tip stays visible on the plant for a long time. Brown tip tissue does not turn green again; it sits there waiting for the next leaf to cover it. Owners who repot, fertilize, prune, and switch water sources in the same week tend to push a slow recovery into a stalled one. Treat the first cause, then watch two new leaves before stacking remedies.
The same caveat does not apply to vigorous cultivars like ‘Tropic Snow’ or ‘Reflector’, which push new foliage quickly enough to mask minor tip damage. Camille hides nothing, which is why careful diagnosis matters more here.
Heating vents, AC drafts, and cold glass
Dumb cane prefers moderate to high humidity and stable room air, and Camille’s compact size means the pot is often staged on a side table close to bright windows - exactly the spots near supply registers, radiators, and cold single-pane glass. Leaf tips are the farthest point from the roots, so they lose moisture first when hot or cold airflow pulls water from tissue faster than the root zone can replace it. The cream center panel is even more exposed because it lies flat toward the light source.
Fluoride and chloride in tap water
Dumb cane is among the fluoride- and chloride-sensitive indoor foliage plants. Fluoride accumulates at the leaf tip and margin over months of regular watering, producing a clean tan edge that is easy to confuse with dry air. Resting tap water overnight releases chlorine but does almost nothing for fluoride; if your municipal supply adds fluoride, the only practical fixes are filtered, distilled, or rainwater. Chloride can show up from water-softener discharge and produces a similar pattern.
Camille makes this diagnosis easier than most dumb canes because the cream panel shows damage first - you see the fluoride arc against pale tissue instead of blending into a green leaf.
Salt buildup from feeding and mineral-laden water
Heavy feeding or skipping soil flushes concentrates salts in the root zone of a slow-growing plant that cannot use them. Excess soluble salts draw water out of root cells and burn leaf edges and tips, often alongside a white crust on the soil or pot rim. Because Camille grows slowly, even modest monthly feeding through fall and winter is enough to push salts past the threshold.
Pot-bound roots in a small pot
Camille is sold in small pots and rarely repotted because the compact habit suits a tabletop. After one to two years the rootball fills the container, water runs straight through the drainage holes without rewetting the mix, and the bottom half of the rootball stays soggy while the top dries fast. The result is the worst combination for tips: chronically wet lower roots and dry upper roots, with brown damage showing on both old and new leaves. Slide the plant partway out of the pot to check - if you see a tight ring of pale circling roots and very little loose mix, repot before changing water or fertilizer.
Overwatering impairs water delivery to leaf tips
When soil stays saturated, roots lose oxygen and stop moving water to the leaves efficiently. The plant cannot reach its own leaf margins even though the pot is wet, so tips crisp while the mix is still damp. This is the most expensive misdiagnosis on Camille because the obvious response - water more - deepens the root stress. Lift the pot before you water: a heavy pot days after watering is a stop signal, not a start signal.
Lookalike symptoms to rule out
Before you repot, switch water, or relocate the plant, compare what you see against these common Camille lookalikes.
| Pattern | Likely cause | Confirming check |
|---|---|---|
| Dry tan tips on cream margins, firm leaves, appropriate soil moisture | Dry air or fluoride | Check vent placement and new-leaf tipping pattern |
| Tips on new center leaves, possibly with white soil crust | Fluoride or salt burn | Water source history, recent feeding |
| Tips + heavy wet pot + yellow lower leaves | Pot-bound or overwatered roots | Lift the pot, slide rootball partway out |
| Bleached papery patches on the sun-facing side | Direct sun scorch | Note window exposure and afternoon light angle |
| Stippling, fine webbing, bronzing from leaf edges inward | Spider mites | See the spider mites guide |
| Soft brown patches, not dry tips, with halos | Fungal or bacterial leaf spot | Check leaf undersides for wet lesions |
| One or two yellow bottom leaves on firm cane | Natural lower-leaf aging | See the yellow leaves guide |
If tips are dry and papery, soil moisture and placement usually tell you which cause fits before you reach for fertilizer or new soil.
How to confirm the cause on Camille
Work through this inspection in order so you do not water a root-bound plant or relocate a thirsty one.
- Lift the pot - Heavy days after watering points to slow drainage or a pot-bound rootball. Light and bone-dry at the surface points to a missed watering cycle or a rootball that has shrunk away from the pot sides.
- Slide a finger a full inch into the mix at the pot edge - Cool and damp at that depth means pause watering. Dry and crumbly at that depth means the plant actually needs a drink. Surface dryness alone is not enough on Camille because the top crust dries faster than the inch below.
- Note which leaves are affected - Oldest bottom leaves only, with clean new growth, suggests dry air or aging. New center leaves tipping within days of unfurling suggests water source or salts. Most leaves at once, with a wet pot, suggests root stress.
- Check the cream panel under the damage - Bleached white patches on the sun-facing side of cream panels are scorch, not tip burn. Crispy tan inside a cream panel away from direct sun is dry air or fluoride.
- Look at the soil surface and pot rim - White crust or gritty deposits point to salt buildup from fertilizer or hard water.
- Review water and feeding history - Months of untreated tap water with recurring new-leaf tipping supports fluoride. Recent feeding during fall or winter supports salt buildup. Use the fertilizer guide if feeding history is unclear.
- Spot-check the rootball if lower leaves are yellowing - Slide the plant partway out. Firm pale roots support a placement-and-water-source fix. Mushy brown roots with sour smell confirm rot and need trimming before recovery. The root rot guide walks through that escalation.
- Confirm light exposure - Bright filtered light keeps cream contrast; direct rays bleach cream tissue; dim corners stretch petioles and slow water use so the pot stays wet.
The first fix to try on Dieffenbachia Camille
Move the pot away from any vent, radiator, or cold-glass draft, then re-check the inch-deep moisture before adding water.
That single change handles the most common misreads at once: treating dry-air damage with extra water on a wet pot, and leaving a compact Camille in airflow that keeps cream margins desiccating. Relocation does not require a new pot, fresh soil, fertilizer, or pruning - it is the cheapest and safest first move on this slow-recovering cultivar.
After placement and moisture check:
- If new leaves keep tipping within four to six weeks, switch to filtered or rested water and pause fertilizer until two consecutive new leaves emerge with clean margins.
- If white crust covers the soil or pot rim, plan a single plain-water flush during the next watering, on a separate day from any relocation.
- If the pot is heavy, the rootball fills the pot, and drainage is slow, plan a repot into fresh mix one size up rather than chasing symptoms with water or fertilizer.
Make this one correction first. Watch two new leaves on Camille before stacking any other remedy - this cultivar does not reward impatient troubleshooting.
Step-by-step recovery for Dieffenbachia Camille
Match follow-up steps to what the inspection confirmed. Each branch below assumes placement and inch-deep moisture have already been checked.
Dry air and drafts (oldest leaves only, new growth clean):
- Relocate Camille at least a meter from any supply register, radiator, or single-pane window.
- Aim for roughly 50 to 60 percent relative humidity in winter - a small humidifier near the plant works better than daily misting, which evaporates in minutes on cream tissue.
- Watch for two consecutive new leaves with clean cream margins before judging the fix successful.
Fluoride or chloride in tap water (new leaves tipping):
- Switch to filtered, distilled, or rainwater for at least four to six weeks.
- Pause fertilizer entirely until new growth emerges with clean margins.
- Trim old brown tips cosmetically along the natural leaf outline if you want. Wear gloves - Dieffenbachia sap irritates skin on contact and the plant is toxic to cats and dogs if chewed.
Salt buildup (white crust, multiple leaves browning):
- Water slowly with plain room-temperature water until it runs freely from the drainage holes - about two to three times the pot volume - to leach accumulated salts from the root zone.
- Let the pot drain fully and empty the saucer.
- Resume feeding at half strength only during spring and summer active growth; skip fertilizer through fall and winter on this slow cultivar.
Pot-bound or chronically wet roots (heavy pot, yellow lower leaves, slow dry-down):
- Lift the plant out of the pot and inspect the rootball.
- If roots circle tightly and most of the original mix is gone, tease the rootball apart gently and repot into fresh well-draining mix one pot size up.
- If roots are mushy and brown, trim back to firm pale tissue, dust cut surfaces with cinnamon, and repot into a clean pot with fresh mix. Hold watering for seven to ten days to let cut roots callus.
- Hold fertilizer for one full month after any repotting.
Direct sun scorch on cream panels:
- Move behind a sheer curtain or one to two meters back from south or west glass.
- Leave already-scorched panels in place - new growth from the crown will replace them in active months.
- Avoid cutting cream panels back into green tissue; cosmetic trimming should follow the leaf outline.
Recovery timeline on Dieffenbachia Camille
Camille is slower to replace damaged leaves than most dumb cane cultivars because variegated tissue photosynthesizes less efficiently than green tissue. Use this realistic timeline when judging whether a fix is working:
- Dry-air tip burn - New leaves usually emerge with clean margins within three to four weeks after placement improves. Old tipped leaves stay as they are or get trimmed cosmetically.
- Fluoride or chloride tip burn - Switching water source may take four to eight weeks before two consecutive new leaves show clean margins on the cream panel. Patience is part of the cure.
- Salt buildup - One thorough flush plus a fertilizer pause usually stops new damage within two weeks, with clean new growth following in three to five weeks.
- Pot-bound or overwatered tip stress - New leaves emerge crisp within three to five weeks after repotting or after the rootball starts drying on a normal rhythm.
- Advanced root rot - Recovery can take two months and may be partial. If the cane softens at the soil line or new leaves keep browning after repotting and a filtered-water switch, the plant may not be saveable.
Signs of improvement: new cream-and-green leaves with clean pointed tips, pot weight dropping on a normal rhythm, and browning that does not spread further down margins. Signs of worsening: sour smell from the pot, soft stems at the soil line, tipping on every new leaf despite filtered water and good placement, or soil that never dries between drinks.
What not to do on Dieffenbachia Camille
- Do not water a tipped plant on impulse because the tips look dry - if the inch-deep mix is still damp, you are pouring onto roots that already cannot breathe.
- Do not rely on misting as the only humidity fix for Camille. Misting evaporates in minutes and can leave droplets on cream panels that magnify light and worsen scorch. Move the pot, group with other tropicals, or run a small humidifier.
- Do not feed a stressed or tipped Camille to force new growth. Fertilizer salts on a slow, root-stressed plant usually deepen the same tip burn you are trying to fix.
- Do not repot on day one unless the rootball is mushy, the pot has no drainage, or roots are visibly circling and choking. Repotting a slightly root-bound plant into a much larger container keeps the mix wet for weeks.
- Do not trim brown tips back into green tissue. Follow the natural leaf shape and stop a hair inside the dead zone so the cut edge still looks pointed. Wear gloves whenever cut tissue is involved.
- Do not stack remedies on the same week - relocation, water-source change, fertilizer flush, repotting, and pruning all at once is how a slow cultivar ends up with stalled growth and a soft cane.
How to prevent brown tips on Dieffenbachia Camille
- Placement first - keep Camille at least a meter from supply registers, radiators, and cold glass; bright filtered light through a sheer curtain keeps cream contrast without scorching.
- Water on the inch-deep dry test - check the pot edge at full finger depth, not the surface crust; summer often means water every 7 to 10 days, winter every 14 to 21 days.
- Hold 50 to 60 percent humidity in dry heated rooms via humidifier, grouping with other tropicals, or a pebble tray kept below the pot base.
- Use filtered, distilled, or rainwater if new leaves keep tipping; most municipal tap water is fine if the cream panels stay clean.
- Feed lightly - balanced liquid fertilizer at half strength during spring and summer only; skip feeding through fall and winter on this slow cultivar.
- Flush salts occasionally with one thorough plain-water pass during active growth if you feed regularly.
- Repot every one to two years before the rootball fills the pot, ideally in spring or early summer when the plant can re-establish quickly.
When to worry on Dieffenbachia Camille
Treat brown tips as urgent when:
- Browning spreads from the tips down most leaf margins on many leaves at once.
- The soil smells sour or the cane feels soft at the soil line while cream margins crisp.
- New center growth tips brown within days of unfurling despite filtered water, good placement, and no recent feeding - inspect roots within the same week.
- The plant collapses while the pot stays moist - roots are no longer moving water.
A few tan tips on one or two oldest leaves near a winter vent on an otherwise stable Camille is cosmetic. Widespread margin browning with a heavy pot and wet mix is not - inspect the rootball promptly and pause any further remedies until you know what the roots look like.
Safety note: sap and toxicity when trimming brown tips
Dieffenbachia Camille contains calcium oxalate raphides in its sap. Wear gloves when trimming brown tips, removing damaged leaves, or handling any cut cane. Wash skin with soap and water if sap contacts you. The plant is toxic to cats and dogs if chewed, and the same compounds irritate human skin and mucous membranes. Bag trimmed foliage and keep it away from pets and children; do not compost Camille trimmings where animals can reach them.
Related Dieffenbachia Camille problems
- Overview - cultivar context and care baseline
- Watering - top-inch dry rhythm on cream-panel foliage
- Low humidity - dry-air margin burn on variegated panels
- Overwatering - wet-soil lookalike and root stress
- Underwatering - dry-soil lookalike and lightweight pots
- Yellow leaves - different symptom branch on the cane
- Genus brown tips hub - general Dieffenbachia guidance if you grow multiple cultivars
When to use this page vs other Dieffenbachia Camille guides
- Dieffenbachia Camille watering guide - Use first when you suspect a watering rhythm problem before treating brown tips as the main issue.
- Low humidity on Dieffenbachia Camille - Use when most damage shows up inside cream panels and new growth stays clean, which points to dry air over water quality.
- Overwatering on Dieffenbachia Camille - Use when the pot is heavy days after watering and lower leaves are yellowing alongside the tip burn.
- Underwatering on Dieffenbachia Camille - Use when the pot is light, the inch-deep mix is bone dry, and limp leaves accompany the crispy tips.
- Dieffenbachia Camille problems hub - Browse all 16 common issues on this species if the symptom pattern does not match a single page.
Related Dieffenbachia Camille guides
- Dieffenbachia Camille overview
- Dieffenbachia Camille watering
- Dieffenbachia Camille light
- Dieffenbachia Camille soil
- Low Humidity on Dieffenbachia Camille
- Overwatering on Dieffenbachia Camille
- Underwatering on Dieffenbachia Camille
- Yellow Leaves on Dieffenbachia Camille
- Dieffenbachia Camille problems