Curry Leaf Plant Repotting: When, How, and Mistakes to Avoid
Curry Leaf Plant Repotting: When, How, and Mistakes to Avoid
Curry Leaf Plant Repotting: When, How, and Mistakes to Avoid
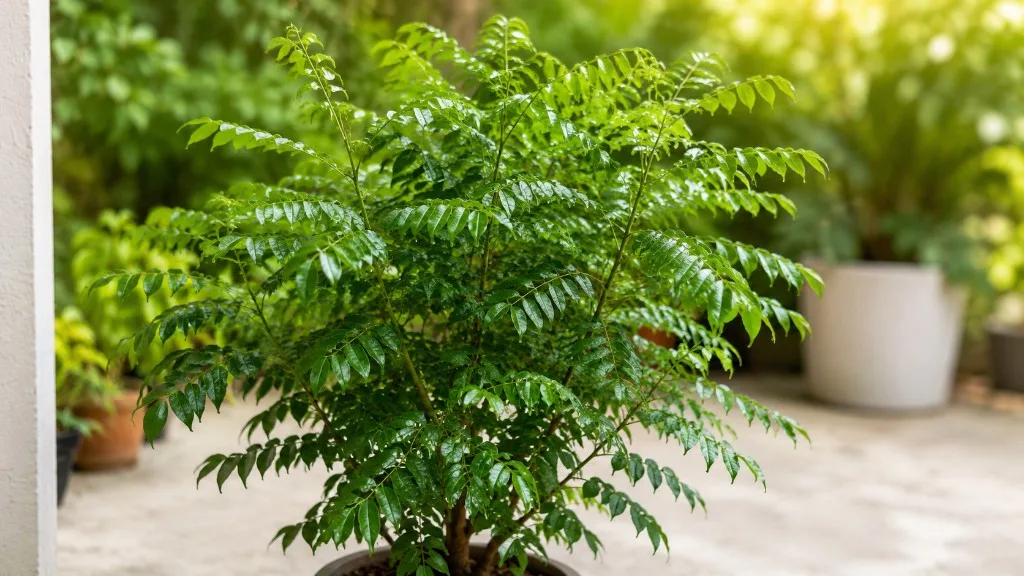
Curry leaf plant repotting is one of those tasks that sounds simple until you do it wrong - and then your Murraya koenigii sits wilted for three weeks while you wonder whether you killed it. The curry leaf tree (kadipatta, kadi patta, sweet neem - not true neem) is a tropical evergreen from the Indian subcontinent and Sri Lanka, valued for aromatic compound leaves used in South Indian and Southeast Asian cooking. In the ground it can reach 4–6 meters; in containers most home growers keep it at 60–120 cm through pruning and pot limits. That confined life changes everything about repotting: soil depletes faster, salts accumulate, and a taproot with sensitive fine root hairs has nowhere to go when the pot fills.
Unlike pothos or basil, Murraya koenigii punishes aggressive root washing. Logee’s notes that curry leaf thrives in well-drained mix in clay pots and that excess winter moisture promotes root disease - the same wet-foot sensitivity that makes repot technique matter. Most people grow this plant to harvest leaves, not to admire a static specimen. A root-bound curry leaf pushes fewer fresh shoots, and stressed leaves can lose aroma. Repotting at the right moment - paired with light pruning after recovery - often triggers the branching flush that makes the kitchen harvest worthwhile again. For species context and dormancy behavior, start with the curry leaf overview; this page covers when the root zone demands a move, how to execute it without bare-rooting, and what normal recovery looks like day by day.
Why Curry Leaf Repotting Is Different from Generic Houseplants
Repotting is not just about giving a plant more room. For a container curry leaf, it resets the root zone environment - soil structure, nutrient availability, drainage speed, and air pockets around fine root hairs. Over one to two years of watering and feeding, even good mix compacts, organic matter breaks down, and soluble salts build on soil particles and pot walls. The Missouri Botanical Garden notes that container-grown Murraya koenigii in non-tropical climates should be kept in bright light with soil allowed to dry between waterings (Missouri Botanical Garden - Murraya koenigii) - a rhythm that depends on mix that drains predictably. When mix breaks down, it holds water longer than these roots tolerate, and curry leaf plants are notably susceptible to root rot in persistently wet conditions. If rot is already present, see the root rot guide before routine repotting.
Taproot Depth and Sensitive Fine Roots
Curry leaf plants develop a strong central taproot alongside finer lateral roots. In habitat they grow in red sandy loam with fast drainage - Tamil Nadu Agricultural University identifies that soil type as ideal for leaf yield. In a pot, depth matters as much as width: shallow bowls force taproots into horizontal circling and uneven drying. Fine root hairs absorb water and nutrients; stripping them through bare-root washing sets recovery back weeks. The safe approach is a gentle upgrade with most of the original root ball intact - tease outer circling roots, trim only mushy tissue, and place the plant in fresh mix at the same soil line. Logee’s recommends well-drained potting mix and clay pots so roots stay healthy, and warns against keeping the plant too wet during winter rest when leaves may drop.
Container Life vs In-Ground Growth
UC Master Gardeners in Santa Clara County note that some gardeners find curry leaf grows more vigorously in the ground than in containers, though it can be grown indoors as a perennial evergreen to Zone 10 (UC Master Gardeners - Curry leaf). Container culture compresses the timeline: a nursery seedling may need upgrading within six months, while a mature balcony specimen may stay in the same pot with periodic soil refresh for years. The Royal Horticultural Society describes Bergera koenigii (syn. Murraya koenigii) as needing acidic to neutral, moisture-retentive but well-drained compost in full sun or partial shade (RHS - Bergera koenigii). Repotting is the moment to rebuild that compost structure rather than compensating for exhausted mix with more fertilizer - details on mix components live in the curry leaf soil guide.
When to Repot Murraya koenigii
How Often: Young vs Mature Plants
Young plants in active growth typically need repotting every one to two years. Mature plants kept at a fixed size may not need a larger pot - instead, refresh one-third to one-half of the soil in the same container every two to three years. Experienced cold-climate growers report repotting annually or biennially while the plant is still sizing up, then switching to same-pot soil refresh once height is stable. There is no universal calendar date; repot when the root zone or soil condition tells you to, during the plant’s active growth window. A healthy curry leaf in an appropriately sized pot with fresh mix may go two full growing seasons without intervention.
Seedling first upgrade: A rooted cutting or small nursery liner in a 10–12 cm pot often graduates to a 25–30 cm (10–12 inch) deep container within the first year once roots circle the plug and new leaf pairs appear regularly. That first move is the most important depth check - choose a pot at least as deep as it is wide so the taproot has vertical room. For propagation timing before that first pot, see the propagation guide.
Signs Your Plant Is Root-Bound
Root-binding happens gradually, and symptoms overlap with other care problems - which is why checking the root ball directly beats guessing from leaf color alone. Plan a repot when two or more of these signs appear together:
- Roots visible at drainage holes or pushing through the soil surface
- Water runs straight through within seconds, or the pot feels unusually light right after a thorough soak
- Soil dries much faster than it did a few months ago - often within 24 hours in warm weather
- Stunted new growth despite adequate light, correct watering, and feeding during the growing season
- White salt crust on the soil surface that returns quickly after flushing
- The plant wobbles because roots formed a dense mat with little soil between them
- Slow surface drainage - water sits on top because fine roots packed the mix into a tight block
To confirm, water lightly the day before, then tip the pot and slide the root ball out. Healthy roots are white or light tan and firm. A solid wall of circling roots, a bottom mat of tangled roots, or pencil-thick wraps confirm binding. If roots look healthy but mix is clearly degraded - compacted, sour-smelling, or mostly roots with little soil - repot for soil refresh even without holes blocked.
Do not repot solely because of yellow lower leaves or slow winter growth. Curry leaf naturally slows in cooler, shorter days and may drop foliage indoors. That is dormancy behavior, not necessarily a root problem. Repotting a semi-dormant plant in December adds stress without the growth hormones needed for quick recovery.
Best Season: India Pre-Monsoon vs Temperate Spring
Spring and early summer - roughly February through May in warm Indian climates, or when nighttime temperatures consistently stay above 10–15°C (50–59°F) in temperate regions - is the ideal window. During this period the plant enters active vegetative growth: new leaf pairs unfurl, roots produce white feeder tips, and minor root damage repairs quickly. Early spring, just before the strongest growth surge, is the sweet spot for tropical container plants including curry leaf.
In India and other tropical regions, the February–March window aligns with pre-monsoon active growth. In colder climates where the plant moves indoors for winter, repot after it returns to brighter conditions and shows new shoots - usually mid-spring - rather than immediately upon bringing it inside in fall. Avoid routine late-fall repotting unless the plant is in crisis; shortened days and cooler nights reduce root activity just when recovery needs it most.
Flowering and fruiting: Light repotting for soil refresh is acceptable while the plant blooms, but a full upsize during heavy flowering or fruit set diverts energy from root repair. If you can wait two weeks until bloom fades, recovery is faster. Emergency rot repot overrides seasonal preference - the alternative is plant loss.
Choosing Pot and Soil at Repot Time
Pot and soil choices set the watering rhythm for the next one to two years. Get either wrong and you will fight moisture problems regardless of how carefully you water.
One-Size-Up Rule with Worked Example
The safe rule: go up only one pot size - approximately 2–5 cm (1–2 inches) wider in diameter than the current container. An oversized pot holds moist soil the root system cannot use quickly; the center stays wet while edges dry, creating ideal conditions for root rot.
Worked example: Your curry leaf has filled a 20 cm (8 inch) diameter terracotta pot - roots circle the bottom, water exits in seconds, and new shoots stalled last summer despite good care. Move to a 22–25 cm (9–10 inch) pot with equal or greater depth, not a 30 cm bowl. Expect mild afternoon wilt for 7–14 days, new leaf pairs by weeks three to six in warm spring conditions, and normal harvest resumption after four to six weeks. If you jump to 30 cm, the same plant may sit wet in the center for ten days after each watering - watch for worsening wilt after week one, which points to rot rather than ordinary shock.
Every pot must have drainage holes. Cachepots and plugged holes trap runoff and recreate swampy conditions this species hates. If you use a decorative sleeve, lift the inner pot to water and drain, then return it only when dripping has stopped.
Pot Depth for Taproot Growth
Depth matters as much as width. Choose a pot at least as deep as it is wide - deeper is often better than wider alone. For a young plant graduating from a nursery container, 25–30 cm (10–12 inches) in both diameter and depth supports several years of growth. Shallow decorative bowls look attractive but force taproots into horizontal circling and dry unevenly - a common reason balcony growers report “it never fills out.”
Terracotta vs Plastic vs Grow Bags
| Material | Drying speed | Best for | Rot risk |
|---|---|---|---|
| Terracotta / unglazed clay | Fast - porous walls breathe | Humid climates, overwaterers | Lower if mix is well drained |
| Plastic | Slower - retains moisture | Hot dry balconies, frequent drought | Higher if pot is oversized or mix heavy |
| Fabric grow bags | Fastest - excellent aeration | Warm regions, strong summer sun | Low rot, but needs more frequent water checks |
Match material to your climate and watering habits, not shelf aesthetics. Logee’s specifically recommends clay pots for root health in container culture.
Soil Mix - See the Full Recipe
Do not repeat the full recipe here - the curry leaf soil guide covers 50-30-20 blends, Indian balcony ratios, pH targets (roughly 5.5–6.5), and drainage testing. At repot time, prepare fresh mix slightly moist - damp enough to hold together when squeezed, not dripping. The RHS specifies acidic to neutral, moisture-retentive but well-drained compost (RHS - Bergera koenigii). Align with TNAU’s sandy-loam drainage principle: water should enter quickly, drain within minutes, and leave the mix damp but not soggy an inch below the surface.
If tap water is very hard and alkaline, repotting is a good moment to flush old mineral buildup and start fresh; chronic high pH can lock up iron and show as yellowing between leaf veins on new growth. Do not use straight garden soil alone in a pot - it compacts in containers. Do not use pure peat or coir without amendment.
Tools and Step-by-Step Repotting
Gather everything before you touch the plant. Mid-repot searching for scissors lets exposed roots dry out.
You will need: a new pot one size up (or the same pot for refresh), scrubbed clean if reused; fresh mix prepared and slightly moistened; clean sharp scissors wiped with rubbing alcohol; a hand trowel or chopstick; newspaper or tarp; a watering can with a gentle rose. Water the plant lightly 24 hours before - cohesive root ball, not bone dry or waterlogged.
Inspecting Roots - No Bare-Rooting
Slide the plant out by tipping and supporting the main stem at the soil line - never yank by the trunk. If stuck, run a knife around the inner edge or squeeze flexible nursery pots. Tease, do not tear. Gently loosen circling roots on the bottom and outer edges with your fingers. Remove the bottom 1–2 cm of dense root mat only if it is entirely circling. Cut away roots that are brown, black, mushy, or smell sour.
Do not bare-root by washing all soil away. Keep most of the original root ball intact with soil clinging. The goal is to give outer roots a path into fresh mix, not to rebuild from zero - the approach Food Garden Life emphasizes when handling curry tree transplants: support the root ball and avoid unnecessary disturbance.
Place a 2–3 cm layer of fresh mix in the new pot. Set the root ball so the soil line stays at the same level on the stem - never bury the trunk deeper. Deep planting encourages stem rot. Fill around the sides, working mix in with a chopstick to eliminate large air pockets without compacting into concrete.
Settling, Watering, and Light Protection
The soil surface should sit 2–3 cm below the pot rim. Tap the pot gently to settle; do not press heavily with palms. First watering should be light to moderate - moisten until water exits drainage holes, then stop. Empty the saucer. Place the plant in bright indirect light for seven to ten days, even if it normally takes full sun. Direct sun on a freshly repotted root system increases transpiration while roots are not yet absorbing, worsening wilt.
Do not fertilize at repotting time. Hold off on harvesting large quantities of leaves for two to three weeks if you can. Light tip pinching after two weeks can encourage branching once turgor returns - see pruning for post-recovery shaping.
Aftercare and Transplant Shock Recovery
The first month is about stability, not pushing growth. After the initial protection week, gradually reintroduce normal light over five to seven days. Curry leaf wants full sun - six or more hours of direct light daily outdoors for best leaf production; indoors, the brightest south or west window available.
Water: Let the top 3–5 cm of mix dry before watering again - same rule as normal care, but check more frequently because new mix may dry on a different schedule. In the first two weeks, err slightly dry rather than wet. Root rot from kindness kills more repotted curry leaf plants than temporary wilt from underwatering on Curry Leaf Plant.
Fertilizer: Do not fertilize for four to six weeks. Fresh mix contains organic matter; damaged root tips cannot handle salts until they regenerate. Resume balanced liquid feed at half strength when new growth appears. Pause again in late fall and winter unless growing under strong supplemental lights with visible shoot growth.
How long does transplant shock last? Mild wilting or paused growth for one to two weeks is normal. Full root re-establishment takes four to six weeks in warm active growth. Cooler temperatures extend the timeline. Some outer leaves may yellow and drop; watch for new leaf pairs at stem tips instead.
Normal recovery pattern: Days 1–3: possible afternoon wilt that recovers by morning. Days 4–14: wilt decreases, moisture rhythm stabilizes. Weeks 3–6: fresh leaf pairs, firm stem tips. After six warm weeks: resume normal harvest, full sun, and feeding.
Abnormal signs beyond ordinary shock: sustained daily worsening wilt after week one; blackening at the soil line; sour smell; fungus gnats in large numbers within days; no new growth after six warm weeks. Those point to overwatering on Curry Leaf Plant in an oversized pot, buried stem, or hidden rot - follow the root rot rescue path rather than repeated rescue watering.
Repot vs Top-Dress vs Emergency Rot Repot
| Situation | Best action | Why |
|---|---|---|
| Young plant sizing up; roots circling; mix compacted | Full repot one size up | Needs space and fresh structure |
| Mature plant at target size; mix depleted but roots healthy | Same-pot refresh - remove one-third to one-half old soil, same container | Renews mix without forcing larger stature |
| Surface crust and salts only; roots healthy below | Top-dress - scrape top 2–3 cm, replace with fresh mix | Lightest disturbance |
| Mushy roots, sour smell, worsening wilt | Emergency rot repot - trim rot, smaller pot if needed | Delay risks plant death; any season |
Root pruning without upsizing is an advanced same-pot variant: slice off the bottom 2–5 cm of root mat, loosen sides, repot into the same container with fresh mix. Controls size aggressively - spring only, sharp clean tools, expect two to three weeks slower recovery than a gentle upsize.
Emergency rot repot requires removing all mushy roots back to firm tissue. Some growers dust cuts with cinnamon - this is folklore, not extension-backed for curry leaf specifically; air-drying cuts briefly is the safer documented approach. Repot into fresh mix in a pot sized to the remaining root mass - often smaller than before.
Common Repotting Mistakes
Jumping two or more pot sizes. Bigger is not faster - it is wetter soil around underdeveloped roots. One size up, every time.
Bare-rooting or aggressive root washing. Stripping fine root hairs destroys the absorption surface needed during recovery.
Fertilizing immediately. Salt burn on healing root tips shows as brown leaf margins within days. Wait four to six weeks minimum.
Heavy first watering and repeated rescue watering. Soggy new mix without active root uptake causes rot. Water once to settle, then let the top few centimeters dry.
Repotting into dry dust or waterlogged mud. Mix should be pre-moistened; root ball slightly moist before starting.
Burying the stem deeper. Crown tissue above the old soil line rots quickly underground.
Ignoring drainage holes or using heavy pure garden soil. Structural problems cannot be fixed by careful watering forever.
Repotting during peak winter dormancy for convenience. Wait for spring unless rot forces your hand.
Repotting a newly purchased plant on day one. Quarantine and learn the pot’s dry-down rhythm first - the overview recommends waiting unless mix is failing or pests are obvious.
Expecting instant new growth. Patience for four to six weeks is part of the process. Watch for new green tips, not old yellow leaves reverting.
Conclusion
Curry leaf plant repotting succeeds when you treat Murraya koenigii as a taproot-aware tropical tree in miniature, not as a disposable herb you can rip apart anytime. Repot every one to two years while young, move up only one pot size with excellent depth and drainage, use slightly acidic well-draining mix from the soil guide, and work during spring or early summer when roots are ready to grow. Handle the root ball gently, water lightly, protect from harsh sun for the first week, and hold fertilizer for at least a month. Mature plants can stay in the same pot with periodic soil refresh instead of endless upsizing.
Most failures come from oversized pots, overwatering fresh mix, and fertilizing too soon - fixable mistakes, not mysteries. Watch for new leaf pairs at stem tips four to six weeks after repotting; that is the signal your plant has accepted its new home and is ready for full sun, normal watering, harvest, and feeding again. When in doubt, wait until spring and repot once with care rather than repot twice in panic.
When to use this page vs other Curry Leaf Plant guides
- Curry Leaf Plant overview - Start here for whole-plant context before deep-diving this topic.
- Curry Leaf Plant problems hub - Jump to symptom-specific fix guides when this care topic does not resolve the issue.
- Root Rot on Curry Leaf Plant - Escalate here when repotting adjustments are not enough.