How to Propagate Curry Leaf Plant: Seeds, Cuttings, Suckers
How to Propagate Curry Leaf Plant: Seeds, Cuttings, Suckers
How to Propagate Curry Leaf Plant: Seeds, Cuttings, Suckers
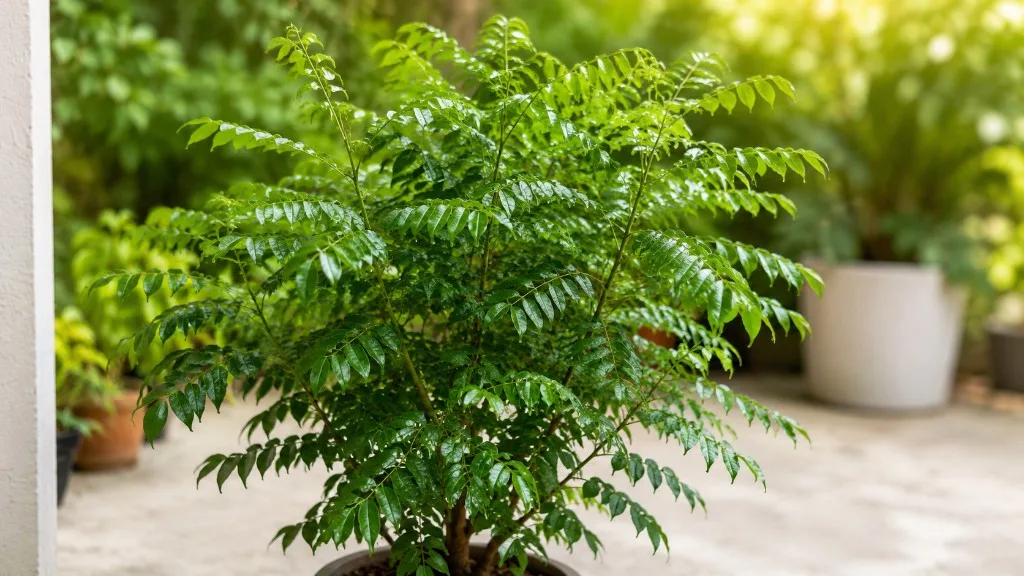
Murraya koenigii - the curry leaf plant, karipatta, kadi patta - is one of those herbs where propagation advice online is almost as confusing as the plant is rewarding in the kitchen. You will see videos of single leaves stuck in water, stems left to rot in soggy soil, and dried seeds from a spice shop that never sprout. None of that reflects how Curry Leaf Plant overview actually reproduces in gardens across India, Sri Lanka, and wherever diaspora growers keep a pot on a sunny balcony.
The honest answer is simpler and narrower than most pages admit. Curry leaf plant propagates reliably from root suckers, semi-hardwood stem cuttings, or fresh seeds taken from ripe black berries. It does not propagate from leaf cuttings - a detached leaf without an attached node cannot produce roots or shoots, no matter how long it sits in water. Once you match the method to the plant’s growth habit and your setup, propagation stops feeling like a lottery and starts behaving like ordinary gardening.
Why propagation method matters for Murraya koenigii
Curry leaf plant is a small evergreen tree or large shrub in the Rutaceae family - the same family as citrus - native to the Indian subcontinent and Sri Lanka. In the ground it can reach several metres; in pots it is usually kept to roughly 60–120 cm through pruning and harvest cuts. That tree-like architecture matters because propagation is not about coaxing any piece of green tissue to root. It is about giving a new plant enough living stem tissue with nodes, or an existing root system, or a viable embryo inside a fresh seed, to restart growth on its own timetable.
The Missouri Botanical Garden lists propagation by seed or root suckers - which explains why suckers work so well. Established curry leaf trees spread laterally through roots and send up shoots from the base. Those shoots already have roots - or partial roots - before you touch them. Semi-hardwood cuttings work because they carry multiple nodes where adventitious roots and new shoots can form, but only if humidity, warmth, and often rooting hormone align. Seeds work because the plant self-seeds freely in warm climates, though germination is slow and viability drops fast once the berry dries.
Choosing the wrong method wastes months. A leaf in a jar looks active while it is actually just dehydrating. A soft green tip cutting wilts before it roots. A woody old branch sits inert for a season. Matching method to material is the first practical skill, and it saves more plants than any product label.
Three reliable ways to propagate curry leaf plant
Every legitimate home or nursery propagation route for Murraya koenigii falls into one of three categories. Each has a different balance of speed, difficulty, and equipment needs. None of them involves rooting a leaf alone.
Root suckers - fastest and most dependable
Root suckers are shoots that emerge from the base of the parent plant or from lateral roots near the surface. On an established curry leaf tree - especially one planted in ground or a large tub - suckers appear regularly. Because they are already connected to the parent’s root system, separating a sucker with a portion of root attached gives you a small plant that skips the most fragile phase of propagation entirely.
Commercial growers in India often prefer suckers for this reason. Survival rates above 90% are commonly reported when suckers are detached during the rainy season and replanted promptly with roots intact. For a home cook who wants harvestable leaves within months rather than a year, suckers are usually the best first attempt.
The trade-off is availability. You need a mature parent plant producing basal shoots. A young nursery specimen in a small pot may not have suckers yet. In that case you move to cuttings or seeds.
Semi-hardwood stem cuttings - possible but demanding
Semi-hardwood stem cuttings are the middle ground between soft new growth and fully woody branches. The stem is firm enough to hold its shape but still capable of forming roots at the nodes. Select pencil-thick material roughly 10–15 cm long with three or four nodes, treat the base with rooting hormone, and root in a well-drained medium under high humidity.
This method works - research trials at Tamil Nadu Agricultural University report roughly 53–60% rooting success for four-node cuttings treated with IBA rooting hormone under controlled mist conditions - but it is harder in an average home without a humidity tent or consistent warmth. Many Indian home-garden guides note that cuttings fail without misting setups; that is not a myth about the species being impossible to root, but a fair warning about how unforgiving the process is without humidity control.
Cuttings also produce a genetic clone of the parent, which matters if you have a prized flavourful cultivar. Suckers clone the parent too. Seeds do not.
Fresh seeds from ripe berries - slow but useful at scale
Curry leaf plants produce clusters of small white flowers in warm weather, followed by black berries. Each berry contains a seed that must be fresh (UC Master Gardeners note seed propagation can be difficult and germination erratic) - extracted from a fully ripe fruit, pulp removed, and sown quickly. Dried seeds sold for culinary use or old shrivelled berries from the ground usually will not germinate because viability collapses once the seed dries.
Seed propagation is the slowest route. Germination often takes two to four weeks in warm, moist conditions, and seedlings may need a year or more before they resemble a productive shrub. Growers who want many plants cheaply, or who enjoy the process, still use seeds. Everyone else should treat seeds as a backup when suckers and cuttings are unavailable.
What does NOT work: leaf cuttings and other common myths
You cannot propagate curry leaf plant from a leaf cutting. The Missouri Botanical Garden lists only seed and root suckers as propagation methods. A single leaf - even a healthy one with a short petiole - lacks the axillary bud and node tissue required to initiate roots and shoots. It may stay green for weeks in water, which creates the illusion of success, but it will not become a plant. The same limitation applies to most woody herbs and trees; curry leaf is not an exception.
Other approaches that routinely disappoint include:
- Water propagation of leafless woody sticks with no leaves left to photosynthesise and no humidity control - the stem rots before rooting.
- Soft tip cuttings taken from the very newest growth - too tender, wilts faster than it roots.
- Hardwood cuttings from old grey stems - low metabolic activity; research shows hardwood can root with high IBA concentrations in mist chambers, but home success without equipment is poor.
- Dried or store-bought seeds - culinary dried curry leaves are leaves, not seeds; even actual seeds from packets are often non-viable.
- Immediate Curry Leaf Plant repotting guide and fertilising of a freshly separated sucker or newly rooted cutting - roots need time to stabilise before heavy feeding.
If someone shows you a “curry leaf propagation” video that starts with plucking a single leaf, you can stop watching. The valid starting materials are a sucker with roots, a semi-hardwood stem with nodes, or a fresh seed.
Comparing propagation methods at a glance
| Method | Difficulty | Typical timeline to established plant | Success rate (home conditions) | Best for |
|---|---|---|---|---|
| Root suckers | Easy | 2–4 months to active growth; harvestable shoots in 6–8 months | High (80–90%+) when roots stay intact | Fastest home propagation; cloning a known plant |
| Semi-hardwood cuttings | Moderate to hard | Roots in 3–6 weeks; full establishment 6–10+ months | Low to moderate without humidity tent; higher with hormone + tent | When no suckers available; cloning preferred cultivar |
| Fresh seeds | Moderate | Germination 2–4 weeks; sapling stage 8–14+ months | Moderate with fresh seed; near zero with dried seed | Raising many plants; no parent plant needed |
This table is a decision tool, not a guarantee. Warmth, light, and a healthy parent matter more than any row in a chart.
Best timing for curry leaf propagation
Timing is less about memorising a calendar date and more about recognising when Murraya koenigii is actively growing. The plant slows in cool, short-day seasons and accelerates when temperatures sit roughly between 18°C and 38°C with strong light. Propagation taken during active growth roots faster because cell division and hormone transport are already running.
Avoid propagating immediately after shipping, repotting stress, pest outbreaks, or visible root rot on Curry Leaf Plant on the parent. Fix the parent first, or take material only from clean, vigorous sections.
In most climates, late spring through summer is the primary propagation window. Longer days and warmer nights support sucker establishment, cutting root initiation, and seed germination alike. In temperate regions where the plant lives indoors for winter, wait until it is back on a sunny windowsill or patio and pushing visible new leaves before you cut or divide. If you propagate in dim, cool conditions, every method slows - cuttings sit unchanged for weeks, suckers stall, and seeds mould before they sprout.
For growers in India, early monsoon (often June–July) is traditionally favoured for sucker separation. Soil moisture is naturally higher, transpiration stress is lower, and separated suckers establish before the post-monsoon growth flush. Dig carefully around a basal shoot, retain as much root as possible, pot or transplant immediately, and shade lightly for the first week while new root hairs form. Container growers elsewhere can follow the same logic whenever their local warm rainy season arrives - high humidity plus warmth, not flooding and waterlogged pots.
How to choose the right method for your situation
Start with a simple decision tree grounded in what you actually have in front of you.
If your mature curry leaf plant is producing basal shoots, propagate by sucker division first. It is faster, more forgiving, and does not require rooting hormone or plastic bags. If you have a healthy parent but no suckers, take semi-hardwood stem cuttings during active growth and commit to a humidity tent and rooting hormone - half measures here produce the “curry leaf won’t root” reputation this plant unfairly carries. If you have neither a parent plant nor access to cuttings, source fresh ripe berries or a fresh seed from a known plant and sow immediately.
Also consider your goal. Need a kitchen-ready plant this season? Suckers. Want ten seedlings for a hedge next year? Seeds. Trying to duplicate a specific aromatic cultivar? Suckers or cuttings - seeds may not come true to type if the parent was a selected clone.
Container growers in apartments should default to suckers or cuttings in pots rather than expecting ground-style spread. In-ground gardeners must remember that unchecked suckers can become invasive over time; propagation and containment are two sides of the same biological coin.
Step-by-step: propagating curry leaf from root suckers
Sucker propagation is the method most home cooks should try first when a parent plant is available. The plant does much of the work before you intervene.
Separating, potting, and first-month aftercare
Choose a healthy basal shoot 15–30 cm tall with its own leaves - not the main central trunk unless you are deliberately coppicing an old tree. In early monsoon or during warm active growth, water the parent the day before so soil clings to roots. Use a clean sharp spade or knife to cut between the sucker and the parent, keeping as much root mass as possible on the sucker side. If the shoot is still loosely attached by a thin runner, sever it cleanly rather than tearing. Shake off excess soil only enough to inspect roots. Trim broken root tips if they are mangled, but do not bare-root aggressively. If no suckers exist yet, switch to cuttings or wait until the parent is larger.
Plant the sucker in a pot one size larger than its root ball, using well-draining mix - cocopeat, sand, and compost in roughly equal parts works well. Position the plant at the same depth it grew before; burying the crown too deep invites stem rot. Water thoroughly once, then let the top few centimetres dry before watering again. Place in Curry Leaf Plant light guide for the first week, then move gradually to full sun - six or more hours of direct light daily once acclimated. Avoid fertiliser for four to six weeks until you see new tip growth. New firm leaves within two to four weeks under warm conditions mean success.
Step-by-step: propagating curry leaf from semi-hardwood cuttings
When suckers are unavailable, semi-hardwood stem cuttings are the correct cutting type - not soft tips, not leaves, not fully hardened old wood unless you have mist-chamber equipment.
Selecting, trimming, and preparing cuttings
Early morning is a good time to take material, when stems are fully hydrated. Select a semi-hardwood branch - firm when bent, neither floppy nor grey and brittle. Cut a segment 10–15 cm long with three or four nodes. Make a clean cut just below the lowest node at a slight angle, and just above the top node.
Remove the lower two-thirds of leaves so buried nodes are bare. Trim remaining upper leaves by half to reduce transpiration - a standard technique in Indian nursery practice for curry leaf cuttings. Each remaining node above the soil line is a potential shoot point; each buried node is a potential root point.
Have your pot ready before you cut. Delay increases wilting.
Rooting hormone, humidity tent, and rooting timeline
Fill a small pot with a light, sterile rooting mix - peat or cocopeat blended with perlite or sand. Pre-moisten until evenly damp, not dripping. Dip the bottom 2 cm of the cutting in rooting hormone powder or liquid IBA; research on Murraya koenigii shows auxin treatment materially improves rooting percentage compared with untreated controls.
Insert the cutting so the lowest node sits 2–3 cm above the bottom of the pot - not pressed against the drainage hole where water stagnates. Firm the mix around the stem. Do not water again immediately if the medium is already moist; extra saturation is the main cause of blackened stems.
Enclose the pot in a clear plastic bag or humidity dome, inflated so leaves do not touch wet plastic, and place in warm bright shade - not direct midday sun, which cooks the tent. Open the bag briefly every few days to exchange air and prevent mould. Rooting often begins in three to six weeks when conditions are warm; tug gently after five weeks to feel resistance.
Once roots hold the mix and new buds swell, crack the tent open for a week, then remove it. Move to brighter light progressively. Treat the young plant like a fragile sucker for the first month - controlled water, no fertiliser yet, full sun only after acclimation.
Step-by-step: growing curry leaf plant from seed
Seed propagation rewards patience and punishes old seed. Treat it as a science experiment with fresh material, not a spice-rack shortcut.
Collect fully ripe black berries directly from a flowering curry leaf plant. Soak berries overnight, remove the pulp, and rinse the seed. Sow immediately - within days, not weeks - 1–2 cm deep in moist cocopeat-sand mix. Cover lightly, mist, and keep at 24–30°C in bright indirect light. Germination commonly appears in 15–25 days, though some seeds take longer.
Keep seedlings evenly moist but never waterlogged. Thin or transplant when the first true leaves develop, handling by the seedling leaves rather than the delicate stem. Seedlings grow slowly compared with suckers; expect months before they resemble a bushy kitchen plant. Fertilise lightly only after several sets of true leaves, using a diluted balanced feed similar to what you would use for citrus.
If nothing sprouts after six weeks with fresh seed, viability was likely poor or conditions too cool. Retry with new berries rather than assuming dormancy - curry leaf seeds are not long-lived in storage.
Germination timeline and seedling aftercare
Expect the first seedling loop to move slowly - that is normal for Murraya koenigii, not a sign you did something wrong. Cotyledons usually appear within two to four weeks when seed is fresh and soil temperature stays above roughly 24°C. The plant then pauses while it builds a taproot, which is why the above-ground growth looks stalled for another few weeks even when roots are active below.
Once true leaves develop, move seedlings into individual pots before roots spiral in the seed tray. Use the same well-draining mix you would for an adult plant, and place pots where they receive increasing direct sun over ten days. Seedlings tolerate less drought than mature plants; water when the top centimetre dries, but never leave them sitting in a saucer of water. A diluted balanced fertiliser at quarter strength can begin after the third or fourth leaf pair, applied monthly until the plant fills a 15–20 cm pot.
Signs your propagation is working - or failing
Working: new bud swell at nodes, firm stem base when gently tugged, fresh lighter-green leaves on suckers, white root tips visible at drainage holes, seed cotyledons lifting cleanly without mould.
Failing: black mushy stem base, sour-smelling medium, leaves shrivelling while soil stays wet, cutting green but soft with no bud movement for eight weeks, sucker wilting entirely despite moist soil - often root loss during separation.
Rotting cuttings need discarding early; trying to rescue a mushy stem spreads fungal problems to the parent. For suckers that wilt, shade more aggressively, reduce watering, and verify roots were not left behind on the parent. For seeds that mould, improve airflow and sow thinner.
Success is measured by new firm growth, not by how long a cutting stayed green. A leaf that stays green without a node never counts as progress.
Common fixes before you start over
Many failures are fixable for a week or two before the tissue is lost. Cuttings with slight wilt but firm stems often need more humidity, not more water in the mix - reseal the tent and move out of direct sun. Suckers that flag after division usually need shade and less watering while roots re-anchor; mist leaves in the morning if air is dry. Seeds with surface mould need better airflow and slightly drier surface conditions - scrape away mouldy crust, vent the cover daily, and avoid over-misting.
When the stem base turns black and soft, or a sucker collapses completely with no firm tissue, discard the material and sanitise the pot before retrying. Propagation succeeds faster when you restart with clean material than when you nurse rotting tissue for another month.
Conclusion
Murraya koenigii gives home growers three legitimate propagation paths - root suckers, semi-hardwood stem cuttings, and fresh seeds from ripe berries - and one persistent myth to ignore. Leaf cuttings, water jars with detached leaves, and dried seeds look like shortcuts because they are easy to start, but they rarely produce a plant worth keeping.
If you have a mature parent, separate a sucker with roots during warm, humid weather and you will likely have a productive clone within a season. If suckers are not an option, take semi-hardwood stems with multiple nodes, use rooting hormone, and commit to a humidity tent until roots hold. If you are starting from scratch, sow fresh seeds and accept the slower timeline.
Match the method to the material, propagate during active growth, keep humidity and drainage in balance, and hold off on fertiliser until new shoots prove the roots are working. Get those pieces right and curry leaf propagation stops being a frustrating experiment and becomes a reliable way to stock your kitchen garden - whether that garden is a balcony pot in Melbourne or a monsoon-fed yard in Chennai.
When to use this page vs other Curry Leaf Plant guides
- Curry Leaf Plant overview - Start here for whole-plant context before deep-diving this topic.
- Curry Leaf Plant problems hub - Jump to symptom-specific fix guides when this care topic does not resolve the issue.