Aluminum Plant (Pilea cadierei) Propagation: Stem Cuttings
Aluminum Plant (Pilea cadierei) Propagation: Stem Cuttings in Water and Soil
Aluminum Plant (Pilea cadierei) Propagation: Stem Cuttings in Water and Soil
Aluminum plant is the kind of houseplant that quietly teaches beginners how propagation works. A clean cut just below a node, a glass of water or a moist pot of mix, Aluminum Plant light guide, and a little patience is almost always enough. Pilea cadierei roots quickly from stem-tip cuttings - frequently in one to two weeks in water and two to four weeks in a moist, well-draining medium - which is why the Missouri Botanical Garden notes that it “propagates easily by stem tip cuttings in spring or summer” and that many growers simply replace the mother plant each year with newly rooted cuttings.
This guide covers the two methods that actually work at home - water propagation and soil or perlite propagation - using healthy, non-flowering stem-tip cuttings. You’ll find a clear walkthrough of how to identify a node, when to take the cutting, how to keep the humidity right without inviting rot, and what to do once roots are long enough to pot up. Sources are cited inline so you can check the timing and conditions against Missouri Botanical Garden, the North Carolina State Extension, the University of Florida IFAS, and the Royal Horticultural Society.
If symptoms persist, see the Leggy Growth on Aluminum Plant guide.
Why aluminum plant is one of the easiest houseplants to propagate
A quick look at the plant you’re multiplying
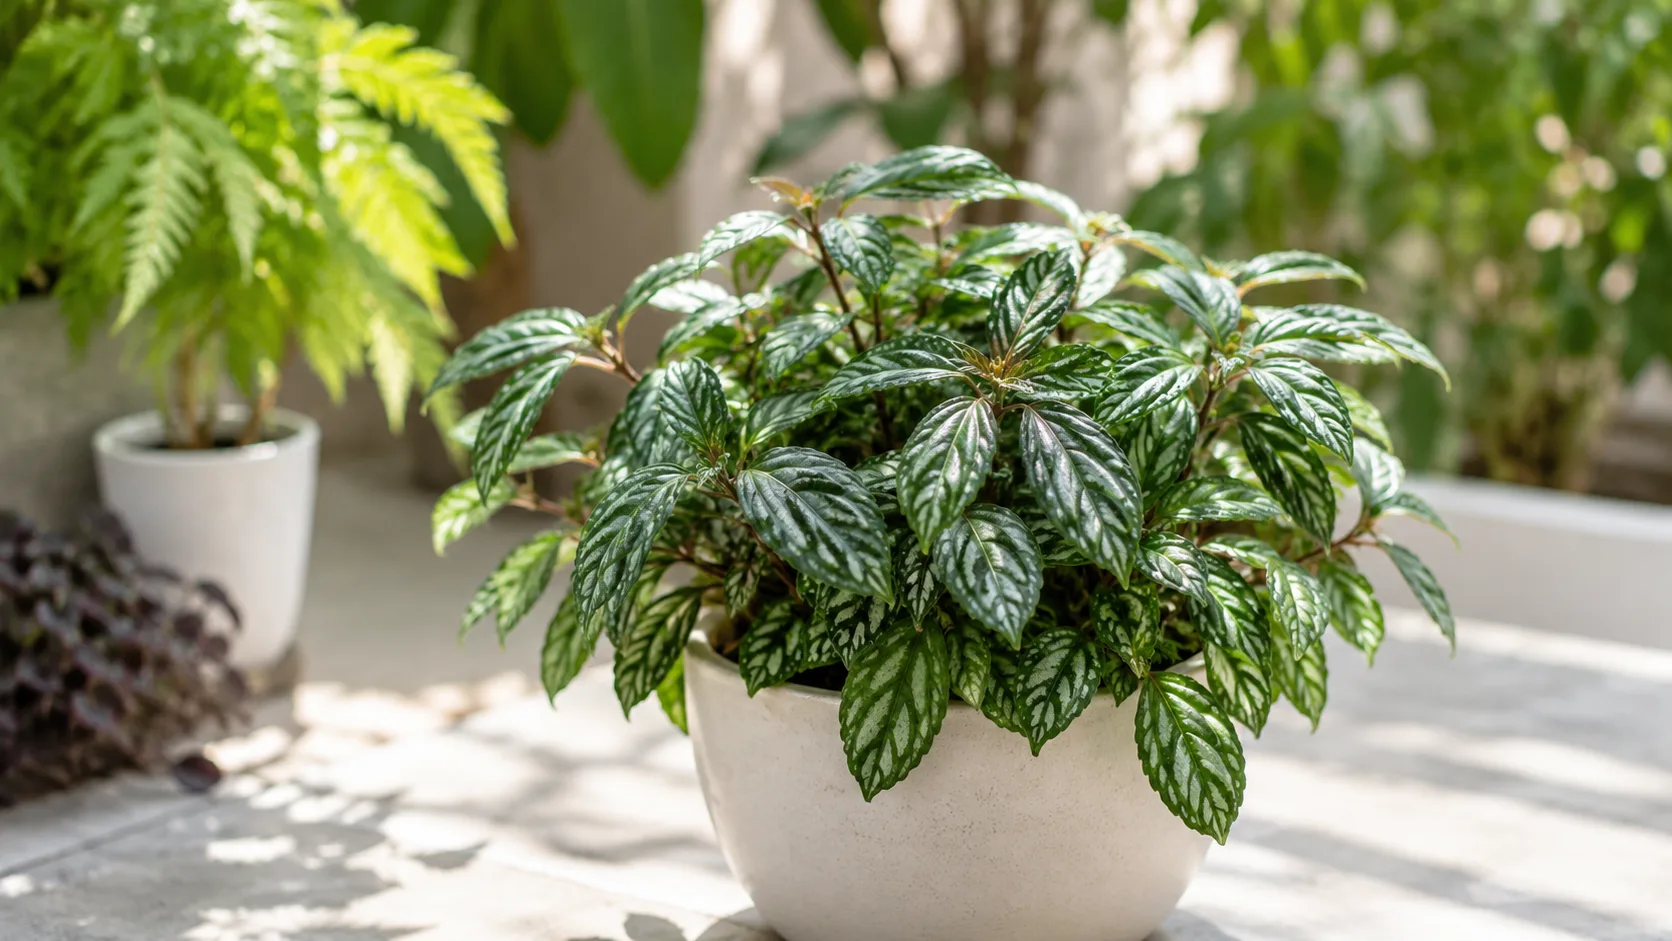
Aluminum plant is an upright, herbaceous perennial in the nettle family (Urticaceae), native to Vietnam and the southern Chinese provinces of Guizhou and Yunnan. It earned the Royal Horticultural Society’s Award of Garden Merit, and indoors it usually grows into a shrubby clump nine to twelve inches tall with elliptical, slightly toothed leaves marked with four rows of raised silver patches - the “aluminum” look that gives the plant its common name. The species epithet cadierei honors the twentieth-century French botanist R.P. Cadière.
Two things matter for propagation. First, the plant’s leaves are arranged in opposite pairs on square green stems, which means the nodes - the small bumps where leaves and side shoots emerge - are easy to find. Second, mature stems become somewhat woody at the base and the plant naturally gets leggy with age, so taking cuttings is a normal part of long-term care, not a rescue mission. The University of Florida IFAS Extension even notes that “unrooted stems can be stuck into the ground and will root if kept moist in a shaded location” - a strong hint at how readily Aluminum Plant overview roots.
Why cuttings work so well on Pilea cadierei
Cuttings work because every healthy node on a Pilea cadierei stem contains dormant tissue that can switch from producing leaves to producing roots when given the right signals: moisture, warmth, and a little light. There are no seeds to germinate, no grafting to perform, and no special hormones required. The Royal Horticultural Society recommends taking “softwood stem-tip cuttings in spring and summer” and inserting them into a “gritty, free-draining, peat-free compost” while maintaining high humidity until well-rooted. The North Carolina State Extension Gardener Plant Toolbox makes the same point more directly: the plant’s “recommended propagation strategy” is stem cutting.
If you’ve ever struggled to root a woodier tropical like a fiddle-leaf fig, you’ll notice the difference immediately. Pilea cadierei is a soft, fast-growing herbaceous plant, and its cuttings behave like the easy tropicals they are.
What is a node, and why it matters more than anything else
If you remember only one thing from this article, make it this: roots form at nodes, not from open stem tissue. A cutting with no node, no matter how long, will sit in water until it rots. A short cutting with a healthy node will often root in days. This is the single most common reason a Pilea propagation fails.
How to identify a node on an aluminum plant stem
A node is the point on a stem where leaves, side branches, or aerial roots can emerge. On aluminum plant, nodes are easy to see: they are the slightly swollen rings on the square green stem where each opposite pair of leaves attaches. The smooth internodal section between two leaves cannot produce roots on its own. Gardeners Path recommends cutting “an eighth of an inch below a pair of leaves to stimulate root growth below the leaf node,” and Houseplant 101 specifies that a cutting should include at least two to three leaf nodes for the highest success rate.
When you look at a healthy Pilea stem, you should be able to run your finger along it and feel the small bump where each leaf meets the stem. That’s the node. If in doubt, aim to include at least two nodes on your cutting - one to root, one as a backup.
What a leaf without a node can and cannot do
A single aluminum plant leaf with a short piece of stem, taken from between two nodes, will not produce a new plant. It may stay green in water for weeks, and it may even produce a few small white roots from the cut end, but those roots cannot support a new shoot. Without a node, there is no meristematic tissue programmed to become a new stem. Cafe Planta puts it bluntly: “While you can try, it’s generally more successful to propagate from a stem cutting. Leaves alone often don’t have the necessary nodes to develop into a full plant.”
This is why the so-called “leaf-bud cutting” technique matters - it includes a node, plus a small piece of stem and ideally a single leaf. We’ll cover that in detail further down.
Best time of year to take aluminum plant cuttings
Spring and early summer are best. The Missouri Botanical Garden recommends “stem tip cuttings in spring or summer,” and the North Carolina State Extension notes that “the best foliage is on new plants” - implying that growers refresh the plant each year by taking cuttings in early spring. The Royal Horticultural Society gives the same window for the closely related Pilea involucrata: take softwood stem-tip cuttings in spring and summer.
The reason is simple physiology. During active growth, the plant’s internal hormone balance - high auxins, high cytokinins, abundant stored carbohydrates - is set up to make new roots quickly. The same cutting taken in midwinter, when light levels and temperatures drop, can sit for six to eight weeks without rooting and is much more likely to rot in cool, wet conditions. Grow and Care notes that the plant “can be propagated the year round” only when indoor temperatures are held between 20 and 27°C (68–81°F), which is rarely true of an unheated room in January.
If you must propagate in fall or winter, expect the lower half of the timing range: 2–4 weeks for water roots, 3–6 weeks for soil roots. Use a heat mat or place the cutting above (not on) a warm appliance to keep the medium around 21–24°C.
Choosing the right stem: healthy, non-flowering, actively growing
The stem you cut decides most of your outcome. You want a stem-tip cutting that is:
- Healthy and disease-free. No yellowing leaves, no black spots, no powdery mildew, no webs, no soft sections. Cafe Planta recommends avoiding “stems with yellowing leaves or those that appear wilted, as they may not have the strength needed to root successfully.”
- Non-flowering. Aluminum plant produces small, greenish, insignificant flowers in summer (NC State). A flowering stem is diverting energy into reproduction rather than vegetative growth, and removing the flower spike along with the cutting helps the cutting focus on rooting.
- Actively growing. Look for a tip with new, partially unfurled leaves at the top. Stems that have stopped pushing new growth - older, woodier, lower sections - root more slowly and are more likely to fail.
- The right length and node count. Aim for a 3- to 6-inch cutting (10–15 cm) with at least two, preferably three, leaf nodes. Houseplant 101 specifies “at least two sets of leaves,” Gardeners Path recommends 3 inches as a minimum, and Gardenia recommends 4 to 6 inches for the most reliable rooting.
A good test: if the tip has at least two pairs of fully expanded leaves and one or two emerging leaves, it’s a candidate. If the tip is still tightly furled and barely a centimeter long, give it another week on the mother plant.
Tools, water, and medium: getting the setup right
You don’t need a lot of equipment, but a few small choices meaningfully improve success.
Clean tools and a clean container
Wipe your pruning shears or scissors with rubbing alcohol or a 10 percent bleach solution (one part bleach to nine parts water), then rinse and dry. Gardeners Path recommends sanitizing any reused propagation container the same way, then rinsing thoroughly. Clean tools keep bacteria from being introduced into the cut, which is the single most common cause of stem rot in propagation.
Water quality for propagation
Tap water is generally fine. If your municipal water is heavily chlorinated, fill the propagation glass a few hours ahead and let it sit out so the chlorine off-gases. Filtered or rainwater also works, but Pilea cadierei is not as sensitive to minerals as, say, Calathea or Maranta. The most important water rule is the next one: change it.
A reliable soil or perlite mix for cuttings
For soil propagation, use a mix that stays evenly moist but never waterlogged. The most widely recommended blend is roughly 50/50 peat-based potting mix and perlite, or two parts standard indoor potting soil to one part perlite (Houseplant 101; Norcal Perlite). For cuttings, finer-textured perlite works better than coarse “hydroponic” perlite because it holds a little more moisture around the stem. The mix should feel like a wrung-out sponge: damp, but not dripping when you squeeze a handful.
How to propagate aluminum plant in water (step by step)
Water propagation is the easiest method to learn, and it’s the one most beginners use first. You can see the roots form, which doubles as a built-in progress check.
- Take the cutting. Choose a healthy, non-flowering stem tip 3 to 6 inches long with at least two nodes. Using clean, sharp shears, make a straight cut about an eighth of an inch below the lowest node you intend to root.
- Strip the lower leaves. Remove the leaves from the bottom half of the cutting so that at least 1 to 2 inches of bare stem is exposed. Any leaf left below the waterline will rot and contaminate the glass. Leave the top two to three pairs of leaves intact to keep the cutting photosynthesizing.
- Optional: rooting hormone. Dip the cut end in powdered rooting hormone. This step is optional - Pilea cadierei roots readily without it - but it can shave a few days off the wait, especially in cooler conditions.
- Place in a clean glass of room-temperature water. Use a clear glass so you can watch root development. Make sure the lowest node is fully submerged, and that no leaf touches the water.
- Set in bright, indirect light. A north- or east-facing windowsill, or a spot a few feet back from a south-facing window, is ideal. Direct sun will cook the cutting and encourage algae in the glass.
- Change the water every 2 to 3 days. Fresh water means oxygen for the developing roots and fewer bacteria. If the water turns cloudy or smells off, change it immediately and rinse the glass.
- Wait 7 to 14 days for visible roots. Most healthy cuttings push white root nubs within a week and reach 1 to 2 inches of root length by weeks two to three.
- Pot up when roots are 1 to 2 inches long. See the potting-up section below.
Day-by-day care for water cuttings
For the first three days, check the glass each morning for cloudiness and make sure no leaf has slumped into the water. From day four onward, change the water every two to three days. Don’t fertilize the water; cuttings have no roots to take up nutrients yet, and unused fertilizer feeds bacteria. Don’t move the cutting around - every reposition delays rooting slightly because the plant has to reorient hormone flow. If a leaf yellows, leave it alone until it comes off cleanly; pulling it early can damage the node.
How to propagate aluminum plant in soil or perlite (step by step)
Soil propagation produces roots that are already adapted to soil, which means less transplant shock when the cutting is potted up. It’s a slightly more advanced technique, but for Pilea cadierei it’s still very forgiving.
- Pre-moisten the mix. Combine two parts peat-based potting soil with one part perlite (or use a 50/50 peat-and-perlite blend). Add water and mix until the medium is evenly damp but not soggy - the wrung-out-sponge test.
- Fill a small pot (2 to 4 inches) with drainage holes. A standard nursery pot works. Avoid starting in a large container; small cuttings in big pots stay wet for too long.
- Take and prepare the cutting exactly as for water propagation - 3 to 6 inches long, cut just below a node, lower leaves removed, top leaves intact. Optionally dip the cut end in rooting hormone.
- Make a hole with a pencil or your finger and insert the cutting to a depth of about 1 inch, or until at least one node is buried. Firm the medium gently around the stem so it stands upright.
- Water once to settle the medium, then let excess drain.
- Build a humidity tent. Place a clear plastic bag over the pot, supported by small sticks or the pot’s rim so the plastic does not touch the leaves. Leave a small opening on one side for airflow. Alternatively, use a propagation dome or the top half of a clear plastic bottle.
- Place in bright, indirect light at 21–24°C (70–75°F). A heat mat set low is helpful in cool rooms.
- Air the tent daily for 5 to 10 minutes to refresh the air and prevent fungal growth.
- Keep the medium consistently moist - never dry, never soaking. Water lightly whenever the surface feels just barely dry.
- Wait 2 to 4 weeks. Tug the cutting very gently after three weeks; resistance means roots have formed. New leaf growth is an even more reliable sign.
Building a humidity tent without trapping rot
The most common mistake with humidity tents is sealing the cutting in still, wet air. Condensation on the inside of the bag, plus a soggy medium, plus no airflow, equals stem rot within a week. Two simple rules solve this. First, never let the plastic touch the leaves - moisture trapped against a leaf surface causes spotting and rot. Second, vent daily. Pull the bag off for five to ten minutes, shake out any heavy condensation, and replace it loosely. If you see persistent droplets inside the bag, the tent is too wet; open it more often or use a slightly drier medium.
Leaf-bud and single-node cuttings: when they’re worth trying
If you have limited material - say, a single long stem that’s already been pruned - you can divide it into single-node “leaf-bud” cuttings, each consisting of one node, one leaf (or one pair), and a short piece of stem above and below. This is the same technique used for difficult-to-root plants, and it works on Pilea cadierei, though success rates are lower than for 3- to 6-inch stem-tip cuttings.
The Healthy Houseplants guide notes that Pilea cadierei can be propagated from “a healthy stem with at least 2-3 leaf nodes,” and Cafe Planta confirms single-node cuttings will root, just more slowly. Place each single-node cutting so that the node is submerged in water or buried just below the surface of the moist mix, with the leaf sitting above the medium. Cover with a humidity tent and treat exactly like a longer cutting.
A pure single leaf with no node and no axillary bud will not produce a new plant. It may push a few thin roots, but it has no meristematic tissue from which a new stem can grow. If you see a guide online claiming otherwise, it is confusing rooting with growing.
How long until roots appear, and what healthy roots look like
In water, healthy aluminum plant cuttings usually push their first visible white root nubs within 7 to 14 days, and reach the 1- to 2-inch length needed for potting up by 14 to 21 days. The Houseplant 101 timing of “7 to 14 days” for water is the most-cited figure in the houseplant community, and the Grow and Care data of “3 to 5 weeks at 20 to 27°C” is at the slower end, reflecting cooler indoor conditions.
In soil or perlite, expect 2 to 4 weeks for visible signs - usually a small new leaf pushing from the top of the cutting, or a slight resistance when you gently tug the stem. Roots in soil are not directly visible, so don’t dig to check; you risk breaking the new roots.
Healthy roots are creamy white, firm, and slightly fuzzy at the tips (those are the actively growing root hairs). Brown, black, slimy, or stringy roots are rotting and should be trimmed back to clean white tissue before re-rooting in fresh water or mix.
Potting up a rooted cutting without shocking it
Transplant shock is real, but it’s easy to minimize. Once water roots are 1 to 2 inches long, or soil cuttings show new leaf growth, it’s time to pot up.
- Choose a small pot. A 3- to 4-inch pot with drainage holes is plenty for one cutting. Two or three cuttings in the same 4-inch pot will produce a bushier plant faster.
- Use a peat-based, well-draining potting mix. The same blend the mother plant enjoys - roughly two parts standard potting soil to one part perlite - works perfectly. Avoid cactus mix; it’s too dry for aluminum plant.
- Plant at the same depth the cutting was at in water. Don’t bury the stem deeper than it was before; the new roots are not adapted to deep, low-oxygen soil.
- Water thoroughly until it drains from the bottom, then let the top half-inch of soil dry before watering again.
- Keep the new plant in slightly higher humidity for the first 1 to 2 weeks. A loose plastic bag for a few days, or simply placing it near other humidity-loving plants, eases the transition from water to soil.
- Hold off on fertilizer for 4 to 6 weeks. Fresh roots are sensitive; fertilizer can burn them. After the cutting has pushed a new set of leaves, begin a half-strength balanced liquid feed once a month during the growing season.
Aftercare for a new aluminum plant
For the first month, treat the new plant as a delicate version of its mother:
- Light: bright, indirect. An east- or north-facing window is ideal. Direct sun scorches the soft new leaves.
- Water: keep the soil lightly and evenly moist. The top half-inch can dry out, but don’t let the whole pot go bone-dry. Aluminum plant wilts dramatically when thirsty and recovers quickly once watered, but repeated wilting stunts growth.
- Humidity: aluminum plant prefers 50% relative humidity or higher, which is higher than the average home in winter (Houseplant 101; Healthy Houseplants). A small humidifier, a pebble tray with water beneath the pot, or grouping with other tropicals will all work.
- Temperature: 60–75°F (16–24°C). Avoid cold drafts from windows in winter and hot, dry air from heating vents.
- Fertilizer: none for the first month, then a diluted balanced houseplant feed once a month in spring and summer. Skip feeding in fall and winter.
- Pinch the tips once the new plant has at least three sets of leaves. Pinching just above a node encourages two new side shoots to break, which is how you turn a single cutting into a bushy plant.
Water propagation vs. soil propagation: honest comparison
Both methods work, but they have different trade-offs. Use the table below to pick the one that suits your situation.
| Factor | Water propagation | Soil / perlite propagation |
|---|---|---|
| Time to first roots | 7–14 days | 14–28 days |
| Time to ready-for-potting | 14–21 days | 21–35 days |
| Visibility of progress | High - you can see roots | Low - judge by new leaves or gentle tug |
| Risk of stem rot | Moderate (if water is not changed) | Moderate to high (if medium stays wet) |
| Transplant shock | Higher (water roots must adapt to soil) | Lower (roots are already in soil) |
| Best for | Beginners, gifts, “show me the roots” satisfaction | More experienced propagators, larger batches |
| Materials needed | Glass, water, optional hormone | Pot, mix, humidity tent, optional hormone |
| Success rate on Pilea cadierei | Very high | Very high |
If you’re just starting out, water propagation is more forgiving and more satisfying. If you’re after speed-to-establishment and want to skip the transplant-shock step, go straight to a moist 50/50 peat-and-perlite mix under a humidity tent.
Common problems and how to fix them
Mushy stems, sour water, and rot
A mushy, blackened, or foul-smelling stem is the most common propagation failure. The causes are almost always:
- Dirty tools or container introducing bacteria into the cut.
- Leaves submerged in water rotting and contaminating the glass.
- Water not changed often enough, running out of oxygen and growing bacteria.
- Soil or perlite mix kept too wet, starving the stem of oxygen.
Fix: cut the stem back to clean, firm, white-green tissue just above the next healthy node. Sterilize your shears between cuts. Re-root in fresh water (changed every two days) or in a fresh, only lightly moist mix. Use a humidity tent with daily ventilation if going the soil route.
Cuttings that wilt, yellow, or never root
Wilting and yellowing usually mean the cutting is losing water faster than it can absorb it. Common culprits:
- Too much direct sun cooking the cutting.
- Too low humidity for the soil/perlite method.
- Old, woody, or flowering stem with low rooting vigor.
- Cutting taken in winter when the plant is semi-dormant.
Fix: move to bright, indirect light, raise humidity with a loose plastic bag, and consider taking a fresh cutting from younger growth in spring. Cuttings that have not rooted after six to eight weeks under proper conditions are usually not going to - start again with a healthier stem.
Refreshing a leggy mother plant with new cuttings
Aluminum plant has a tendency to get leggy as it ages - older stems stretch, lower leaves drop, and the base of the plant thins out. This is normal. The Missouri Botanical Garden notes that “the best foliage is on new plants” and that “some gardeners replace plants each year by taking cuttings for new plants in early spring.” Epic Gardening and Level Up Garden both recommend the same approach: once a mother plant starts looking tired, take a round of fresh cuttings and start new, bushier plants to replace it.
The simplest routine is to take three to five healthy stem-tip cuttings in early spring, root them in water or moist mix, and pot them together into a 4- to 6-inch container once rooted. Three or four rooted cuttings in the same pot quickly fill out into a fuller, more compact plant than a single rooted stem - a small but worthwhile trick for that “just-bought-it” look.
It’s also worth knowing that aluminum plant is non-toxic to cats, dogs, and horses (Level Up Garden, citing the ASPCA), so any cuttings that don’t make it aren’t a hazard to curious pets.
Conclusion
Propagating Pilea cadierei is a high-success, low-drama project once you understand the one rule that matters most: the cutting must include a node. Choose a healthy, non-flowering stem tip 3 to 6 inches long with at least two nodes, cut just below the lowest node with clean shears, strip the lower leaves, and root in either a glass of water (changed every 2–3 days) or a moist 50/50 peat-and-perlite mix under a humidity tent. Bright, indirect light, temperatures of 21–24°C, and humidity around 50% give the fastest, most reliable results. Roots typically appear in 1 to 2 weeks in water and 2 to 4 weeks in soil; pot up when water roots reach 1 to 2 inches, hold off on fertilizer for the first month, and pinch the tips to encourage a bushy shape. Done this way, a single mother plant can supply a steady stream of fresh, vigorous aluminum plants for the price of a pair of clean scissors and a little patience.
When to use this page vs other Aluminum Plant guides
- Aluminum Plant overview - Start here for whole-plant context before deep-diving this topic.
- Aluminum Plant problems hub - Jump to symptom-specific fix guides when this care topic does not resolve the issue.