Watermelon Peperomia Repotting: When, How & Pot Size
Watermelon Peperomia Repotting: When, How & Pot Size
Watermelon Peperomia Repotting: When, How & Pot Size
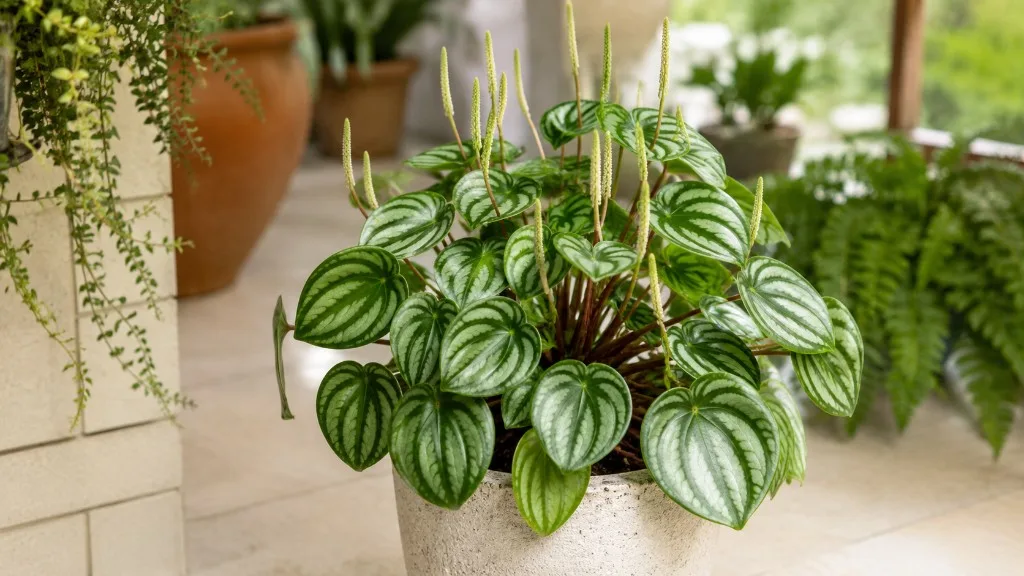
Watermelon Peperomia (Peperomia argyreia) is one of those houseplants that rewards patience and punishes enthusiasm. Its striped, watermelon-patterned leaves look fragile, but the plant itself is tougher than it appears - until you yank it into an oversized deep pot, bare-root the entire ball, or repot it on a cold January afternoon. Then the leaves droop, the red petioles go limp, and you wonder what you did wrong.
The answer is almost always the same: you treated it like a fast-growing tropical with a deep root system when it is actually a compact, slow-growing Piperaceae native to the forest floor of Brazil, where its roots spread horizontally in loose, airy leaf litter rather than diving deep into saturated soil. Repotting for Watermelon Peperomia overview is less about giving it room to explode and more about refreshing degraded mix, correcting drainage, and giving the shallow root zone a modest upgrade - ideally once every 2 to 3 years, in spring, inside a shallow pot that matches the root habit, with gentle handling throughout. BBC Gardeners’ World notes that watermelon peperomia benefits from being slightly pot-bound but still needs repotting every two to three years.
This guide covers the full decision path: when repotting is actually necessary, why spring timing matters, how to choose a shallow container one size up, how to move the plant without shredding fine roots, and what the first month of aftercare should look like.
Why Watermelon Peperomia Needs Repotting - and Why It Needs So Little of It
In its native understory habitat, Watermelon Peperomia grows as a low rosette with a compact, shallow root system that stays near the surface where oxygen is plentiful and water drains quickly after rain. Indoors, that same root architecture meets a fixed volume of potting mix that slowly compacts, decomposes, and loses the air pockets roots depend on. After a year or two, even a plant that looks healthy on top may be sitting in substrate that holds water longer than it did when the mix was fresh - and that mismatch is often the hidden cause of floppy stems, dull striping, and persistent fungus gnats.
Repotting solves three problems at once. It replaces broken-down organic matter with fresh, airy mix. It gives circling roots a little room to spread without forcing the plant into a swimming pool of unused soil. And it gives you a chance to inspect the root zone for rot, compaction, or salt buildup before symptoms reach the leaves. BBC Gardeners’ World notes that Watermelon Peperomia benefits from being slightly pot-bound but still needs repotting every two to three years - a detail that tells you something important about this plant’s psychology. It likes a snug home. It does not like a stale one.
What repotting is not: a growth hack. Watermelon Peperomia is a slow to moderate grower with semi-succulent leaves that store some moisture. Upsizing aggressively will not make it bushier faster. It will make the center of the pot stay wet longer than the roots can use, which is the fastest route to crown rot and root decay. The goal is a reset, not an expansion project.
How Often to Repot Watermelon Peperomia
The practical answer for most indoor growers: every 2 to 3 years, measured from the last full repot or from the date you brought the plant home in its nursery pot. Clemson HGIC notes that peperomias do not need annual repotting and can remain in the same pot for several years when growth is stable. That interval aligns with how long a typical peat- or coir-based indoor mix retains good structure before fine particles migrate downward, drainage slows, and the perched water table at the pot bottom grows larger than the plant’s shallow roots can tolerate.
If your plant is young, in a 4-inch nursery pot, and growing steadily through two full growing seasons, year two is a reasonable first repot. If your plant is mature, stable, and still draining well after three years, you can often stretch to year three without harm - especially if you top-dress with fresh mix each spring, which BBC Gardeners’ World recommends as part of normal care. Top-dressing buys time by refreshing the upper root zone without disturbing the whole ball.
Repot sooner - regardless of the calendar - if you see roots circling heavily, water running straight through compacted soil, a sour smell from the mix, or soft stems combined with soil that never dries. Repot immediately if you discover active root rot on Watermelon Peperomia (black, mushy roots with a foul odor). In those cases, waiting for the ideal spring window can cost you the plant.
Six Signs Your Watermelon Peperomia Is Ready for a New Pot
Roots and soil tell the truth before leaves do. Watch for these six signals.
- Roots circling the bottom or poking through drainage holes. A few visible root tips are normal. A dense white mat wrapping the entire root ball means the plant has used the space available.
- Water runs straight through in seconds. When irrigation channels through old, decomposed mix without wetting the root zone evenly, the plant dehydrates even though you are watering - and the mix itself is the problem.
- Soil dries unevenly or stays wet too long. If the top crusts over while the bottom stays soggy, or if the pot takes more than 10–14 days to approach dryness when it used to dry in a week, the substrate structure has failed.
- Growth stalls despite good light and normal watering. A Watermelon Peperomia that refuses new leaves for an entire growing season while everything else in the windowsill is pushing growth often has exhausted or compacted soil, not a light problem.
- Persistent fungus gnats or a sour smell. Organic matter breaking down anaerobically in the lower pot invites gnats and means roots are losing oxygen even if leaves still look fine.
- The plant is physically unstable or rising out of the pot. A compressed, root-bound mass can push the crown upward until the plant wobbles with every watering.
One sign is a fair reason to plan a repot. Two or more, and the plant is overdue.
Best Time of Year to Repot Watermelon Peperomia
Timing is not cosmetic. Watermelon Peperomia roots respond to warmth, daylight length, and the plant’s internal growth cycle. Repot when the plant is already gearing up to grow, and recovery is measured in days. Repot when it is dormant or stressed, and recovery is measured in months - if it happens at all.
Why Spring Is the Ideal Window
Spring and early summer are the active growing months for Watermelon Peperomia in most homes. Daylight lengthens, temperatures stabilize above the low-60s°F range, and the plant begins pushing new leaves from the crown. Root tips are active during this period, which means minor disturbance heals quickly and new white roots colonize fresh mix within weeks.
The practical sweet spot is when you see the first new leaf of the season unfurling and nighttime indoor temperatures stay consistently above about 60°F (16°C). In temperate climates, that usually falls between mid-March and June. Repotting in this window gives the plant the full growing season ahead to re-establish before shorter days and cooler rooms slow everything down in fall.
Spring repotting also pairs naturally with other maintenance: top-dressing, division for propagation, and a light assessment of whether last year’s Watermelon Peperomia watering guide still matches the pot and mix. Doing it all at once reduces the number of times you stress the plant in a single year.
Emergency Repots That Override the Calendar
Two situations demand an immediate repot no matter the month. The first is active root rot - black, mushy roots, a sour or swampy smell, and wilting that does not respond to adjusting water. Trim affected roots, repot into fresh dry mix in a clean shallow pot, and accept slower recovery than a spring repot would deliver. The second is a catastrophically broken or waterlogged pot where the root zone cannot be salvaged in place.
If you must repot in fall or winter for a non-emergency reason, keep expectations low. Provide stable warmth, Watermelon Peperomia light guide, and strict aftercare - no fertilizer, lighter watering, and no repotting again for at least a year. Do not compensate for off-season timing by feeding early; roots that are not actively growing cannot use fertilizer, and salts can accumulate in fresh mix and burn delicate root hairs.
Choosing the Right Shallow Pot - Size, Depth, and Drainage
The new container matters as much as the new mix. For Watermelon Peperomia, diameter and depth are two separate decisions, and most repotting failures come from getting one of them wrong.
Why Shallow Beats Deep for Peperomia Roots
Watermelon Peperomia roots spread horizontally, not vertically. In nature, they occupy the top few inches of forest litter. A deep pot filled with mix to the brim puts a large volume of soil below the active root zone - soil that stays wet long after the upper layers have dried. That lower wet zone is where anaerobic conditions develop, where fungus gnat larvae thrive, and where crown-adjacent roots slowly rot while the leaves still look acceptable.
A shallow pot - often called a bulb pan, azalea pot, or simply a container whose height is roughly equal to or less than its diameter - keeps the root zone and the drainage profile aligned. The plant looks proportionally full sooner, the crown sits at a sensible depth relative to the soil surface, and the entire root mass can dry on a predictable schedule after watering. Multiple experienced growers note that Watermelon Peperomia often looks best and grows most reliably in pots that appear almost too small by houseplant standards - because the visual scale of the leaves is larger than the root mass beneath them.
Whatever pot you choose, a drainage hole is mandatory. Peperomia crowns are sensitive to standing water. A decorative cachepot without a hole is for display only; the plant itself should live in a drilled inner pot that can shed excess water freely.
Sizing Up Safely (1–2 Inches Wider, Not More)
When upsizing, go one pot size up - roughly 1 to 2 inches (2.5–5 cm) wider in diameter than the current container. A plant in a 4-inch pot moves to a 5- or 6-inch. A plant in a 6-inch moves to an 8-inch at most. Jumping from a 4-inch to an 8-inch feels generous, but the math works against you: pot volume scales with the cube of the radius, so a pot twice as wide holds roughly four times the soil - far more than a shallow peperomia root system can drink through before the mix sours.
Depth should increase only modestly, if at all. If you must choose between a pot that is slightly wider and one that is significantly deeper, choose wider and shallower every time. The root ball should sit near the top third of the container, with fresh mix tucked underneath and around the sides - not buried deep in a tall cylinder of unused soil.
Material choice affects drying speed. Unglazed terracotta breathes through its walls and dries faster - a good match if you tend to overwater or run a humid home. Plastic nursery pots hold moisture longer and work well if you underwater or live in a dry climate, but they leave less margin for error. Glazed ceramic is fine with a drainage hole and suits display pots, though it behaves like plastic in terms of moisture retention. Match the material to your watering habits, not to aesthetics alone.
The Best Soil Mix for Repotting Watermelon Peperomia
Watermelon Peperomia wants a well-draining, airy potting mix that retains some moisture in the upper layers without staying wet at the bottom. BBC Gardeners’ World recommends free-draining, peat-free compost that can retain some moisture, with a preference for acidic to neutral pH - alkaline mixes tend to produce poor results over time.
A reliable repotting blend you can assemble at home:
- 60% high-quality indoor potting mix or peat-free compost as the base
- 20% perlite or pumice for drainage and air pockets
- 20% orchid bark or coarse coco chips to keep the structure open long-term
Some growers add a small handful of horticultural charcoal to the bottom layer for extra drainage insurance in shallow pots, though this is optional rather than essential. What matters most is that the mix feels loose in your hand, drains in seconds when you water a test handful in a cup, and does not compact into a brick after three months.
Do not reuse old mix. Decomposed substrate may carry pathogens, salt buildup, or gnat eggs, and it defeats the purpose of repotting. Do not reach for heavy garden soil or pure peat - the first suffocates roots, the second holds too much water without structure.
Prepping Your Plant 24 Hours Before Repotting
Good repotting starts before you touch the pot. Water lightly the day before so the root ball holds together but is not saturated. A bone-dry plant crumbles when you tip it out; a soggy plant smears and tears fine roots. The goal is a root ball that is cohesive enough to slide out in one piece.
Gather your materials in one place: the new shallow pot, fresh mix, clean scissors or pruning shears (wiped with rubbing alcohol), a chopstick or pencil for settling soil, and a watering can with a narrow spout. If the old pot is plastic, squeeze the sides gently to loosen the root ball before removal. If it is terracotta, run a knife around the inner edge if the plant is stuck.
Choose a workspace with good light where you can lay the plant on its side without crushing leaves. Watermelon Peperomia petioles snap easily under pressure - another reason to handle the root ball, not the foliage, during the entire process.
Step-by-Step: How to Repot Watermelon Peperomia
Follow this sequence for a clean move with minimal shock.
- Add a shallow base layer of fresh mix to the new pot - roughly 1–2 cm deep, enough to lift the root ball so the crown will sit at the same depth it occupied before.
- Tip the plant out gently. Hold the pot sideways, support the crown with your palm, and slide the root ball out. Never yank by the stems.
- Inspect the roots. Healthy peperomia roots are white to pale tan, firm, and sparse compared to many houseplants. Trim only what is clearly dead, black, or mushy.
- Tease circling roots lightly. Use your fingers to loosen the bottom and outer edges. Remove loose old mix from the bottom third. Do not bare-root the entire plant or wash every particle away - the fine root hairs you cannot see do most of the absorbing.
- Place the root ball on the base layer. Center it so the crown sits at or slightly above the original soil line. Burying the crown is one of the fastest ways to kill a peperomia.
- Fill around the sides with fresh mix. Add small amounts, tap the pot gently, and use a chopstick to settle mix into gaps without packing it tight.
- Stop filling about 1 cm below the rim. You need headroom for watering without overflow.
- Water lightly. One slow pass around the crown - enough to settle the mix, not enough to saturate a volume the roots cannot reach yet.
Move the plant back to its usual bright indirect light spot. Skip fertilizer for at least four weeks. Expect a brief pause in growth while the roots find their footing in the new mix.
Handling the Delicate, Shallow Root System
Watermelon Peperomia roots are fine, brittle, and shallow - more like thread than rope. They do not tolerate rough handling, prolonged air exposure, or aggressive washing the way a pothos or spider plant might. The repotting goal is minimum necessary disturbance: enough to free circling roots and refresh the lower mix, not enough to strip the entire root ball naked.
If old mix clings stubbornly to the center, leave it. A collar of previous substrate around the core protects root hairs and reduces shock. If you accidentally break roots during the move, do not panic - peperomias regenerate from healthy crown tissue, but recovery takes longer when a large percentage of the root mass is lost.
Never tug a stuck plant by its red petioles or striped leaves. If the pot will not release the root ball, water lightly, wait ten minutes, and try again - or cut a plastic nursery pot away rather than force the plant.
Root pruning is rarely needed for Watermelon Peperomia. Unlike woody houseplants that benefit from trimming circling roots aggressively, peperomias respond better to a slightly larger pot and gentle teasing. The exception is rot: cut back to firm, white tissue with sterile shears, let the cuts air-dry for an hour if the rot was extensive, then repot into fresh mix without watering heavily for the first week.
Top-Dressing vs. Full Repot - When Each Makes Sense
Not every spring maintenance session requires a full repot. Top-dressing - scraping away the top 2–3 cm of old mix and replacing it with fresh, airy substrate - is often enough when the plant is healthy, roots are not circling heavily, and the pot still drains well. BBC Gardeners’ World includes top-dressing with fresh compost as part of routine annual care, and it is a smart middle ground for a plant that is not yet due for its 2–3 year upgrade.
Choose a full repot when two or more of the six signs above are present, when the pot itself is failing (cracked, salt-crusted, or lacking drainage), or when you need to inspect roots for rot. Choose top-dressing when the plant is thriving, the interval since the last full repot is less than two years, and your main goal is refreshing the upper root zone before growth season peaks.
Full repots stress the plant more than top-dressing. If you top-dressed last spring and the plant still looks excellent, you do not need to full-repot this spring just because the calendar says so.
Aftercare for the First 4–6 Weeks
Transplant shock on Watermelon Peperomia usually shows up as slight wilting, one or two yellowing lower leaves, or a pause in new growth for one to two weeks. That is normal. Sustained collapse, multiple soft stems, or spreading yellow leaves beyond the third week usually mean the mix is staying too wet, the pot is too large, or the crown was buried - not that the plant needs more water.
Keep the plant in stable bright indirect light - no direct sun while roots are re-establishing, and no move to a darker corner “to rest.” Temperature stability matters more than usual; avoid cold drafts from windows or hot air from radiators directly above the pot.
Watering and Fertilizer Rules After Repotting
Water lightly and selectively for the first two to three weeks. The fresh mix around the root ball will hold moisture differently from the old compacted soil your rhythm was calibrated to. Check the top 2–3 cm with your finger before each watering. When in doubt, wait an extra day - peperomias recover from slight underwatering on Watermelon Peperomia far more reliably than from soggy fresh mix in an oversized pot.
Do not fertilize for four to six weeks after repotting. Fresh mix already contains some nutrients, and roots without active tips cannot absorb fertilizer efficiently. Early feeding can burn delicate root hairs and show up as brown leaf edges on new growth. Resume your normal diluted feeding schedule only after you see a new leaf unfurl at full size and color.
Humidity does not need special intervention unless your home is extremely dry, but avoid misting the crown directly - wet leaf bases in stagnant air invite fungal problems on a stressed plant.
Common Repotting Mistakes to Avoid
Most Watermelon Peperomia repotting failures trace back to a short list of avoidable errors.
Over-potting is the most common. A pot that is too wide and too deep holds a reservoir of wet soil the roots never reach. The upper layers dry while the bottom stays anaerobic - classic crown-rot setup. One size up, shallow profile, every time.
Bare-rooting or aggressively washing roots strips the fine hairs that absorb water and nutrients. Keep a core of old mix if needed. Tease, do not scrub.
Burying the crown below the original soil line traps moisture against the stem base where peperomias are most vulnerable to rot. The crown should sit at the same depth as before, with no mix piled against the petioles.
Repotting into dry mix and then flooding the pot shocks roots and compacts airy mix. Water lightly once after repotting, then return to a cautious rhythm.
Fertilizing within the first month burns recovering roots. Patience here directly determines whether new growth arrives in three weeks or three months.
Choosing a deep decorative pot for aesthetics prioritizes shelf appearance over root biology. If you love a tall cachepot, keep the plant in a proper shallow inner pot with drainage and lift it out to water.
Repotting a visibly stressed plant - one already yellowing from overwater, recovering from cold damage, or drooping from low light - compounds the problem. Fix the underlying stress first unless the roots themselves are the clear cause.
How Repotting Connects to Watering, Light, and Propagation
Repotting does not happen in isolation. It resets the relationship between water, soil volume, and root mass - which means your old watering schedule may no longer apply for several weeks. A plant that needed water every seven days in compacted old mix may need ten days in fresh, airy substrate inside a slightly larger pot. Re-calibrate by checking the mix, not by following the old calendar.
Light conditions should stay consistent before and after the move. A repot plus a simultaneous relocation to a brighter or dimmer spot doubles the adjustment load. Keep the plant where it was happy, let it settle, then acclimate to any new location gradually over a week or two.
Spring repotting is also the best time to divide an overcrowded plant for propagation - gently separating rooted offsets with their own small root systems and potting them into shallow containers of their own. Each division inherits the same rules: small pot, airy mix, gentle handling, no early fertilizer. If you are not dividing, resist the urge to propagate from leaf cuttings immediately after a full repot; let the mother plant recover first.
The soil mix you choose at repotting should match what you use for routine care - consistency prevents the drainage mismatch that happens when a plant moves from a bark-heavy blend into straight peat-based mix or vice versa. If you have adjusted your watering or light recently, note those conditions when you assess recovery; a plant repotted into better mix but kept in too-low light will still struggle.
Conclusion
Watermelon Peperomia repotting is a low-frequency, high-precision task. Most healthy plants need a full repot only every 2 to 3 years, ideally in spring when growth is active, into a shallow pot just 1 to 2 inches wider than the current one, using fresh airy mix and gentle root handling throughout. The plant prefers a slightly snug root zone - not a stale one - and it will tell you the difference through drainage speed, leaf firmness, and whether new striped foliage keeps arriving on schedule.
If you remember nothing else: match pot depth to shallow roots, upsize modestly, protect the crown, skip fertilizer for the first month, and repot because the soil or roots need it - not because the calendar or a bigger decorative pot caught your eye. Get those decisions right, and Watermelon Peperomia rewards you with crisp patterning and firm red petioles for years before it asks for another move.
When to use this page vs other Watermelon Peperomia guides
- Watermelon Peperomia overview - Start here for whole-plant context before deep-diving this topic.
- Watermelon Peperomia problems hub - Jump to symptom-specific fix guides when this care topic does not resolve the issue.
- Root Rot on Watermelon Peperomia - Escalate here when repotting adjustments are not enough.