Tradescantia Zebrina Propagation: Stem Cuttings
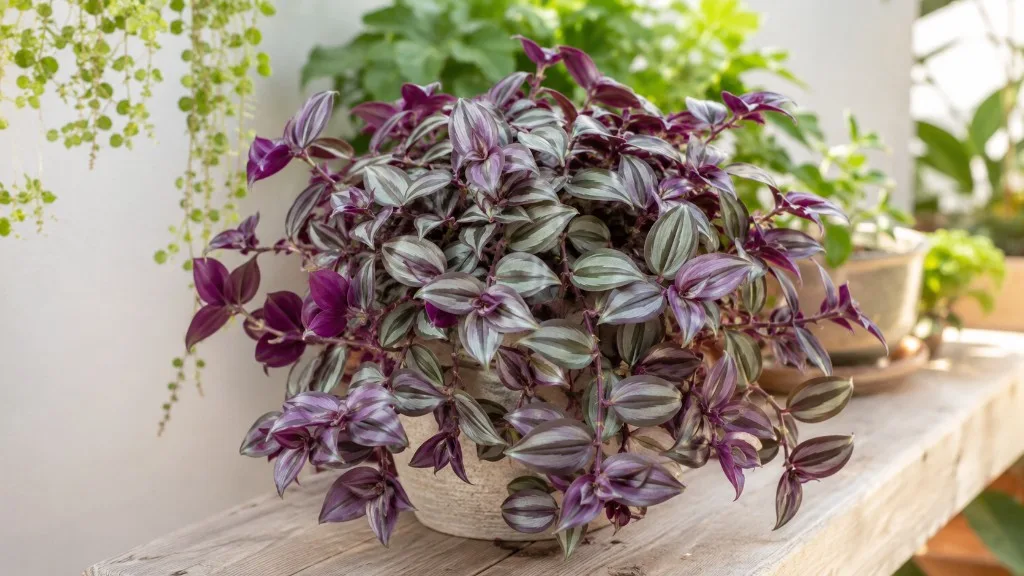
Tradescantia Zebrina Propagation: Stem Cuttings
Tradescantia Zebrina Propagation: Stem Cuttings
Tradescantia zebrina propagation belongs in the same conversation as pothos and coleus - plants so willing to root from stem cuttings that the hard part is not getting roots, but remembering to include a node. Also called inch plant, wandering dude, zebra plant, or silver inch plant, Tradescantia zebrina is a fast-trailing member of Commelinaceae, the spiderwort family, native from Mexico through Central America into Colombia. Its stems carry nodes at roughly inch-long intervals - which is how the common name “inch plant” originated - and each node can push both adventitious roots and new shoots when given water, light, and warmth. Drop a healthy cutting in a clear jar with one or two submerged nodes and you can often see white roots within days, not weeks, during active growth.
That speed makes Zebrina one of the best beginner propagation projects and one of the most useful maintenance tools for an aging hanging basket. Stems age, crowns go bare, and striping dulls when light is weak - but regular pruning plus rooting gives you fresh plants for free. This guide covers the full workflow: why nodes are mandatory, how to take clean cuttings, water propagation step by step, when soil makes more sense, how to pot up without shock, and how to use cuttings to rebuild a sparse pot.
If symptoms persist, see the Brown Tips on Tradescantia Zebrina guide.
Why Tradescantia Zebrina Is One of the Easiest Plants to Propagate
Zebrina is built for vegetative spread. In its native tropical range it behaves as a creeping herbaceous perennial that colonizes moist ground and shaded edges by layering stems where nodes contact soil. Indoors, that same biology means a severed stem segment does not need seeds, division, or specialist equipment to restart - it needs living node tissue, moisture at the node zone, and enough light to fuel cell division. The NC State Extension Gardener Plant Toolbox lists stem cutting as the recommended propagation strategy for Tradescantia Zebrina overview, which matches what home growers observe daily: high success rates, fast root initials, and visible progress you can watch through glass.
Compared with succulents that demand callusing or finicky tropicals that sulk for weeks, Zebrina rewards minimal intervention. Sharp scissors, a jar of water, Tradescantia Zebrina light guide, and a warm room cover most scenarios. Rooting hormone is optional, not required. The main failure mode is almost always human: a pretty leaf section with no node, leaves rotting underwater, or water left unchanged until it turns cloudy and anaerobic. Avoid those three errors and propagation becomes routine.
How Stem Cuttings Clone the Parent Plant
Stem cuttings produce genetically identical copies of the parent - every stripe pattern, purple underside, and growth habit carries over. That matters when you are refreshing a basket you have shaped for months or sharing a specimen with consistent color. Unlike seed propagation, which can vary, cuttings preserve the exact cultivar you already grow. A four-to-six-inch segment with two or three nodes is enough to start a small trailing plant; longer cuttings root just as readily but take up more jar space.
Zebrina stems are semi-succulent: they store water, tolerate brief drying, and rehydrate quickly once roots form. That storage buys time while roots develop, which is why cuttings rarely wilt catastrophically in water the way thin-stemmed herbs might. Still, removing lower leaves reduces transpiration from tissue that cannot yet replace lost moisture - a small step that noticeably improves stability in the first week.
What Nodes Are and Why They Matter
A node is the joint on the stem where leaves, buds, and roots emerge. On Zebrina, nodes appear as slight swellings or bumps at each leaf attachment point, often spaced about an inch apart along active growth. Adventitious roots - roots that form from stem tissue rather than an existing root system - develop from these nodes when they stay moist and oxygenated. Without at least one node submerged in water or buried in soil, a cutting may stay green for a while but will not produce a self-sustaining plant. A single leaf with a petiole but no stem node will not work.
The practical rule is simple: every propagation piece needs one or two nodes in the rooting zone and at least one or two sets of leaves above the water or soil line for photosynthesis. More nodes mean more rooting sites and faster establishment, but one healthy node is sufficient for success. When in doubt, include an extra node rather than trimming too aggressively.
When to Propagate Tradescantia Zebrina
Timing is less about a calendar date and more about whether the plant is actively growing. Zebrina pushes fastest new stems when light is bright, temperatures sit in the comfortable indoor range, and the parent is hydrated but not waterlogged. Propagation taken during that window roots quickly; cuttings taken from a stressed, pest-ridden, or recently shipped plant struggle even though the method is easy.
Avoid propagating as a rescue mission when the parent shows widespread rot, severe mealybug infestation, or mushy stems. Clean up or discard affected tissue first, then take cuttings only from firm, unmarked stems. Propagation multiplies healthy plants; it does not cure systemic problems in the source pot.
Best Season for Fast Rooting
Spring and summer are the best seasons for Tradescantia zebrina propagation because day length, warmth, and metabolic activity peak together. During active growth, root initials can appear within three to seven days in water under warm bright conditions - the “roots in days” experience many growers report. Fall cuttings still root but often need one to two weeks. Winter cuttings in cool dim rooms may stall until warmth and light improve; the cutting usually survives, but progress feels slow enough that beginners assume failure and discard viable material.
If you propagate in winter, place jars on a warm shelf away from cold window glass, maintain bright indirect light, and change water regularly. Do not expect summer speed in a 62°F room with weak light - adjust expectations instead of blaming the plant.
Signs Your Plant Is Ready for Cuttings
A parent plant is ready when stems are firm, leaves show strong silver-purple striping for the light level you provide, and tip growth is active. Leggy pale stems can still root, but they make weaker starts until you grow them under better light. The best material often comes from routine pruning: you were going to remove those long bare runners anyway, so rooting them turns maintenance into multiplication.
If the crown is bare but tip growth is healthy, take cuttings from the vigorous ends and root them back into the same pot once established - a faster cosmetic fix than waiting for the old base to branch. Check under leaves for aphids, spider mites, and mealybugs before cutting; propagation transfers pests along with stems.
How to Take the Perfect Stem Cutting
Good cuttings start with clean tools and clear node placement. Use sharp scissors or pruning shears wiped with rubbing alcohol or washed with soap and hot water. Dull tears crush stem tissue and invite rot at the wound. Work on a dry day when the parent is normally hydrated - not immediately after a heavy soak when stems are brittle, and not when the plant is severely drought-stressed.
Target stems four to six inches long with several nodes and healthy terminal growth. Shorter cuttings work if they include at least one node and a few leaves; longer cuttings root fine but are harder to balance in small jars. Remove leaves from the lower half of the stem so nothing sits underwater or underground except bare nodes and stem.
Choosing Healthy Stems
Select stems that are firm, not mushy, with vivid striping and no blackened nodes. Avoid sections with brown crispy tips, mechanical damage, or pest stippling. The best cuttings come from the actively growing tips of trailing vines - the same sections you would pinch to encourage bushiness on the parent. If your plant stretched in low light, propagate those stems anyway but plan to grow the new pots in brighter indirect light so the next generation stays compact.
When refreshing a large basket, take multiple cuttings at once. Zebrina handles batch propagation well, and grouping three to five jars on the same windowsill lets you pot up a fuller new container in one session later.
Making the Cut Below a Node
Make your cut just below a node, leaving the node itself intact on the cutting - not on the discarded parent stub. The node is the rooting engine; damaging it with a ragged cut or splitting the stem reduces success. One clean snip through the stem at a slight angle increases surface area slightly without exposing excessive inner tissue.
Strip or pinch off lower leaves back to the node zone you will submerge. If remaining leaves are large, you may halve them horizontally to reduce water loss, though small Zebrina leaves usually do not need trimming. What you must not do is leave any leaf submerged; decaying leaf tissue in water is the fastest route to cloudy jars and stem rot.
Water Propagation Step by Step
Water propagation is the most popular Tradescantia zebrina method because it is visible, forgiving, and fast. You watch roots form, catch problems early, and pot up only when the cutting is clearly ready. Wisconsin Horticulture Extension notes that zebrina cuttings root readily in water or moist potting soil - the same approach extension references and experienced growers use worldwide.
Follow this sequence for consistent results:
- Prepare a cutting four to six inches long with lower leaves removed and at least two exposed nodes on the submerged portion when possible.
- Fill a clear jar with room-temperature water - tap water is fine for short-term propagation; rainwater works equally well.
- Place the cutting so one or two nodes sit fully underwater and all leaves remain above the surface.
- Set the jar in bright, indirect light - an east window or a few feet back from a south or west window.
- Change the water every two to four days, or whenever it looks cloudy, to maintain oxygen and limit bacterial growth.
- Top up water as it evaporates so nodes stay submerged.
- When roots reach one to two inches long, pot into moist well-draining mix.
That is the entire core workflow. Most of the “skill” is patience and hygiene, not technique.
Setting Up Your Propagation Jar
Jar choice matters more than aesthetics. Clear glass lets you inspect roots and spot murky water without lifting the cutting. Pint-sized canning jars, small vases, and recycled spice jars all work if the mouth supports the stem without crushing leaves. Avoid oversized containers where the cutting falls deep and leaves dip toward the water.
Position matters alongside container choice. Direct sun on a jar can overheat water and encourage algae; deep shade slows rooting enough that cuttings look stalled. Bright indirect light - the same light Zebrina prefers for mature growth - is the target. Warm ambient room temperature accelerates root initials; cold drafts from air conditioning vents slow cell activity noticeably.
If you propagate several cuttings, give each stem its own jar or sufficient spacing so leaves do not overlap and shade each other. Crowded leaves increase humidity around foliage without helping submerged nodes, and they make it harder to see which stem belongs to which jar when roots tangle.
How Long Until Roots Appear
Under warm bright conditions during active growth, Tradescantia zebrina often shows root initials within three to seven days - sometimes visible as tiny white bumps at submerged nodes before full threads extend. Within two weeks most healthy cuttings in water carry usable root systems. Cooler or dimmer conditions stretch that timeline toward three weeks without necessarily indicating failure.
Root speed depends on node count, water freshness, temperature, and parent vigor - not on rooting hormone, which is optional for this species. If two weeks pass with no root bumps in warm bright conditions, re-cut the stem end cleanly above the lowest node and restart in fresh water; the old wound may have sealed poorly or begun to decay. If the stem stays firm and green, waiting longer is reasonable in winter.
Soil Propagation as an Alternative
Soil propagation skips the jar entirely by placing prepared cuttings directly into moist potting mix. The NC State Extension Gardener Plant Toolbox recommendation for stem cuttings applies equally to soil: bury at least one node, keep the medium lightly and evenly moist, and provide bright indirect light. Soil rooting hides progress underground, but it can produce tougher root systems that never pass through the water-to-soil transition shock some cuttings experience.
Fill a small pot with standard well-draining houseplant mix - peat or coco-based blend with perlite is typical. Moisten the mix before inserting cuttings so dry pockets do not pull moisture from the stem. Use a finger or dibber to make a two-inch hole, set the cutting so one or two nodes sit below the surface, and firm mix gently around the stem without compacting it airless. Water lightly after planting.
Keep soil evenly moist, not soggy, while roots form. A gentle tug after ten to fourteen days may meet slight resistance when roots anchor - but tugging too hard breaks fragile new roots, so treat this as a cautious check, not a daily habit. New leaf growth at the tip is often the most reliable above-ground sign that soil-rooted cuttings have established.
Choose soil when you want to chop and prop directly back into the parent pot - a classic Zebrina refresh technique - or when you prefer one-step planting over jar maintenance. Choose water when you want to monitor progress, share cuttings before potting, or teach propagation visually to someone new.
Potting Up Water-Rooted Cuttings
Moving from water to soil is the most delicate transition in the workflow, though Zebrina handles it better than many houseplants. Wait until roots are at least one inch long, preferably closer to two inches, with multiple root strands visible. Potting too early forces a stem to survive on stored water while roots too short to absorb soil moisture catch up - a common cause of post-transplant wilt.
Select a small pot with drainage holes - two to three inches wide is enough for one cutting; four inches holds several rooted stems for a bushier start. Use fresh well-draining mix, pre-moisten it, and plant so buried nodes sit at the same depth they experienced in water. Do not bury leaves. Water thoroughly once after potting, let excess drain, and empty the saucer.
For the first week after potting, keep bright indirect light and maintain lightly moist - not wet - mix. Avoid direct sun on a freshly potted cutting. Hold fertilizer until you see active new growth, usually two to four weeks after potting; roots need time to integrate with soil before feeding. If leaves droop slightly for a day after transplant, stable moisture and patience usually resolve it; mushy stems mean rot and require a fresh cutting.
Aftercare for Newly Propagated Zebrina
Young Zebrina plants need steadier conditions than established baskets, but not coddling. Bright indirect light keeps internodes tight and striping strong; weak light produces thin pale growth even on well-rooted cuttings. Water when the top inch of mix dries, using the same finger-test rhythm you apply to mature plants - newly rooted specimens are not exempt from overwatering risk.
Humidity is helpful but rarely decisive indoors. Average home humidity suffices if light and watering are correct. Do not mist as a substitute for proper watering; wet foliage adds little lasting humidity and can encourage fungal spotting on crowded leaves.
Pinch or trim tip growth once stems reach a few inches to encourage branching and a fuller habit. Zebrina responds vigorously to pinching above a node - two new shoots often emerge from the cut point. That responsiveness is why propagation pairs naturally with shaping: every trim can become a new plant or an insert back into the parent pot.
Watch for aphids on tender new growth in the first month. Propagation concentrates soft tissue in one small pot, which pests notice quickly. Rinse with water, isolate affected cuttings if needed, and avoid propagating from visibly infested parent material until pests are controlled.
Using Propagation to Fill Out Leggy Plants
Leggy Zebrina - long bare stems with foliage only at the ends - is a display problem, not a propagation problem. The fix is mechanical: cut trailing stems back, root the tips, and plant them into the bare crown area once rooted. This chop-and-prop refresh produces a fuller basket faster than hoping old woody stems backbud.
When the crown looks empty, take four-to-six-inch cuttings from healthy tips before the visual gap widens. Root in water or insert wet stems directly into moist mix around the base of the parent plant. Multiple rooted cuttings tucked into the same hanging basket can transform a tired display within one growing season. Keep the refreshed pot in bright indirect light and water consistently without leaving the crown soggy - stem rot at the soil line is the main risk when many fresh cuttings cluster in one container.
Compared with Tradescantia nanouk, which is thicker-stemmed and slower, Zebrina roots and branches faster, making it the better candidate for aggressive refresh propagation. Nanouk cuttings still work, but Zebrina’s inch-spaced nodes and rapid adventitious rooting are why it became the classic “give a cutting to a friend” houseplant.
Common Propagation Mistakes and Fixes
Most failures trace to a short list of avoidable errors. No node on the cutting produces a green fragment that never roots - fix by re-cutting to include node tissue. Leaves underwater rot and cloud the jar - remove submerged foliage and change water immediately. Stale cloudy water goes anaerobic and softens stems - replace water every few days and rinse the jar. Cold dim conditions slow rooting enough to look like failure - move to warmth and bright indirect light before discarding firm cuttings.
Overpotting immediately after water rooting places a small root system in a large wet volume of mix - stay in small pots until growth accelerates, then step up gradually. Propagating from sick parents spreads rot and pests - stabilize or discard the source plant first. Fertilizing too early burns tender roots - wait for visible new top growth.
If stems turn mushy from the cut end upward, discard that cutting and sanitize the jar before restarting. Partial rot rarely reverses. If roots in water look brown and slimy rather than white and firm, change water, rinse roots gently, and consider potting into fresh mix if enough healthy root length remains.
Safety Notes for Pets and Skin Contact
Tradescantia zebrina is widely grown but not harmless in every household. NC State Extension notes that ingestion can cause mouth and stomach irritation, while handling sap may trigger skin irritation or contact dermatitis in sensitive individuals and pets. The ASPCA lists inch plant (Tradescantia fluminensis) as toxic to dogs, cats, and horses; confirm current guidance before placing plants within reach of chewing pets.
Wear gloves if sap contact irritates your skin, wash hands after handling cut stems, and keep propagation jars and trimmings off counters where cats knock them over. Propagated cuttings carry the same toxicity profile as the parent - sharing rooted jars with pet-owning friends deserves a quick heads-up. Toxicity does not prevent propagation, but it shapes where finished plants live.
Conclusion
Tradescantia zebrina propagation succeeds because the plant already wants to layer and spread - your job is to supply nodes, clean water or moist mix, and bright indirect light while roots form. Take four-to-six-inch cuttings just below a node, strip lower leaves, submerge one or two nodes in a clear jar, and change water every few days. In warm active growth, roots often appear within days; pot up at one to two inches of root length into well-draining mix and hold fertilizer until new growth confirms establishment.
Water propagation is the easiest way to watch progress; soil propagation and chop-and-prop refreshes suit leggy baskets that need immediate filling. Avoid node-less cuttings, submerged leaves, and stale water - three mistakes that cause most beginner failures. With those guardrails, Zebrina becomes a reliable source of free plants, fuller hanging baskets, and easy gifts. Keep the parent brightly lit, prune regularly, and treat every trim as optional propagation material rather than waste.
When to use this page vs other Tradescantia Zebrina guides
- Tradescantia Zebrina overview - Start here for whole-plant context before deep-diving this topic.
- Tradescantia Zebrina problems hub - Jump to symptom-specific fix guides when this care topic does not resolve the issue.