Poor Potting Setup on Raindrop Peperomia: Causes, Checks &
Quick answer
Poor potting setup on Raindrop Peperomia means the container, drainage path, or soil volume does not match this species' shallow, oxygen-sensitive roots-glossy teardrop leaves can look fine while the mix stays wet underneath. First step: lift the plant from any cache pot, confirm drainage holes are open, and empty all standing water before changing anything else.
Poor Potting Setup on Raindrop Peperomia: Causes, Checks & Fixes
This guide covers poor potting setup on Raindrop Peperomia. See also the general Poor Potting Setup guide, watering, and light pages for this plant.
Poor Potting Setup on Raindrop Peperomia: Causes, Checks & Fixes
Quick answer
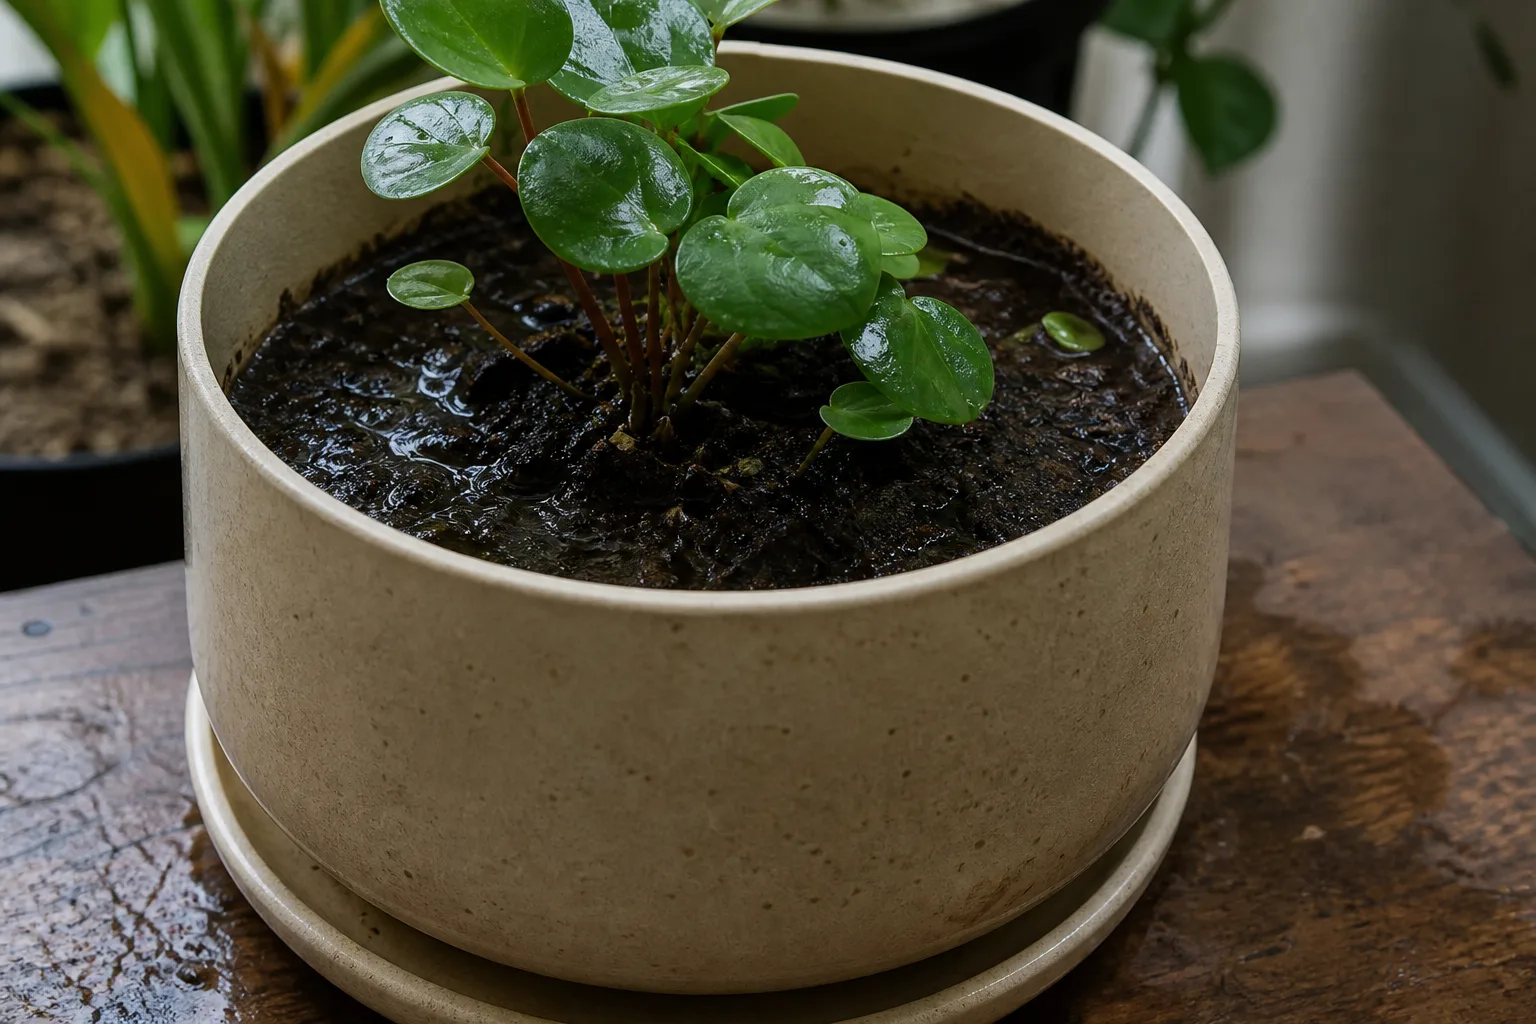
Raindrop Peperomia (Peperomia polybotrya) is sold as an easy upright houseplant with thick, glossy teardrop leaves that store water like a semi-succulent. That foliage disguise is the trap: the leaves can stay plump and green for days while roots underneath suffocate in wet mix. In the wild Raindrop Peperomia overview grows in shallow forest humus in Colombia, Peru, and Ecuador-water passes through quickly and roots never sit in standing moisture. A bad indoor pot setup reverses that ecology.
Poor potting setup here means the container, drainage path, or soil volume does not match how P. polybotrya actually dries indoors. Yellow lower leaves, a heavy pot, limp petioles on damp mix, and stalled coin-shaped new growth often follow-even when you pour carefully.
First step: lift the plant from any cache pot or saucer, confirm drainage holes are open, and empty all standing water. Do not repot, fertilize, or prune until you know whether water can exit freely and how long the mix stays wet at root depth.
This page is diagnostic triage-is the pot, mix, or drainage path the problem? For step-by-step repot procedure, mix ratios, and seasonal timing, use the Raindrop Peperomia repotting guide. For watering rhythm once drainage is fixed, see watering. Species baseline: Raindrop Peperomia overview.
Reviewed by the LeafyPixels Review Board against NC State and Clemson peperomia extension guidance before publication.
What poor potting setup looks like on Raindrop Peperomia
Container failure on this species rarely announces itself with a unique leaf pattern. Instead, a root zone that cannot breathe shows through water stress on thick teardrop foliage:
Poor Potting Setup symptoms on Raindrop Peperomia - compare with healthy tissue on the same plant.
- Yellow lower leaves while mix 5–7 cm deep stays damp for many days
- Limp teardrop leaves despite wet soil-the wilt-with-wet-soil paradox of damaged roots
- Fungus gnats hovering over a surface that never fully dries
- Stalled new growth or smaller, duller coin-shaped leaves as root function declines
- Roots circling the nursery plug or pushing through drainage holes
- Pot weight that stays heavy a week after one moderate watering
- White mold or algae on soil that never gets a dry cycle
- Sour smell when lifting the pot from a decorative shell
Yellow teardrop leaves and the wilting paradox
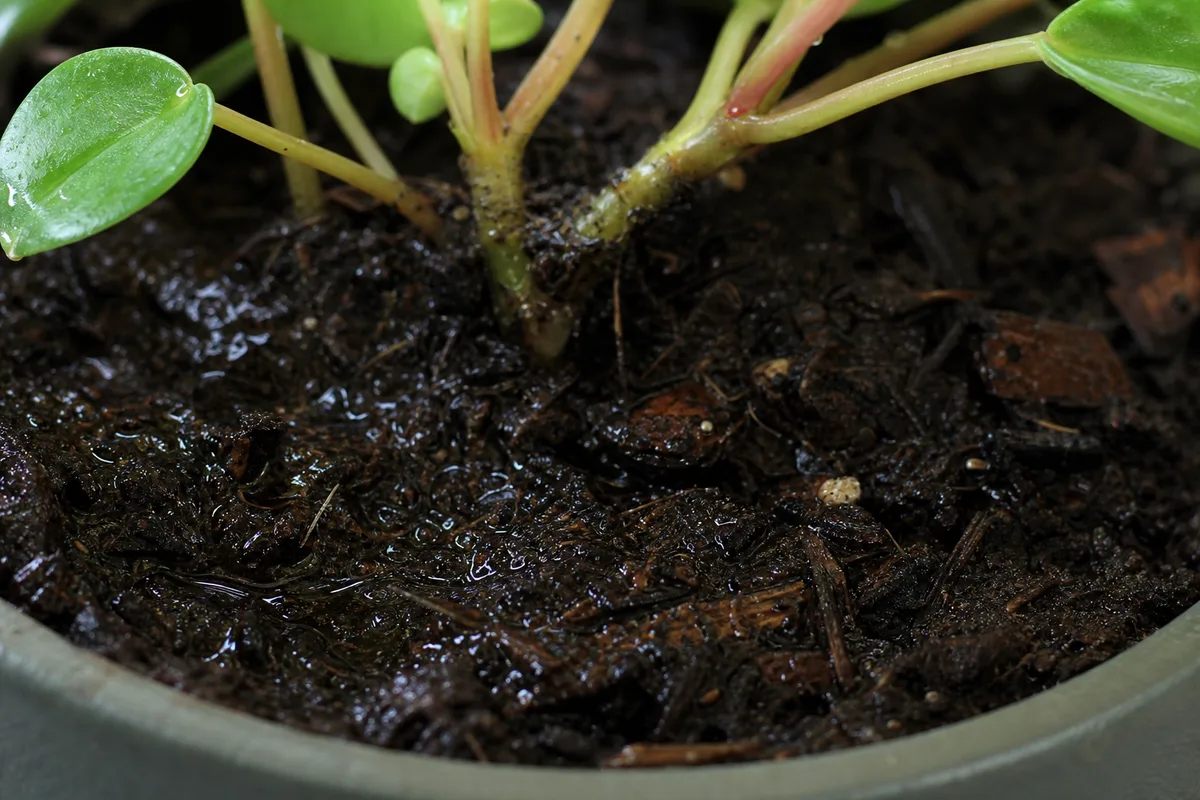
Raindrop Peperomia carries fleshy, glossy, teardrop-shaped leaves on an erect, compact habit. Those leaves hold moisture; the fine fibrous roots do not. Clemson HGIC notes root rot from overwatering is the most common peperomia disease-chronic wet feet from a bad setup produce the same symptom picture as pouring too often on a good pot.
When roots lose oxygen, they stop moving water. The plant wilts while the mix is still wet-owners often add another drink, which deepens the damage. Judge the root zone, not leaf plumpness alone.
Cache-pot and oversized-planter traps
Raindrop Peperomia is frequently displayed in a nursery grow pot dropped inside a sealed decorative shell-polished for store shelves, lethal long term. Water drains from the inner pot into a reservoir with nowhere to go. The glossy upright silhouette looks showroom-ready; underneath, the root ball marinates.
Oversized statement planters are the second common trap. Jumping from a 4-inch nursery pot to an 8-inch bowl surrounds a tiny root mass with inches of unused wet soil. NC State describes P. polybotrya as needing less than 12 inches of planting space with a shallow root profile-that extra volume stays saturated in average indoor light while leaves still look fine.
Healthy Raindrop Peperomia in a good setup dries predictably: the top 1–2 inches go dry within about a week in Raindrop Peperomia light guide, the pot lightens, and new teardrop leaves stay glossy and firm.
Why Raindrop Peperomia gets poor potting setup
Shallow brittle roots vs. semi-succulent leaves
Raindrop Peperomia belongs to the Piperaceae family and keeps most absorbing surface in the upper few inches of soil. Roots are fine, fibrous, and easy to snap during transplant-unlike the tough-looking foliage above. They are oxygen-sensitive: air through the mix matters as much as moisture.
The semi-succulent leaves buy time. Owners see firm green teardrops and delay repotting-”it still looks fine.” Underneath, anaerobic conditions develop in unused wet soil or trapped cache-pot runoff. By the time leaves yellow, root damage is often already underway.
Oversized pots and unused wet soil zones
Oversized containers are especially dangerous on this slow grower. A large wet zone the roots never colonize stays saturated in moderate light and invites rot before the plant fills the space. Raindrop Peperomia tolerates slight snugness better than chronic wet feet-resist upsizing into a decorative bowl because the leaves look lush.
For pot-size rules and the one-size-up principle, the repotting guide carries full detail. This page focuses on recognizing when the current container is the problem.
Dense peat, blocked holes, and decorative shells
No drainage holes or holes blocked by roots and debris trap water at the bottom. Potted plants should always have good drainage so excess water can exit and the mix does not become waterlogged.
Heavy peat-only mix without perlite or bark holds moisture like a sponge. Raindrop Peperomia needs moist, well-drained loam-dense media suffocates fine roots even with careful watering. See the soil guide for a 50/25/25 blend or African violet mix amended with perlite.
Cache pots without emptying turn runoff into a standing bath. Decorative shells work only when the inner pot drains freely and you remove excess water after every drink.
Root-bound undersized pots
Circling roots fill a small container, water runs straight through without wetting the root mass, and the plant wilts between brief wet spells. Roots exiting drainage holes signal it is time to move up one size-not several. Slight snugness is less dangerous than swimming in empty wet soil.
Pot material and dry-down speed
Unglazed terracotta pulls moisture faster; glazed ceramic and plastic hold it longer. Neither is wrong- but switching materials without adjusting your watering rhythm throws off the dry-down cycle. In dim winter rooms, plastic cache-pot displays dry even more slowly; wet mix persists longer even when hole size and pot diameter look correct.
How to confirm the cause
Work through this inspection order before repotting:
- Drainage path - Water should exit holes within minutes. Lift the pot from its saucer or cache pot immediately after watering. Standing water underneath confirms trapped runoff.
- Hole condition - Roots matting over holes, gravel plugs, or decorative bases flush against holes all block outflow. Gravel under soil decreases drainage-do not assume a bottom layer fixes a bad setup.
- Pot size vs. root ball - Slide the plant partway out. More than 2 inches of empty wet soil around a small root mass means the pot is too large. Tight circling roots with little soil left mean it is too small.
- Mix texture - Crumbly mix with perlite is appropriate. Dense peat that smears when wet and stays clumped confirms the wrong medium.
- Pot weight timeline - Note how many days the container stays heavy after one watering. Chronic heaviness in moderate light points to setup, not just frequency.
- Stem base and smell - Firm tissue at the soil line is reassuring. Soft stems or sour odor mean escalate toward unpotting and root inspection.
Lookalike symptoms to rule out
Simple overwatering on a good pot resolves when you dry the mix down-the overwatering guide covers frequency errors. Setup problems persist after dry-down because holes, size, or mix still fail. Underwatering shows light pots and dry soil throughout, not chronic heaviness. Low light slows drying but should not cause sour soil if drainage and pot size are correct. Repotting stress can yellow leaves temporarily-but that follows a recent move, not months in a sealed cache pot.
Pilea confusion: Raindrop Peperomia is commonly confused with Pilea peperomioides. Many growers keep pilea on a lighter watering rhythm in shallow display pots-treating P. polybotrya the same way in a sealed decorative shell keeps mix damp too long.
Severity decision table
| Severity | What you see | Pot / mix clues | First action | Escalate to |
|---|---|---|---|---|
| Mild | Slow growth, slightly heavy pot, firm stems | Cache pot with occasional standing water; pot one size large | Lift from shell, empty saucer, open blocked holes; pause watering until top 1–2 inches dry | Repotting guide if no improvement in 2 weeks |
| Moderate | Yellow lower leaves, gnats, dull teardrop gloss | Oversized planter, dense peat plug, blocked holes | Verify drainage, then repot into right-sized pot with airy mix per soil guide | Overwatering if frequency also off |
| Severe | Limp leaves on wet mix, sour smell, soft stem base | Standing water for days, no holes, mushy roots on unpotting | Trim mushy roots, smallest fitting pot, fresh mix; withhold water ~1 week | Root rot guide for full rescue ladder |
First fix for Raindrop Peperomia
Confirm and clear the drainage path before any other change.
Remove the plant from decorative outer pots. Pour off saucer water. Probe drainage holes with a skewer if flow seems slow. Stop watering until the top 1–2 inches of mix are dry so you can assess how the current setup actually behaves.
Only after drainage is verified should you decide whether repotting is needed. If holes were blocked or water was standing, many early cases stabilize once the root zone can breathe-without an immediate transplant.
Step-by-step recovery
When inspection confirms a structural problem-oversized pot, no holes, root-bound nursery container, or heavy mix-repot during active growth. Full technique, gentle root handling, and post-repot watering nuance live on the repotting guide; the essentials:
- Choose the right container - No more than 2 inches larger in diameter than the current pot. Functional drainage holes are non-negotiable. A shallow, wide pot suits the shallow root profile better than a deep tall one.
- Prepare airy mix - Blend per the soil guide: roughly 50% indoor potting soil, 25% perlite, 25% orchid bark-or African violet mix with extra perlite. Avoid garden soil or pure peat.
- Unpot gently - Raindrop Peperomia roots are brittle. Loosen circling roots on the outer edge; trim only mushy or black tissue. Do not bare-root or aggressively tease-fine root hairs absorb water.
- Set depth correctly - Root ball top should sit about an inch below the rim with fresh mix around the sides, not piled on top of the crown.
- Water once lightly - Let excess drain fully, then empty the saucer. Avoid overwatering right after repotting-saturated fresh mix on stressed roots adds unnecessary strain.
- Hold off on fertilizer until new growth appears.
When to escalate to root rot protocol
If roots are mostly mushy after unpotting, switch to the root rot guide: trim aggressively, repot into fresh mix in the smallest pot that fits trimmed roots, and withhold water for about a week. Stem cuttings from firm tissue above the damage may be the salvage path if the crown is compromised.
Avoid winter repotting unless stems are softening or watering is impossible-schedule non-emergency moves for spring per the repotting guide.
Recovery timeline
Mild setup corrections-clearing cache-pot water, opening blocked holes-often show firmer leaves within one to two weeks once the mix dries on a normal cycle.
Full repot into proper size and mix typically produces new root tips in two to three weeks and fresh teardrop leaves within four to six weeks in bright indirect light.
Yellow leaves that already formed usually do not green up again. Judge success by neutral-smelling soil, lighter pot weight between waterings, and new firm foliage-not by old damaged leaves.
Mistakes to avoid
- Repotting into a much larger decorative pot because the upright plant looks small-extra wet soil around tiny roots is the classic Raindrop decline trigger.
- Choosing a deep cachepot because the stem is tall-roots live shallow; depth becomes a wet basement the plant never uses.
- Drilling no holes because “peperomia likes moisture”-it needs damp mix, not standing water at the bottom.
- Leaving the nursery pot inside a sealed cache pot forever-empty runoff or use the decorative shell only as a dry display base.
- Adding gravel to the pot bottom thinking it improves drainage-extension guidance shows it can actually reduce it.
- Stacking repotting, pruning, and fertilizing in the same week-fix the container first, then adjust care once the plant stabilizes.
- Assuming plump teardrop leaves mean roots are fine-semi-succulent foliage masks failure until yellowing or wilt-on-wet-mix appears.
How to prevent poor potting setup on Raindrop Peperomia
Match pot size to root mass, not leaf display. Repot every two to three years when roots exit holes or growth stalls. Use moist, well-drained mix with perlite per the soil guide, pots with open holes, and empty saucers within 30 minutes of watering.
For cache-pot displays, treat the inner grow pot as the real home-lift it out to water at the sink, drain fully, then return it to the shell only when the saucer is dry. When upgrading containers, move up one size at a time. Refresh compacted mix before it breaks down into a dense wet plug.
When to worry
Treat setup failure as urgent when stems soften at the base, soil smells sour despite cautious watering, or drooping happens on wet mix-those point to active root damage. Mild slow growth in a slightly oversized pot with firm stems gives you time to repot properly before rot sets in.
If most roots are mushy after unpotting, propagation from healthy stem cuttings above the damage may be more realistic than saving the original root ball-see the root rot guide for the full ladder.
Conclusion
Poor potting setup on Raindrop Peperomia hides behind glossy teardrop leaves and a compact silhouette: a sealed cache pot, a container one size too big, or nursery mix that never dries. The plant’s shallow, oxygen-sensitive roots cannot compensate for a large wet zone or trapped runoff. Confirm drainage first, size the container to the roots-not the stem height-use airy mix, and let the pot tell you when to water.
When you are ready to execute the repot, mix ratios, and seasonal timing in full, continue with the Raindrop Peperomia repotting guide.
Related guides
- Raindrop Peperomia overview - species biology and compact upright habit
- Raindrop Peperomia repotting - step-by-step procedure, pot geometry, post-repot care
- Raindrop Peperomia soil - fast-draining mix ratios
- Overwatering - frequency errors on an otherwise adequate pot
- Root rot - mushy-root rescue and stem-cutting salvage
- Raindrop Peperomia watering - dry-down rhythm after drainage is fixed
When to use this page vs other Raindrop Peperomia guides
- Raindrop Peperomia watering guide - Use for routine moisture checks before assuming poor potting setup is the main issue.
- Raindrop Peperomia problems hub - Browse all 20 common issues on this species.