Spider Mites on Polka Dot Plant: Causes, Checks & Fixes
Quick answer
On Polka Dot Plant, spider mites are easiest to miss early because natural leaf speckles can hide fresh stippling. First fix: isolate the plant, rinse leaf undersides well, then start a labeled insecticidal soap or horticultural oil cycle every 5-7 days.
Spider Mites on Polka Dot Plant: Causes, Checks & Fixes
This guide covers spider mites on Polka Dot Plant. See also the general Spider Mites guide, watering, and light pages for this plant.
Spider Mites on Polka Dot Plant: Causes, Checks & Fixes
Quick answer
Spider mites on Polka Dot Plant (Hypoestes phyllostachya) usually flare when indoor air is warm and dry, and this species is less forgiving because it prefers consistently humid conditions for best foliage quality. On speckled cultivars, early mite stippling can blend into natural pink, white, or red spotting - so underside checks matter more than top-leaf color alone.
First step: isolate the pot, rinse leaf undersides thoroughly, then begin a labeled insecticidal soap or horticultural oil treatment cycle every 5–7 days. That sequence confirms active pests, knocks down adults, and sets up repeat coverage before populations rebound in heated rooms.
This page is the spider-mite hub for Polka Dot Plant. If margins crisp without stippling or webbing, start with low humidity on polka dot plant instead.
Why Polka Dot Plant gets spider mites
Spider mites thrive in hot, dry conditions and tend to accelerate indoors during heater season when relative humidity drops below 50%. Polka Dot Plant is a humidity-loving tropical foliage species, so dry air creates a double problem: plant stress plus better pest conditions.
Dense pinched growth creates shelter. Polka Dot Plant is often pinched weekly to stay full, which doubles sheltered axils and interior nodes where mites feed unnoticed. Your pinching habit is also your best scouting opportunity - if you only admire the colorful leaf tops, you will miss stippling tucked against stems.
Speckled cultivars camouflage early damage. Pink Splash, Confetti, and white-heavy cultivars already show pale flecks in the leaf tissue. Fresh mite stippling can look like more variegation until webbing appears. White- or pink-dominant leaves hide pale feeding marks longer than green-forward specimens - compare suspect leaves to newer healthy leaves on the same stem, not to a photo online.
Warm window sills and heat vents. Plants on south-facing glass or above radiators experience leaf-level heat and low humidity even when room air feels comfortable. Mississippi State Extension notes plants in especially warm locations are especially susceptible to spider mites.
Hitchhikers from new purchases. Mites spread on infested nursery stock, outdoor-summered patio plants, and shelf neighbors before webbing is obvious. Quarantine new polka dots for two to three weeks with weekly underside checks before grouping them in a terrarium or bathroom display.
What spider mites look like on Polka Dot Plant
Watch for these signs in order of progression:

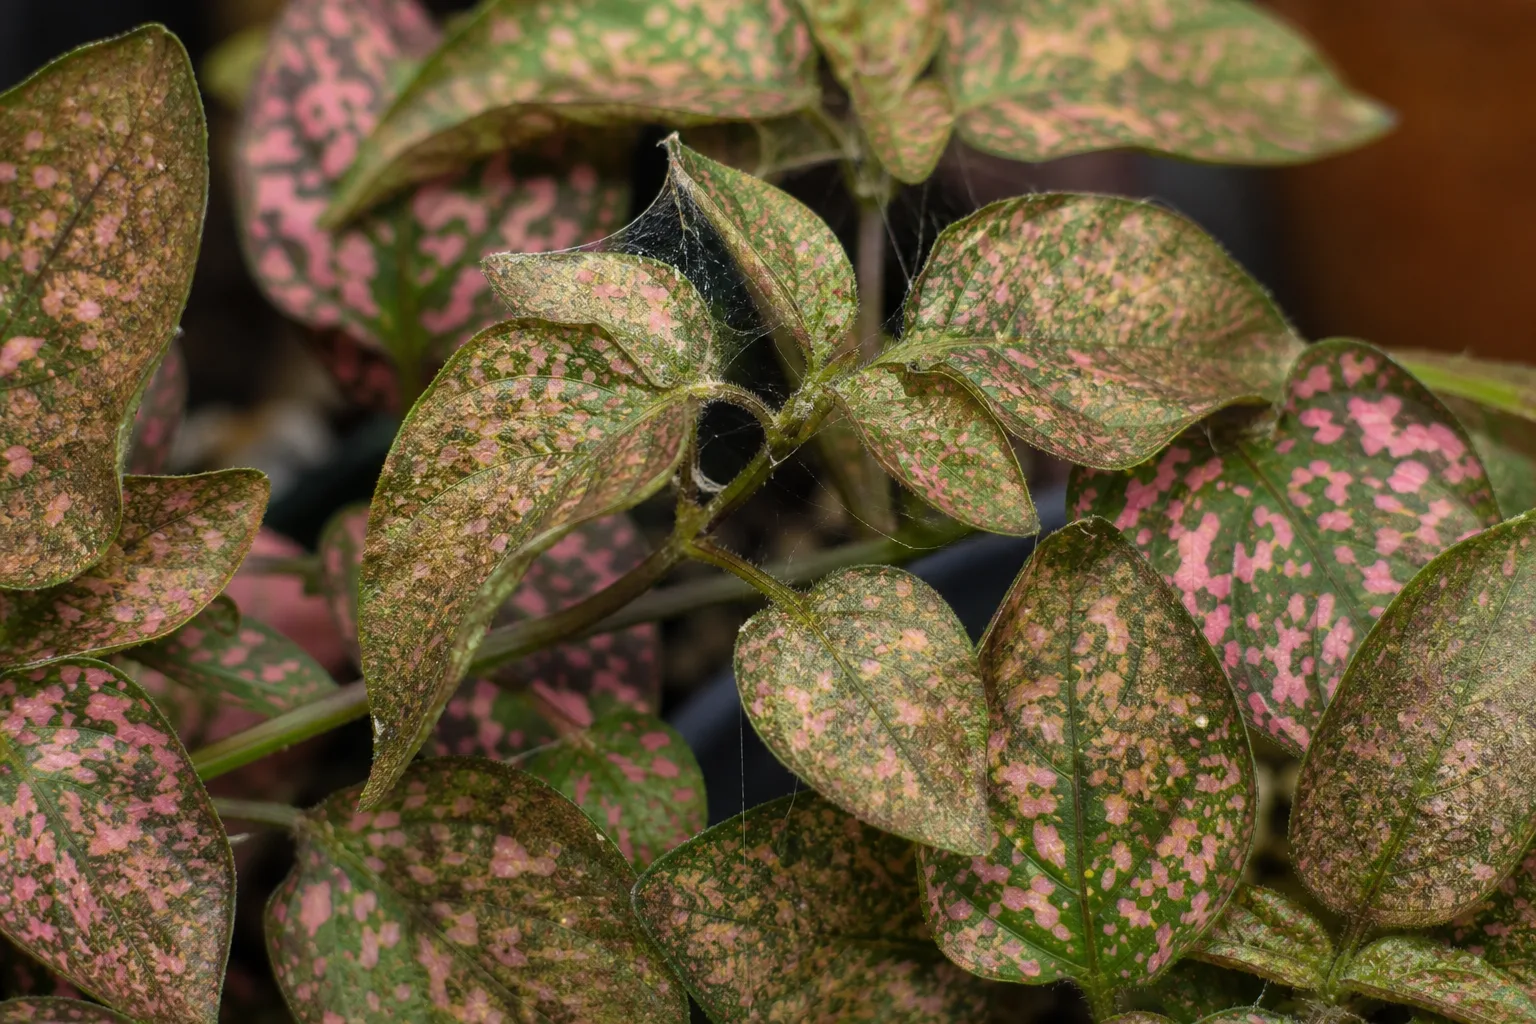
Spider Mites symptoms on Polka Dot Plant - compare with healthy tissue on the same plant.
- Very fine pale stippling - tiny yellow or white dots where mites pierce cells; on speckled leaves this can masquerade as extra pigment at first
- Dulling or bronzing patches as feeding pressure increases across a leaf section
- Fine silk webbing along undersides, petiole joins, and inner nodes once populations climb
- Leaf drop on heavily infested lower stems while the plant still pushes tips - a late-stage warning
On Polka Dot Plant, compare suspicious leaves to newer healthy leaves on the same stem. Natural variegation appears as stable pigment patterning from the first true leaves; mite damage looks like random surface flecking that spreads and leaves tissue looking dusty or drained. Webbing at a node is the clearest separator from cultivar speckling.
Photo reference (pending): Side-by-side macro of stable pink speckle pattern vs. irregular mite stippling on the same cultivar; underside webbing at an interior pinch node.
How to confirm the cause
Work through this inspection in order so you do not miss early infestations:
- Paper-tap test - hold white paper under a leaf, tap sharply, and look for moving specks. Crush one - a green or red smear confirms spider mite, not dust.
- Underside lens check - inspect lower leaf surfaces and node joints with a phone macro lens for mites, cast skins, and silk threads.
- Pattern check - compare suspect leaves to unaffected leaves from the same plant section to separate pest stippling from normal speckle pattern.
- Neighbor check - inspect nearby humidity-loving plants; spider mites spread shelf to shelf quickly in dry rooms.
Spider mites are arachnids, not insects, which is one reason labeled miticidal or soap/oil coverage strategy matters - broad-spectrum indoor sprays aimed at insects may miss mites entirely.
Symptom vs. lookalike decision table
| What you see | Spider mites | More likely lookalike |
|---|---|---|
| Mark location | Random stippling spreading across blade; webbing at nodes | Speckles follow cultivar pattern from first leaves |
| Paper-tap test | Moving specks; green/red smear when crushed | No movement; dust wipes dry |
| Webbing | Fine silk on undersides and stem joints | No silk - see thrips silvering or mealybugs wax |
| Humidity context | Heated dry room; hygrometer below 40% at canopy | Crispy edges only - low humidity without insects |
| Urgency | Webbing on growing tips = treat this week | Edge browning on firm leaves, no movement = humidity or brown tips |
First fix for Polka Dot Plant
Isolate and rinse - not spray first.
- Isolate immediately from the rest of your houseplants.
- Rinse all foliage in the sink or shower with attention to undersides and inner nodes. Forceful water sprays can remove mites when repeated at 3–5 day intervals.
- Apply a labeled insecticidal soap or horticultural oil with full underside coverage after foliage dries - insecticidal soap and horticultural oil are effective spider-mite treatments when the label permits indoor use.
- Repeat every 5–7 days for at least three rounds to disrupt hatch cycles - MS State Extension recommends treating two to three times at 5-day intervals.
- Raise humidity toward 50–70% at canopy height and keep the plant off hot air streams per our low humidity guide.
Do not fertilize as your first response. A stressed, actively infested plant usually needs pest reduction and stable moisture first.
Soap vs. oil on tender new growth: Polka Dot Plant pushes soft shoots after every pinch. Horticultural oil can burn thin new leaves in hot, bright rooms. If your plant was recently moved to stronger light or sits in a warm window, test one leaf with oil, wait 24 hours, or default to insecticidal soap for the first two cycles on tender regrowth. UC IPM notes eggs are not killed by soap sprays - repeat coverage is mandatory either way.
Step-by-step recovery (by severity)
Match your response to infestation severity so you do not overtreat or undertreat:
Early infestation (light stippling, no heavy webbing)
- Rinse + full-coverage spray cycle, then recheck after 5–7 days.
- Inspect interior pinch nodes with a magnifier each cycle.
- Keep isolated until two consecutive checks show no new stippling or webbing.
Moderate infestation (visible webbing on several stems)
- Keep the same spray cadence; add a second rinse between spray days if the plant tolerates it.
- Increase inspection frequency to every three days.
- Remove only the worst yellowed leaves after activity drops - do not strip the plant bare while mites are still active.
- Hold pinching until two clean weekly checks; fresh soft shoots are harder to coat and easier for mites to hide in.
Shelf-wide spread (multiple plants affected)
- Isolate the worst pots and treat all exposed neighbors on the same 5–7 day schedule.
- Improve room humidity and airflow together - grouping helps humidity but can speed mite walking between pots if treatment is inconsistent.
- Quarantine any new arrivals for two to three weeks before returning them to the shelf.
Recovery timeline
Existing stippling does not heal. Judge recovery by clean new growth, reduced webbing, and stable leaf retention rather than hoping old marks disappear.
Typical pattern on a bushy polka dot in warm bright conditions:
- Week 1: less active movement after first two treatments if coverage is complete.
- Week 2–3: webbing should decline sharply; new leaves should emerge with intact speckling and no fresh stippling.
- Week 4+: resume normal pinching per our pruning guide only after repeated checks show no active mites.
Signs treatment is failing: new webbing on previously clean stems between cycles, accelerating leaf drop despite wet soil, or mites visible on neighboring plants after three full spray rounds.
Lookalikes to rule out
| Problem | How it can look similar | What separates it from spider mites |
|---|---|---|
| Low humidity stress | Crispy edges, dull color | Edge browning without moving specks or webbing |
| Thrips | Silvering and distortion | Black frass spots and different feeding streaks; webbing uncommon |
| Salt/fertilizer stress | Leaf burn and patchy decline | Linked to soil crust and watering history, not underside webbing |
| Natural speckle variation | Pale patterning on leaves | Pattern is cultivar-consistent, not fast-spreading random stippling |
| Mealybugs | White marks on stems | Cottony wax in axils, not stippling across leaf blade |
What not to do
- Mist once and assume the problem is solved - brief misting does not replace rinse-and-spray cycles or humidity management.
- Use outdoor pesticides indoors unless the label clearly permits indoor ornamental use.
- Prune heavily while mite activity is still high - dense regrowth makes follow-up coverage harder and gives mites new soft tissue.
- Fertilize during active infestation - nitrogen pushes tender shoots mites prefer.
- Return the plant to a shared shelf too soon - two pest-free weeks minimum after the last visible webbing.
- Compost infested trimmings near active indoor plant areas.
How to prevent spider mites
Keep humidity consistently in the 50–70% range at canopy height, inspect undersides during every weekly pinch session, and quarantine new plants for two to three weeks before placing them on shared shelves. A monthly rinse-and-check routine is especially useful for polka-dot plants because dense growth can hide early colonies.
Avoid placing pots directly above radiators or in hot window drafts. Group humidity-loving plants to share transpired moisture, but treat the whole group if one pot shows webbing. For routine culture context, see our watering and light guides.
When to worry
Escalate urgency when:
- Webbing reaches multiple growing tips or growing points stall
- Leaf drop accelerates despite two full treatment rounds with complete underside coverage
- Mites are now visible on neighboring plants on the same shelf
- Ants or sooty mold appear - sometimes a sign of other sap feeders sharing stressed plants
In severe, repeated infestations on a heavily declining short-lived specimen, replacement can be more practical than endless retreatment. Polka Dot Plant is often grown as a colorful seasonal desk plant; a backup stem-tip cutting rooted during early recovery may outpace a repeatedly defoliated mother.
If mites persist after four weekly cycles with correct coverage, contact your local cooperative extension office or master gardener helpline before rotating to stronger products.
Escalation summary
- Rinse + monitor - Few stippled leaves, no webbing, firm stems, hygrometer below 40%. Rinse undersides twice weekly; raise humidity; recheck in 10 days.
- Rinse + soap/oil cycle - Webbing on one or two stems, paper-tap confirms mites. Isolate; three to four treatments at 5–7 day intervals.
- Collection protocol - Multiple pots on one shelf show stippling. Treat every exposed plant on the same schedule; quarantine new arrivals.
- Replace or propagate - Growing tips webbed solid, majority of leaves dropped, three treatment rounds failed. Take healthy tip cuttings if any firm tissue remains per our propagation guide.
Related Polka Dot Plant guides
- Polka Dot Plant overview - full care hub for humidity, light, and pinching
- Low humidity - crisp edges without insects; dry-air prevention
- Mealybugs - white wax in axils, not stippling
- Aphids - soft shoots with honeydew, no webbing
- Brown tips - margin burn from several causes
- Leggy growth - recovery after pests when light was also marginal
- Watering - moisture rhythm during recovery
- Pruning - weekly pinching and where to inspect for mites
FAQs
How do I tell mite stippling from normal Polka Dot Plant speckles?
Natural speckling follows the cultivar pattern and is usually even across leaves from the first true leaves outward. Mite stippling looks dusty, irregular, and increases quickly over one to two weeks, especially with webbing on leaf undersides and nodes. When in doubt, run the paper-tap test - speckles do not crawl.
Should I pinch damaged Polka Dot Plant growth right away?
Wait to pinch hard until mite activity is controlled. Early heavy pinching on an active infestation can hide pests in dense new growth and make treatment coverage harder. Once two weekly checks show no new webbing, resume normal tip pinching per our pruning guide.
How often should I repeat treatment for spider mites?
Most indoor control plans use repeat coverage every 5–7 days for at least three rounds. That schedule helps catch newly hatched mites before populations rebound in warm rooms. Eggs survive soap sprays, so stopping after one application rarely clears a bushy polka dot.
Can my Polka Dot Plant recover from spider mites?
Yes, if you catch it before severe webbing and stem decline. Existing stippling will not reverse, but clean new growth with intact pink or white speckling is a strong recovery sign. This species branches quickly in bright filtered light once pests are gone.
Can spider mites spread from Polka Dot Plant to nearby plants?
Yes. Spider mites spread easily across close shelves, especially in warm, dry indoor air, so isolate quickly and inspect neighboring plants. Quarantine new purchases for two to three weeks before returning them to a shared bathroom or terrarium display.
Conclusion
Spider mites on Polka Dot Plant are a common dry-air pest - not a sign your freckle face is doomed. Their stippling hides in cultivar speckling and dense pinch nodes, so underside inspection matters more than admiring leaf tops.
Isolate first, rinse thoroughly, then repeat soap or oil coverage every 5–7 days until new growth emerges clean. Judge success by intact speckling on fresh leaves, not by old stippled tissue. Route cottony wax to mealybugs and crisp edges without webbing to low humidity.