Peace Lily Watering: Schedule, Soil Checks & Mistakes
Peace Lily Watering: Schedule, Soil Checks & Mistakes
Peace Lily Watering: Schedule, Soil Checks & Mistakes
Peace lily watering looks simple until you own one. The plant collapses like it is dying, you give it a drink, and it stands upright again a few hours later - as if nothing happened. That dramatic wilt-and-recovery cycle is one of the most distinctive behaviors in houseplant care, and it makes peace lily watering feel intuitive in exactly the wrong way. Many owners learn to water on droop alone, which works until it does not, because the same limp leaves can mean thirsty roots or rotting ones. The goal is not to keep the soil wet at all times. The goal is to keep the root zone consistently moist through a predictable dry-down window, use water the plant can actually process, and read the pot before you read the leaves.
Why Peace Lilies Need Consistently Moist - Not Soggy - Soil
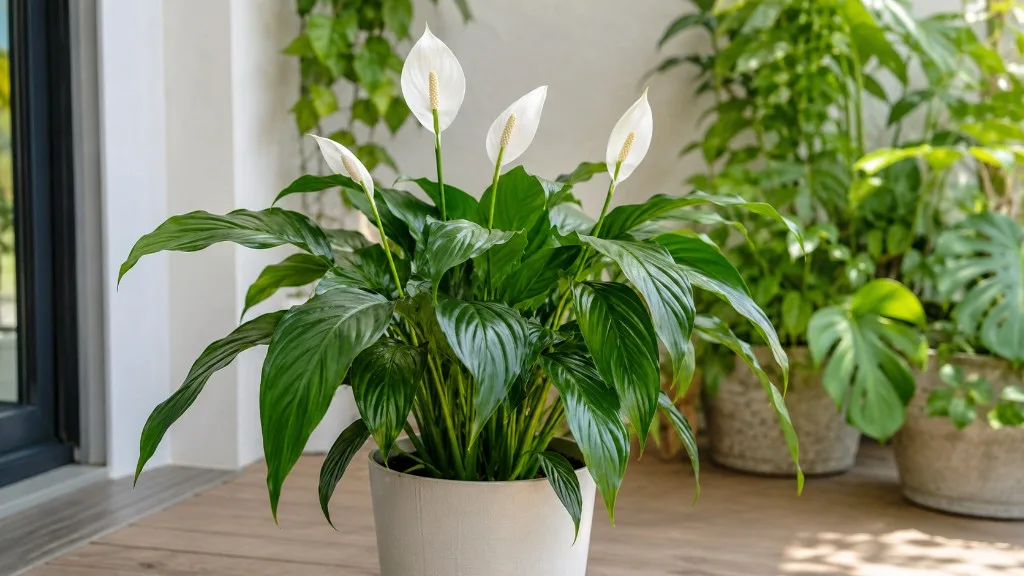
Peace lilies (Spathiphyllum spp., especially Spathiphyllum wallisii and its hybrids) evolved as tropical forest-floor plants where soil stays damp but never waterlogged. Clemson University’s Home & Garden Information Center describes the ideal as soil that is kept moist but not soggy, allowed to dry out slightly between waterings. That single sentence contains the whole philosophy: moisture at the roots, oxygen in the pore spaces, and a brief dry surface layer before the next drink. When you hit that balance, leaves stay glossy, new growth emerges from the center, and white spathes form more reliably on mature plants.
The trouble is that “moist” and “wet” are not the same thing, and peace lilies punish both extremes. Bone-dry soil collapses turgor pressure in the leaves within hours, producing the famous wilt. Permanently saturated soil displaces oxygen, suffocates fine roots, and opens the door to root and stem diseases that Clemson HGIC links to overwatering practices. The plant that looks healthiest long-term is neither cycling through daily crash-and-recovery nor sitting in stale, sour mix. It is the one whose soil dries gently at the top while staying lightly damp where the roots actually live.
What “Consistently Moist” Actually Means Indoors
Consistently moist does not mean watering on a fixed weekly schedule. It means the root ball rarely experiences full drought and never sits in standing water. In practice, most healthy indoor peace lilies reach that state when the top 1 to 2 inches (2.5 to 5 cm) of soil feel dry to the touch, while the lower profile still holds faint moisture. Clemson HGIC recommends allowing the mix to dry out slightly between waterings rather than counting days on a calendar. The surface color lightens, the pot feels noticeably lighter when you lift it, and only then do you water thoroughly.
Environmental variables shift how fast that dry-down happens. A peace lily in Peace Lily light guide on a warm windowsill may need water every four to seven days during summer growth. The same plant in a fluorescent-lit office corner might go seven to twelve days between drinks because evaporation is slower and transpiration is lower. Pot size matters too: a slightly root-bound peace lily in a snug container dries faster than a recently repotted plant swimming in fresh, unused mix. Consistently moist is therefore a condition you maintain by checking the pot, not a number you memorize.
How Often to Water a Peace Lily
If you are searching for how often to water a peace lily, the honest answer is that there is no fixed calendar interval that works in every home. The seven-to-ten-day range cited in many care guides is a starting observation for average indoor conditions, not a rule. Your peace lily might need water twice a week in a dry, sunlit room during July and once every two weeks in a cool, shaded spot during January. Chasing a schedule without checking soil moisture is how owners accidentally train themselves into chronic overwatering in winter or repeated underwatering crashes in summer.
Clemson HGIC and other extension sources converge on one principle: water when the soil has slightly dried, not when a phone reminder fires. Peace lilies are thirsty by houseplant standards, but they are still aroids that need oxygen at the roots. The best rhythm is check first, water second, drain always. Once you adopt that loop, frequency takes care of itself because you are responding to the actual dry-down rate in your specific pot, not to someone else’s climate.
Checking Soil Moisture Before You Pour
Reliable peace lily watering starts with three checks that take under thirty seconds. First, press your finger into the mix to the second knuckle. If the top inch feels dry and the material below still has slight coolness or give, you are in the watering window. Second, lift the pot. A peace lily ready for water feels distinctly light compared to how it felt one or two days after its last thorough drink. Third, look at the soil surface. Dry mix is lighter in color and may pull slightly away from the pot wall in severe cases, which is a late-stage thirst signal you want to catch earlier next time.
A moisture meter can help if you struggle to read peat-based mixes by touch, but treat it as a secondary tool, not a verdict. Meters lag behind reality in dense or stratified soil and can read “moist” at the probe depth while the surface has been dry for days. Clemson HGIC notes that well-drained potting mixes and proper saucer drainage are central to houseplant watering success - so your reading habits should match your actual potting medium. The finger-and-weight combination remains the most dependable pair for most indoor growers.
Seasonal Rhythm: Spring Through Winter
Peace lily water requirements follow the plant’s growth cycle even indoors, where seasons are muted but not absent. From late spring through summer, longer days and warmer temperatures increase transpiration, and you will water more often while still checking soil each time. Early fall brings a gradual slowdown as light softens. Winter is the danger season for overwatering: growth stalls, soil stays wet longer, and the instinct to “give it a little something” on a gray afternoon is how root rot on Peace Lily starts in an otherwise healthy plant.
A practical seasonal framework looks like this without turning into a rigid calendar. In peak growth months, expect faster dry-down and keep the root zone evenly moist - never bone dry, never soggy. In shoulder seasons, stretch the interval slightly and pay attention to whether new leaves are still emerging. In winter, let the top dry a bit further before watering, reduce volume if the pot stays heavy, and move the plant away from cold drafts that compound moisture stress. Clemson HGIC notes that temperatures below about 60°F (15°C) slow metabolism and water uptake, which means the same pour that was perfect in August can be excessive in February.
The Peace Lily’s Dramatic Wilt - and Fast Recovery
No houseplant performs thirst quite like a peace lily. Leaves that were upright at breakfast can lie flat against the pot by afternoon if the root ball dried out. Interiorscape professionals sometimes call severe underwatering-induced collapse “crashing,” and Clemson HGIC confirms what owners discover on their own: a wilted peace lily that still has healthy roots will recover once watered correctly, though the plant will wilt when the soil dries excessively. That recovery speed is genuinely remarkable and is one reason the species survives in offices and low-care environments where other plants would not.
The mechanism is straightforward. Leaf and petiole cells lose turgor pressure when roots cannot supply water fast enough. The plant sacrifices posture to reduce surface area and slow water loss - a controlled drought response, not immediate death. Pour in enough water to fully saturate the root ball, let excess drain freely, and check back in two to four hours. Most plants show visible improvement the same day and stand fully upright by the next morning. If you have ever watched a flattened peace lily perk up after a soak, you understand why so many people assume droop is the only signal that matters.
Underwatering vs Overwatering Droop: How to Tell Them Apart
Here is the central diagnostic problem in peace lily watering: underwatering and overwatering can both cause wilting, but the fixes are opposite and the recovery timelines differ dramatically. Underwatered droop arrives with dry, lightweight soil, leaves that feel thin and papery, and sometimes dry edges pulling inward. Water thoroughly and the plant usually rebounds within hours. Overwatered droop arrives with soil that stays wet or heavy several days after watering, leaves that may yellow from the bottom up, and a sour or musty smell from the pot. Giving more water makes this worse, and recovery - if it is still possible - takes weeks of root repair, not an afternoon.
Before you water a wilted peace lily, always check the soil. If the mix is wet and the plant is limp, you are likely looking at root damage, not thirst. If the mix is dry and the pot is light, you are looking at a crash you can fix quickly. One more tell: underwatered plants tend to perk up and stay up until the next legitimate dry-down. Overwatered plants may briefly stiffen after a misguided pour, then wilt again within one to two days as failing roots cannot move water. Learning to separate these two stories is the skill that separates owners who keep peace lilies for years from owners who cycle through replacements every few months.
Reviving a Collapsed Peace Lily Step by Step
When you have confirmed underwatering - dry soil, light pot, green leaves gone limp - revival is simple but must be thorough. Carry the plant to a sink or basin and water slowly until the entire root ball saturates and excess runs freely from the drainage holes. A surface splash that only wets the top inch is not enough; dry peat can channel water down the pot sides while the center stays parched. If water races straight through and out the bottom in seconds, your mix may have gone hydrophobic from extended drought. In that case, bottom-water by setting the pot in a few inches of water for thirty to forty-five minutes so the root mass rehydrates from below, then let it drain completely.
After soaking, empty the saucer or cachepot so the plant is not sitting in runoff. Return it to its usual bright indirect light - not direct sun, which stresses a dehydrated plant further. Check progress at the two-hour mark and again the next morning. Do not fertilize during recovery; roots under stress cannot handle salts. If the plant has not improved after a verified full soak, inspect whether the soil was actually dry throughout or whether a hidden drainage problem has been leaving the bottom of the root ball wet while the top dried. That mixed-moisture pattern confuses both plants and owners.
Chlorinated and Fluoridated Tap Water Sensitivity
Peace lilies are more sensitive to municipal tap water chemistry than many common houseplants. The issue is not mystery or fussiness - it is physiology. As monocots, peace lilies transport water and dissolved minerals to leaf margins through vascular tissue. When that water carries chlorine, fluoride, chloramine, or accumulated hard-water salts, those compounds concentrate at the tips where transpiration is highest. Cells die, tissue turns brown and crispy, and the damage is permanent on affected leaf areas even after you correct the water source.
This is why a peace lily can receive what feels like perfect peace lily watering on a consistent schedule and still develop brown tips. The soil moisture rhythm is right, but the chemistry is wrong. The RHS and Old Farmer’s Almanac note that peace lilies can be sensitive to fluoride and chlorine in tap water. Many municipal systems add fluoride at levels safe for human consumption but problematic for this genus over months of repeated watering. Chlorine receives more attention in casual advice, but fluoride is often the harder problem because it does not evaporate from an open container.
Water Types Ranked by What Works Best
Not every grower needs the same water solution. Ranked from most to least forgiving for peace lilies with chemical sensitivity:
Rainwater is the gold standard where collection is practical - naturally soft, free of treatment additives, and close to what the plant would receive in its native tropical habitat. Distilled or reverse osmosis (RO) water removes virtually all minerals and additives and works excellently for sensitive plants, though long-term use in inert mixes may eventually warrant very light balanced feeding since those waters contribute no minerals. Filtered pitcher water (basic activated carbon filters) removes much of the chlorine and improves outcomes noticeably for many households; it is the most cost-effective upgrade for beginners. Tap water left open for twenty-four to forty-eight hours off-gasses free chlorine but does not remove fluoride, chloramine (used by many modern utilities instead of chlorine), or hard-water minerals - so it helps some situations and fails in others.
If you are unsure what is causing tip burn, switch to filtered or distilled water for four to six weeks and watch only new growth. Old brown tips will not green up; the test is whether fresh leaves emerge clean. That single experiment tells you more than guessing about humidity or fertilizer.
Flushing Salt and Chemical Buildup from the Soil
Even after you improve your water source, legacy salts and fluoride may linger in the potting mix. Periodic flushing leaches those residues before they reach toxic concentration at the root surface and leaf margins. Every four to six weeks during active growth, water slowly with your improved water source until several pot-volumes run through the soil and out the drainage holes. Let the plant drain fully afterward. This is not a daily practice - it is maintenance, like clearing a filter.
If you see white crust on the soil surface or pot rim, that is mineral precipitation and a clear sign flushing is overdue. Combine flushing with a water-source upgrade rather than doing one without the other. You can safely trim existing brown tips with clean scissors, following the natural leaf curve so the cut does not look squared-off and artificial. Trimming is cosmetic; flushing and better water are the actual fix.
Root Rot from Overwatering: Causes, Signs, and Rescue
Peace lily root rot is the most serious outcome of bad watering, and it is almost always cultural rather than random bad luck. Overwatering does not mean pouring too much water once. It means keeping the root zone oxygen-starved for too long - watering again before the soil has dried adequately, leaving the pot in a full saucer, using a mix that holds water without structure, or placing a plant in low light where evaporation barely happens. Clemson HGIC is direct: excess water leads to root rot issues, and tissues that should be firm and white turn brown, black, soft, or slimy.
Peace lilies are particularly vulnerable because owners misread wilt as thirst. A plant with early root rot droops; the natural response is to add more water; the rot accelerates. By the time lower leaves yellow and the base of stems darkens, damage may already be extensive. NC State Extension notes that overwatering and salt buildup can burn leaf tips and roots, and symptoms may progress for weeks before above-ground decline becomes obvious. Prevention is far easier than rescue, and prevention is almost entirely about drainage, soil structure, and checking moisture before every pour.
Early Warning Signs Before Roots Fail
Catch overwatered peace lily problems before roots turn to mush and your options narrow. Watch for these patterns:
- Yellowing lower leaves that appear while the soil stays wet, not dry
- Wilting despite moist soil, especially if the plant wilts again shortly after you watered
- Brown or blackening at the base of stems near soil level
- Soft, limp petioles on leaves that are yellowing rather than merely drooping green
- Musty, sour, or rotten smell when you sniff the drainage hole or lift the plant from its cachepot
- Mold or algae on the soil surface in low-light conditions
- Slowed or stopped new growth from the center while older foliage declines
A single yellow leaf on an old plant can be normal senescence. Multiple signals appearing together, especially with persistent wet soil, warrant immediate action - not another watering.
Emergency Repot and Root Trim Protocol
If you suspect peace lily root rot, unpot the plant immediately and inspect roots in good light. Healthy peace lily roots are firm and whitish to light tan. Diseased roots are dark, mushy, slimy, or hollow. Rinse away old soil gently with lukewarm water. Trim all compromised tissue back to firm root with sterilized scissors or shears. If you remove a large portion of root mass, trim back some foliage proportionally so the remaining roots can support the plant. Discard all old soil - do not compost it. Wash the pot with hot soapy water or a dilute bleach rinse if reusing it.
Repot into fresh, well-draining indoor potting mix with added perlite or bark for structure. Choose a container with drainage holes that is appropriately sized - not a huge pot that will hold moisture too long. Water lightly to settle the mix, then let the plant drain. Place it in bright indirect light and do not fertilize until you see new growth, which may take two to four weeks. Recovery is slow because roots must regrow before the plant can sustain upright leaves again. If every root is black and mushy with no firm tissue remaining, survival is unlikely no matter how skilled the repot.
Pot, Soil, and Drainage Choices That Shape Watering
Your watering technique does not exist in isolation. A peace lily in a ten-inch plastic nursery pot with four drainage holes and a chunky peat-perlite mix behaves nothing like one planted in a ceramic cachepot with no holes and straight bagged potting soil. Clemson HGIC warns that oversize pots keep mix too wet for too long, a common mistake after Peace Lily repotting guide. Peace lilies tolerate being slightly root-bound; a snug pot dries at a predictable rate and is often easier to water correctly than an unnecessarily large one.
Every pot must have functional drainage holes, and every saucer or decorative outer pot must be emptied after watering. Sitting in runoff is one of the fastest routes to root rot because the bottom of the root ball stays saturated while the surface appears to dry. If you use a cachepot for aesthetics, grow the plant in a plain inner pot that lifts out easily, water at the sink, and only return it to the decorative shell once dripping has stopped. Soil should be slightly moisture-retentive but never dense or compacted - the same Clemson HGIC guidance that applies to watering also applies here: moist, not soggy, with enough structure for air to move.
Watering Techniques That Keep the Root Zone Healthy
Top watering at the soil line - not splashed over leaves - is the standard method. Water evenly around the surface until you see free drainage. This distributes moisture through the profile and helps flush salts downward. Bottom watering is a useful supplement for plants that have become slightly dry at the core or for growers who tend to under-soak the center when pouring from above. Set the pot in standing water briefly, let the mix wick upward, then drain fully afterward. Bottom watering alone every cycle can allow salts to accumulate at the surface over time, so alternating methods or occasional top-water flushing is wise.
Use room-temperature water. Cold tap water shocks tropical roots and can slow uptake right when a wilted plant needs recovery. Morning watering gives the plant the full day to absorb and drain before cooler overnight conditions, which some growers find reduces fungal issues on stressed plants, though the more important variable is thorough drainage any time of day. Avoid misting as a substitute for soil moisture - peace lilies appreciate ambient humidity around forty to sixty percent, but misting leaves does not hydrate roots and can encourage foliar spotting in poor air circulation.
Common Peace Lily Watering Mistakes
The same errors appear in forum posts and extension clinic questions year after year. Watering on droop alone without checking soil trains owners to overwater rotting plants and underwater healthy ones in alternating cycles. Using a calendar reminder instead of a soil check ignores seasonal and environmental change. Leaving the pot in a full saucer creates a standing-water bath at the root base. Letting the plant crash repeatedly - even though recovery looks fast - stresses fine roots and reduces bloom potential over time; Clemson HGIC cautions that allowing soil to dry excessively causes wilt and yellowing, so droop alone should not replace regular moisture checks.
Using untreated tap water on sensitive cultivars produces brown tips that owners then blame on humidity or fertilizer. Repotting into an oversized container after a health scare keeps the mix wet too long and can restart rot in freshly trimmed roots. Watering with ice cubes - a social-media hack - delivers cold, uneven moisture and tells you nothing about whether the root ball actually received a full drink. Fertilizing a wilted or rotting plant adds salt stress when the root system cannot absorb it. Each of these mistakes is preventable once you treat watering as a diagnostic habit rather than a reflex.
Peace Lily Watering Checklist by Growing Situation
Different placements change the dry-down rate. Use these as starting frameworks, always overridden by what your finger and pot weight tell you.
Bright indirect light, warm room, active summer growth: Check every three to five days. Expect to water roughly weekly or more. Keep top inch dry-down consistent; do not let full crashes become routine.
Low-light office or north-facing room: Check every seven to ten days. Soil stays wet longer - resist the urge to water because the week arrived. Winter intervals may stretch further.
Recently repotted plant: Mix without established roots dries slowly. Extend the interval and verify the lower soil is not staying soggy while the surface looks fine.
Plant in a dry, air-conditioned space: Soil may dry faster than expected even in moderate light. Weight-check the pot mid-week during heat waves.
Plant recovering from root rot: Water sparingly after repot. Let the top inch dry, ensure drainage, and wait for new center growth before returning to a normal rhythm.
Plant with chronic brown tips: Switch water source first, flush salts, then evaluate whether inconsistent moisture is still contributing. Fix chemistry and rhythm together.
Conclusion
Peace lily watering succeeds when you treat moisture as a range, not a rule. Keep the root zone consistently moist by watering after the top inch dries, draining every saucer, and checking the pot before you react to wilt. Enjoy the plant’s dramatic recovery superpower when you genuinely underwater - but do not turn crashes into a lifestyle, because repeated drought cycles wear down fine roots even when leaves bounce back overnight. Match your water quality to the plant’s chemistry sensitivity: filtered, distilled, or rainwater prevents the brown-tip accumulation that tap water fluoride and chlorine cause over months of otherwise correct scheduling. Guard against root rot from overwatering by reading soil, not just leaves, and by respecting drainage in every pot and cachepot. A peace lily that is checked regularly, watered thoroughly, and allowed to breathe between drinks will reward you with deep green foliage, reliable structure, and - when light and maturity align - those white spathes that made the plant famous in the first place.
When to use this page vs other Peace Lily guides
- Peace Lily overview - Start here for whole-plant context before deep-diving this topic.
- Peace Lily problems hub - Jump to symptom-specific fix guides when this care topic does not resolve the issue.
- Root Rot on Peace Lily - Escalate here when watering adjustments are not enough.