How to Propagate Hoya Carnosa Stem Cuttings
How to Propagate Hoya Carnosa Stem Cuttings
How to Propagate Hoya Carnosa Stem Cuttings
How Hoya Carnosa Stem Propagation Works
Hoya carnosa propagation at home is almost always a story about stem cuttings - not seeds, not division, and not the single-leaf novelty pots that occasionally appear in gift shops. Hoya carnosa, the classic wax plant or porcelain flower, is an epiphytic trailing vine in the Apocynaceae family native to Eastern Asia, where it climbs trees and rocks in bright, humid forests. Indoors it roots most reliably from stem sections that carry at least one node, the slightly swollen joint where leaves, roots, or new shoots can emerge. Iowa State University Extension lists stem cuttings with one or two nodes as the most dependable propagation method for hoyas, with roots often appearing within weeks when warmth and Hoya Carnosa light guide stay consistent.
That node requirement sounds simple, but it is the line between a future trailing plant and a permanent paperweight. A Hoya carnosa leaf suspended in water or pinned in soil may stay green for months and even produce roots from the petiole base, yet without node tissue it cannot generate the bud that becomes a vine. Retail single-leaf Hoya souvenirs are the famous example: charming, alive, and often incapable of ever becoming a climbing plant because the seller removed the node. For propagation purposes, you are cloning vegetatively - the new plant will match the parent cultivar, whether that is the classic green form, ‘Krimson Queen’, ‘Tricolor’, or ‘Rubra’ - which makes stem quality and parent-plant health more important than any rooting gadget.
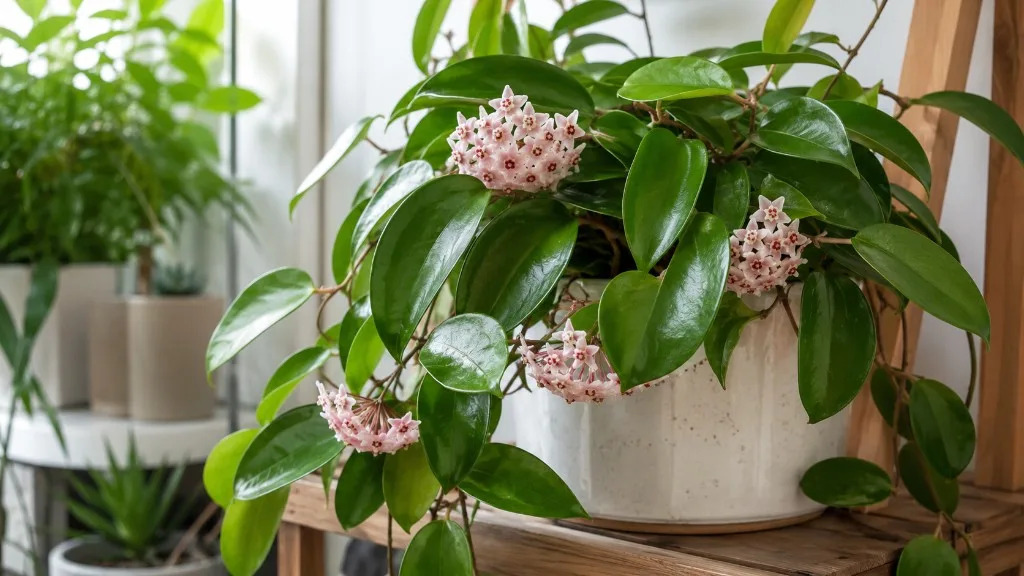
Propagation also intersects with one of the most misunderstood rules in Hoya carnosa culture: never remove peduncles or spurs. Those short, woody stalks left behind after an umbel of waxy, star-shaped flowers finishes are not dead growth waiting to be tidied. They are the plant’s reusable flowering infrastructure. Cut them off during propagation cleanup or post-bloom pruning and you delete bloom sites the plant may need years to replace. The sections below walk through where to cut on a carnosa vine, how to root the piece, and how to keep both the cutting and the parent plant bloom-capable for the long run.
Nodes, Internodes, and What Actually Roots
On a typical Hoya carnosa vine, nodes appear as small bumps or slight ridges along the stem, often opposite a leaf pair. The smooth stem between two nodes is the internode. When you take a cutting, at least one node must contact moisture - submerged in water, buried in moss, or inserted into airy mix - because adventitious roots and new shoots originate from nodal meristem tissue, not from leaf blades alone. Two nodes are better than one: one can root while the other supports leaves above the medium, giving you margin if the lower node fails.
Internode length tells you something about recent growing conditions on your carnosa. Long, stretched internodes usually mean the plant was reaching for light; those sections still root, but compact growth from a well-lit stem often roots faster because the tissue is less water-stressed. Avoid the oldest, fully hardened woody sections unless you are air layering, because lignified stems contain less of the active tissue that responds quickly to rooting cues. The sweet spot is firm, semi-succulent stem from the current or previous season’s growth - pliable enough to bend slightly when pinched, not so soft that it collapses.
Orientation matters when you pot a cutting. Mark which end was closer to the soil on the parent plant if the piece lacks obvious leaf direction. An upside-down node can still root in some cases, but shoot emergence is slower and less predictable. Remove leaves from the lowest node zone so nothing sits underwater or buried in wet moss, because decaying foliage is one of the fastest routes to stem rot on carnosa’s thick, waxy leaves. Leave one or two healthy leaves above the medium so the cutting can photosynthesize while roots form; stripping every leaf “to reduce stress” often backfires by removing the plant’s only energy source during a slow rooting phase that can last several weeks.
Peduncles, Spurs, and Why They Are Not Trimming Scraps
Botanically, the peduncle is the stalk that bears the flower cluster. In Hoya talk, the same structure is often called a spur - a short, woody, sometimes bare-looking twig at a node from which umbels of porcelain-white or pink-tinged flowers emerge year after year. In most Hoya species these spurs are perennial and rarely shed, lengthening slightly with each flowering cycle. The individual flowers are ephemeral; the spur is the permanent address where future inflorescences return.
On Hoya carnosa, spurs can look inactive for months or even a year between bloom cycles, which tempts tidy-minded growers to snip them off along with “empty” bare vine sections. That impulse is the single most common reason a mature wax plant “suddenly stopped flowering” after years of reliable summer blooms. Iowa State Extension is explicit: do not deadhead hoya by cutting spent flower clusters off the spur, because you remove the site where future flowers form. NC State Extension likewise advises resisting pruning of the peduncle where flowers have been produced, as it repeatedly produces flowers over several years. Propagation work sits inside the same rule set: when selecting stem material, cut above or below a spur-bearing node without removing the spur from the parent plant, and if a cutting accidentally includes a spur, treat that as a bonus flowering site on the new plant - not as trim waste.
Why You Must Never Remove Peduncles or Spurs
The spur rule is not folklore. It reflects how Hoya carnosa allocates growth: building a new peduncle from scratch costs time and carbohydrates that would otherwise fuel roots, leaves, or the next bloom cycle on an existing spur. Growers who “clean up” bare twigs after flowers drop often wait one to three years - sometimes longer - before seeing blooms again, not because the plant is unhappy, but because it must grow entirely new flowering infrastructure. On a plant you just propagated from, removing a spur on the parent is especially costly because you have already reduced its photosynthetic surface by taking cuttings.
Perennial Reblooming From the Same Site
After an umbel finishes, individual flowers and their short pedicels may dry and fall away naturally. What remains is the spur - woody, knobby, occasionally leafless, and very much alive. Under continued bright indirect light, appropriate watering, and seasonal warmth, the same spur initiates another inflorescence cycle, often lengthening slightly each time. Some Hoya carnosa cultivars bloom more readily than others - variegated forms like ‘Krimson Queen’ sometimes need stronger light before they flower - but the mechanism is consistent: rebloom happens from established spurs, not from random new tips alone.
This is why general houseplant advice - “remove spent blooms to encourage more flowers” - fails on wax plants. Roses rebloom on new wood; Hoya carnosa reblooms on old spurs. Let flowers senesce and drop on their own. If a dried flower cap hangs on, you can gently twist off the individual flower without touching the spur. On the parent plant you are propagating from, scan the vine before you cut and mentally tag every spur so your propagation cuts do not amputate them. If you are training a long carnosa vine on a trellis or hoop, leave bare sections alone when spurs are present along them; those “empty” stretches are often where the plant keeps its bloom calendar.
Propagation Mistakes That Steal Future Blooms
Three propagation-adjacent mistakes show up constantly among Hoya carnosa growers. First, deadheading or spur removal on the parent while taking cuttings - sometimes done in one “refresh” session - eliminates bloom sites faster than the new cuttings can mature. Second, taking cuttings exclusively from the newest tip while repeatedly stripping the mid-vine where spurs live, slowly denuding the plant of flowering real estate. Third, pruning an entire long vine back to bare stumps for aesthetic reasons without noticing that the vine carried multiple spurs along its length.
You can still shape a Hoya carnosa. Remove truly dead brown stems, redirect overly long leaders, and trim back to a node for bushier growth - but cut through internodal stem, not through the spur itself. When a vine is too long and you need a propagation piece, select a section between spurs or take material from a non-flowering lateral that lacks peduncles, leaving spur-bearing nodes intact on the mother plant. If the only available cutting includes a spur at its tip, keep it on the cutting; the clone inherits a bloom-ready site, which is valuable on a species that often needs two or three years before its first flowers even under good care. Just do not habitually remove spurs from either plant because they look untidy between shows.
Choosing and Taking the Right Hoya Carnosa Cutting
The best Hoya carnosa stem cutting is healthy, non-flowering, and long enough to include two to four nodes, though a two-node piece can work when material is scarce. Aim for roughly 10–15 cm (4–6 in) of stem with at least one mature leaf pair and visible node bumps. Avoid stems actively carrying open buds or fresh umbels; flowering stems divert energy away from root formation, slowing or weakening rooting. If your only option is a blooming vine, cut from a side branch below the inflorescence rather than through the peduncle, or wait until the bloom cycle finishes.
Make the cut with sharp, disinfected snips just below a node on the piece you are keeping, using a clean straight slice rather than a crushed chew. On the parent plant, cut just above the node you are leaving behind so the remaining stump can activate dormant buds. Hoya carnosa bleeds a milky latex sap when wounded - normal for Apocynaceae. Blot excess sap with paper towel; some growers let the cut end air-dry for an hour before water or moss placement, especially on thick-stemmed sections, though thin softwood cuttings from actively growing tips often root faster when placed promptly into a humid medium.
Do not harvest more than roughly 30–40% of the parent’s living foliage in one session. A stressed parent recovers slowly and may drop leaves or abort spur development. One or two well-chosen cuttings beat five mediocre ones. Reject stems that are wrinkled, mushy, blackening at the base, or covered in persistent sticky honeydew without treating pests first - propagation multiplies problems as efficiently as it multiplies plants. Mealybugs in particular love the leaf axils of carnosa vines and will hitch a ride into every propagation jar on your shelf.
When to Propagate Hoya Carnosa
Propagate during active growth, typically late spring through summer in temperate indoor settings, when day length and room temperatures support root initiation. Hoya carnosa grows at a slow to moderate pace and slows noticeably in cool, dim months; cuttings taken in winter can sit unchanged for long periods without necessarily failing, but rot risk rises when wet media stay cold and evaporation is low. Calendar season matters less than plant state: choose a parent that is hydrated, pest-free, and pushing firm new leaves, not one recovering from shipping, Hoya Carnosa repotting guide, or root rot on Hoya Carnosa rescue.
Warmth accelerates rooting more than any product label. Aim for a stable 18–27°C (65–80°F) environment - the same comfort band cited in most Hoya carnosa care guides - and avoid placing fresh cuttings on cold window sills that drop sharply at night. If your home runs cool, a heat mat under a propagation tray can help, but measure the medium temperature; excessive bottom heat without airflow can cook stem bases in enclosed bags. Bright indirect light should accompany warmth; dark corners prolong rooting and encourage mold on moss. NC State Extension notes that bright indirect light year-round is ideal for Hoya Carnosa overview, and the same principle applies to cuttings waiting to root.
Tools, Safety, and Rooting Setup
Gather bypass pruners or fine snips, 70% isopropyl alcohol for blade disinfection, small clear vessels or 2–3 inch pots with drainage, and your chosen rooting medium before you cut. Labels matter when you root multiple cultivars - ‘Krimson Queen’ and the green species form look similar early on. Wear gloves if latex irritates your skin; wash hands after handling cut stems. The ASPCA lists Hoya as non-toxic to cats and dogs, but sap can still irritate mouths and skin, and chewed stems are messy.
For water propagation, use a glass narrow enough to support the stem upright while keeping leaves out of the water. For moss or mix, pre-moisten medium to evenly damp, not dripping. A clear humidity dome or loose plastic bag can raise humidity around leaves in dry homes, but vent daily to prevent mold. Rooting hormone is optional; Hoya carnosa roots readily without it. If you use powder or gel, apply a thin film to the lowest node only, following product safety directions.
Method 1: Rooting Hoya Carnosa Cuttings in Water
Water propagation is the most visible method and often the fastest way to confirm that roots are forming on Hoya carnosa. The Royal Horticultural Society notes that Hoya cuttings can root in water in as little as two to three weeks under favorable conditions, though four to eight weeks is a more realistic home range depending on temperature and light. Clear water lets you catch stem softness or algae early, which makes it excellent for beginners who tend to overwater soil.
Placing the Cutting and Changing Water
Fill a clean container with room-temperature water - tap water left to sit overnight is fine in most municipalities - and submerge only the lowest node, keeping all leaves above the waterline. One carnosa leaf accidentally dipped will rot and foul the vessel within days. Position the setup in bright indirect light, not direct sun that heats the water like a lens. Change water when it clouds, smells stale, or develops biofilm, typically every five to seven days, using a gentle pour to avoid damaging emerging root hairs.
Avoid cramming multiple cuttings into one jar where stems rub and waxy leaves crowd. Each cutting needs oxygen at the submerged node; stagnant, oxygen-poor water is a common reason water attempts fail after initial callusing. If the stem tip above water looks wrinkled while the node is submerged, increase humidity around the leaves with a loose bag or move slightly away from a dry heat vent - the cutting is losing water faster than the node can replace it, a frequent issue with carnosa’s thick, water-retaining foliage.
When Water Roots Are Ready for Soil
Transplant when roots are roughly 2–5 cm (1–2 in) long and beginning to branch, not when the first white bump appears. Water roots are thinner and more brittle than moss-grown roots; rushing the move causes breakage. Prepare a small pot with chunky, well-draining mix - a typical Hoya carnosa blend of orchid bark, perlite, and potting compost in roughly equal parts works - and pre-moisten it. Create a hole, lower the roots in without forcing, and firm lightly around the stem. Keep the mix evenly lightly moist for the first two weeks while water roots adapt; alternate slight drying with gentle rewetting rather than soaking.
Expect two to four weeks of transplant shock where little visible top growth occurs even though roots are extending into soil. Do not fertilize immediately. If leaves yellow one at a time while roots look white and firm, patience is usually safer than repotting again. Hoya carnosa often pushes its first new leaf pair only after roots have fully settled - a delay that frustrates impatient growers but is normal for this slow to moderate species.
Method 2: Rooting in Sphagnum Moss or Airy Mix
Sphagnum moss and airy propagation mixes often produce roots that transition to permanent pots with less shock than water roots, at the cost of less visibility. Iowa State Extension recommends moist sphagnum or a light propagation mix alongside water as standard options for hoyas. This method suits growers in very dry air, anyone who prefers to skip the water-to-soil bridge, and variegated carnosa cultivars whose pale leaves scorch easily in direct sun near a water jar.
Moss, Perlite, and Chunky Blends Compared
Long-fiber sphagnum holds moisture around the node while staying open enough for air when loosely packed - not compressed into a brick. Wrap loosely around the lowest node inside a small cup or pot, mist when the surface lightens, and never let the moss bake dry in direct sun. 100% perlite in a small nursery pot, pre-wetted, is another clean option: insert the cutting, settle perlite around the node, and water from below by sitting the pot in a shallow tray briefly. Chunky blends of bark, perlite, and a little coir mimic the epiphytic conditions Hoya carnosa prefers and work well when you plan to leave the cutting in the same medium until roots reach pot edges.
Covering the pot with a clear bag or dome raises humidity, but leave a vent slit and check twice weekly for mold on moss surfaces or stem bases. Roots in moss typically appear in three to six weeks in warm bright conditions. When roots hold the moss ball together and poke through drainage holes, pot up into standard carnosa mix without disturbing fine root hairs more than necessary.
| Factor | Water | Sphagnum moss | Airy mix |
|---|---|---|---|
| Root visibility | Excellent | Poor unless clear cup | Poor |
| Transition to final pot | Needs acclimation | Moderate | Easiest |
| Rot risk | Stagnant water, submerged leaves | Overcompressed wet moss | Oversaturated dense mix |
| Best for | Fast feedback, beginners | Dry homes, variegated leaves | Growers skipping water step |
Method 3: Air Layering Long Carnosa Vines
Air layering is the lowest-risk option when a long trailing Hoya carnosa vine is already healthy but you hesitate to remove a cutting before roots exist. Select a node below a spur you intend to keep on the parent - or on a section far from spurs - and wound the stem lightly by scraping a small ring of outer tissue or making a shallow upward cut without severing the vine. Apply moist sphagnum around the node, wrap with plastic film to hold humidity, and seal both ends with twist ties or tape.
Roots form while the vine still receives full photosynthate from the parent plant, which dramatically reduces wilt stress. Check monthly for root density through the plastic; when you see a solid moss-root mass, cut below the new roots and pot the layered section. This method takes six to twelve weeks in many homes but preserves parent vigor and is ideal when a spur sits mid-vine and you refuse to remove it - you root below, leave the spur-bearing upper vine intact.
Rooting Timeline and Success Signals
Most Hoya carnosa stem cuttings show the first root initials within two to four weeks in water at warm room temperatures, though seeing nothing until week six is not automatic failure in cool or dim conditions. Moss and airy mix often lag slightly behind water for visible progress but produce transplant-ready roots on a similar overall schedule once warmth and humidity stay consistent. Carnosa is among the easier hoyas to root - its waxy leaves retain moisture well and its nodes respond reliably - but patience still matters because new leaf growth may not appear until weeks after roots form.
Success is more than a root bump. Firm stem tissue above the node, leaves that remain plump or recover from mild wrinkling after misting, and new root length increasing week over week are positive signs. Failure shows as progressive stem softness, sour-smelling water, black nodes spreading upward, or leaves that shrivel despite moist medium - restart from higher on the vine only if the remaining parent tissue is sound. Resist daily tugging; a gentle once-only resistance test after six to eight weeks in warm conditions is enough to confirm anchorage without breaking fragile root hairs.
Aftercare for Newly Rooted Hoya Carnosa Plants
Newly rooted Hoya carnosa plants are not mature houseplants yet. Keep them in small pots relative to root mass; oversized containers stay wet too long and stall the oxygen-loving roots this epiphyte evolved with. Bright indirect light, the same 40–60% humidity band comfortable for adults, and a Hoya Carnosa watering guide that lets the top of the mix approach dryness before the next soak will carry most cuttings through their first season. Do not fertilize until you see new vine extension or at least one fresh leaf pair unfurling, then use a dilute balanced or slightly low-nitrogen feed at half label strength during active months.
Spur preservation applies to young plants too: if your cutting arrived with a peduncle, leave it. If the plant blooms early on a small root system, enjoy the show but expect slower vine growth afterward - blooming is optional stress on a juvenile clone. Many propagated carnosa plants need two to three years before their first bloom even when spurs are intact, because flowering depends on maturity, light intensity, and cultivar temperament as much as on spur presence. NC State Extension notes that most hoyas will not produce flowers until they are two or three years old. Slightly root-bound conditions often favor flowering later, so resist upsizing pots every month.
Troubleshooting Failed or Slow Cuttings
Mushy stem base almost always means rot from submerged leaves, stagnant water, or moss kept soggy without airflow. Cut back to firm green or tan tissue, disinfect tools, and restart with a shorter cutting and drier medium. Wrinkled leaves with dry medium signal underwatering on Hoya Carnosa or a node that never rooted; confirm the node actually contacts moisture. Blackened nodes after cold exposure need a warm restart, not more water. Cutting unchanged for eight weeks in winter may still be viable - check firmness, not length - but moving to moss with bottom warmth often breaks dormancy.
Leaf-only cuttings sitting unchanged is not a troubleshooting problem but a biology dead end unless a hidden node remains. Pests on parent - mealybugs love carnosa stem axils - must be cleared before propagation spreads insects to every jar on the shelf. If every attempt fails on an otherwise healthy plant, suspect hidden stem rot higher on the vine and take a cutting from firm tissue closer to the soil line. Accidental spur removal during cleanup will not kill the plant, but it removes a bloom site permanently from that node - learn from it and protect every remaining spur on both parent and propagated plants going forward.
Conclusion
Hoya carnosa propagation from stem cuttings succeeds when you treat nodes as non-negotiable and peduncles as permanent equipment, not clutter. Take firm, non-flowering sections with at least one or two nodes, root them in clean water, moist sphagnum, or airy mix under warm bright indirect light, and transplant only when roots can handle soil without snapping. On the parent plant - and on any mature wax plant you ever prune - never remove peduncles or spurs; let spent flowers fall, protect bare woody spurs, and cut around them when harvesting vines. That single habit preserves rebloom sites that Iowa State Extension and NC State Extension treat as essential, while your cuttings develop into rooted clones ready for the slow, rewarding path toward the next umbel of porcelain stars.
When to use this page vs other Hoya Carnosa guides
- Hoya Carnosa overview - Start here for whole-plant context before deep-diving this topic.
- Hoya Carnosa problems hub - Jump to symptom-specific fix guides when this care topic does not resolve the issue.