Hornwort Propagation: Stem Cuttings & Side Shoots
Hornwort Propagation: Stem Cuttings & Side Shoots
Hornwort Propagation: Stem Cuttings & Side Shoots
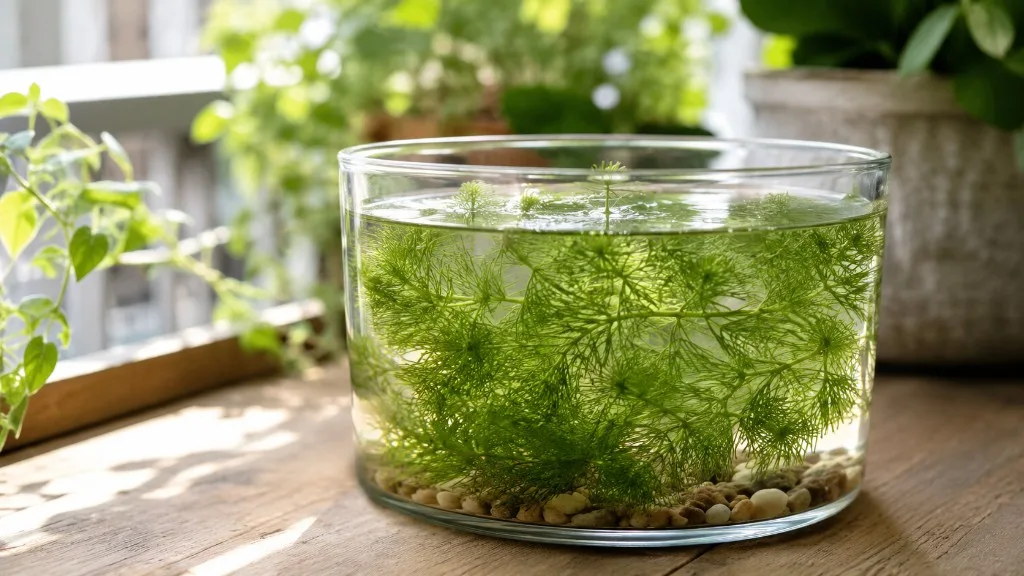
Hornwort (Ceratophyllum demersum) is one of the few aquarium plants that propagates almost as easily as it grows. Snip a stem, float the piece, and within days you have a second plant pulling nutrients from the water column and expanding its whorled foliage. No rooting hormone. No special substrate. No weeks of waiting for visible roots. The trade-off is that hornwort’s simplicity hides a few rules - cutting placement, anchoring depth, disposal responsibility - that separate a tank full of healthy new plants from a mat of shed needles and rotting stem bases.
This guide focuses on the two propagation methods home aquarists and pond keepers actually use: stem fragmentation (intentional cuttings) and side shoots (branches that detach and grow independently). Sexual reproduction through seeds happens in wild populations but fails reliably in most indoor tanks, so it is not covered as a practical home method. If you have one healthy hornwort stem and clean water, you already have everything required to multiply the plant.
If symptoms persist, see the Yellow Leaves on Hornwort guide.
What Is Hornwort and Why It Propagates So Easily
Hornwort - also sold as coontail, rigid hornwort, or foxtail - belongs to the family Ceratophyllaceae and grows as a submerged, free-floating or loosely anchored aquatic macrophyte on every continent except Antarctica. In commerce, the species you will most often receive is Ceratophyllum demersum, though related species such as Ceratophyllum echinatum appear in some regions. The plant’s global distribution is not accidental. It spreads aggressively through vegetative fragmentation, meaning broken stem pieces establish new individuals without any genetic exchange. That same biology is what makes hornwort propagation in your aquarium feel almost effortless once you understand the mechanics.
Ceratophyllum demersum Basics
A mature hornwort stem can reach 1–3 meters (3–10 feet) in ideal conditions, though most aquarium specimens stay shorter because regular trimming and nutrient limits cap vertical growth. Leaves grow in whorls of six to twelve, each leaf forked into thread-like segments with small spiny teeth along the edges. The stems are stiff and somewhat brittle - a feature that matters directly for propagation because physical disturbance naturally produces the fragments hornwort uses to colonize new areas. Flowers and seeds exist in wild populations, with Rutgers NJAES noting that coontail reproduces by both seed formation and fragmentation, but indoor sexual reproduction rarely produces viable offspring. For practical home propagation, fragmentation and side shoots are the entire game.
Hornwort tolerates an unusually wide environmental range. Tropica lists a temperature window of roughly 15–30°C (59–86°F), pH 6.0–8.0, and soft to very hard water - parameters that cover most community aquariums, outdoor ponds in temperate climates, and dedicated grow-out tubs. Growth rate is moderate to fast, with established stems commonly adding several inches per week under good light and stable water quality. That speed is why propagation feels rewarding: a single trimming session can stock a second tank within two weeks.
Rootless Design and What That Means for Cuttings
The single most important biological fact for hornwort propagation is that the plant has no true roots. It absorbs nutrients directly from the water column, which classifies it as a column feeder rather than a substrate feeder like Vallisneria or Cryptocoryne. Lower stem sections may develop rhizoids - fine, hair-like structures that help anchor the plant to rocks, driftwood, or sediment - but rhizoids are anchoring adaptations, not the nutrient-absorbing root systems other plants depend on for propagation success.
This rootless design changes every propagation rule you may know from terrestrial houseplants or even rooted aquatics like Anacharis. A hornwort cutting does not need to “take root” before it grows. The moment a fragment with intact meristem tissue contacts clean water and adequate light, it can resume photosynthesis and apical growth. You do not need rooting hormone, nutrient-rich substrate, or CO2 injection for basic propagation success, though good overall tank health accelerates establishment. What you do need is to avoid the one placement mistake that kills more hornwort cuttings than any disease: burying the stem base deep in substrate, where low oxygen and detritus accumulation cause the brittle stem to rot before rhizoids can anchor it.
How Hornwort Reproduces in the Wild and in Tanks
Understanding hornwort’s natural reproduction explains why the plant seems to propagate itself whether you intend it or not. In lakes, ponds, and slow-moving streams, stems break apart during storms, boat traffic, and waterfowl activity. Each viable fragment drifts until it finds suitable water, anchors loosely if needed, and continues growing as an independent plant. Your aquarium is simply a smaller, more controlled version of that process.
Vegetative Fragmentation
Vegetative fragmentation is a form of asexual reproduction in which a portion of the parent plant separates and develops into a genetically identical individual. For hornwort, fragmentation is the primary spread mechanism in both wild and captive environments. Rutgers NJAES confirms that coontail reproduces through fragmentation, with even small stem pieces capable of re-sprouting and growing into new plants. Fragments may also overwinter or remain dormant in sediment for extended periods in temperate outdoor water bodies, which is one reason mechanical harvesting of wild coontail requires removing all fragments - any piece left behind can re-establish the population.
In aquariums, fragmentation happens through three main pathways: intentional cuttings you take with scissors, accidental breaks from fish activity or filter current, and trimmings that you replant rather than discard. All three work equally well biologically. The difference is only in your control over fragment size, placement, and disposal. Intentional cuttings give you the cleanest results because you choose healthy tissue, make the cut below a leaf whorl, and place the fragment immediately in stable water rather than letting it tumble against a filter intake.
Side Shoots That Detach on Their Own
Alongside fragmentation, hornwort produces side shoots - lateral branches that emerge from nodes along the main stem as the plant grows. A single specimen can look like a large bushy mass because the main stem and its side shoots all carry whorled foliage simultaneously. These side shoots propagate in two ways without any intervention from you.
First, side shoots simply grow as attached branches until you cut them or they break free. A detached side shoot behaves identically to a top cutting: it floats, develops rhizoids if anchored near a surface, and continues vertical growth from its apical bud. Second, regular trimming of the main stem stimulates additional side shoot production through apical dominance release - when you remove the top growing point, dormant lateral buds along the remaining stem often activate, producing a bushier parent plant and more propagation material simultaneously.
If you watch a well-lit hornwort colony over several weeks, you will often find small detached branches collecting at the surface or against the glass. These are not waste. They are ready-made propagules. Scoop them out, inspect for healthy green coloration and intact whorls, and place them where you want new growth. No cutting required.
Turions and Why They Matter Less Indoors
In temperate wild populations, hornwort also reproduces through turions - dense, starch-rich winter buds that form at stem tips in late summer and autumn, sink to the sediment, remain dormant through cold months, and sprout new growth in spring. UC Davis weed guidance describes turion formation as an important overwintering and dispersal mechanism in regions where water temperatures drop too low for flowering and seed development. Turions can also spread through flooding events that move sediment between connected water bodies.
For most heated indoor aquariums, turion formation is largely irrelevant to propagation planning. Warm, stable temperatures and year-round light keep hornwort in active growth rather than triggering the dormancy pathway. Pond keepers in temperate climates may notice bud-like clusters forming as temperatures fall in autumn; those structures can produce spring growth without any cutting. If you propagate hornwort exclusively in tropical or heated tanks, treat turions as background biology rather than a method you need to manage. Stem fragmentation and side shoots will supply more plants than you can use long before turions become a factor.
What You Need Before You Start
Hornwort propagation requires minimal equipment, but the quality of your starting material and water matters more than the presence of any product marketed for plant propagation.
Tools and Sourcing
The only essential tool is a pair of sharp, clean scissors or aquascaping shears. Dull blades crush hornwort’s brittle stems and increase needle shedding at the cut site. Rinse tools with tap water before use; dipping in dilute bleach or hydrogen peroxide is reasonable if you have recently trimmed diseased plants in the same tank. Optional but useful items include plant weights or lead strips for loose anchoring, a fine mesh net for collecting floating side shoots, and a separate grow-out container if you want to propagate outside a display tank.
Sourcing matters especially for turtle tanks and breeding setups. Start from correctly identified, pesticide-free aquarium trade stock rather than wild-collected pond material when possible, because plants grown with copper-based algae treatments, terrestrial pesticides, or polluted outdoor water can carry residues harmful to reptiles and sensitive fish fry. Quarantine new hornwort for one to two weeks in a clean container before introducing it to a display tank. During quarantine, inspect for snail eggs, hydra, and abnormal leaf coloration. Rinse the plant gently in dechlorinated tank water to remove hitchhikers without stripping so many needles that the stems go bare.
Tank, Pond, or Grow-Out Tub Setup
Hornwort cuttings establish fastest in stable, dechlorinated freshwater with moderate to bright light and gentle water movement. Strong filter outflow directly on fresh cuttings can tear whorls loose and delay establishment, so position new fragments away from powerhead jets until they have hardened for a week or two. A dedicated grow-out tub - even a plastic storage container with a simple LED strip - works well when you need to produce volume for multiple tanks, turtle enclosures, or pond stocking without cluttering a display aquascape.
Minimum water volume depends on your goal. A 10–15 liter (roughly 3–4 gallon) container holds enough cuttings for a small breeding tank. Larger propagation runs benefit from 40 liters (10 gallons) or more so nutrient dilution and temperature swings are less dramatic. Hornwort does not require CO2 injection or liquid fertilizer for propagation, though tanks with measurable nitrate and phosphate produce visibly faster growth. In nutrient-poor water, cuttings still survive and slowly expand; they just take longer to reach a size worth transplanting.
Step-by-Step Stem Fragmentation Method
Intentional stem fragmentation is the most controlled hornwort propagation method. The process takes minutes and succeeds reliably when you select healthy tissue and place fragments correctly.
Where and How to Cut
Select a healthy main stem or side shoot with firm green foliage and no brown, mushy sections at the base. Avoid stems that have already shed most of their lower whorls - bare stem segments have reduced photosynthetic capacity and establish more slowly. Count the leaf whorls before you cut. Each cutting should carry at least two to three intact whorls, and four or more is better for fast establishment. Aquaterra Obsession and multiple aquarium references recommend segment lengths of 3–15 cm (roughly 1–6 inches), which generally translates to two to five whorls depending on spacing.
Make your cut just below a leaf whorl using a single clean snip rather than a sawing motion. Cutting below the whorl preserves the apical bud or the nearest lateral node with active tissue, giving the fragment a clear growth point. You can divide one long stem into multiple pieces in a single session - hornwort does not require a minimum parent size to survive after trimming, though leaving at least one whorl on the original stem if you want it to continue growing as a parent plant is good practice. Labeling is unnecessary; all fragments from one genotype are identical clones.
After cutting, expect some immediate needle shedding around the cut zone. Hornwort’s forked leaves are brittle by design, and mechanical disturbance always loosens a few segments. Moderate shedding in the first 24–48 hours is normal. Shedding that leaves the stem visibly bare, or continues for more than a few days, usually signals a problem with water quality, excessive current, or a stem that was already declining before you cut it.
Floating vs Loosely Anchoring
You have two viable placement options for new cuttings, and floating is the safer default.
Floating places the fragment at or just below the water surface, where it receives maximum light and stays clear of anaerobic substrate zones. Floating cuttings establish fastest in most setups because the entire stem accesses oxygenated surface water. The downside is surface coverage: unchecked floating hornwort blocks light to lower plants and can interfere with gas exchange if it carpets the entire surface. For propagation purposes, confine floating cuttings to one corner or use a floating ring to contain them.
Loose anchoring wedges the stem among rocks, driftwood, or a light plant weight without burying it. The lower portion develops rhizoids over several days to a week, holding the stem in place while the apical end grows upward. This approach works well when you want hornwort at a specific depth for fry cover or mid-water aesthetics. The critical rule: never bury more than the bottom centimeter of stem in gravel or sand. Hornwort is not adapted to rooted life, and deep burial causes the buried section to rot. If you use a plant weight, attach it to the lower third of the stem loosely enough that rhizoids can still contact open water.
In turtle tanks and high-flow setups, floating propagation in a separate grow-out tub often outperforms in-tank anchoring because turtles dislodge weighted stems and current tears fresh cuttings apart before they stabilize.
Propagating From Side Shoots Without Cutting the Parent
Side-shoot propagation requires even less labor than intentional fragmentation because the plant does part of the work for you. As hornwort grows, lateral branches extend from nodes along the main stem. In calm water, these branches remain attached and contribute to the bushy appearance of a mature colony. In tanks with active fish, turtle browsing, or moderate current, side shoots periodically break free and float independently - exactly the natural fragmentation pathway hornwort uses in wild waterways.
To propagate from side shoots deliberately, identify a lateral branch with its own apical tip and at least two whorls. You can either wait for natural detachment or cut the side shoot where it joins the main stem, leaving a small stub on the parent that may produce another branch later. The detached shoot floats and grows identically to a top cutting taken from the main stem. Many aquarists collect floating fragments during weekly maintenance and sort them into “replant” and “compost” piles based on size and color.
Side-shoot propagation shines when you want to expand coverage without reducing the parent plant’s height. Cutting the top of a main stem shortens the parent temporarily while side-shoot removal lets the central stem continue vertical growth. For pond keepers establishing shoreline cover, harvesting lateral branches from a dense central mass spreads plants horizontally without thinning the core colony that filters nutrients.
Encouraging Bushier Growth Through Trimming
Trimming and side-shoot production are linked. When you remove the apical growing tip of a hornwort stem, the plant redirects energy to lateral buds, producing more side shoots over the following two to three weeks. This is the same apical dominance principle gardeners use when pinching coleus or basil - remove the top, get bushier sides.
A practical trimming cycle for propagation looks like this: every one to two weeks, cut the top 5–10 cm (2–4 inches) from established stems. Float or anchor the trimmings as new plants. Leave the parent stems in place to branch. Within a month, a single starting stem often becomes a source of both a bushy parent colony and a dozen viable cuttings. The main risk is overpopulation: hornwort’s fast growth means propagation can outpace your ability to use or dispose of plants responsibly, which is why disposal protocol matters as much as cutting technique.
Aftercare for New Fragments and Cuttings
New hornwort fragments do not need a complicated acclimation period, but they do respond to stable conditions during the first 7–14 days after separation.
Keep water temperature above 15°C (59°F) for active growth. Below that threshold, establishment slows sharply and fragments may enter dormancy rather than expansion. Light should be at least moderate - roughly the same intensity that supported the parent plant. Sudden moves from dim to very bright light can bleach foliage; gradual acclimation over a week reduces stress if you are shifting cuttings from a low-light turtle tank to a brightly lit grow-out tub.
Water changes matter because hornwort pulls nitrates and phosphates from the water column aggressively during rapid growth. In a small propagation container with many cuttings, nutrients can deplete surprisingly fast, producing pale new growth even when light and temperature are correct. A partial water change every week, or transferring cuttings to a tank with fish producing gentle nutrient input, keeps color strong. You do not need to dose fertilizer specifically for propagation, but completely sterile RO water with zero nutrients will produce slower expansion than aquarium water with a normal nitrogen cycle.
Growth expectations: under good conditions, expect visible new whorl development within 3–7 days and several inches of vertical growth within two weeks. Rhizoid formation on anchored cuttings typically appears within 5–10 days as fine hair-like threads on the lower stem. Floating cuttings may not develop obvious rhizoids at all and do not need them for success.
Watch for these positive establishment signs: firm green stem tissue, new whorls forming at the tip, and minimal additional needle shedding after the first 48 hours. Negative signs requiring action include stem base browning (usually burial too deep or anaerobic substrate contact), persistent bare stems (insufficient light or nutrients), and complete fragmentation of the cutting into smaller pieces (current too strong or rough handling).
Common Propagation Problems and Fixes
Hornwort propagation fails less often than most aquatic plants, but when it does, the cause is usually environmental rather than biological.
Excessive needle shedding after cutting is the most common complaint. Distinguish normal short-term shedding from problematic loss. Normal: a small cloud of needles immediately after the cut, then stable foliage. Problematic: the stem goes bare within days. Causes of problematic shedding include copper-based medications in the water, liquid carbon (glutaraldehyde) exposure, sudden salinity changes, and stems that were already declining before propagation. Fix by moving cuttings to clean water without chemical treatments, reducing current, and selecting healthier parent tissue.
Stem base rot appears as a brown, mushy section at the bottom of anchored cuttings. The cause is almost always too-deep substrate burial or compacted detritus around the lower stem. Fix by removing the rotting section, taking a new cutting from healthy tissue higher on the same stem if possible, and floating the replacement rather than re-burying it.
Cuttings floating into filter intakes get shredded before they establish. Fix with a filter intake sponge, temporary containment with a floating ring, or propagation in a separate container until stems are larger.
Slow or stalled growth in otherwise healthy water usually indicates low nutrients or insufficient light. Increase light duration or intensity modestly, ensure the propagation container shares water with a stocked tank or receives occasional fertilizer at low dose, and verify temperature is within the active growth range.
Algae coating new cuttings competes for light on fine hornwort foliage. Gently rinse algae-coated fragments in tank water and move them to a lower-light holding area briefly while algae grazers or manual removal clear the problem. Do not propagate from stems that are mostly algae with little green tissue remaining.
Turtle Tanks and High-Activity Setups
Turtle keepers use hornwort as a sacrificial plant and natural nutrient sponge - turtles nibble it, uproot weighted stems, and scatter fragments that then grow wherever they land. Propagation in turtle tanks follows the same biology but needs a different workflow. Maintain a separate grow-out tub stocked with cuttings from your main hornwort supply. When turtles consume or dislodge plants in the display enclosure, replace them from the tub rather than trimming the display colony repeatedly and stressing it.
Turtle safety depends on correct identification and clean sourcing, not on propagation method. Pesticide-free stock, quarantine, and rinsing before introduction protect turtles regardless of whether you use cuttings or side shoots. Trimmings removed from a turtle tank should go to the grow-out tub or compost - not back to wild waterways.
Overstock propagation volume in turtle setups. Hornwort often outgrows turtle damage when you maintain a continuous supply of fresh cuttings, but expecting a single anchored stem to survive a large slider indefinitely without replacement is unrealistic. Treat propagation as ongoing tank maintenance, not a one-time event.
Conclusion
Hornwort propagation is stem fragmentation and side-shoot biology working in your favor. The plant’s rootless, column-feeding design means any healthy fragment with two or more leaf whorls and intact apical tissue can become an independent plant - no rooting hormone, no CO2, and no waiting for roots. Cut 3–15 cm (1–6 inch) segments just below a whorl, float them as the default method or anchor them loosely without deep burial, and expect visible new growth within a week under stable light and temperature.
Side shoots extend the same logic with even less effort: collect detached branches during maintenance, or trim parent stems to stimulate lateral growth and harvest the branches that follow. Sexual seed propagation and turion dormancy are wild-population strategies that rarely matter in heated aquariums, so fragmentation should be your primary focus.
The responsibility that comes with easy propagation is disposal. Hornwort fragments establish new populations from tiny pieces, and the species is classified as invasive or unwanted in some regions including New Zealand and Tasmania. Never release trimmings, excess cuttings, or post-water-change plant debris into streams, lakes, ponds, or storm drains. Compost on dry land away from water, discard in sealed waste, or share with other hobbyists. Propagation is only successful stewardship when the plants you produce stay where you intend them - and the fragments you do not keep are destroyed responsibly.
When to use this page vs other Hornwort guides
- Hornwort overview - Start here for whole-plant context before deep-diving this topic.
- Hornwort problems hub - Jump to symptom-specific fix guides when this care topic does not resolve the issue.