Fittonia Repotting: When, How & Pot Choice
Fittonia Repotting: When, How & Pot Choice
Fittonia Repotting: When, How & Pot Choice
Fittonia - the nerve plant, the mosaic plant, the dramatic fainter of the houseplant world - is not hard to repot. It is easy to repot badly. Put a shallow-rooted creeper into a tall, deep pot because it looked elegant on the shelf, yank the root ball apart like you would a pothos, and water heavily the same afternoon, and the plant will collapse into a limp green puddle within hours. That wilt is not a death sentence. It is a stress response. But it is avoidable.
This guide covers the decisions that actually matter for Fittonia repotting: when spring timing wins over a calendar date, why a shallow wide pot suits the root structure better than a deep one, how to handle fragile roots without stripping the fine hairs that absorb water, and when dividing at repot time makes more sense than simply sizing up. The guidance draws on established references including the RHS and Missouri Botanical Garden.
Why Fittonia Repotting Is Different From Most Houseplants
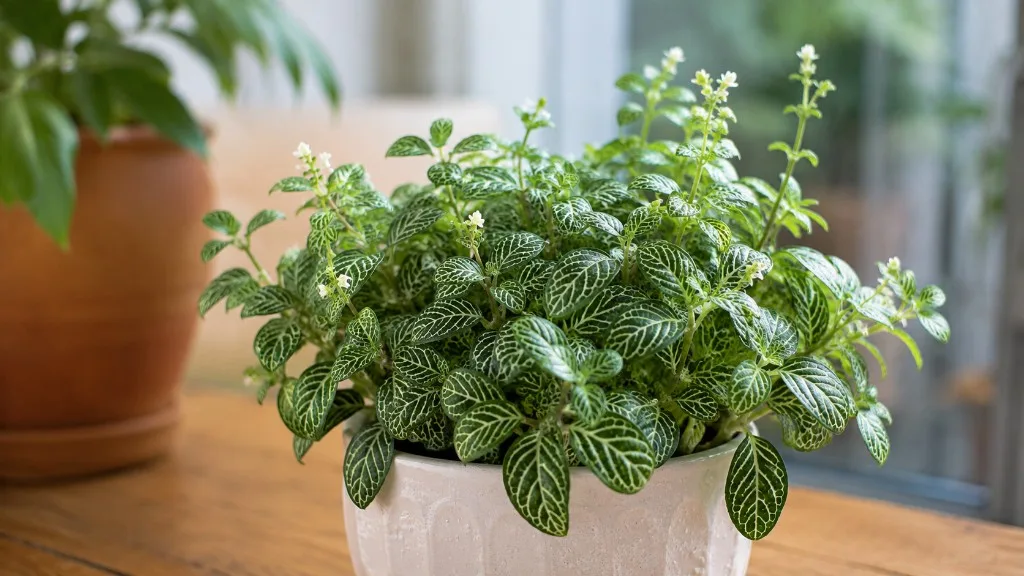
Most repotting advice assumes a plant with a vertical root system - something that grows down as much as it grows up. Fittonia does not work that way. Fittonia albivenis is a low, creeping herbaceous perennial from the Acanthaceae family, native to the humid rainforest floors of Peru and Colombia. In cultivation it forms a spreading mat roughly 3–6 inches tall, with oval leaves 1–3 inches long and a growth habit that runs outward, not downward.
That native ecology shapes every repotting decision. A plant adapted to thin leaf litter over damp, well-aerated forest soil does not need a deep container full of unused substrate. It needs a wide surface area where roots can spread horizontally, access oxygen, and stay evenly moist without sitting in a cold, wet column of soil below the root zone.
Shallow Roots and a Creeping Growth Habit
Fittonia’s root system is genuinely shallow. The active roots concentrate in the top few inches of the mix, mirroring the way the plant creeps along the forest floor rather than anchoring deep into subsoil. The RHS notes Fittonia is naturally low-growing and spreads slowly outward, suiting terrariums and shallow containers.
The practical implication is straightforward. When you shop for a new pot, think about the plant’s spread, not just its height. A four-inch-tall Fittonia in a six-inch-deep pot is a mismatch. The lower half of that pot will hold moisture the roots never reach - a slow invitation to compaction, salt buildup, and eventually root problems in the zone the plant actually uses.
Shallow roots also mean the root ball is physically fragile. Fine root hairs - the microscopic structures that do most of the water and nutrient absorption - tear easily when the soil is knocked off aggressively or when circling roots are ripped apart. Fittonia recovers from gentle disturbance. It struggles with bare-rooting.
What Repotting Actually Solves for a Nerve Plant
Repotting is not a cosmetic upgrade. Three problems get addressed at once, and all three matter for a moisture-sensitive plant like Fittonia.
First, the substrate is refreshed. Indoor potting mix breaks down over twelve to twenty-four months. Organic particles decompose into finer material, perlite works its way to the surface, and the air pockets that once let water drain quickly begin to close. Compacted mix stays wet longer, which is dangerous for a plant that wants consistent moisture but cannot tolerate prolonged saturation. Fresh mix restores the drainage-and-retention balance.
Second, the root system is inspected and corrected. Roots that have circled the bottom of the pot are gently teased apart, dead or mushy material is trimmed, and early signs of trouble - brown, soft roots or a sour smell from the mix - are caught before they spread through the whole plant.
Third, the plant gets modest new room. Not a mansion. Fittonia is a slow to moderate grower indoors and does not need aggressive upsizing. The goal is enough fresh substrate around the existing root ball to support another year or two of growth, not a container the roots will take eighteen months to colonize.
When to Repot Fittonia: Signs Your Nerve Plant Is Ready
Fittonia does not send dramatic distress signals when it needs a new pot. It wilts easily under many conditions, which makes it harder to read than a succulent or a snake plant. The signs below are the reliable ones - patterns that persist even when light, humidity, and watering are otherwise correct.
Root-Bound Symptoms and Watering Red Flags
The most dependable sign is roots emerging from drainage holes. Not a single white exploratory tip, but multiple roots visibly protruding and thickening at the pot base. That means the plant has used the horizontal and vertical space available and is searching for more.
A second sign is water that runs straight through the pot. When the root mass displaces enough soil, irrigation has nowhere to sit. You water thoroughly and the pot feels light again within hours. The plant may wilt on its normal schedule despite your best efforts, because there is simply not enough substrate left to hold moisture around the roots.
A third sign is stalled growth during the active season. If Fittonia is receiving Fittonia light guide, stable warmth, and adequate humidity but has not produced new leaves or stems for several weeks in spring or summer, the root system may be the limiting factor. Cross-check by gently sliding the plant out of its pot. A solid mass of white and tan roots with little visible soil confirms root-binding.
A fourth sign is the plant drying out faster than it used to. The same pot, the same room, the same Fittonia watering guide - but the mix goes dry a day or two sooner. That often means roots have replaced soil volume.
Less urgent but still valid: salt crust on the soil surface, a musty smell when you water, or soil that has visibly shrunk away from the pot walls. These point to exhausted mix rather than pure crowding. A full repot with fresh substrate addresses both.
Most healthy indoor Fittonia plants need repotting every one to two years. Fast-growing specimens in warm, humid terrariums may need attention closer to the twelve-month mark. Mature plants that are not root-bound can sometimes go longer with a spring top-dress - scraping out the top inch of old mix and replacing it with fresh substrate - rather than a full repot.
Why Spring and Early Summer Beat Every Other Season
Spring is the best time to repot Fittonia, with early summer as a reliable backup - repot when the plant is actively growing, as the RHS advises using moisture-retentive compost in a container only slightly larger than the rootball. During this window, Fittonia has the metabolic capacity to produce new roots, replace damaged root hairs, and push out fresh leaves to replace any that yellow during recovery.
Repotting in spring also aligns with longer days and warmer room temperatures in most homes. The mix dries on a predictable rhythm, which makes it easier to avoid the overwatering on Fittonia trap that catches so many freshly repotted nerve plants. You can see new growth within two to four weeks - the clearest confirmation that the roots have re-established.
Early summer works if you missed the spring window, provided the plant is not sitting in a hot, dry room above 85°F. Avoid repotting in the peak heat of midsummer in warm climates, when recovery is harder and wilting is more severe.
Fall is a compromise. If the plant is only mildly root-bound and still growing, a top-dress may be safer than a full repot heading into shorter days. If you must repot in fall, keep humidity high and expect slower recovery.
Winter repotting should be avoided unless the situation is urgent - severe root rot on Fittonia, a cracked pot, or a plant so root-bound that it cannot be watered normally. Fittonia’s growth slows in cool, dim months. Disturbed roots sit in wet mix longer because the plant is not actively drawing water. If winter repotting is unavoidable, keep the plant warm (above 65°F), maintain humidity above 50%, and accept a longer recovery timeline.
Choosing the Right Pot: Shallow, Wide, and Only One Size Up
Pot selection is where most Fittonia repotting goes wrong. The plant is small, so owners often reach for whatever decorative container fits the windowsill - frequently something tall and narrow. For Fittonia, shape matters as much as size.
Why Depth Matters Less Than Spread for Fittonia
A shallow, wide pot matches Fittonia’s natural growth direction. The roots spread laterally; the stems creep along the soil surface; the plant fills horizontal space before it ever needs vertical depth. Wide dish-style pots, low bowls, and standard nursery pots that are wider than they are tall all work well. Terrariums and enclosed dish gardens are also appropriate because they replicate the humid, low-profile environment of the rainforest floor.
A deep, narrow pot creates a moisture trap. The upper zone - where the roots actually live - dries at the rate Fittonia expects. The lower zone, which the roots may never reach, stays wet for days. Over time, that wet layer wicks upward, keeping the root zone cooler and more saturated than the plant prefers. The result is often yellowing lower leaves, a sour smell from the mix, or soft stems at the soil line.
When choosing between two pots of similar volume, pick the one with the wider diameter and lower profile. A six-inch-wide, four-inch-deep pot is almost always better for Fittonia than a four-inch-wide, six-inch-deep pot, even if both hold roughly the same amount of mix.
Material matters less than shape and drainage, but unglazed terracotta can help in humid homes where the mix stays wet too long. Plastic and glazed ceramic work fine if you adjust watering to the faster or slower drying rate. Never use a decorative pot without a drainage hole as the primary growing container.
Drainage Holes and the One-to-Two-Inch Rule
A drainage hole is non-negotiable - Missouri Botanical Garden links rots to overwatered conditions when drainage is poor. If you want a cachepot for aesthetics, keep the plant in a nursery pot with holes and set that inside the decorative outer shell. Empty the saucer after every watering.
For size, go up only one pot size - roughly one to two inches wider in diameter than the current container, matching RHS guidance to repot into a container only slightly larger than the rootball. The logic is the same as for most houseplants, but the stakes are higher for Fittonia because a too-large pot holds excess wet soil that the shallow root system cannot colonize quickly.
If your Fittonia is in a four-inch nursery pot, step up to a five- or six-inch pot - not an eight-inch one. If it is in a six-inch pot, a seven- or eight-inch wide shallow container is the ceiling for a routine repot. Jumping two or more sizes creates a ring of perpetually wet mix around the root ball, which is one of the most common causes of post-repot decline.
The Best Soil Mix for Fittonia at Repotting Time
Fittonia wants moist, well-draining potting mix with enough structure to stay airy for twelve to twenty-four months. The plant is not a succulent - it will wilt dramatically if the mix dries out completely - but it is equally intolerant of heavy, waterlogged soil. The target is a substrate that holds moisture in the root zone for a day or two while letting excess water drain freely.
A Practical Indoor Mix Recipe
A reliable starting blend for repotting Fittonia:
- 60% peat-free indoor potting mix or coco coir base - provides structure and moderate moisture retention
- 20% perlite - adds aeration and prevents compaction
- 20% orchid bark or coarse coconut husk chips - creates air channels and mimics the chunky forest-floor texture
Mix thoroughly in a bowl before you start repotting. The result should feel light and crumbly, not dense or sticky. When you squeeze a handful, it should hold together briefly and then fall apart - not form a tight ball.
If you are repotting into a very shallow pot where the mix dries quickly, you can reduce the bark fraction slightly and add a small amount of sphagnum moss (no more than 10%) to extend moisture retention. If you are in a humid terrarium where the mix stays wet longer, increase perlite to 25–30% and skip the moss entirely.
Target substrate pH is 6.0–7.0, which most peat-free indoor mixes already approximate. Exact pH adjustment is rarely necessary for a hobbyist setup. Refreshing the mix every one to two years matters more than chasing decimal points on a pH meter.
Do not reuse old substrate. Even if it looks fine on the surface, spent mix has lost pore structure and may carry fungal spores or pest eggs. A full repot is the moment to start clean.
How to Repot Fittonia Step by Step
The procedure is methodical rather than difficult. The theme throughout is gentle handling - preserve the root ball’s integrity, keep fine roots intact, and resist the urge to “clean up” the plant aggressively.
Preparing the Plant Without Disturbing Fine Roots
Water the plant twenty-four hours before repotting, not the morning of. The goal is a root ball that holds together when you tip the pot, with soil that is moist but not saturated. Bone-dry soil crumbles and tears roots. Sopping-wet soil smears and compacts. The day-before timing gives you the middle ground.
Gather your materials: the new shallow pot, fresh mix, clean scissors, a chopstick or pencil for settling soil, and a towel or newspaper for the work surface. Sterilize scissors with rubbing alcohol if you have recently used them on a diseased plant.
Choose a work area with space to lay the plant on its side. Fittonia wilts quickly when exposed to dry air, so work efficiently and keep the room reasonably humid if possible.
Unpotting, Inspecting, and Teasing - Not Tearing
Turn the pot on its side and gently slide the plant out by supporting the base of the stems with one hand and easing the pot away with the other. If the plant is stuck, squeeze flexible plastic pots or run a clean knife around the inside edge. Do not yank on the leaves - Fittonia stems snap easily at the crown.
Once the plant is free, inspect the root ball. Healthy Fittonia roots are white to light tan and firm. Trim away anything brown, black, or mushy with clean scissors. If you detect a sour smell or widespread rot, trim affected roots back to healthy tissue and consider repotting into a slightly smaller pot with extra perlite rather than sizing up.
If roots are circling the bottom, tease them gently with your fingers. Loosen the outer quarter-inch of the root ball so roots point outward into the new mix. Do not bare-root the plant. Do not wash all the old soil away under running water. Stripping the root ball removes fine root hairs and sets the plant back weeks. Keep most of the original soil attached - only the bottom and outer edges need loosening.
This is also the right moment to check the crown. Remove any yellowed or dead leaves at the base, but leave healthy foliage intact. The plant needs leaves to photosynthesize during recovery.
Filling In and Positioning at the Same Crown Depth
Add a thin layer of fresh mix to the bottom of the new pot - just enough to raise the root ball so the crown sits at the same depth it was in the old pot. Burying the stems deeper than they were previously growing invites crown rot. Sitting the plant too high exposes roots to air and light they are not adapted to.
Set the Fittonia in the center of the pot (or slightly off-center if you want it to creep in a particular direction). Hold it steady with one hand and fill in around the sides with fresh mix using the other. Use a chopstick to settle mix into gaps without compacting it. The soil surface should sit about half an inch below the pot rim so water does not overflow when you irrigate.
Once the plant is stable, give the pot a gentle shake or tap to settle the mix. Add more if low spots appear. The plant should not wobble. If it does, firm the mix lightly around the base with your fingertips - not a heavy press.
Dividing Fittonia at Repot Time
Repotting is the best opportunity to divide a mature Fittonia into two or more plants. Division is faster than stem-cuttings propagation for an established specimen and gives you immediately full-looking plants rather than small starts in propagation trays.
Division makes sense when the plant has multiple distinct stem clusters with their own root sections - Missouri Botanical Garden notes stems root at nodes when they touch moist substrate, supporting division of mat-forming plants at repot time.
To divide, remove the plant from its pot and brush away just enough soil to see where natural separations exist. Fittonia often forms clumps that pull apart with gentle finger pressure. Each division needs its own roots and at least several stems with healthy leaves. If the root mass is one solid mat with no obvious break points, do not force it - either repot as a single plant or propagate by stem cuttings instead.
Use a clean knife only if hand separation fails. Cut through the root ball decisively, making sure each section has adequate roots for its foliage mass. A division with lots of leaves but few roots will wilt severely and may not recover.
Pot each division into its own shallow container with fresh mix, following the same crown-depth and one-size-up rules. Water lightly and place all divisions in bright, indirect light with humidity above 50%. Expect some wilting - Fittonia is dramatic after any root disturbance - but new growth within two to three weeks confirms success.
Do not divide a plant that is already stressed from pests, rot, or severe underwatering on Fittonia. Fix the underlying problem first, let the plant recover, and divide at the next spring repot.
Post-Repotting Care: Water, Light, and Humidity
The first two weeks after repotting determine whether Fittonia bounces back or lingers in a wilted slump. This species responds to root disturbance with visible wilting - leaves go limp, stems droop, and the plant looks terrible even when you did everything right. That response is normal. Panic-watering, moving the plant into direct sun, or fertilizing to “help” it are the moves that turn normal stress into real damage.
Water lightly after repotting - enough to settle the fresh mix around the roots, not a full soak that saturates every inch of new substrate. Fittonia’s disturbed roots cannot take up water at full capacity for several days. Excess moisture in the mix during this window is the fastest route to rot.
For the first week, check moisture with your finger rather than following a calendar. Water only when the top half-inch of mix is approaching dry and the plant is not sitting in a humid terrarium where the mix barely dries at all. In an open pot indoors, that often means a light watering three to five days after the initial settle-in drink.
Keep the plant in bright, indirect light for seven to fourteen days. Avoid direct sun on a recovering nerve plant - the stressed root system cannot replace water fast enough to support leaves in harsh light, and Fittonia scorches easily. A north-facing window, an east-facing window with morning sun only, or a spot a few feet back from a south-facing window all work well.
Humidity is the recovery variable most guides underemphasize. Fittonia evolved on a rainforest floor where humidity rarely drops below 60%. After repotting, maintain humidity at 50% or higher if possible. A humidifier, a pebble tray, grouping plants together, or returning the plant to a terrarium or cloche for the first week all reduce wilting severity. Do not mist leaves as a substitute - the effect is brief and wet foliage can invite fungal spotting.
Hold off on fertilizer for at least four weeks. Fresh mix contains enough nutrients for the initial recovery period. Fertilizing damaged roots risks salt burn on tender new root tips. Resume feeding at half strength only after you see new growth - a fresh leaf or stem tip emerging in the right color and size.
Recovery timeline: mild wilting usually resolves within one to two weeks. Full root re-establishment takes four to six weeks. New growth is the signal that matters - not whether old leaves perk back up. Damaged leaves may not recover fully; new ones tell you the plant is fine.
Common Fittonia Repotting Mistakes to Avoid
Most post-repot problems trace back to a short list of avoidable errors.
Using a pot that is too large or too deep. Excess wet soil around a shallow root system is the leading cause of post-repot decline. One size up, wide and shallow.
Bare-rooting or over-teasing the root ball. Fittonia needs its fine root hairs. Knock off only what is necessary to loosen circling roots at the bottom and sides.
Repotting in winter without urgency. Slow growth plus disturbed roots plus cool, wet mix equals a long, risky recovery. Wait for spring when you can.
Watering heavily immediately after repotting. Light moisture to settle the mix; full soak-and-dry cycles come after the roots recover.
Burying the crown deeper than it was growing. Stem rot at the soil line follows buried crowns reliably.
Fertilizing within the first month. Salt burn on recovering roots stalls the plant for weeks.
Placing the plant in direct sun during recovery. Bright indirect light only until new growth appears.
Dividing a weak or immature plant. Each division needs enough roots to support its foliage. Small, single-stem plants are better propagated by cuttings.
Skipping the drainage hole. No drainage means no reliable moisture control. Fittonia will not tolerate it long.
Conclusion
Fittonia repotting rewards a light touch and the right container shape more than it rewards speed or ambition. Repot in spring or early summer, when the plant is entering active growth. Choose a shallow, wide pot one to two inches larger in diameter than the current one, with a drainage hole. Use a moist, well-draining mix heavy on aeration - perlite and orchid bark alongside a peat-free base. Handle the root ball gently: tease circling roots, trim only what is dead or mushy, and keep the crown at the same depth it was growing before.
If your plant is mature and crowded, division at repot time is a practical way to refresh the specimen and gain extra plants in one session. After the move, expect wilting, keep humidity high, water lightly, and wait for new growth before you resume normal feeding. Fittonia looks fragile during recovery and is, in fact, quite resilient when the pot, the soil, and the season align with how this rainforest creeper actually grows.
When to use this page vs other Fittonia guides
- Fittonia overview - Start here for whole-plant context before deep-diving this topic.
- Fittonia problems hub - Jump to symptom-specific fix guides when this care topic does not resolve the issue.
- Root Rot on Fittonia - Escalate here when repotting adjustments are not enough.