Spider Mites on Echeveria: Causes, Checks & Fixes
Quick answer
Spider mites on Echeveria cause pinprick stippling and fine webbing in dry, warm rooms. First step: isolate the rosette and rinse leaf undersides from below before applying any spray.
Spider Mites on Echeveria: Causes, Checks & Fixes
This guide covers spider mites on Echeveria. See also the general Spider Mites guide, watering, and light pages for this plant.
Spider Mites on Echeveria: Causes, Checks & Fixes
Quick answer
Spider mites on Echeveria show up as pinprick yellow or white stippling on rosette leaves, often with fine silk webbing tucked between overlapping leaf layers where casual top-down inspection misses them. They are not insects-they are tiny arachnids that pierce leaf cells and suck sap, and they multiply fast in the warm, dry microclimates common above radiators, beside AC vents, and on south-facing windowsills.
First step: isolate the rosette and rinse every leaf underside from below with lukewarm water. Tilt the plant so water hits the backs of overlapping leaves and the tight axils where webbing hides. That single rinse knocks down live mites before you confirm severity or reach for sprays. Do not start with oil on a farina-coated cultivar without a patch test-some blue-gray Echeveria lose their powdery bloom permanently when coated with horticultural oil.
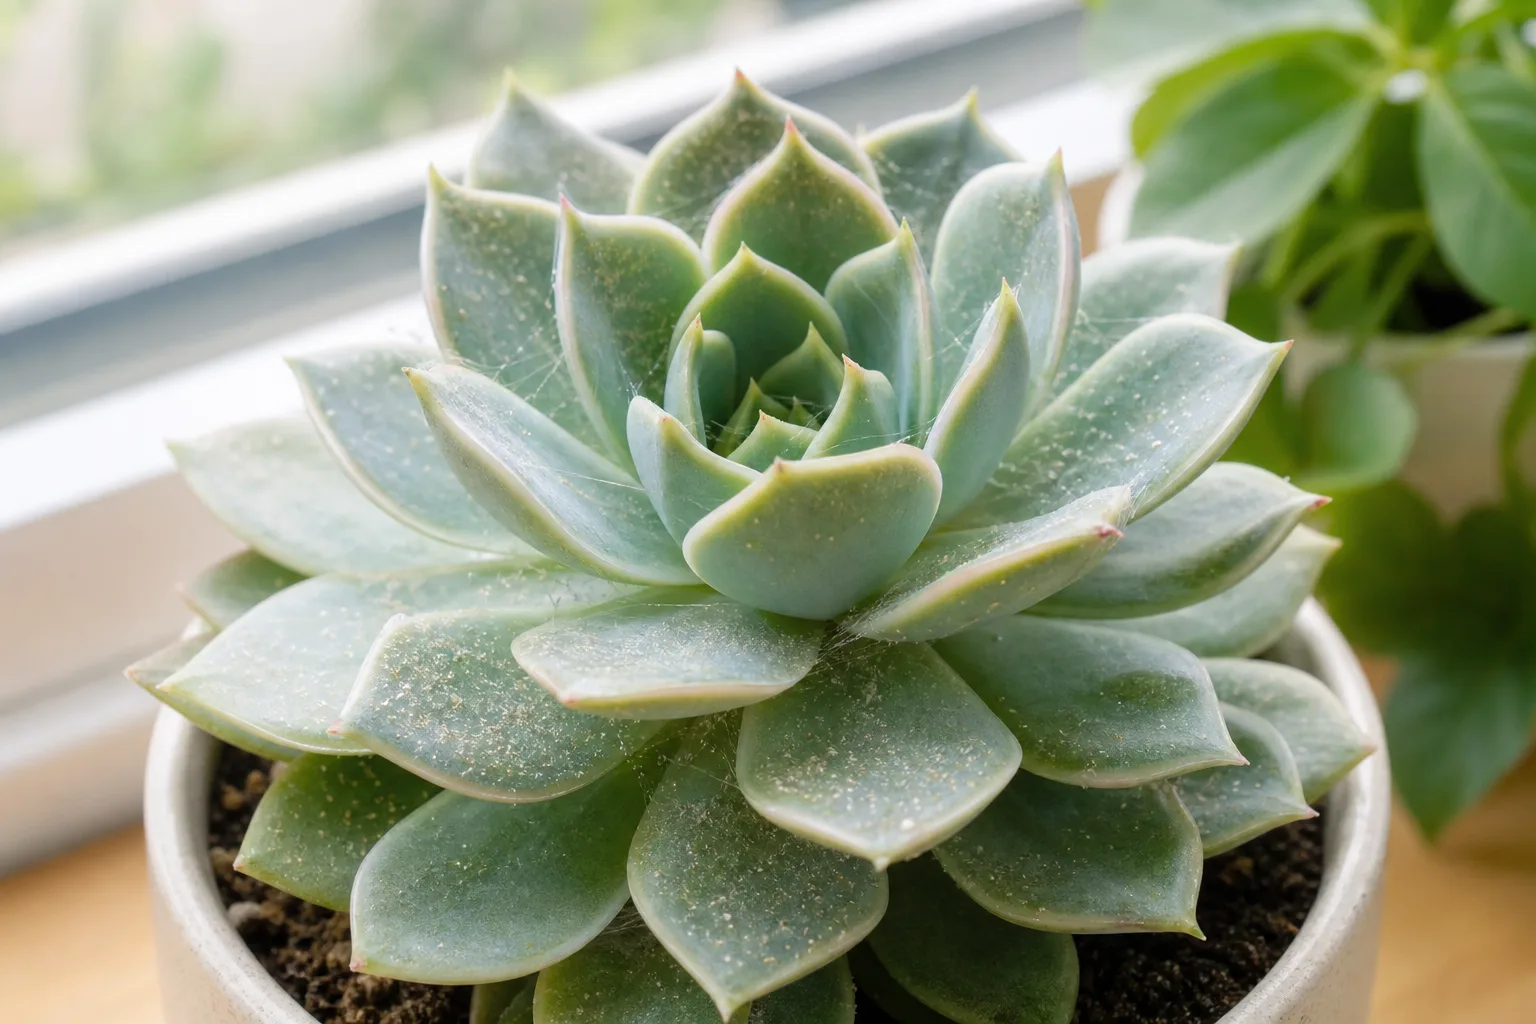
What spider mites look like on Echeveria
Yellow pinprick stippling on upper leaf surfaces and fine silk tucked between overlapping rosette layers - tilt the plant and inspect from below before stippling spreads inward.
Early feeding:
- Scattered yellow or pale pinprick dots on upper leaf surfaces-the classic stippled look
- Slight dullness on outer rosette leaves while the center still looks clean
- No webbing yet; damage easy to confuse with sun-stress bronzing on exposed outer leaves
Established colonies:
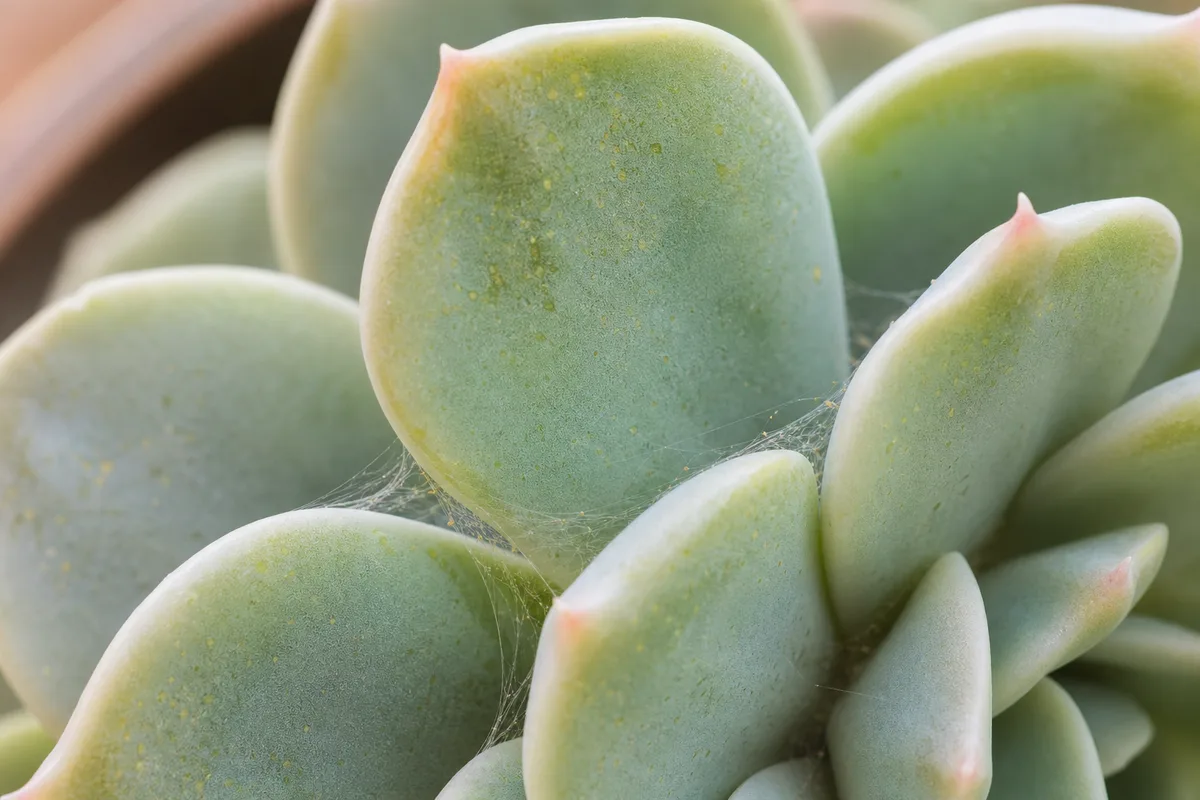
- Fine silk webbing at the base of overlapping leaves, best seen when you tilt the rosette and look from below
- Undersides feel gritty; amber eggs or black fecal specks visible with a 10× hand lens
- Bronzing that follows the stipple pattern rather than uniform color change across a sun-exposed face
- Damage spreading from outer leaves inward as mites colonize deeper rosette layers
Advanced infestation:
- Leaves turn bronze or bleach pale, then crisp and drop from the bottom of the rosette up
- Webbing bridges multiple leaf layers; mites visible as moving dots when you disturb a leaf
- Center growth slows or stops; offsets may stay cleaner longer than the mother crown
To the naked eye, mites look like tiny moving dots about 1/50 inch long. Echeveria’s overlapping rosette shape hides colonies in shaded pockets between leaves until stippling reaches the visible outer tier-by then the infestation is often further along than it looks from above.
Why Echeveria gets spider mites
Echeveria is drought-tolerant and stores water in its leaves, but that does not make it mite-proof. Spider mites thrive in dry, warm conditions-exactly the microclimate many indoor rosettes sit in during winter heating season.
Several Echeveria-specific factors raise risk:
Dry winter air near heat sources. Rosettes on windowsills above radiators, beside forced-air vents, or in rooms that drop below 30% humidity lose leaf moisture faster. Mites reproduce quickly in that environment while the plant’s outer leaves show drought stress that can mimic or mask early stippling.
Tight overlapping rosette layers. Unlike a flat-leaved pothos vine, Echeveria leaves stack in concentric circles. Mite colonies settle in the shaded gaps between layers, spinning webbing where you cannot see it without tilting the pot. Stippling on the outer ring is often the last visible sign, not the first.
South-window sun stress on outer leaves. Growers who move Echeveria to maximum light for compact growth sometimes get uniform bronzing on sun-facing outer leaves. That bronzing lacks pinprick dots and webbing-but if you assume “just sun” without a tap test, mites in the layers below keep spreading.
Crowded succulent trays. Grouping pots for humidity helps individual plants, but mites crawl from plant to plant when populations are high. One infested rosette in a dense tray can seed neighbors within days in warm dry air.
New plants and outdoor summer returns. Mites often arrive on newly purchased plants or pots summered outdoors. A single nursery rosette placed beside a collection without quarantine is a common introduction route.
Farina-coated cultivars show damage differently. Powdery blue-gray leaves on E. lilacina, E. peacockii, or similar cultivars can make early stippling harder to spot against the natural bloom. Webbing at leaf overlaps remains the clearer signal on these plants.
Lookalike symptoms
| What you see | Likely cause | How to tell apart |
|---|---|---|
| Scattered pinprick yellow dots with fine webbing | Spider mites | Tap test shows moving specks; webbing at overlapping leaf bases |
| Even bronzing or bleaching on sun-facing outer leaves | Sun stress | Smooth color across the exposed face; no webbing; no moving dots on tap test |
| Silvery streaks or scuffed patches, no silk | Thrips | Adults fly when disturbed; no stipple-dot pattern or webbing |
| White cottony clumps in leaf axils | Mealybugs | Wax smears pink when crushed; sticky honeydew, not dry stippling |
| Fixed brown or tan bumps on leaves or stems | Scale insects | Immobile when touched; no stippling pattern |
| Dry brown leaf tips without pinprick dots | Low humidity or drought stress | Edge browning only; firm leaves otherwise; tap test negative |
| Pear-shaped insects on new growth or flower stalks | Aphids | Visible bodies and honeydew; no fine webbing between leaf layers |
How to confirm the cause
Work through these checks in order:
-
Tap test - Hold white paper under a suspect outer leaf and tap the blade firmly. Watch for tiny moving specks on the paper. Static debris or farina dust does not crawl; mites do.
-
Underside inspection from below - Tilt the rosette and examine overlapping leaf layers and offset axils. Mites live in colonies mostly on undersides. Webbing at the base of overlapping leaves is a strong mite signal on tight rosettes.
-
Pattern check - Scattered pinpricks across individual leaves point to mites. Uniform bronzing on the sun-exposed face of outer leaves without dots fits sun stress instead.
-
Webbing vs. no webbing - Silk webbing confirms spider mites. Thrips leave silvery marks but do not spin silk. Mealybugs show white wax clumps, not stipple dots.
-
Environment check - Is the rosette beside a heat vent, in a sun-baked south window, or in a room that has been dry for weeks? That context fits mites better than overwatering rot, which causes mushy translucent leaves from the base up.
-
Neighbor plants - Scan other succulents within two feet on the same shelf or tray. Mites spread between pots when populations build.
-
Farina cross-check - Powdery coating on blue-gray cultivars is normal and dry to the touch. Stippling feels like texture change in the leaf surface beneath the bloom; webbing at overlaps confirms pests.
If the tap test shows no movement, webbing is absent, and outer leaves show even sun bronzing without dots, investigate light placement before committing to a mite treatment cycle.
First fix for Echeveria
Move the rosette away from other plants-if pests are detected, isolate the plant from others-and rinse every leaf underside from below with lukewarm running water or a gentle shower spray.
Wrap the soil surface in plastic if you rinse in a sink so grit does not wash down the drain. Tilt the rosette so water hits the backs of overlapping leaves, offset joints, and the tight pockets where webbing forms. Forceful washing reduces mite numbers and breaks up protective webbing.
Let the plant dry completely in bright indirect light the same day. Echeveria hates water sitting in the rosette crown-after rinsing, keep the plant out of hot direct sun until foliage is dry to avoid sunburn on wet leaves and to prevent rot where water pools between tight center leaves.
Do not apply horticultural oil or insecticidal soap in the same session as your first rinse unless the infestation is severe and you have already isolated the plant. Soap and oils work by contact; a pre-wash clears debris so later sprays reach mites. On farina-coated cultivars, patch-test one outer leaf with any spray and wait 48 hours before treating the whole rosette-test on a portion of foliage before a full treatment.
Step-by-step recovery
After the initial isolation and rinse, continue in this order based on severity:
Light infestation (stippling on a few outer leaves, minimal webbing):
- Repeat water rinses every two to three days for one week. Re-check undersides from below with a hand lens after each session.
- Raise humidity slightly without soaking soil-space pots or use a pebble tray, but avoid crowding infested and clean plants together. Higher humidity slows mite reproduction but does not replace direct treatment.
Moderate infestation (stippling across multiple leaves, webbing at several leaf overlaps):
- Apply insecticidal soap or horticultural oil after the initial rinse, using a product labeled for houseplants and mites. Both smother mites on contact when coverage is complete. Coat undersides thoroughly, including overlapping layers.
- Repeat every five to seven days for at least three cycles to catch newly hatched nymphs-repeat every four to seven days through several cycles. Eggs hatch on a short cycle in warm conditions-one spray rarely finishes the job.
- Spray in early morning or evening, not in hot midday sun. Do not treat water-stressed plants or when temperatures exceed 90°F-succulent leaves burn more easily when pores are coated in heat.
Heavy infestation (webbing across most of the rosette, center growth affected):
- Remove the most heavily webbed outer leaves with clean scissors to lower pest load and improve spray reach on remaining tissue.
- Behead firm offsets above the worst webbed crown if the stem base is still solid-treat offsets as separate isolated plants.
- Inspect and treat every succulent on the same tray on the same schedule so reinfestation does not bounce between neighbors.
- Hold fertilizer until new center growth looks clean for two weeks. Feeding a stressed rosette pushes tender tissue mites prefer.
For collections with repeated outbreaks, consider whether grouping for humidity is spreading mites faster than it helps individual plants.
Recovery timeline
Within three to five days of the first thorough rinse, live mite counts should drop sharply if you are hitting hidden colonies between overlapping leaves.
Two to three weeks of consistent rinsing or follow-up soap/oil treatment usually clears moderate infestations. Watch for clean new center leaves and offsets-that is the best sign the rosette is recovering.
Old stippled leaves remain scarred until they age out and are replaced. Do not expect cosmetic recovery on leaves that were heavily fed upon.
Worsening signs include fresh stippling appearing daily after three treatment cycles, webbing spreading to center growth, mites on multiple rosettes in one tray, or center leaves collapsing while the stem base stays firm-last case may mean rot coinciding with pests and needs separate soil and watering inspection.
If new growth stays clean for two weeks after your last treatment, consider the outbreak controlled. Resume normal soak-and-dry watering only after you confirm mites are gone.
Mistakes to avoid
Do not stop after one spray because outer leaves look better for a day-mite eggs hatch within days and populations rebound within a week.
Do not spray only the tops of rosette leaves. Mites live on undersides and between overlapping layers; top-only treatment misses colonies.
Do not apply oil or soap to a drought-stressed Echeveria in direct hot sun without a patch test. UC IPM warns against treating water-stressed plants or when temperatures exceed 90°F.
Do not use broad-spectrum insecticides aimed at other pests. Pyrethroids can kill mite predators and trigger mite outbreaks.
Do not soak the entire farina-coated rosette in horticultural oil without a patch test-you will permanently strip the powdery bloom across treated leaves.
Do not leave water or soap pooled in the rosette crown after rinsing or spraying-rot risk rises when the center stays wet in low airflow, especially on tight-headed cultivars.
Do not group an infested rosette back into a crowded tray while treating-mites crawl to neighbors within days in warm dry air.
Do not fertilize during active infestation hoping to push new growth-that produces tender tissue mites prefer.
Do not assume chemical pesticides labeled for insects will kill mites-mites need miticides, insecticidal soap, or horticultural oil labeled for spider mites.
Echeveria care cross-check
Mite recovery goes faster when baseline care is stable:
- Light - bright light with several hours of direct sun keeps growth compact; weak light produces soft stretched tissue that hides pest damage longer
- Water - soak-and-dry only when soil is bone dry per the watering guide; never let the pot sit wet after any rinse or spray treatment
- Soil - fast-draining succulent mix; chronically wet peat stresses roots while you fight foliar pests
- Airflow - space pots so rosettes dry quickly after any water or spray contact
- Season - expect more mite pressure during winter heating season when indoor air is driest; scout weekly through that window
For full species context, see the Echeveria overview.
How to prevent spider mites next time
Quarantine new plants and outdoor-return pots for two weeks before placing them beside other succulents-monitor for stippling during isolation. Tilt rosettes to inspect overlapping leaf layers from below during that period.
Scout weekly during heating season, especially on rosettes beside south windows or heat vents. One tap test on an outer leaf takes less time than treating a whole tray later.
Keep Echeveria firm and well-lit rather than drought-stressed for weeks. Water-stressed plants suffer more mite damage, but avoid overwatering to compensate-that invites rot in the rosette crown.
When moving plants outdoors for summer, rinse them and quarantine before bringing them back indoors in fall-outdoor exposure can pick up mites that thrive once windows close.
If you group succulents for humidity, inspect every pot in the group when one shows stippling. Raising humidity helps individual plants but does not stop crawl between neighbors in a crowded tray.
Avoid placing rosettes directly beside blasting heat vents or in sun-baked south windows without airflow-the dry microclimate mites favor.
When to worry
Treat as urgent when webbing spans most of the rosette, center growth stops, or mites appear on several succulents in one tray within days. At that stage, isolation and repeated washing may need to extend to the whole collection.
Consider beheading healthy offsets and discarding a severely webbed mother rosette in a sealed bag rather than risking months of reinfestation across a shared tray. Offsets with firm stems and no webbing in their axils are often worth saving separately.
Early stippling on one outer leaf with no webbing yet is manageable-confirm with a tap test and start rinsing from below before populations build in the hidden layers between leaves. That window closes quickly in warm dry rooms.
Escalate when fresh stippling appears daily after three full soap or oil cycles, or when center leaves collapse while sticky residue is absent- that pattern may mean root rot coinciding with pests and needs separate soil inspection.
Conclusion
Spider mites on Echeveria are a dry-air, hidden-colony problem as much as a pest problem. The overlapping rosette shape hides webbing until damage reaches outer leaves, and sun-stress bronzing on south-window plants can delay diagnosis. Isolate, rinse undersides from below, confirm with a tap test, then repeat soap or oil sprays through several generations while keeping farina-coated cultivars patch-tested first. Stippled old leaves may stay marked, but clean new center growth tells you the rosette is winning-act on those first pinprick dots before silk bridges the whole plant.
When to use this page vs other Echeveria guides
- Echeveria watering guide - Use for routine moisture checks before assuming spider mites is the main issue.
- Echeveria problems hub - Browse all 16 common issues on this species.
- Low Humidity on Echeveria - Different entry point when symptoms overlap with spider mites.
- Slow Growth on Echeveria - Different entry point when symptoms overlap with spider mites.