Spider Mites on Baby Rubber Plant: Causes, Checks & Fixes
Quick answer
Spider mites on Baby Rubber Plant cause pale pinprick stippling on thick waxy leaves and fine webbing at stem joints-especially in dry winter air. First step: isolate the plant and rinse every leaf underside with lukewarm water while keeping the upright stem crown dry.
Spider Mites on Baby Rubber Plant: Causes, Checks & Fixes
This guide covers spider mites on Baby Rubber Plant. See also the general Spider Mites guide, watering, and light pages for this plant.
Spider Mites on Baby Rubber Plant: Causes, Checks & Fixes
Quick answer
Spider mites on Baby Rubber Plant (Peperomia obtusifolia) pierce thick, glossy leaves and drain sap from individual cells. The damage shows up as pale pinprick stippling across the waxy leaf surface-not the even edge browning you see from dry air alone. Fine silk webbing at leaf-stem joints and between upright stems confirms an active colony, especially when indoor air turns hot and dry in winter.
First step: isolate the plant and rinse every leaf underside with lukewarm water. Hold the pot tilted so runoff does not pool where leaves cluster around the upright stem crown-Peperomia obtusifolia rots quickly when stems stay wet. Only after you knock down live mites should you consider insecticidal soap or horticultural oil, and repeat on a label schedule because one rinse rarely clears eggs.
What spider mites look like on Baby Rubber Plant
Healthy Baby Rubber Plant leaves are thick, oval, and glossy-waxy to the touch on upright fleshy stems that typically reach about 12 inches indoors. Mite feeding changes that look in specific ways:
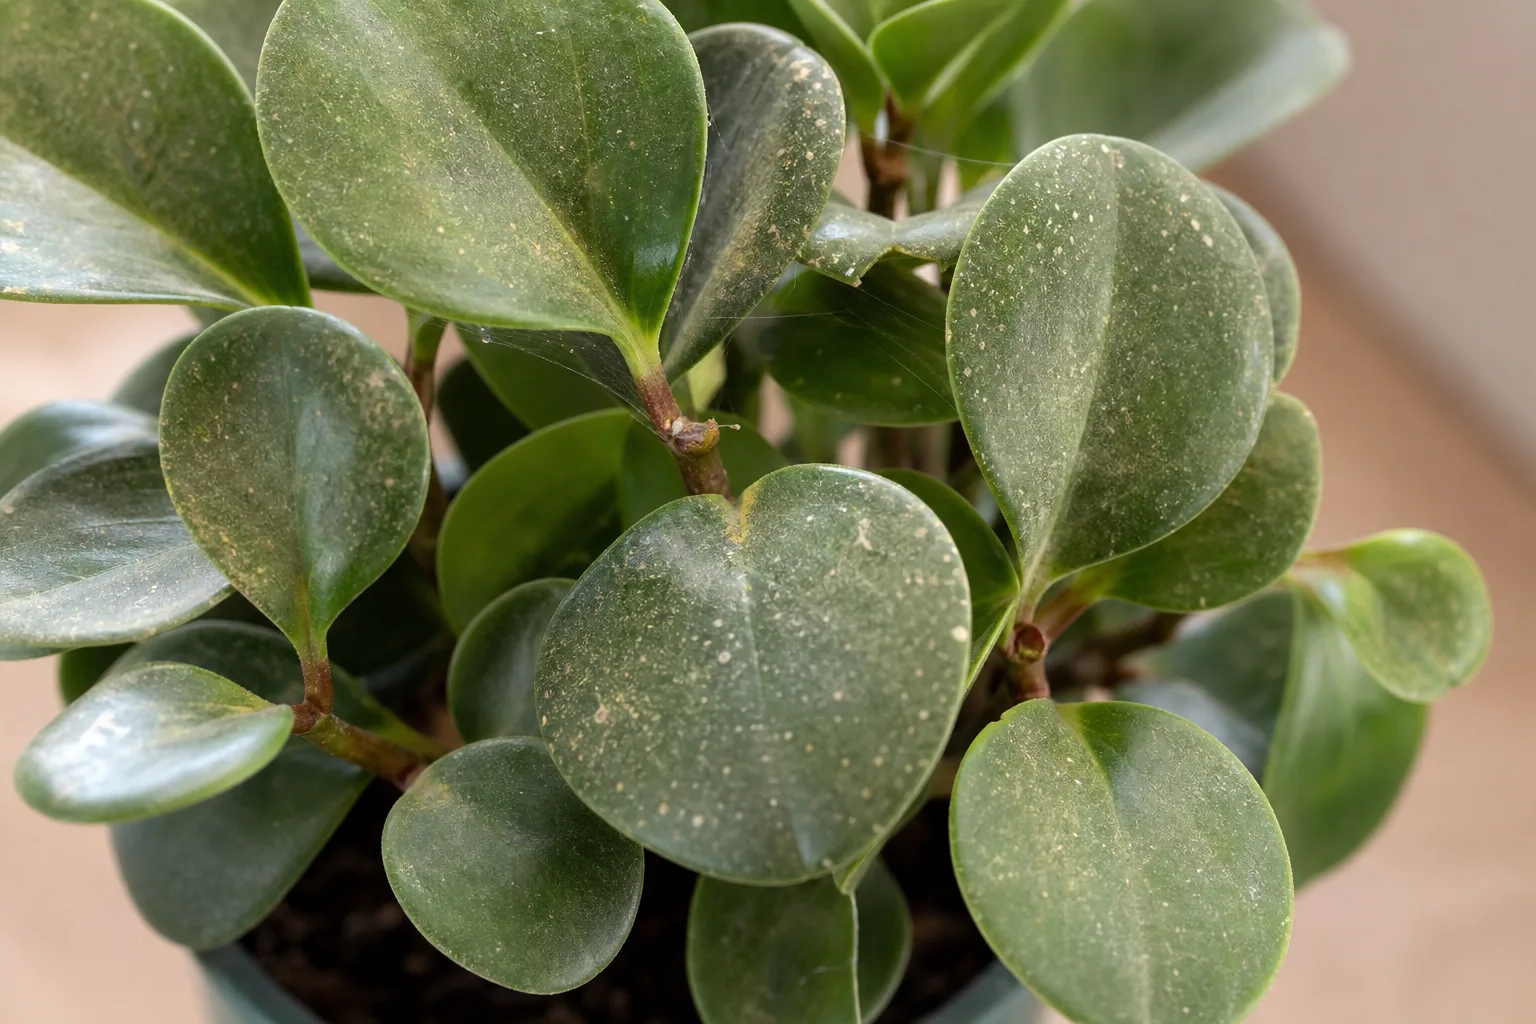
Spider Mites symptoms on Baby Rubber Plant - compare with healthy tissue on the same plant.
- Stippling - Thousands of tiny yellow, white, or tan dots where sap was removed; the glossy surface looks grainy or dull under light
- Bronzing or fading - Heavily fed leaves lose their polished sheen and may feel slightly papery, though they stay thicker than thin-leaf houseplants
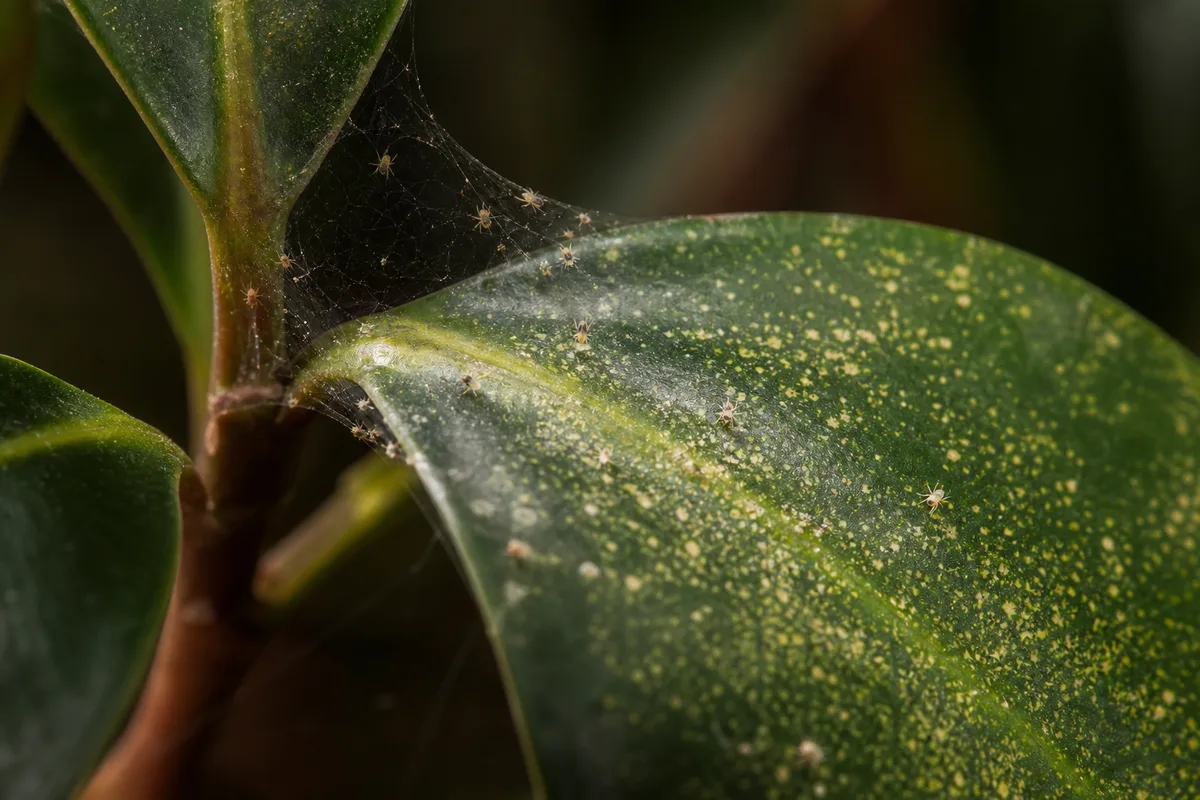
- Fine webbing - Silk threads bridging petioles, leaf edges, or the gap between leaves and the stem cluster
- Slight droop on upper leaves - Delicate petioles weaken before leaves drop; this can mimic underwatering on Baby Rubber Plant because obtusifolia stores water in its leaves
- No stickiness - Unlike aphids, scale, or mealybugs, spider mites do not produce honeydew
The mites themselves are barely visible-about 1/50 inch long, often greenish or amber. You usually confirm them with a white paper tap test or a 10× hand lens on undersides, not by spotting individuals from arm’s length.
On variegated cultivars such as ‘Variegata’ or ‘Golden Gate’, stippling often shows first on cream or pale-green sections where the thinner pigmented tissue is easier to pierce. Solid green forms may hide early damage longer because the uniform color masks faint speckling-check undersides even when the top looks fine.
Damage often starts on the warmest leaves near a south or west window, where dry air and bright light speed mite reproduction. Lower, shaded leaves may look fine while the top of the bush is already stippled.
Why Baby Rubber Plant gets spider mites
Baby Rubber Plant is not unusually mite-prone, but UF/IFAS notes that mites are the main pest problem on Peperomia obtusifolia. Its care profile creates a common trap: the plant appreciates moderate humidity, yet many homes run dry heat in winter exactly when the pot sits on a sunny sill. Spider mites thrive in dry, warm conditions and reproduce quickly when humidity drops.
Several traits make this species a good mite host once conditions favor pests:
- Thick, succulent-like leaves store water but still offer plenty of sap access through individual cells
- Compact upright bush form lets mites hide in crowded leaf axils and undersides along multiple stems
- Slow growth on Baby Rubber Plant means stippling stays visible on the same leaves for weeks, so damage looks severe before you notice movement
- Small root system limits how aggressively the plant can push replacement foliage during stress
Stress from the wrong care does not cause mites, but it slows recovery. An overwatered peperomia with a soft crown fights pests poorly. An underwatered one may already look dull and slightly limp-exactly the confusion that delays mite diagnosis. Dry air browns leaf edges too, but edge crisping alone without stippling or webbing usually points to low humidity, not mites.
Crowded shelves, dusty leaves, and skipped inspections after buying a new plant are the usual entry points. Mites walk from leaf to leaf and drift on air currents; they rarely live in potting soil.
How to confirm the cause
Work through these checks before you change watering or buy spray:
- Stippling pattern - Mite damage is speckled and patchy across the leaf face. Low light fades the whole plant evenly and stretches stems. Overwatering yellows lower leaves and softens the crown.
- Underside inspection - Lift each thick leaf and check the back with a lens. Mites, eggs, cast skins, and early webbing concentrate there.
- Paper tap test - Hold white paper under a suspect leaf and tap sharply. Moving specks smaller than a pinhead confirm mites.
- Webbing check - Fine silk at petiole bases or between stems is strong mite evidence. Absence of webbing does not rule out an early infestation.
- Stickiness test - Sticky residue with ants or sooty mold suggests aphids, scale, or mealybugs, not mites.
- Crown and soil check - Press the base of petioles where they meet the stem. Firm tissue and dry-to-touch top soil fit mite stress on an otherwise healthy plant. Mushy crowns and sour-smelling mix mean rot-you still may have mites, but fix waterlogged soil before heavy rinsing.
- Neighbor plants - Scan other houseplants on the same sill. Matching stippling means quarantine the whole group.
If stippling is absent and only leaf tips are crisp, suspect low humidity or salt buildup first. If whole leaves are yellow and the pot stays wet, inspect roots before treating for mites.
First fix for Baby Rubber Plant
Move the plant away from others and rinse all foliage-especially undersides-with lukewarm water.
Tilt the pot or wrap the soil surface so water runs off leaves without flooding the stem cluster where leaves meet the crown. Baby Rubber Plant rots when crowns stay wet, so avoid showering directly down into the center of the bush. Use a sink sprayer or shower setting; aim from below so undersides get direct pressure. Let leaves air-dry in Baby Rubber Plant light guide the same day.
This single step physically removes mites, webbing, and dust that shelters colonies. Do not reach for neem oil or soap on day one if you have not confirmed pests-and do not soak the soil trying to “humidify” the plant. Do not prune heavily before rinsing; you want maximum leaf area rinsed in the first pass.
Step-by-step recovery
After the initial isolation and rinse:
- Repeat water rinses every three to five days until tap tests show no moving specks for two consecutive checks.
- Apply insecticidal soap or refined horticultural oil if colonies persist after several rinses. Coat undersides until runoff; follow label intervals-typically every seven to ten days for at least three cycles to catch newly hatched mites.
- Raise ambient humidity moderately with a pebble tray or humidifier in the room, but keep the peperomia crown dry and soil on its normal dry-down schedule from the watering guide. Extra misting that leaves the stem cluster wet overnight can encourage rot.
- Move off the hottest glass if leaves scorch while wet spray dries-thick peperomia foliage can burn when oil or soap sits on leaves in direct sun.
- Prune only heavily webbed or collapsed leaves after sprays begin, using clean scissors. Do not strip the plant bare; it needs leaves for recovery.
- Inspect neighboring plants weekly with the same tap test. Treat any positive plant before webbing spreads across a collection.
Avoid systemic insecticides unless label allows indoor peperomia use. Because Baby Rubber Plant is non-toxic to cats and dogs, store sprays out of reach and let treated foliage dry before pets access the area-spray residues are a separate concern from the plant itself.
Recovery timeline
Expect to see fewer live mites within a few days of consistent rinsing. Stippling stops spreading once feeding pressure drops. Because Baby Rubber Plant grows slowly, new clean leaves may take two to four weeks to emerge after pests are controlled.
Old stippled leaves will not regain their polished green-judge success by firm new growth with no fresh speckling, no new webbing, and clear tap tests. If stippling spreads despite three spray cycles, switch product class (soap to oil or vice versa) per label directions and recheck that undersides receive full coverage.
Lookalike symptoms to rule out
Low humidity browns leaf tips and edges evenly without pinprick stippling or webbing. See low humidity when dry air is the main stressor.
Thrips leave silvery scrape marks and black specks of excrement; damage often runs in streaks rather than uniform stippling across thick glossy blades.
Mealybugs show white cottony patches in leaf axils and sticky honeydew-not fine evenly spaced dots. See mealybugs when wax clusters are present.
Edema from overwatering causes blister-like bumps that turn brown and corky; pattern is raised spots, not flat speckling.
Sun scorch bleaches or tans patches on leaves facing direct glass; margins look cooked, not peppered with pinprick dots.
Underwatering makes petioles slightly floppy and leaves soft before crisping; soil is very dry and there is no webbing. Thick leaves store water, so obtusifolia wilts more slowly than thin-leaf plants-check pot weight.
| Symptom | Spider mites | Low humidity | Mealybugs | Overwatering |
|---|---|---|---|---|
| Pattern | Pinprick stippling, patchy | Even edge/tip browning | White cottony clusters | Yellow lower leaves, soft crown |
| Webbing | Fine silk at stem joints | None | None | None |
| Stickiness | None | None | Honeydew | None |
| Paper tap test | Moving specks | Negative | Negative | Negative |
| Soil cue | Usually normal dry-down | Normal | Normal | Wet, heavy pot |
Mistakes to avoid
Do not flood the upright stem crown during rinsing to fight mites-that raises rot risk on a plant already sensitive to wet stems.
Do not stop after one good rinse; mite eggs hatch on a cycle and will restart the infestation.
Do not spray only the tops of thick leaves; colonies live underneath.
Do not use dish soap mixes on peperomia foliage; improper soap burns leaves. Use products labeled for plants and spider mites.
Do not increase watering because leaves look dull-check whether stippling and mites are the real issue first.
Do not place an oily plant in direct afternoon sun; leaf burn is common on waxy peperomia foliage.
Do not ignore adjacent plants; mites spread faster than Baby Rubber Plant recovers.
Do not assume this is a rubber tree (Ficus elastica)-that species needs different watering and has woody stems; see the baby rubber plant overview for identity and care context.
Baby Rubber Plant care cross-check
While treating mites, keep the basics stable. Allow the top inch of soil to dry before watering-soggy mix weakens roots and invites crown rot. Use bright indirect light so new growth is strong, but pull back from hot glass if leaves scorch. Aim for moderate room humidity without keeping the pot constantly damp.
Clemson HGIC describes baby rubber plant as easy to grow with thick succulent-like leaves in solid green or variegated forms. Because this species has a small root system and is non-toxic to cats and dogs, avoid Baby Rubber Plant repotting guide mid-infestation unless soil is failing. Rinsing and spraying are lower risk than disturbing roots during pest stress. Resume normal feeding only after new growth looks healthy; fertilizer does not fix mite damage.
How to prevent spider mites next time
Quarantine new plants for at least two weeks and tap-test leaves before placing them near your peperomia. During dry winter months, run a humidifier or pebble tray in the room-not constant leaf misting into the stem cluster. Rinse foliage lightly every few weeks in the shower to knock down early colonies.
Space plants so leaves do not touch on a shared sill. Dust blocks inspection and stresses leaves. When you water, flip one leaf per plant and glance at the underside-it takes seconds and catches mites before webbing appears.
Inspect immediately after moving plants closer to heating vents or after a stretch of hot, dry weather.
When to worry
Treat promptly when webbing spans multiple leaves, tap tests stay positive after two rinse cycles, or new stem-tip leaves emerge stippled and distorted. Escalate if several plants in one room show the same pattern-mites may be throughout the collection.
A plant with a soft, mushy crown and sour soil needs rot intervention first; mites are secondary until drainage is fixed. If more than half the foliage is bronzed and the plant keeps dropping leaves despite three weeks of labeled treatment, consider discarding it to protect others-Baby Rubber Plant is easy to propagate from healthy stem cuttings once your space is mite-free.
Conclusion
Spider mites on Baby Rubber Plant announce themselves through stippled glossy leaves, undersurface colonies, and fine webbing at stem joints-not through the even tip browning of low humidity or the yellow mush of overwatering. Isolate, rinse undersides thoroughly without soaking the crown, then repeat contact treatments until tap tests stay clear. Old leaves keep their scars; recovery shows up in new firm growth from stem tips. Keep humidity moderate and inspect undersides during dry seasons, and this slow-growing peperomia usually stays ahead of the next outbreak.
When to use this page vs other Baby Rubber Plant guides
- Baby Rubber Plant watering guide - Use for routine moisture checks before assuming spider mites is the main issue.
- Baby Rubber Plant problems hub - Browse all 16 common issues on this species.
- Low Humidity on Baby Rubber Plant - Different entry point when symptoms overlap with spider mites.
- Slow Growth on Baby Rubber Plant - Different entry point when symptoms overlap with spider mites.