Brown Tips on Anubias: Causes, Checks & Fixes
Quick answer
Brown tips on Anubias in aquariums usually mean algae on slow-growing leaves, a buried rhizome starting to rot, or normal emersed-to-submersed melt on a new plant-not dry soil or low humidity. First step: lift the rhizome above substrate and confirm it is firm and green before changing light or fertilizer.
Brown Tips on Anubias: Causes, Checks & Fixes
This guide covers brown tips on Anubias. See also the general Brown Tips guide, watering, and light pages for this plant.
Brown Tips on Anubias: Causes, Checks & Fixes
Quick answer
Brown tips on Anubias in a freshwater aquarium are rarely about “dry air” or soil moisture-the usual houseplant explanation. Anubias is a slow-growing rhizomatous epiphyte from shaded African streams. Its leaves can persist for months, so brown margins most often mean algae colonizing old tissue, a rhizome buried in substrate starting to rot, or normal emersed-to-submersed melt on a newly purchased plant.
First step: inspect the rhizome. The thick horizontal stem where leaves and roots meet must sit fully exposed on hardscape or on top of the substrate-not buried in gravel or sand. A firm, green rhizome is healthy; mushy, brown, or foul-smelling tissue signals rot that needs immediate trimming. Only after the rhizome checks out should you adjust light, photoperiod, or fertilizer.
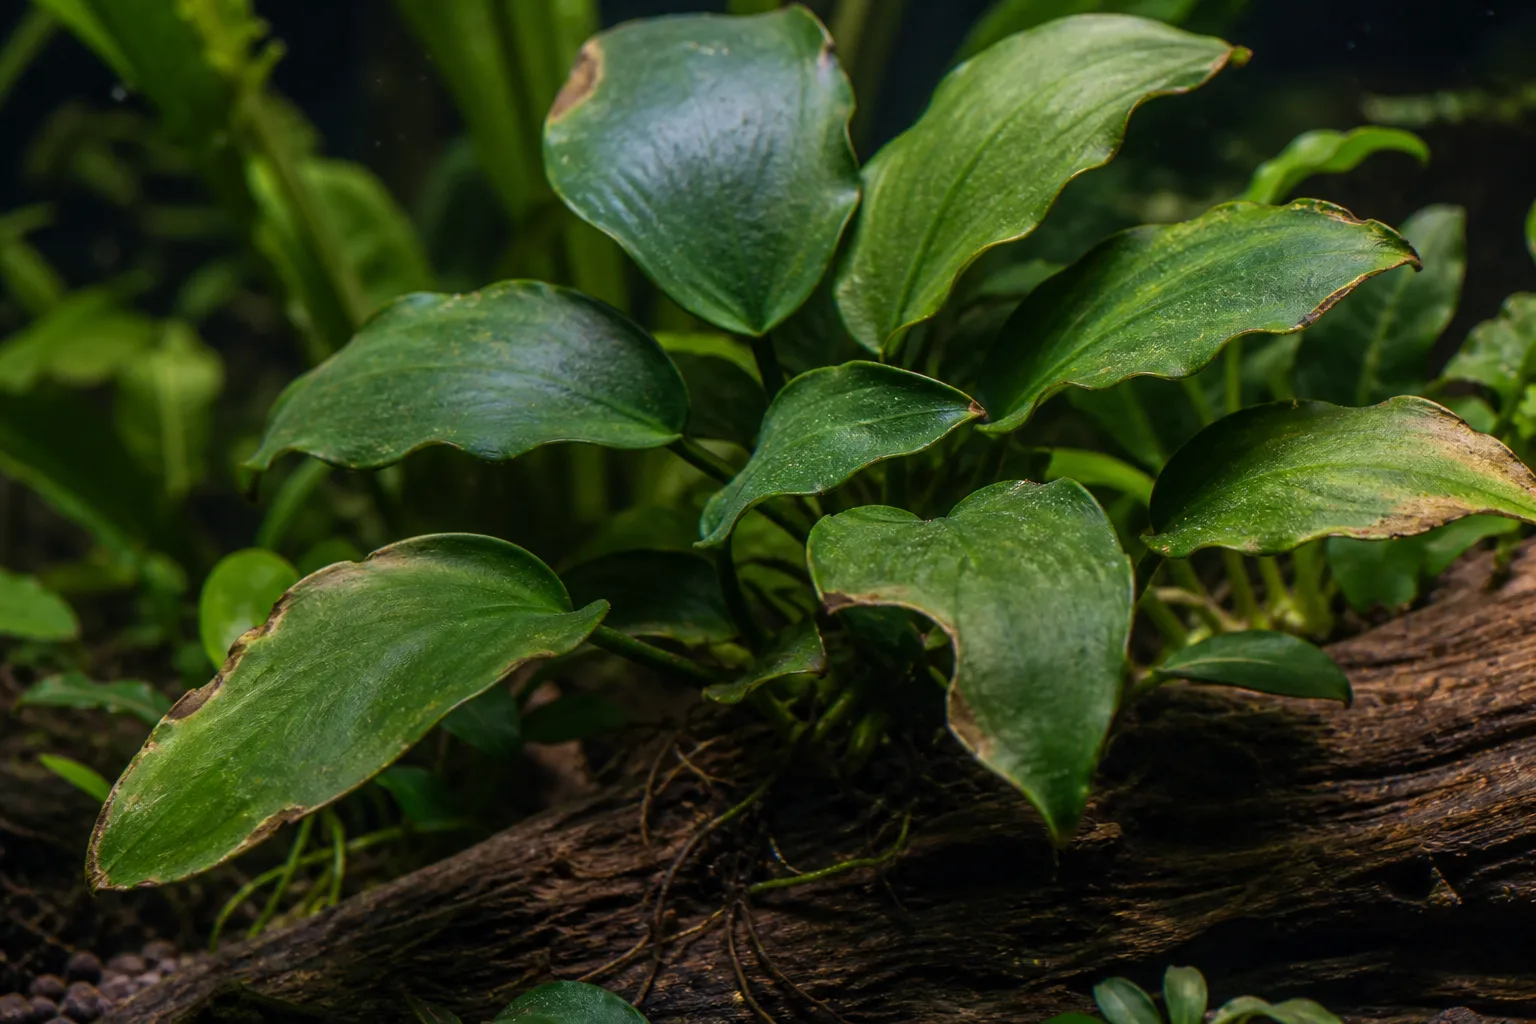
What brown tips look like on Anubias
On Anubias barteri and A. barteri var. nana, brown tips usually appear on the oldest leaves first-the ones that have sat under your tank light the longest. Patterns differ by cause:
Brown Tips symptoms on Anubias - compare with healthy tissue on the same plant.
- Algae-coated margins: Hard green dots (green spot algae) or grey-black tufts (black beard algae) at leaf edges. The coating sits on the surface; tissue beneath may still be green when you scrape gently.
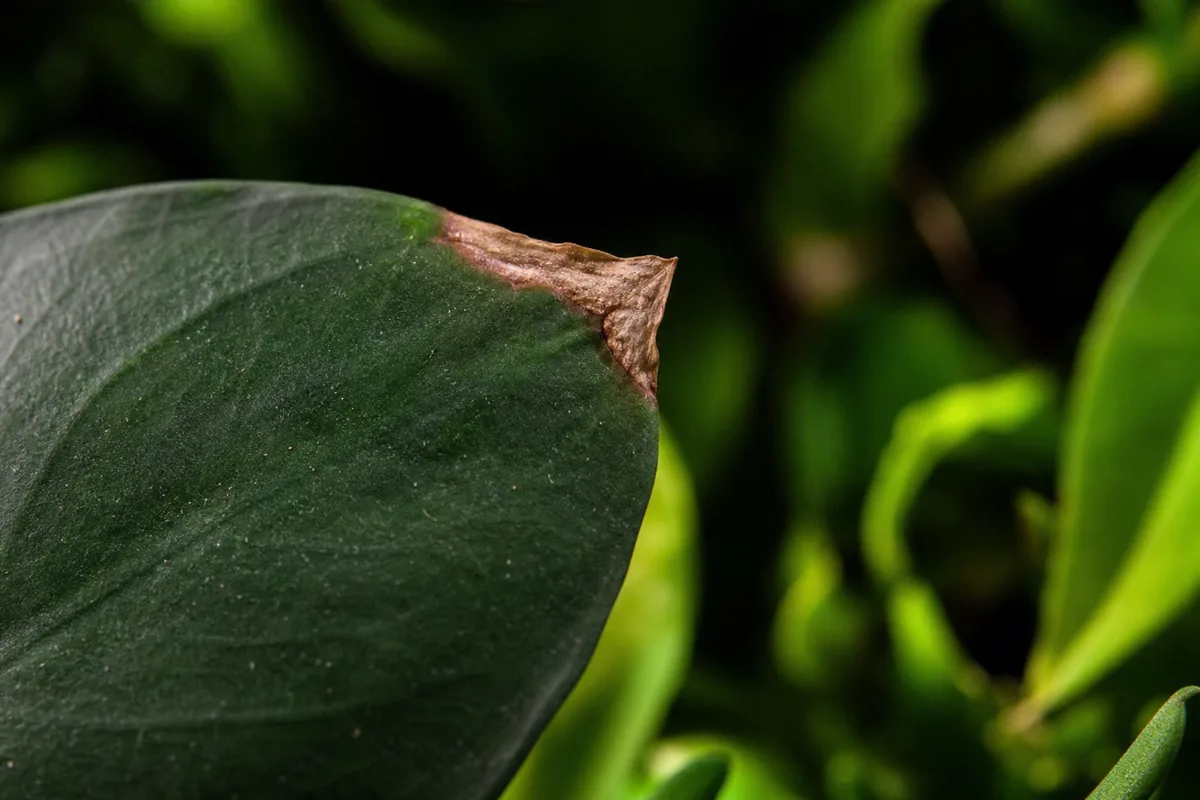
- True necrosis: Dry, tan-to-dark brown tissue inside the leaf blade, often starting at the tip or margin without a separate fuzzy layer. The leaf feels papery, not slimy.
- Melt after purchase: Several older leaves develop brown, transparent edges within the first two weeks, then detach cleanly at the rhizome while new, smaller submersed leaves emerge.
- Rot-linked browning: Browning starts at the petiole base where the leaf meets the rhizome, sometimes with clear gel or a soft spot on the rhizome itself.
- Physical damage: A single leaf with a crisp brown tip after fish grazing, rough handling, or a fold during shipping-neighboring leaves stay green.
Anubias produces roughly one new leaf every two to four weeks under good conditions. That slow turnover is why algae problems look like “brown tips” for months on the same leaf instead of disappearing quickly.
Why Anubias gets brown tips
Algae on slow-growing leaves
Because Anubias grows slowly and leaves survive for years, each leaf presents a stable surface for algae spores. Excess PAR, photoperiods longer than about eight hours, and unused nutrients in the water column accelerate green spot algae and black beard algae on leaf margins-especially when the plant sits in the brightest zone of a high-tech tank. Anubias does not speed up enough under intense light to outpace algae; it mainly gets cleaner when light and duration drop. See the Anubias light guide for PAR targets and shade strategies.
Buried or partially buried rhizome
Anubias attaches to rock and wood in nature; burying the rhizome in substrate creates an anaerobic zone around tissue that must stay oxygenated. Tropica warns the rhizome must not be covered because it tends to rot. Rot often begins subtly-one leaf browns at the base, then another-before the whole rhizome collapses. This is the most dangerous cause because it can kill an otherwise healthy-looking plant.
Emersed-to-submersed melt
Commercial Anubias is usually grown emersed (in humid air) and transitions to fully submersed growth in your tank. Old leaves with a waxy cuticle that does not function underwater are reabsorbed; edges brown and leaves detach over four to eight weeks while the rhizome stays firm. This pattern overlaps with yellow leaves on Anubias during acclimation but shows more as brown, melting margins on older foliage.
Excess light without shade
Anubias tolerates low to medium light-roughly 20 to 40 µmol/m²/s PAR at the leaf in most home setups. Readings consistently above about 60 µmol without hardscape or floating-plant shade commonly produce algae browning before the plant adds enough new clean leaves to replace damaged ones. Long photoperiods (10–12 hours “for the fish”) are a frequent trigger even when intensity seems moderate.
Nutrient gaps and old-leaf senescence
A single lower leaf browning slowly while new growth stays dark green is often normal aging. Widespread pale new leaves with brown edges may point to iron or general nutrient shortage in a heavily planted or low-fish-load tank-but only after rhizome placement and light are ruled out. Do not dump fertilizer into an algae-coated plant before reducing light; unused nutrients feed the algae layer.
Poor flow and detritus
Anubias evolved on shaded, fast-flowing forest streams. Stagnant pockets let detritus and biofilm accumulate at leaf margins, which can look like brown tipping and encourages algae. Aim filter output so leaves move gently.
How to confirm the cause
Work through these checks in order:
- Rhizome exposure - Is any part of the thick horizontal rhizome buried in gravel, sand, or aquasoil? Can you see green-brown firm tissue along its full length? If buried, that is your primary suspect before any other fix.
- Rhizome firmness - Press lightly along the rhizome. Firm and slightly springy is healthy. Mushy, jelly-like, or foul-smelling sections indicate rhizome rot-cut back to healthy tissue or treat as urgent.
- Algae scrape test - Rub a brown edge gently with a soft toothbrush or your finger. Algae often partially lifts or feels gritty; necrotic tissue does not separate as a coating.
- Purchase age - Added within the last two months with multiple older leaves browning together? Emersed melt is likely if the rhizome is firm and exposed.
- Light audit - Note photoperiod hours, whether the plant sits in direct fixture beam, and PAR if you have a meter. Compare against low-to-medium targets for Anubias.
- New growth quality - Pale or gnarled new leaves plus brown tips suggest light stress or nutrient shortage overlapping with algae; dark green new leaves with one old brown tip suggest aging or localized algae.
- Flow check - Do leaves in a back corner sit still while the rest of the tank ripples? Detritus buildup often concentrates there.
Symptom lookalike table
| What you see | Most likely cause | Key differentiator |
|---|---|---|
| Hard green dots or black tufts on edges | Algae (GSA/BBA) | Coating on surface; worsens under bright/long light |
| Brown tissue inside leaf; no fuzzy layer | Necrosis, melt, or age | Scraping does not remove a separate layer |
| Browning at petiole base; soft rhizome spot | Rhizome rot | Mushy rhizome; often started from burial |
| Several old leaves brown after new purchase | Emersed melt | 4–8 week timeline; firm rhizome throughout |
| One leaf tip only; rest of plant perfect | Physical damage | Follows handling, fish, or shipping fold |
| Pale new leaves + brown old margins | Nutrient or light stress | Check fertilizer only after light and rhizome OK |
First fix for Anubias
Expose or reattach the rhizome so the full horizontal stem sits above substrate on driftwood, rock, or the gravel line-with only the fine roots trailing down if needed.
If the plant was planted like a stem plant with the rhizome under gravel, gently lift it, brush away buried substrate, and tie or glue the rhizome to hardscape using cotton thread, fishing line, or a thin bead of cyanoacrylate gel. Tropica recommends attaching to stone or wood until roots grip. Do not rebury the rhizome to “anchor” it while troubleshooting browning.
This single step addresses the most common fatal mistake and stops rot from advancing. Wait one week and reassess before stacking light changes, algae scrubbing, and fertilizer.
Step-by-step recovery
After the rhizome is exposed and firm:
- Trim heavily affected leaves at the rhizome with sterilized scissors-especially leaves more than half brown or coated in stubborn algae. Rhizome plants are trimmed between leaf bunches when tissue is beyond saving.
- Reduce light for two weeks - Set photoperiod to six hours and move the plant into shade under a branch or floating plants. Anubias falls in the 10–20 PAR low-light category on many reference charts; aim for roughly 20–40 µmol at the leaf when you increase again.
- Gently remove algae from remaining leaves with a soft toothbrush. Avoid metal scrapers that tear the waxy cuticle.
- Improve flow across the plant without blasting shrimp off the rhizome.
- Add algae grazers if tank mates allow-Amano shrimp are especially effective on slow plants when stocked appropriately.
- Review fertilizer only after algae stops spreading and new leaves emerge clean. Half-doses in low-tech tanks are usually enough.
- If rot was found, cut back to firm green rhizome with a sterile blade, then reattach the healthy section. See root rot on Anubias if mushy tissue returns.
Change one major variable per week so you can read the plant’s response.
Recovery timeline
Algae on margins: Photoperiod cut and shade often stop new colonization within two weeks; existing brown or algae-coated tissue does not re-green. Judge success by the next one or two new leaves emerging clean.
Emersed melt: Expect four to eight weeks of older leaves browning and dropping while submersed leaves appear slowly. A firm rhizome throughout means the plant is acclimating, not dying.
Rhizome rot caught early: After trimming soft tissue and reattaching, the plant may sit unchanged for two to six weeks before the first new leaf. No new growth for months with a still-firm rhizome can mean not enough light-not ongoing rot.
Physical tip damage: Stable; trim the single leaf for appearance. Neighbors unaffected.
Brown tip tissue never heals back to green. Recovery always means new foliage, not repaired old blades.
Mistakes to avoid
Do not apply houseplant advice-lowering water level to “dry the soil,” misting for humidity, or waiting for potting mix to dry-none of that applies to submerged Anubias.
Do not bury the rhizome deeper while trying to stabilize a leaning plant. Reattach to hardscape instead.
Do not blast full fertilizer or CO2 as the first response to brown tips on an algae-coated plant; that often worsens the algae layer.
Do not strip every leaf during new-plant melt. The rhizome needs some photosynthetic tissue while transitioning.
Do not use harsh algaecides or copper treatments without checking shrimp and snail safety-many Anubias tanks rely on invertebrate algae crews.
Do not assume brown tips mean the plant needs more light. Anubias browning from excess PAR is more common than browning from shade in brightly lit hobby tanks.
Anubias care cross-check
Brown tips sit at the intersection of attachment, light, and algae management-the same pillars covered in the Anubias overview. A healthy setup keeps the rhizome exposed, runs six to eight hours of low-to-medium light with shade in intense tanks, maintains gentle flow, and uses grazers or manual cleaning on slow leaves.
If tips brown while new growth is dark green and the rhizome is firm, one old leaf aging out or a localized algae spot is cosmetic. If browning climbs from leaf bases or the rhizome softens, treat as rot urgency-not a trimming-only problem.
How to prevent brown tips next time
Attach new Anubias to wood or rock at purchase-never plant the rhizome under substrate. Run a timer at six to eight hours of light; shorten to six if algae appears on epiphyte leaves. Shade Anubias under hardscape or floating plants in tanks with carpet plants or high PAR fixtures.
Stock algae helpers appropriate to your bioload-Tropica’s algae-control trials show how much difference Amano shrimp make on Anubias leaves over a few months. Keep steady water changes and avoid overfeeding that raises unused nutrients.
Inspect rhizomes during routine maintenance. As the creeping rhizome lengthens, older sections can accidentally get covered by shifted gravel or detritus. Re-expose them before rot starts.
When buying, choose plants with firm rhizomes and avoid pots where the seller buried the stem. Quarantine and trim melting emersed leaves rather than assuming the plant is failing.
When to worry
Escalate immediately if the rhizome feels mushy, smells bad, or leaves detach with clear gel at the base-that is active rot, not cosmetic tipping. Cut away infected tissue the same day and reattach only firm sections.
Treat as urgent if brown-black tissue spreads along the rhizome faster than you can trim, or if multiple plants on the same wood share soft spots-remove the affected piece before neighbors infect.
Low urgency: one old leaf with brown tips, firm rhizome, clean new growth, and algae that wipes off after a light reduction. Cosmetic trim and patience are enough.
Conclusion
Brown tips on Anubias are a diagnostic puzzle, not a single disease. In aquariums the answer is almost always rhizome placement, algae on slow leaves, or normal post-purchase melt-not underwatering on Anubias in soil. Confirm the rhizome is exposed and firm first, then reduce light duration, clean or trim affected leaves, and wait for new submersed growth to judge success. The Araceae epiphyte habit explains why houseplant brown-tip scripts fail here: Anubias lives on current-washed hardscape in shaded water, and its leaves tell that story slowly.
When to use this page vs other Anubias guides
- Anubias watering guide - Use for routine moisture checks before assuming brown tips is the main issue.
- Anubias problems hub - Browse all 16 common issues on this species.
- Low Humidity on Anubias - Different entry point when symptoms overlap with brown tips.
- Underwatering on Anubias - Different entry point when symptoms overlap with brown tips.
- Overwatering on Anubias - Different entry point when symptoms overlap with brown tips.