Tulsi Propagation: Cuttings, Water & Seeds Guide
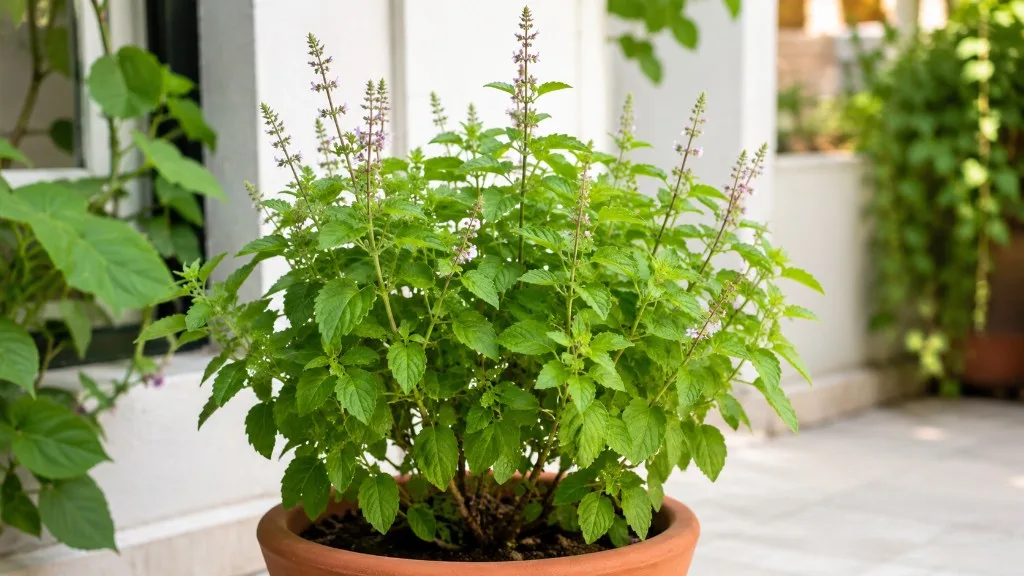
Tulsi Propagation: Cuttings, Water & Seeds Guide
Tulsi Propagation: Cuttings, Water & Seeds Guide
Tulsi propagation is one of the most approachable herb projects you can take on at home because the plant cooperates with two beginner-friendly paths: stem cuttings that root in water or moist soil within one to two weeks, and seed sowing that produces fresh seedlings in roughly the same timeframe when warmth and light are right. Ocimum tenuiflorum - the species most people mean when they say tulsi or holy basil - belongs to the Lamiaceae (mint) family, a group famous for rooting soft stems from nodes without fuss. You are not forcing an unwilling houseplant into a propagation jar; you are using the same biology that lets grocery-store sweet basil sprout roots on a kitchen counter if you forget a stem in a glass of water.
The practical goal for most growers is straightforward: more plants for a balcony pot, a sunny kitchen window, or daily harvest without buying new starts every season. Cuttings clone the parent exactly - same leaf color, aroma profile, and growth habit - while seeds give you volume and a clean restart when you want many small plants or when dried manjari (the upright flower spikes) have already formed on a mature plant. This guide covers method selection, timing, step-by-step workflows for water and soil rooting, surface seed sowing, and the aftercare that turns a rooted cutting or sprouted seedling into a bushy, harvest-ready tulsi plant.
If symptoms persist, see the Leggy Growth on Tulsi guide.
Why Tulsi Is One of the Easiest Sacred Herbs to Propagate
Holy basil has been cultivated across the Indian subcontinent and throughout South and Southeast Asia for centuries, both as a sacred plant in Hindu households and as a valued herb in Ayurvedic tradition. That long domestication history matters for propagation because tulsi behaves like a fast-growing annual or short-lived perennial herb rather than a slow woody shrub. Stems stay soft and photosynthetically active for much of the year in warm conditions, nodes retain the meristematic tissue needed to switch from leaf production to root production, and the plant recovers quickly from harvest cuts - the same cuts you might use to propagate in the first place.
Unlike finicky tropicals that demand division, air layering, or precise humidity chambers, tulsi responds to the basic toolkit most kitchens already have: sharp scissors, a clean glass, well-draining potting mix, and a bright spot out of harsh midday sun while roots form. NC State Extension lists Seed as the recommended propagation strategy for holy basil, though stem cuttings root easily in warm, humid environments - a split that mirrors home practice, where seeds suit bulk sowing and cuttings suit cloning a plant you already love.
How Lamiaceae Stem Anatomy Makes Rooting Fast
The reason tulsi cuttings root easily comes down to node anatomy. Each leaf pair attaches at a node - a slightly swollen joint on the square stem typical of mint-family plants. Nodes concentrate vascular tissue and undifferentiated cells capable of forming adventitious roots when moisture, oxygen, and warmth signal that the detached stem should re-anchor. A cutting taken just below a node and placed with that node above the water line or buried lightly in moist mix has the correct starting point; a leaf stripped off without its node may green up temporarily but will not become an independent plant.
Soft herbaceous stems root faster than woody ones, which is why tulsi propagation works best from young to mid-stem growth rather than old basal wood that has begun to lignify. The stem should feel firm and snap cleanly, with healthy green or purple-tinged color depending on cultivar. Krishna tulsi often shows purplish stems and leaves; Ram tulsi tends toward greener foliage; Kapoor tulsi is a compact variety common in North Indian gardens. All root by the same node logic even though leaf shape and scent intensity differ slightly. If you are propagating to preserve a specific look or aroma, cuttings are the only method that guarantees a genetic match; seed-grown plants may show minor variation.
Rooting speed also depends on whether the parent stem was actively growing. A cutting taken while the plant pushes fresh tips roots faster because its cells are already dividing. Stems pulled from a plant in decline - yellowing lower leaves, sour-smelling soil, heavy pest load - may sit in water for weeks and then collapse because the tissue lacked stored energy and clean vascular flow before you ever cut it.
What Success Looks Like for Cuttings vs Seeds
For stem cuttings in water or soil, success means white or pale roots emerging from the submerged or buried node within roughly 7 to 15 days in warm, bright conditions, followed by new leaf growth at the tip within another week after potting. In water, you can watch roots elongate to 2 to 5 cm (about 1 to 2 inches) before transplant; that visible length is a clearer signal than guessing in opaque soil. For seed sowing, success means even germination across the tray surface in 7 to 14 days at temperatures around 21 to 29°C (70 to 85°F), with tiny seed leaves unfolding and true leaves following soon after. Johnny’s Selected Seeds lists holy basil at 5 to 10 days to germination at 65 to 70°F (18 to 21°C) under ideal seed-starting conditions, though home setups without bottom heat often sit at the longer end of that range.
Cuttings give you a small plant faster from a larger starting piece; seeds give you more individuals from one packet or one dried manjari but require thinning and a few extra weeks before they match a rooted cutting in size. Neither method needs rooting hormone for tulsi - optional products may shave a day or two but rarely change outcomes on healthy material. Your real leverage is clean tools, correct node placement, appropriate moisture, and Tulsi light guide during the vulnerable rooting or germination phase.
Cuttings vs Seeds: Choosing the Right Propagation Method
Both methods work. The better choice depends on whether you need a clone of an existing plant, how many plants you want, and what material you have on hand today. Most home growers default to water propagation for the first attempt because feedback is immediate: you see roots or you see rot, and you adjust before investing potting mix. Gardeners planning a row of tulsi on a terrace or replenishing several pots after monsoon damage often prefer seeds because one manjari holds hundreds of tiny seeds and surface sowing fills a tray quickly.
Speed, Cloning, and When Each Method Wins
Stem cuttings win on speed and identity. A 10 to 15 cm (4 to 6 inch) cutting with two or three nodes can produce a rooted plant ready for its permanent pot in two to three weeks from start to finish, sometimes faster in peak summer warmth. The new plant is genetically identical to the parent - important when you have acclimated a tulsi to your balcony microclimate over a season and want duplicates that tolerate the same light and wind exposure. Cuttings also skip the seedling vulnerability window where slugs, drying soil surfaces, and accidental burying kill germination before you notice.
Seeds win on scale and availability. If a neighbor shares dried manjari from a temple garden plant, or you order holy basil seed online, you can start dozens of plants without sacrificing parent stems that you might otherwise harvest for tea or prasad. Seeds are the practical path when the parent is too weak for cutting, when you want to compare seedlings from a mixed seed lot, or when regulations or logistics make sharing live cuttings harder than sharing seed. The trade-off is genetic variability: seed-grown tulsi may differ slightly in leaf size, purple intensity, or growth rate even within the same species.
Water versus soil for cuttings is a secondary decision. Water propagation offers visibility and easy water changes; direct soil rooting reduces transplant shock for some growers because roots form in their long-term medium from the start. Tulsi handles both; water is more educational, soil is slightly lower maintenance once planted if you resist overwatering.
Starting From Seed When Cuttings Are Not Available
Choose seeds when you have no healthy parent plant, when you want a large batch for gifting or hedge-style planting, or when the cultivar you desire is only sold as seed. Collect seeds from mature plants by letting flower spikes (manjari) develop on the plant until they brown and dry on the stem, then rub the spikes between your fingers over paper to release the tiny nutlets. Store fully dried seed in a labeled jar away from humidity until sowing. Purchased seed from reputable suppliers like Johnny’s or regional nurseries saves that step and gives predictable viability if stored properly.
Seeds also make sense at the start of a growing season when parent plants outdoors are still waking up but you want seedlings ready for transplant when nights stay warm. Start indoors on a bright sill or under a simple grow light while outdoor cuttings would sit in cool air and root slowly. If you already have a thriving tulsi, cuttings remain the faster clone; seeds are the parallel track for expansion.
Best Timing for Tulsi Propagation
Timing for tulsi propagation is less about ritual dates and more about active growth and stable warmth. The plant roots and germinates when metabolism is high - typically when days are long, nights stay above about 18°C (65°F), and the parent shows fresh apical tips rather than heavy flowering on every branch. Propagation during stress - immediately after Tulsi repotting guide, mid pest outbreak, or while recovering from root rot - stacks failure modes even when the technique is correct.
Warm-Season Windows in India and Cooler Climates
In most of India, two natural windows align with how people already grow tulsi outdoors: late winter through spring (roughly February to April) and the post-monsoon warm stretch (August to October) when humidity and warmth return without the heaviest rain battering young seedlings. Balcony and terrace growers in hot plains cities often succeed year-round if the pot drains well and midday sun is tempered; cuttings taken in peak May heat root quickly but need shade from harsh afternoon rays until established.
In temperate climates where tulsi is treated as a warm-season annual, start seeds indoors 6 to 8 weeks before the last frost and take cuttings from overwintered indoor plants or purchased starts once outdoor nights reliably exceed 50°F (10°C). Propagation timing should follow whether your plant is in an active flush, not whether the calendar says “spring” in abstract terms.
Indoor-only growers with a sunny window or supplemental light have more flexibility. Root cuttings whenever the parent looks vigorous, but expect slower rooting in dim, cool winter rooms - sometimes three weeks instead of ten days - and adjust water changes and soil moisture downward to match slower uptake.
Parent Plant and Material Quality Checks
Before you cut, inspect the donor tulsi the way you would before a pruning session meant to heal, not harm. Leaves should be mostly firm and aromatic when crushed; stems should not be blackened at nodes; soil should not smell sour. Avoid taking propagation material from stems already covered in dense flower clusters if you can choose greener side shoots instead - flowering stems can root but often redirect energy away from root formation while blooms continue. If the plant is healthy but hungry, water normally the day before cutting so stems are hydrated, not wilted from drought.
Pests travel with cuttings. Scan leaf undersides for aphids and stems for white cottony mealybug patches; rinse or treat the parent before propagating so you do not multiply infestations across new jars and pots. Quarantine fresh cuttings for a week after potting if you are uncertain about parent health - a small price for protecting an existing collection.
How to Take Tulsi Stem Cuttings
Taking the cutting is a two-minute job that deserves full attention because node placement and leaf removal determine everything downstream. You are harvesting living tissue that will sit rootless for days; clean cuts and stripped lower leaves reduce rot pressure while leaving enough upper foliage for photosynthesis.
Gather sharp scissors or pruning shears, 70% isopropyl alcohol or soap-and-water cleaned blades, a clear glass or small pots, and labels if running multiple batches. Morning is a fine time to cut when stems are turgid; avoid midday on hot terraces when wilting happens fast.
Cutting Length, Nodes, and Leaf Removal
Select a non-flowering or lightly flowering side shoot and cut a segment 10 to 15 cm (4 to 6 inches) long, making the slice just below a leaf node at a slight angle so water sheds off the cut face in jars. The lowest node on the cutting is your rooting zone; aim to have at least one additional node above the water or soil line for future branch points. Remove all leaves from the lower half of the stem so nothing submerges or sits buried in wet mix - submerged leaves decay quickly and foul water or soil. Keep two to four leaves at the top so the cutting can photosynthesize; if leaves are huge, you may halve them with scissors to reduce transpiration while roots are absent.
If you are harvesting during regular pruning for bushiness, propagate from the tip sections you would otherwise compost. Tulsi responds well to pinching; propagation and harvest can be the same action. Take multiple cuttings if you want redundancy - one jar with three stems is fine if leaves do not crowd each other and air can circulate.
Sanitation and Avoiding Weak Stems
Sterilize blades between plants if you suspect disease. A single crushing cut invites infection; one smooth snip is enough. Discard stems that are woody at the base, shriveled, or mottled with dark spots. The “easy rooting” reputation of tulsi applies to healthy soft growth, not rescue material from a dying parent - though a firm accidental snap from an otherwise healthy plant still roots well if you trim the break cleanly and start fresh.
Optional rooting hormone powder or gel at the cut end can help in marginal conditions but is not required for holy basil the way it might be for slow woody shrubs. If you use it on soil-bound cuttings, apply a thin dusting on the moist cut surface before planting; for water propagation, hormone washes off and adds little benefit.
Rooting Tulsi Cuttings in Water
Water propagation is the most visible tulsi propagation method and the one most beginners recognize: a glass on a bright counter, roots appearing like a time-lapse video, then a small pot waiting on the shelf. Holy basil roots in water reliably when nodes stay submerged, leaves stay dry above the rim, and water stays fresh enough that oxygen does not fully deplete.
Fill a clear glass or jar with room-temperature water deep enough to cover the lowest 3 to 5 cm (1 to 2 inches) of bare stem - typically one submerged node, sometimes two on longer cuttings. Do not let upper leaves dip below the surface. Place the jar in bright indirect light: a east- or north-facing windowsill indoors, or a shaded balcony table outdoors where direct midday sun will not cook the submerged stem. Tulsi loves sun once rooted, but rootless cuttings lose water faster than they replace it under harsh rays.
Jar Setup, Light, and Water Changes
Change the water every two to three days, or whenever it looks cloudy or smells stale. Fresh water reintroduces oxygen and limits bacterial film that softens stem tissue. Rinse the jar briefly if slime builds on the glass. If tap water is heavily chlorinated and you notice slow progress, let water sit open overnight before refilling or use filtered water - the effect is minor on healthy cuttings but can help in sensitive setups.
Within 7 to 10 days in warm conditions, you should see white root initials nubbing from the submerged node; by 10 to 15 days, roots often reach 2 to 5 cm (1 to 2 inches) long and are ready for soil. Cool or dim conditions stretch that to three weeks without necessarily indicating failure - look for firm green stem and continuing root elongation rather than blackening at the water line. If the stem turns mushy or the water smells sour within the first week, discard the cutting, sterilize the jar, and restart with fresher material and cleaner leaf-stripping discipline.
Multiple cuttings can share one jar if spaced so stems do not rub wounds together. Avoid overcrowding that pushes leaves into the water. A narrow mouth jar can support a single stem without props; wider jars may need a piece of foil with a slit to hold stems upright - optional, not mandatory.
Potting Up Water-Rooted Cuttings
Transplant when roots are long enough to survive the shift to soil but not so overgrown that they tangle and break during planting - the 2 to 5 cm range is the usual target. Use a small pot 10 to 12 cm (4 to 5 inches) with drainage holes and a fertile, well-draining mix: roughly 40% cocopeat or quality potting soil, 40% compost, 20% perlite or coarse sand mirrors what many Indian home growers already use for tulsi. Pre-moisten the mix so it is damp but not soggy.
Make a hole with a finger, lower the cutting so the previously submerged node sits just below the surface, and firm mix gently around the stem without crushing roots. Water lightly to settle, then place the pot in bright indirect light for 5 to 7 days while roots adapt from water to soil - this hardening-off period reduces wilt. Gradually introduce stronger sun matching your normal tulsi placement: full sun to bright indirect for most cultivars once new growth looks perky.
Hold fertilizer until you see fresh top growth - roots need to integrate with soil first. Pinch the tip once the plant stabilizes to encourage bushy side branches instead of a single lanky spike. That pinch also delays premature heavy flowering, keeping leaf production high for harvest.
Rooting Tulsi Cuttings Directly in Soil
Soil propagation skips the glass stage and asks roots to form in their permanent medium from day one. Some growers prefer it because they avoid the transplant step entirely; others find soil less transparent when diagnosing problems. Tulsi cuttings root directly in moist mix in roughly 15 to 20 days, sometimes matching water speed in warm humid air.
Prepare the same well-draining, compost-rich mix as for potting up water-rooted plants. Fill a small pot or nursery cell, insert the stripped cutting 2 to 3 cm deep so the lowest node is buried, and firm lightly. Water once to settle, then maintain lightly moist conditions - the top should not crust dry for days, but squeezing a handful of mix should not drip water.
Mix, Moisture, and Early Shade
Place soil-rooted cuttings in bright indirect light with protection from direct afternoon sun for the first week. A clear plastic bag loosely tenting the pot can raise humidity and reduce wilting on hot balconies; vent daily so mold does not form. Remove the tent once the cutting stands upright without drooping - usually when you tug gently and feel slight resistance, indicating roots anchoring.
Overwatering is the primary failure mode in soil. Rootless stems cannot drink aggressively; idle wet mix invites stem rot at the buried node. If the cutting collapses while mix stays wet, discard it and retry with drier initial moisture and better drainage. Underwatering shows as limp leaves but firm stem; a light soak often revives before roots form if correction is prompt.
Once rooted, care matches any young tulsi: move toward full light exposure for your climate, water when the top inch of mix dries, and pinch tips to branch. Direct-soil cuttings often transition to harvest-ready growth with less transplant shock than water-rooted ones, which is the main reason experienced growers choose this path despite losing the visual progress of a jar.
Growing Tulsi From Seed by Surface Sowing
Tulsi seeds are tiny and require light to germinate - burying them deeply is the most common seed-starting mistake. Commercial guidance is consistent: Johnny’s Selected Seeds instructs sowing holy basil more shallowly than other basils because of light dependence, with direct seeding at about 6 mm (¼ inch) or less and firming seeds to soil contact without deep burial. Many home growers achieve better results by surface sowing: scatter seeds on pre-moistened mix, press gently with a flat palm or finger, mist with a spray bottle, and leave seeds exposed to bright light rather than covered with a thick soil layer.
Fill a seed tray or shallow pot with fine, well-draining seed-starting mix - cocopeat blended with compost and a little perlite works well. Pre-moisten evenly. Sprinkle seeds sparingly; one packet goes a long way. Mist the surface until damp, then cover the tray with clear plastic or a humidity dome only if your air is very dry, removing it at the first sign of sprouting so seedlings do not damp off. Place the tray in warm, bright light targeting 21 to 29°C (70 to 85°F); a heat mat under the tray speeds germination in cool rooms but is optional in already-warm Indian flats.
Expect germination in 7 to 14 days, with Johnny’s reporting 5 to 10 days under optimal 65 to 70°F lab-style conditions. Research on Ocimum tenuiflorum seed quality under controlled environments (PMC peer-reviewed study on germination and light spectra) underscores that light conditions during germination influence seedling vigor - a botanical reminder that a dim closet tray produces leggy, fragile seedlings even if some seeds eventually sprout. A sunny sill or supplemental LED grow light for 12 to 16 hours daily produces sturdier starts.
When seedlings show two true leaves beyond the cotyledons, thin or transplant to individual pots spaced 10 to 15 cm apart so each plant develops airflow and root volume. Water with a spray bottle or gentle pour that does not dislodge seeds or flatten tiny stems. Begin pinching growing tips once plants reach 15 to 20 cm height to encourage the bushy form tulsi is known for. Fertilize lightly only after true leaves expand and roots fill the cell - young seedlings need little beyond good mix.
Collected manjari seed may vary in viability depending on drying and storage; if home-collected seed germinates poorly, retry with fresher seed or purchased stock before assuming your conditions are wrong. Seed-grown tulsi may show slight trait variation; that is normal and rarely matters unless you are selecting for a specific purple-leaf clone - in that case, return to cuttings for true copies.
Conclusion
Tulsi propagation rewards a simple, clean workflow more than expensive gear or rooting secrets. For most home growers, stem cuttings in water remain the fastest way to see progress: cut 10 to 15 cm of healthy stem just below a node, strip lower leaves, submerge the node in fresh water under bright indirect light, change water every few days, and pot up when roots reach 2 to 5 cm. Direct soil rooting suits those who want to skip the jar and accept slightly less visibility, using the same node rules and a moist, well-drained compost-enriched mix. Seed sowing scales your garden from dried manjari or purchased holy basil seed when you surface sow, press lightly, mist, and keep seeds in warm bright light without burying them deep.
Match timing to active parent growth and stable warmth, start from healthy material, and treat early aftercare - gradual sun increase, controlled moisture, tip pinching - as part of propagation, not an optional appendix. When something fails, the diagnosis is usually visible: black mushy stems mean wet, stale conditions or submerged leaves; shriveled firm stems mean underwatering; leggy pale seedlings mean insufficient light. Restart with cleaner technique rather than nursing rotting cuttings indefinitely. Once you have rooted one tulsi cutting or tray of seedlings, the rhythm becomes repeatable - the same plant that roots in a glass on your counter can supply cuttings for years of harvest, sharing, and replacement without starting over from seed every time.
When to use this page vs other Tulsi guides
- Tulsi overview - Start here for whole-plant context before deep-diving this topic.
- Tulsi problems hub - Jump to symptom-specific fix guides when this care topic does not resolve the issue.