How to Propagate Rhaphidophora Tetrasperma Cuttings
How to Propagate Rhaphidophora Tetrasperma Cuttings
How to Propagate Rhaphidophora Tetrasperma Cuttings
Rhaphidophora tetrasperma propagation is one of the most forgiving projects in indoor gardening - if you respect one biological rule that trips up nearly every beginner. You need a node, not just a pretty leaf. Rhaphidophora tetrasperma, sold as Mini Monstera, Monstera Minima, Philodendron Ginny, and Piccolo Monstera, is a fast-growing climbing aroid native to the wet forests of Southern Thailand and Malaysia. It is not a true Monstera; it belongs to the genus Rhaphidophora within the family Araceae, and it roots from stem tissue the same way its wild relatives anchor to tree trunks with aerial roots. A clean stem cutting with at least one node can produce a genetically identical clone in two to four weeks in water at warm room temperatures, or slightly longer in moss, LECA, or soil depending on your setup.
The dependable home routes are stem cuttings rooted in water, damp sphagnum moss or perlite, LECA with a partial water reservoir, or directly in airy aroid mix under a humidity tent. Water propagation gives you visible roots and early rot detection. Moss and LECA balance moisture and oxygen in ways that reduce transplant shock later. Direct soil rooting skips a transfer step but demands stricter humidity control. Every method fails quickly when water stagnates, the parent plant is already stressed, or cuttings sit in cold, dim corners. Success depends less on rooting powder and more on healthy tissue, clean tools, Rhaphidophora Tetrasperma light guide, and moisture without stagnation.
If symptoms persist, see the Leggy Growth on Rhaphidophora Tetrasperma guide.
What Makes This Mini Monstera Worth Multiplying
Rhaphidophora tetrasperma earns its popularity on speed and structure. According to NC State Extension, Rhaphidophora Tetrasperma overview can climb to 15 feet (4.5 m) outdoors in frost-free climates and behaves as a vigorous indoor vine when given a moss pole or trellis. Propagation preserves the exact leaf shape, fenestration pattern, and growth habit of the parent because a stem cutting is a vegetative clone - the new plant matches the cultivar you already own. Seeds, if you could source them reliably from a houseplant, would not guarantee the same appearance. That matters when you are cloning a particularly fenestrated specimen, filling out a sparse pot, or sharing a cutting with a friend who admired your plant.
Propagation also solves practical problems that indoor gardeners face regularly. Leggy vines can be refreshed by rooting the top section and discarding the bare lower stem. A single nursery purchase can become several plants without another trip to the store. Long stems tangled on a moss pole can be trimmed into multiple single-node cuttings during spring Rhaphidophora Tetrasperma repotting guide. Because the plant grows fast during warm months, rooted cuttings often push new leaves within weeks of potting - faster than many comparable aroids. One critical caveat: Rhaphidophora tetrasperma is toxic to cats and dogs if ingested, with calcium oxalate crystals that cause oral irritation per NC State Extension and the ASPCA toxic plants list. Wear gloves if sap irritates your skin, and keep cuttings on high shelves away from pets during the rooting phase.
The plant’s aerial roots along the stem are a propagation advantage, not a cosmetic quirk. In nature, these roots grab bark and draw moisture from humid air as the vine climbs. On a cutting, an aerial root that is already protruding from a node often converts into a functional root system faster than a node with no visible root initials. That does not mean you need an aerial root to succeed - bare nodes root reliably - but it explains why experienced growers get excited when they see fuzzy brown nubs along a stem they plan to cut.
Understanding Nodes, Aerial Roots, and Stem Anatomy
A node is the joint on the stem where a leaf petiole attaches and where the plant can produce new growth. On Rhaphidophora tetrasperma, nodes often look like slight swellings or brownish rings along an otherwise green stem. Internodes are the stem segments between nodes. When you take a propagation cutting, the cut should sit just below a node, and at least one node must contact your rooting medium or water. Roots emerge from the node tissue - sometimes from an existing aerial root, sometimes from the node surface itself. New leaves emerge from the axillary bud located at the node above the cut on the parent plant, and from the terminal bud on the rooted cutting once it establishes.
Adventitious roots are roots that form from non-root tissue - in this case, stem nodes rather than an existing root system. Aroid propagation depends entirely on this capacity. The cutting has no functional roots when you place it in water or moss, so it must prevent excessive water loss through its leaves while the node tissue reorganizes into root initials. Your setup narrows that gap: enough leaf area for modest photosynthesis, enough humidity or stem contact with moisture, and enough oxygen that bacteria do not consume the cutting first.
Why a Leaf Alone Will Never Become a Plant
This is the most common propagation failure on social media, and it is worth stating plainly. A Rhaphidophora tetrasperma leaf with no node attached cannot produce a new plant. The leaf may stay green for weeks in water, and you may even see root-like structures emerge from the petiole base in rare cases, but without node tissue connected to the vascular system of the main stem, the cutting lacks the meristematic cells needed to generate shoots. You will end up with a decorative floating leaf that eventually yellows - not a vine.
What about a leaf that still has a tiny piece of stem? If that stem fragment includes even a sliver of node tissue, propagation can work. The test is simple: trace the petiole back to where it meets the main stem. If you cut below that junction and the cutting includes the node bump, you have viable material. If you snapped off a leaf flush with the stem surface and left the node on the parent plant, the detached leaf will not root into a full specimen. When in doubt, include more stem rather than less - a 10–15 cm (4–6 inch) cutting with one or two nodes is easier to manage than a leaf with a millimeter of stem stub.
Water vs Moss vs LECA vs Soil: Choosing Your Rooting Medium
There is no single best medium for every grower. The right choice depends on how hands-on you want to be, how visible you need roots to be, and how confident you feel about the water-to-soil transition.
Water propagation is the most popular starting point because roots are visible, water changes are simple, and Rhaphidophora tetrasperma roots aggressively in plain water at warm temperatures. The trade-off is transplant shock when water roots meet soil for the first time. Water roots are structurally different from soil roots - thinner, more fragile, adapted to full submersion - and they can stall or rot if the potting mix stays too wet immediately after transfer.
Sphagnum moss and perlite offer a middle path. Damp moss pressed against a node provides moisture and oxygen simultaneously, and roots that form in moss tend to adapt to soil more smoothly than water roots. Perlite mixed into moss increases airflow and reduces the compaction risk that dense wet moss can create in a closed bag.
LECA (expanded clay aggregate) uses a water reservoir below the balls while the node sits in humid air above the water line. The clay wicks moisture upward, creating the high-humidity, high-oxygen environment aroids prefer. LECA propagation requires a clear container so you can monitor water level and root progress, but it reduces the daily maintenance of water changes.
Direct soil rooting skips an intermediate transfer. You plant the node into moist aroid mix, cover the pot with a clear humidity tent, and wait. This method works well for experienced growers who already understand aroid soil moisture, but beginners often overwater sealed tents and lose cuttings to stem rot before roots form.
For most first-time propagators, water is the easiest diagnostic medium - you see problems early. If you plan to root many cuttings or hate changing water every few days, LECA or moss rewards the extra setup time with less shock at potting.
Selecting a Healthy Parent Plant Before You Cut
Propagation multiplies whatever condition the parent is in. A stressed, pest-infested, or rotting plant produces stressed cuttings that rot before they root. Before you reach for the pruners, evaluate the whole specimen.
Choose a parent with firm stems, evenly colored leaves, and active new growth at the tip. Avoid plants with widespread yellowing, mushy stem bases, sticky residue suggesting scale or mealybugs, or soil that smells sour. If only one section of a large vine is healthy, take cuttings from that section only. Do not propagate as a rescue mission for a dying plant - stabilize the parent first, or accept that you are gambling with limited material.
Size matters for planning, not for biology. A small plant with one healthy vine can yield a single-node cutting and still look fine afterward. A large plant on a moss pole can yield a dozen cuttings in one pruning session. If the parent is small, take one cutting and let it recover before taking more. If the parent is overgrown, spring pruning plus propagation can refresh the display and produce gifts for friends in the same afternoon.
Do not propagate immediately after shipping, repotting, or a pest treatment with oil sprays. Give the plant one to two weeks of stable care in its current spot so tissue is fully hydrated and stress hormones have settled. Cuttings taken from a plant that just crossed the country in a dark box often sulk even when the method is correct.
Propagation is a backup plan, not a cure for bad conditions. Do not propagate as your first response to every yellow leaf or leggy stem. If the parent has active root rot, severe dehydration, a heavy pest infestation, or soil that smells sour, stabilize the mother plant first - or take cuttings only from sections clearly free of the problem. Skip propagation right after shipping, during repotting shock, or in a cool dim winter unless you can add supplemental light and warmth.
Best Timing for Rhaphidophora Tetrasperma Cuttings
Rhaphidophora tetrasperma roots fastest during active growth - typically spring through early fall when light is strong, temperatures sit in the comfortable range, and the parent is pushing new leaves. According to NC State Extension, this species thrives at 65–80°F (18–27°C) and slows markedly in cool, dim winter conditions. You can propagate in winter indoors, especially if you use a grow light and keep the room above 65°F, but expect slower root development and a higher rot risk if water stays cold and unchanged too long.
The best timing is not a calendar date alone. It is the moment when the plant is actively growing - you can see unfurling leaves, firm new stems, or roots circling a pot - and when you have stable indoor conditions for the cutting afterward. Avoid taking cuttings during a heat wave that wilts the parent daily, during an active spider mite outbreak, or right after you moved the plant from a bright greenhouse to a dim apartment without acclimation.
If you need to propagate before a move or a hard prune, take cuttings a few weeks before the event so the parent begins healing first. The parent plant will sprout new growth from the axillary bud just below each cut; that new shoot is your confirmation that the pruning wound is healing cleanly.
Tools and Supplies for Stem Cuttings
Gather supplies before you cut so stem tissue does not dry out while you search for a jar. You need less than you might think.
Cutting tools: sharp bypass pruners, a clean knife, or precision scissors. Dull blades crush stem tissue and invite infection. Sanitize blades with 70% isopropyl alcohol or a 10% bleach solution before each cut, especially when taking multiple cuttings from one vine.
Propagation vessels: clear glass jars or bottles for water propagation; clear plastic cups or nursery pots for moss, LECA, or soil; a clear plastic bag or humidity dome for soil rooting.
Rooting media: filtered or dechlorinated tap water; rehydrated sphagnum moss wrung to damp-not-dripping; LECA clay balls; perlite; or a pre-mixed aroid potting blend of potting soil, perlite, and orchid bark.
Optional aids: rooting hormone powder or gel (helpful but not required for this species); a small moss pole or bamboo stake for potting rooted cuttings; a heat mat if your room drops below 65°F at night.
Safety: gloves if calcium oxalate sap irritates your skin; a stable work surface; paper towels for sap drips.
How to Take a Clean Stem Cutting Step by Step
Follow these steps in order for a standard single-node or multi-node stem cutting.
- Identify a healthy section with at least one node and preferably one to two healthy leaves. Aerial roots at the node are a bonus.
- Sanitize your blade and decide where to cut. Make the cut ¼ to ½ inch (0.6 to 1.3 cm) below the lowest node you want on the cutting.
- Remove leaves that would sit below the water line or bury in soil. Keep at least one leaf at the top for photosynthesis.
- Inspect the node - it should look firm, not mushy or blackened. Trim any dried, papery sheath if it blocks contact with the medium.
- Place immediately into water, moss, LECA, or soil. Do not let the cutting sit on the counter for an hour.
- Label the jar if you are running multiple experiments. All aroid cuttings look identical after a week.
A workable cutting length is 10–20 cm (4–8 inches) with one to three nodes. Single-node cuttings are valid and common in the plant trade - one node, one leaf, and a short stem stub is enough. Multi-node cuttings produce more roots per piece but give you fewer total plants from one vine. If you are pruning a long leggy stem, you can cut between every node to maximize plant count.
Rooting hormone is optional for Rhaphidophora tetrasperma. This species roots readily without it. Hormone can slightly speed callus formation on direct-soil cuttings in cool conditions, but it is not a substitute for node tissue, clean tools, or proper moisture. If you use it, apply a thin dust or dip to the cut end and node surface only - excess powder can inhibit rooting.
Single-Node vs Multi-Node Cuttings
Single-node cuttings - one node, one leaf, and a short stem stub - are the industry standard for aroid propagation. They root efficiently, take less space on a propagation shelf, and let you multiply a long vine into many plants. The downside is that each piece has minimal stored energy, so single-node cuttings are slightly less forgiving of cold rooms or inconsistent water changes than cuttings with two nodes and two leaves.
Multi-node cuttings keep two or three nodes on one stem segment, usually with two or three leaves at the top. They photosynthesize more actively and often root faster in marginal conditions, but you get fewer total plants from one pruning session. Multi-node cuttings also create tangled root masses in water if you wait too long to pot - detangling four rooted nodes from one jar is tedious work that experienced growers regret when they get lazy about transplant timing.
For beginners, a two-node cutting with one or two leaves balances forgiveness and simplicity. For maximizing plant count from an overgrown pole, cut between every node and root singles in separate jars. Label each jar if you are running both strategies side by side.
Water Propagation for Rhaphidophora Tetrasperma
Water propagation is the method most growers start with, and Rhaphidophora tetrasperma responds enthusiastically when conditions are warm and bright. Fill a clear glass container with room-temperature water - filtered or dechlorinated tap water is fine. Insert the cutting so the node is submerged while leaves remain above the water line. Only the node needs water contact; submerging leaves invites rot and bacterial film.
Place the jar in bright indirect light - an east-facing windowsill or a few feet back from a south or west window. Avoid direct sun on the jar, which heats the water and encourages algae. Avoid dark hallways, which slow rooting enough that the cutting may decay before roots appear.
Jar Setup, Water Changes, and Root Milestones
Change the water every three to five days, or sooner if it looks cloudy or smells stale. Fresh water replenishes oxygen, which submerged roots need. You do not need to add fertilizer during the first two weeks. After white root tips appear, a drop of diluted balanced liquid fertilizer at one-quarter strength in the water is optional - not mandatory.
Rooting timeline: at 65–80°F (18–27°C) with adequate light, most cuttings show root initials in 7 to 14 days and usable roots in two to four weeks. Cuttings with existing aerial roots may root faster. Cold rooms below 60°F can stretch the timeline to six weeks or longer.
Transfer trigger: pot into soil when roots reach 2.5–5 cm (1–2 inches) long - long enough to anchor in mix but not so long that they become fragile water-specialized threads. Roots much longer than 7.5 cm (3 inches) can struggle after soil transfer because they are adapted to full submersion. If you let roots grow very long, trim lightly or transition through moss first to bridge the texture change.
Watch for new bud growth while the cutting is still in water - a small green bump emerging from a node above the water line means the cutting is viable and likely to thrive after potting. That bud is your early success signal.
Sphagnum Moss, Perlite, and LECA Propagation
If you want roots that transition to soil with less shock, moss and LECA are worth the extra setup.
Sphagnum moss method: rehydrate dried sphagnum in warm water for an hour, then wring until damp but not dripping. Lay the node against the moss and press gently for contact. Add a handful of perlite for airflow if you are using a cup. Cover loosely with a clear bag or use a propagation box, venting daily to prevent mold. Keep moss consistently damp with a spray bottle - never sodden. Roots typically appear in two to four weeks at warm temperatures, similar to water, but the root texture is closer to soil roots.
LECA method: add LECA to a clear jar until one-third full. Pour in water to just below the node - the node sits in humid air above the water line, not submerged. The clay balls wick moisture upward. Top off water as it evaporates, usually every week. Roots form along the node in two to four weeks. LECA’s advantage is stable humidity without daily water changes, though you must monitor that the water level does not rise high enough to submerge the stem base continuously.
Both methods allow you to inspect roots through a clear container without disturbing the cutting. When roots reach 2.5–5 cm, pot into aroid mix using the same gentle technique described in the transfer section below.
Air layering is an alternative that roots a node while it remains attached to the parent vine. Wrap a node in damp sphagnum moss, cover with plastic wrap, keep the moss moist, and cut below the node once roots penetrate the moss - usually in three to six weeks. This method suits growers who want a larger rooted piece with less shock, or who hesitate to sever a long vine before roots are confirmed.
Direct Soil Rooting With a Humidity Tent
Direct soil rooting works when you want to skip the water phase entirely. Fill a small pot with moist, well-draining aroid mix - roughly equal parts potting soil, perlite, and orchid bark. Insert the cutting so the node is buried 1–2 cm (½–¾ inch) deep and the stem stands upright. Firm the mix lightly around the stem.
Cover the pot with a clear plastic bag supported by stakes so plastic does not touch leaves. This creates a humidity tent that reduces water loss while roots form. Place in bright indirect light. Vent the bag daily for a few minutes to exchange air and prevent mold. Keep the mix lightly moist, not wet - the most common failure is treating a sealed tent like a swamp.
After three to five weeks, test with a gentle tug. Resistance means roots have anchored. No resistance means wait another week and recheck. Once the tug test passes, remove the bag gradually over several days rather than all at once, letting the cutting acclimate to normal room humidity.
Creating Ideal Rooting Conditions
Rhaphidophora tetrasperma cuttings are not demanding, but they are consistent. Weak light, cold water, and stagnant air produce the slow, rotting results that make beginners think they lack a green thumb.
Light, Temperature, and Humidity Targets
Light: bright indirect exposure for most of the day. A cutting in low light may stay alive but root slowly, stretching toward the nearest window and losing leaf color. If your only available spot is dim, add a full-spectrum grow light on a 10–12 hour timer, positioned 30–45 cm (12–18 inches) above the cutting.
Temperature: target 65–80°F (18–27°C). Rooting stalls below about 60°F (15°C). A heat mat set to 70–75°F under propagation trays can help in cool apartments, but avoid cooking the cutting - gentle warmth, not hot soil.
Humidity: average home humidity of 40–50% is adequate for water-propagated cuttings because the node is submerged or in contact with damp moss. For soil tents and moss bags, 50–70% ambient humidity speeds the process. A humidifier near the propagation station helps more than misting, which raises humidity briefly and can leave wet leaf surfaces that invite fungal spotting.
Airflow: stagnant closed tents need daily venting. Open shelves with water jars benefit from normal room air circulation - just keep cuttings away from heating vents that blast hot dry air directly onto leaves.
Moving Rooted Cuttings Into Potting Mix
The water-to-soil transition is where many propagations fail after weeks of apparent success. Plan the move carefully.
Choose a pot only slightly larger than the root mass - often 8–10 cm (3–4 inches) for a first pot. Use chunky aroid mix: potting soil plus perlite plus orchid bark, the same blend you would use for a mature Rhaphidophora tetrasperma. Pre-moisten the mix so it is evenly damp, not dry dust or wet mud.
Create a hole, place the cutting so the node sits at or just below the soil surface, and backfill gently. If water roots are long and tangled, coil them loosely rather than cramming them into a tight ball. Water lightly once to settle the mix, then let the top 2–3 cm dry slightly before the next drink - the rhythm you use for an established plant, not constant saturation.
Keep the newly potted cutting in bright indirect light without direct sun for the first week. Some leaf droop is normal as water roots adapt. New firm growth - a leaf unfurling or a stem stiffening - is the sign that soil roots are taking over. Do not fertilize for four to six weeks after potting; new roots are sensitive to salt burn.
If the cutting collapses within days and the mix smells sour, remove it, rinse roots, trim any mushy tissue, and restart in water or moss rather than repotting into wet soil again immediately.
Aftercare During the First Month
Newly potted Rhaphidophora tetrasperma plants need steadier, slightly more conservative care than mature specimens. The root system is still small relative to the leaf area, so the plant cannot tolerate long drought or chronic wet feet.
Water when the top 2–3 cm of mix feels dry - the same checkpoint used for adult plants. In a small starter pot in bright light, that may mean every five to seven days in summer and every ten to fourteen days in winter. Lift the pot to judge weight; a very light pot needs water, a heavy cold pot needs more drying time.
Do not repot again during the first month unless roots are visibly circling and the plant is stable. Do not move the pot between rooms repeatedly. Do not fertilize until you see active new growth - a fresh leaf unfurling is your green light for half-strength balanced liquid feed once a month.
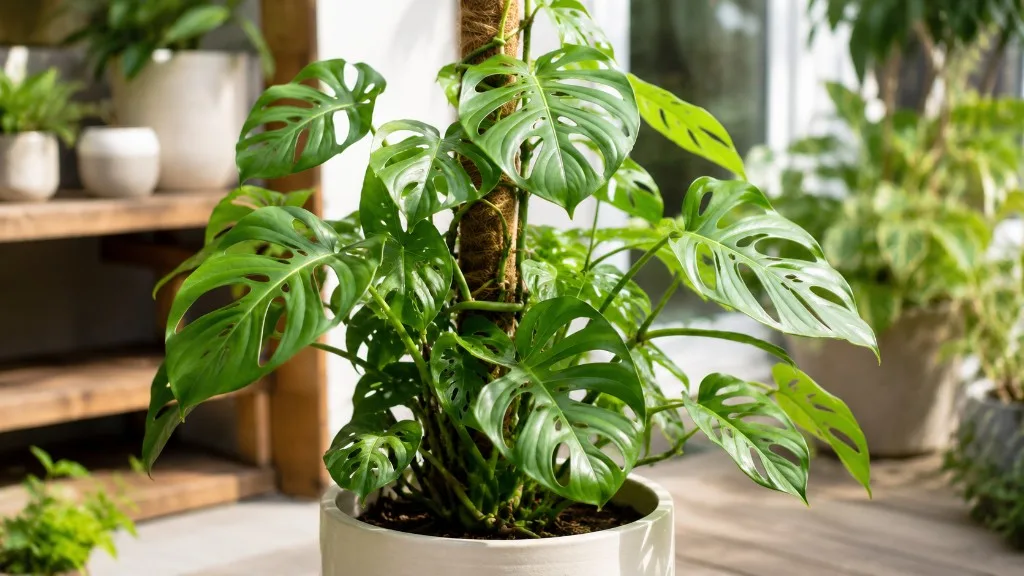
Install a moss pole or trellis early if you want climbing habit from the start. Rhaphidophora tetrasperma is an epiphyte that produces larger, more fenestrated leaves when it climbs. A small stake in the starter pot now prevents awkward repositioning later when aerial roots have already grabbed a surface.
Watch for spider mites on new tender growth, especially in dry winter air. Inspect leaf undersides weekly. If you see stippling or fine webbing, isolate the plant and treat before the infestation spreads to other houseplants.
Troubleshooting Failed or Slow Cuttings
Most propagation failures trace back to a short list of causes. Diagnose before starting over.
Mushy stem at the node means rot - usually stale water, submerged leaves, oversaturated soil in a sealed tent, or a cutting that was already compromised. Trim back to firm green tissue if any remains, sanitize tools, and restart in fresh water or moss. If the entire stem is soft, discard it and take a new cutting from healthier parent tissue.
Shriveling leaves with dry stem mean the cutting is losing water faster than it can absorb. Increase humidity with a bag over the jar top (leaves only, node still exposed to water), move to brighter indirect light, or shorten the cutting to reduce leaf surface. A cutting with four large leaves on a single node struggles more than one with a single modest leaf.
Cloudy water with foul smell signals bacterial growth. Replace water, rinse the stem, and switch to a clean container. Add a small piece of activated charcoal to the jar if cloudiness returns quickly - optional but helpful.
No roots after six weeks in winter often means temperature or light, not dead tissue. Move to a warmer spot or add a grow light, change water weekly, and wait another month before giving up. Rhaphidophora tetrasperma cuttings can sit apparently dormant and then root suddenly when spring light arrives.
Roots formed but plant stalled after potting usually means the mix stayed too wet or too dry. Re-check your Rhaphidophora Tetrasperma watering guide against pot weight. Confirm the node is not buried too deep. Ensure the pot has a drainage hole.
Blackened node with no roots means the cutting is finished. Do not propagate from a parent that keeps producing black nodes - inspect the mother plant for stem rot or cold damage at the base.
Conclusion
Rhaphidophora tetrasperma propagation from stem cuttings is straightforward once you internalize the node rule and match your medium to your patience. Take a clean cut below a node, keep leaves out of stagnant water, provide bright indirect light and warmth near 65–80°F, and transfer to chunky aroid mix when roots reach 1–2 inches. Water is the easiest starting point for visibility; moss and LECA reduce transplant shock; direct soil works if you respect humidity without waterlogging. The plant rewards good cuttings quickly - often within weeks - because it is a fast-growing tropical vine built to colonize new surfaces in the wild. Give rooted cuttings a calm first month, a moss pole if you want climb habit, and the same well-draining mix you would use for the parent. Skip propagation when the mother plant is stressed, remember the ASPCA toxicity listing if pets share your space, and judge success by new firm growth, not by how often you inspect roots. Get those basics right and one healthy Mini Monstera vine can become a shelf of independent plants without a second nursery bill.
When to use this page vs other Rhaphidophora Tetrasperma guides
- Rhaphidophora Tetrasperma overview - Start here for whole-plant context before deep-diving this topic.
- Rhaphidophora Tetrasperma problems hub - Jump to symptom-specific fix guides when this care topic does not resolve the issue.