Ficus Elastica Ruby Propagation: Cuttings Guide
Ficus Elastica Ruby Propagation: Cuttings Guide
Ficus Elastica Ruby Propagation: Cuttings Guide
Why Ruby Rubber Plants Need a Different Propagation Mindset
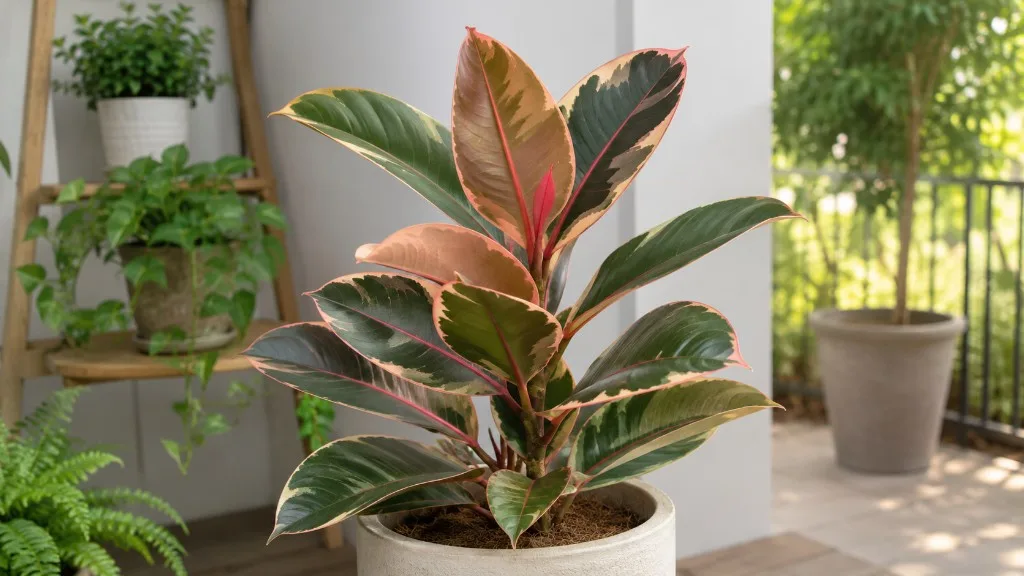
Ficus elastica ‘Ruby’ - the Ruby rubber plant - is one of the most visually striking cultivars in the Ficus elastica group. New leaves emerge with vivid pink, cream, and deep green patterning that reads almost painted on. That beauty comes with a propagation complication most generic rubber plant guides skip: Ruby is a chimeric variegated cultivar, meaning its color zones come from genetically distinct cell layers stacked in the same stem. When you divide that tissue through a cutting or an air layer, the new plant may root perfectly and still look different from the parent - sometimes greener, sometimes with softer pink, occasionally with stronger blush on new growth if light is excellent.
Propagation for Ruby is therefore not just about getting roots. It is about choosing the right method for your stem type, starting from healthy actively growing tissue, and setting realistic expectations about variegation on the offspring. The two methods that work reliably at home are stem cuttings that include at least one node and air layering on stems still attached to the parent. Leaf cuttings - a single detached leaf with or without a short petiole stub - do not produce a full Ruby rubber plant because leaves alone lack the bud tissue required to generate shoots and branches.
If you treat Ruby like a pothos that roots from any segment, you will waste months watching a leaf produce roots and nothing else. If you treat it like a solid Burgundy rubber plant without accounting for light demand after rooting, you may succeed at propagation and still lose the pink tones that made the plant worth keeping. The sections below walk through both valid methods in full, from tool prep through aftercare, with the variegation caveat woven in where it actually changes your decisions.
What Makes Ruby Variegation Unreliable in New Plants
Variegated Ficus elastica cultivars - including ‘Ruby’, ‘Tineke’, and related tricolour types - depend on a balance between chlorophyll-rich green tissue (which fuels growth) and anthocyanin-rich pink or cream zones (which create the display colour but photosynthesize less efficiently). In chimeric plants, those colour zones are not uniformly distributed through every cell in the stem. A cutting taken from a strongly variegated tip may contain a different ratio of green to pink tissue than a cutting from a lower stem section that has already begun reverting toward green.
Propagated Ruby plants often root successfully but show shifted variegation. A offspring may keep tricolour patterning yet produce less intense pink than the parent displayed in the nursery. Another may stabilize into a look closer to Tineke - cream and green with occasional pink flush on new leaves. Low light after rooting accelerates reversion because the plant compensates by pushing greener foliage with more chlorophyll. This is not propagation failure; it is the biology of variegated Moraceae tissue responding to its environment.
You cannot guarantee that a propagated Ruby will be a pixel-perfect clone of the parent. You can improve the odds by selecting cuttings from strongly variegated, actively growing tips, rooting during warm bright months, and giving the new plant brighter filtered light than a solid rubber plant needs once it is established. Air layering sometimes preserves variegation more predictably than stem cuttings because the rooted section remains fed by the parent until roots are substantial, but even air-layered plants are not immune to colour shift. Plan for success as a healthy Ficus elastica ‘Ruby’ with good variegation potential - not as a guaranteed colour duplicate.
Before You Cut: Timing, Tools, and Parent Plant Health
Propagation starts before the blade touches the stem. The parent plant should be healthy, pest-free, and in active growth - not recovering from root rot on Ficus Elastica Ruby, not dropping leaves from a recent move, and not sitting in a dim corner pushing weak pale growth. Weak tissue rots faster than it roots, and Ruby already roots more slowly than solid green rubber plants because variegated sections carry less photosynthetic capacity to fuel the process.
Inspect the stem you plan to use. It should feel firm, show tight internodes (short gaps between leaves), and carry leaves with crisp colour appropriate for your light conditions. Avoid stems with brown lesions, scale insects, mealybug cotton, or soft spots near nodes. If the plant recently arrived from a shop or shipment, give it two to three weeks to acclimate before propagating. Rubber plants react to change with leaf drop; propagating during that stress window stacks two shocks on top of each other.
Gather supplies before cutting so you are not holding a dripping stem while searching for a pot. You will need sharp bypass pruners or a knife, 70% isopropyl alcohol for sterilizing blades, rooting hormone powder (optional but helpful for stem cuttings), a small pot or propagation cup with drainage, chunky moist rooting mix (see below), a clear humidity cover or plastic bag supported on stakes, and for air layering: sphagnum moss, clear plastic wrap, and twist ties or soft string. Keep paper towels or a damp cloth nearby for sap.
Best Season to Propagate Ficus Elastica Ruby
Late spring through summer is the most reliable window for propagating Ficus elastica ‘Ruby’ indoors or outdoors in frost-free climates. During this period, warmth and longer daylight support callus formation and root initiation on Moraceae cuttings. Room temperatures roughly 18°C to 28°C (65°F to 82°F) align with what the species prefers in cultivation, according to Missouri Botanical Garden and Clemson HGIC guidance for rubber plants.
You can attempt propagation in autumn if your home stays warm and bright, but rooting slows as growth slows. Winter propagation in a cool, dim room often ends in mushy stem bases rather than roots because the cutting transpires moisture through its large leaves while biological activity in the stem remains too low to replace it. Watch the plant, not the calendar: if the parent is pushing firm new leaves and the pot dries on a normal rhythm, the plant is in active growth regardless of the month on the wall.
Preparing Clean Tools and Handling Latex Sap
Ficus elastica is a Moraceae species, and like its relatives it bleeds milky white latex sap the moment you cut. The sap coagulates in air and can irritate skin and eyes; the ASPCA lists Ficus species as toxic to cats and dogs, with sap ingestion or contact causing oral irritation and gastrointestinal upset. Wear gloves if you are sensitive, keep sap away from faces and pets, and wash tools and skin after handling.
Sterilize blades with rubbing alcohol between cuts, especially if you previously trimmed a diseased plant. A clean cut through a node heals more predictably than a crushed stem from dull pruners. After taking a stem cutting, rinse the cut end under lukewarm running water for 30 to 60 seconds until sap flow slows. This step appears in few popular articles but makes a measurable difference: fresh latex at the wound can inhibit callus formation and invite rot in an overly wet medium. Pat the end dry, apply rooting hormone if using, and plant or wrap promptly.
Stem Cuttings: The Fastest Home Method
Stem cuttings are the most accessible way to propagate Ficus elastica ‘Ruby’ at home. The concept is simple: remove a section of stem that includes at least one node, encourage it to form roots at that node, and once the root system supports the foliage, treat it as an independent plant. Clemson HGIC lists stem or tip cuttings or air layering as standard rubber plant propagation methods - success rates vary by home conditions, but cuttings are faster to set up than air layering when you have multiple healthy stems.
Take a cutting 15 to 20 cm (6 to 8 inches) long from a healthy tip or mid-stem section. Include two to three leaves at the top if possible, but remove the lowest leaf to expose a bare node that will sit below the medium surface. That buried node is where roots emerge. Make the bottom cut 3 to 5 mm below a node at a slight angle to maximize exposed surface area without damaging the bud tissue above the node. If the cutting feels top-heavy, trim each remaining leaf horizontally across its width, removing roughly the top half. Large rubber plant leaves lose water faster than roots can supply it during the weeks before rooting; halving leaves reduces transpiration without removing photosynthetic tissue entirely.
Dip the rinsed, dried cut end in rooting hormone powder if you have it. IBA-based powders are widely used for woody houseplant cuttings and help protect the wound from fungal entry while stimulating root initials. Hormone is not mandatory - clean technique and stable humidity matter more - but it improves odds on marginal cuttings. Insert the stem into pre-moistened medium so the lowest node is buried 2 to 3 cm deep while leaves stay above the surface. Firm the mix lightly so the cutting stands without wobbling.
Choosing a Cutting With Viable Nodes
A node on Ficus elastica is the slightly swollen point on the stem where a leaf attaches and where dormant buds sit ready to break if the stem is cut above them. Roots form from nodal tissue and adjacent stem cambium; internode sections without nodes root poorly or not at all. When selecting material, trace your finger down the stem and identify these joints before cutting.
Prefer cuttings from the top third of a healthy branch where variegation is strongest and growth is soft enough to root yet firm enough to resist rot. Avoid the oldest woody base of a leggy plant for standard stem cuttings - that tissue is better suited to air layering. Each cutting needs one node below the medium line minimum; two nodes give insurance if the lowest one fails. If you are pruning the parent anyway, you may get both a propagation piece and a branching response on the stub left behind.
Why Leaf-Only Cuttings Fail on Rubber Plants
This point deserves emphasis because social media frequently shows detached Ficus leaves rooting in water without clarifying what happens next. A Ruby rubber plant leaf - even a beautiful pink-flushed leaf cut with a sliver of petiole - cannot regenerate a stem, apical bud, or branching structure from leaf tissue alone. It may produce adventitious roots from the petiole base and survive for months as a rooted leaf, but it will never become a bushy rubber plant you can pot as a specimen. NC State Extension lists layering, root cutting, and seed as recommended propagation strategies for Ficus elastica - not leaf cuttings alone.
Full plant propagation requires stem tissue with nodes and lateral buds. The node carries the meristematic cells capable of producing shoots; roots without shoots are a dead end for anyone trying to multiply a Ruby collection or share a plant with a friend. If someone offers you a “rooted Ruby leaf,” understand you are receiving a novelty, not a future tree. Always propagate from stem sections with at least one node, and ideally from stems showing the variegation pattern you hope the offspring will inherit.
Rooting in Soil vs Water
Ruby rubber plant cuttings root in both soilless mix and water, but the trade-offs differ. Direct soil or perlite-coco mix rooting avoids the transplant shock of moving water roots into mix later and reduces stem rot risk once you control moisture carefully. A standard approach uses equal parts perlite and coco coir (or a peat-free alternative), moistened until it holds together when squeezed but does not drip. Cover the pot with a clear bag or dome vented daily to prevent mold, and place the setup in Ficus Elastica Ruby light guide.
Water propagation lets you observe root formation visually, which is satisfying but not automatically safer. Change water weekly, keep the node submerged while leaves stay dry above the rim, and use a dark or opaque container to limit algae. Water roots are structurally different from soil roots; when potting up, expect some adjustment period and possible leaf drop. Many experienced growers skip water for Ficus elastica and go straight to airy mix because Moraceae cuttings sit for weeks before roots appear - long enough for submerged stems to soften if water turns stagnant.
Whichever medium you choose, expect four to eight weeks for meaningful root development in warm, bright conditions. Some cuttings root faster; woody or variegated-heavy cuttings often take longer. Test gently with a very light tug after week five: resistance suggests roots; mush or easy sliding suggests rot. Patience beats Ficus Elastica Ruby repotting guide too early.
Air Layering: Highest Success on Leggy or Valuable Plants
Air layering encourages roots to form on a stem while it remains attached to the parent plant, so the developing root ball continues receiving water and nutrients through the intact vascular connection above the wound. Only after a substantial root mass forms do you sever the stem below the new roots and pot the top as an independent plant. NC State Extension recommends layering as a primary propagation strategy for Ficus elastica - air layering on woody stems often succeeds more reliably than detached cuttings when stems are thick or the plant is leggy.
Air layering is the right choice when your Ruby has become tall and bare on the lower stem, when the upper section is beautiful but the base is woody and unlikely to root as a detached cutting, or when you have one prized specimen and cannot afford to gamble on a 50% cutting success rate. It is also the best rescue for a plant that lost lower leaves to low light or draft stress: root the leafy crown in place, remove it as a compact new plant, and let the remaining stub branch from dormant buds below the cut - turning one awkward silhouette into two useful outcomes.
Step-by-Step Air Layering on a Ruby Rubber Plant
Choose a stem section 30 to 45 cm below the top where the bark is still green enough to wound cleanly but the stem has some diameter - typically pencil-thickness or thicker. Avoid the very tip where stems are too soft, and avoid the oldest wood at the base unless you are experienced.
- Identify the layering site on a node-bearing section with healthy leaves above it. The new plant will be everything above the layer.
- Make two parallel circumferential cuts through bark and cambium, 2 to 3 cm apart, using a clean knife. Cut deep enough to expose the green cambium without severing the stem completely.
- Remove the bark ring between the two cuts, scraping gently until the inner wood is visible and the cambium ring is fully interrupted. Rooting hormone powder applied to the exposed ring helps but is optional.
- Wrap a handful of moist long-fiber sphagnum moss around the wound, covering it completely. The moss should feel like a wrung-out sponge - damp, not dripping.
- Enclose the moss in clear plastic wrap, sealing top and bottom with twist ties or soft string to hold moisture in. You should see the moss through the plastic without opening the wrap.
- Wait six to twelve weeks, checking periodically through the plastic for white root tips penetrating the moss. Do not unwrap prematurely; drying the moss mid-process kills developing roots.
- Sever below the root ball once roots fill the moss visibly. Pot into well-draining houseplant mix, water thoroughly, and place in bright indirect light with humidity slightly higher than normal for two weeks.
The parent stub below the layer will often produce new shoots from nodes within weeks if light and warmth are adequate. That branching response is how growers restore bushiness on a leggy Ruby after saving the top.
When Air Layering Beats Stem Cuttings
Choose air layering over stem cuttings when any of the following apply: the stem you want to propagate is woody and thick; the plant is leggy with leaves only at the top; you have limited material and need the highest-confidence outcome; or the specimen is large and established and a failed cutting would waste the only good section. Choose stem cuttings when you have multiple healthy tips after routine pruning, want several offspring at once, or prefer a faster setup without waiting three months for a layered root ball.
Air layering demands more patience upfront but less gambling. Stem cuttings demand more copies and acceptance of some losses. Neither method uses leaf cuttings. Both require bright post-rooting light to preserve Ruby’s pink tones.
Rooting Environment: Light, Warmth, and Humidity
Rooting is a climate problem as much as a technique problem. Bright indirect light - the same quality Ruby needs as a mature plant, though slightly gentler if direct sun hits the propagation dome and overheats it - keeps the cutting photosynthesizing enough to fuel root formation without scorching halved leaves. A east or north-facing window with morning sun, or a few feet back from a south or west window behind sheer curtain, works well. Avoid dark corners where soil stays cold and wet.
Warmth accelerates rooting. Bottom heat from a propagation mat set around 24°C to 27°C (75°F to 80°F) on the medium surface can shave weeks off the timeline if your room runs cool. Do not cook the cutting: heat the pot base, not the leaves. Humidity around 60–70% during rooting reduces leaf desiccation. A vented plastic cover achieves this; open it briefly each day to exchange stale air and prevent mold on moss or mix surface.
Water the medium lightly when the top centimeter dries - never on a rigid schedule. Soggy mix is the primary killer of Ficus cuttings. If condensation constantly coats the inside of your dome and the mix smells earthy-sour, increase ventilation and reduce watering. If leaves wrinkle and the medium is dust-dry, you have swung too far the other way. Ruby propagation rewards observation over routine.
Aftercare From First Roots to Independent Plant
The transition from rooted cutting or freshly severed air layer to confident houseplant is where many propagations fail after technically succeeding. Do not fertilize until the plant has been in its own pot for at least four to six weeks and shows new leaf growth or clear root-bound resistance when gently tugged. Fresh roots burn easily on concentrated fertilizer salts.
Keep conditions stable for the first month: same light zone, no repotting into oversized containers, no moving between rooms with different humidity. Ruby rubber plants drop leaves when environment shifts; a newly rooted plant has a smaller root system to recover from that stress. Water when the top 2 to 3 cm of mix dries, matching mature Ruby rhythm but err slightly drier rather than wetter while roots still expand.
Watch for new leaves unfurling - the most reliable sign of independence. Those first leaves may show stronger or weaker pink than the parent depending on light and the chimeric tissue in the cutting. Increase filtered light gradually if new growth emerges mostly green; do not jump straight into harsh midday sun that scorches pale tissue.
When to Pot Up and How to Reduce Transplant Shock
Stem cuttings rooted in small cups can move to a 10 to 12 cm pot once roots are 3 to 5 cm long and hold the mix when you lift the root ball gently. Air-layered plants pot into a container sized for the root mass - typically one size larger than the moss ball - using well-draining potting mix with roughly 20% perlite by volume. Oversized pots stay wet too long and invite root rot on a plant still rebuilding its system.
Pot at the same depth the stem rooted previously; burying the stem deeper than necessary encourages trunk rot on Ficus. Water in thoroughly, discard saucer runoff, and skip fertilizer for the first month. If leaves drop after potting, stabilize light and moisture before assuming failure - Ruby often pauses then resumes once roots contact fresh mix.
Keeping Variegation Strong on Propagated Ruby Plants
Propagation success and colour success are related but not identical. A rooted Ruby that reverts toward green is usually telling you about light, not about rooting technique. Variegated rubber plant cultivars need more bright filtered light than solid Burgundy types to maintain pink and cream zones because pale tissue cannot photosynthesize as efficiently as green tissue. After propagation, place offspring closer to your brightest acceptable window - bright enough that new leaves hold variegation, protected enough that pale sections do not burn in hot direct sun through glass.
Increase light gradually over one to two weeks rather than in one jump. Watch new leaves, not old ones: if the newest foliage emerges with visible pink or cream, your level is working. If three consecutive new leaves emerge mostly green while the parent showed strong tricolour, add brightness or accept that this particular offspring may stabilize as a greener phenotype. Temperature stability and moderate humidity support colour expression, but light is the primary lever.
Accept that sibling cuttings from the same parent can diverge in variegation intensity. That variability is normal for chimeric cultivars and does not mean you propagated incorrectly. Select the strongest variegated offspring for long-term keeping; compost or gift greener ones with honest disclosure.
Common Propagation Failures and How to Fix Them
Mushy stem base, sour-smelling medium: almost always overwatering on Ficus Elastica Ruby plus poor airflow on a cutting that was already weak or taken in cool dim conditions. Discard the rotting section, sterilize the container, and restart with firmer material in fresher mix with better ventilation. Rinse sap more thoroughly next time.
Cutting shriveling while medium stays wet: the stem may be sealed by dried latex at the base or the node was damaged during cutting. Re-trim above a healthy node, rinse sap again, and retry with hormone. Check that buried nodes are not sitting against compacted wet mix with no air.
Leaves yellowing and dropping on a rooted cutting: often transplant shock, low light, or sudden environment change rather than root failure. Hold moisture steady, avoid fertilizing, and maintain bright indirect light. If the stem remains firm, new buds may still break.
Roots in water but plant collapses after potting: water roots need gentle transition - use very airy mix, keep humidity high for two weeks, and avoid disturbing roots when potting. Some leaf drop is normal.
Air layer produces no roots after twelve weeks: the cambium ring may be incompletely removed, the moss dried out from a loose wrap, or the stem was too woody without supplemental warmth. Open the wrap only if no roots are visible, re-wound if needed, reapply moist moss, and reseal.
Propagated plant grows but loses all pink: increase bright filtered light and verify you propagated from variegated tissue, not a section already reverting on the parent. Some loss of intensity is normal; total loss on every new leaf is a light or selection problem.
Pruning and Propagation Together: Shrinking a Leggy Ruby
Many Ruby rubber plants arrive as single-stem specimens that grow tall toward light, shedding lower leaves until only a leafy crown remains on a bare pole. Propagation pairs naturally with corrective pruning: air layer the leafy top, root it in place, then cut the bare stub back to a node where you want branching. The stub - still rooted in the original pot - often pushes two or more lateral shoots within weeks, producing a bushier parent while the layered top becomes a second compact plant.
If the stem is still green and not yet woody, you may also take a tip cutting when pruning and root it while leaving a lower node on the parent to branch. Do not attempt to root the leafless woody middle section as a stem cutting; it lacks the soft tissue and stored energy for reliable rooting. Match method to stem anatomy and you avoid the frustration of watching a thick woody segment rot in perlite for two months.
When pruning for shape, always cut just above a node at the height you want future branches to emerge. Dab sap with a clean paper towel on parent wounds. Use the removed tip for propagation the same day - stem tissue dries and loses viability quickly once latex stops flowing and the cut desiccates.
Conclusion
Propagating Ficus elastica ‘Ruby’ comes down to two reliable paths: node-bearing stem cuttings for accessible multiplication when you have healthy soft growth, and air layering when stems turn woody, plants go leggy, or you want the highest odds on a single valuable specimen. Leaf cuttings are not a valid route to a full Ruby rubber plant regardless of how often rooted leaves appear in casual tutorials. Start from firm actively growing tissue in warm bright months, rinse latex from cut surfaces, keep rooting media moist but never soggy, and give offspring more filtered light than a solid rubber plant once they are independent.
Variegation on propagated plants may not match the parent exactly - expect shifts in pink intensity or occasional greener new leaves, and treat strong light plus healthy parent selection as your best tools for preserving colour. Failures usually trace to weak material, overwet mix, incomplete air-layer wounding, or impatience with a species that roots on a multi-week timeline. Get the basics right and Ruby rewards you with a second plant worth keeping - even if its blush settles into its own slightly different version of tricolour beauty.
When to use this page vs other Ficus Elastica Ruby guides
- Ficus Elastica Ruby overview - Start here for whole-plant context before deep-diving this topic.
- Ficus Elastica Ruby problems hub - Jump to symptom-specific fix guides when this care topic does not resolve the issue.