Calathea Roseopicta Propagation: Division Method Guide
Calathea Roseopicta Propagation: Division Method Guide
Calathea Roseopicta Propagation: Division Method Guide
What Calathea Roseopicta Propagation Actually Means
Calathea Roseopicta propagation means creating new plants by splitting a mature Calathea roseopicta at the root ball during Calathea Roseopicta repotting guide, giving each section its own rhizome tissue, roots, and leaves. That is the entire practical method for Calathea Roseopicta overview indoors. You are not rooting a detached leaf in water, sticking a stem into moss, or waiting for a node to callus. You are gently separating natural clumps that the plant has already built underground and potting each clump on its own.
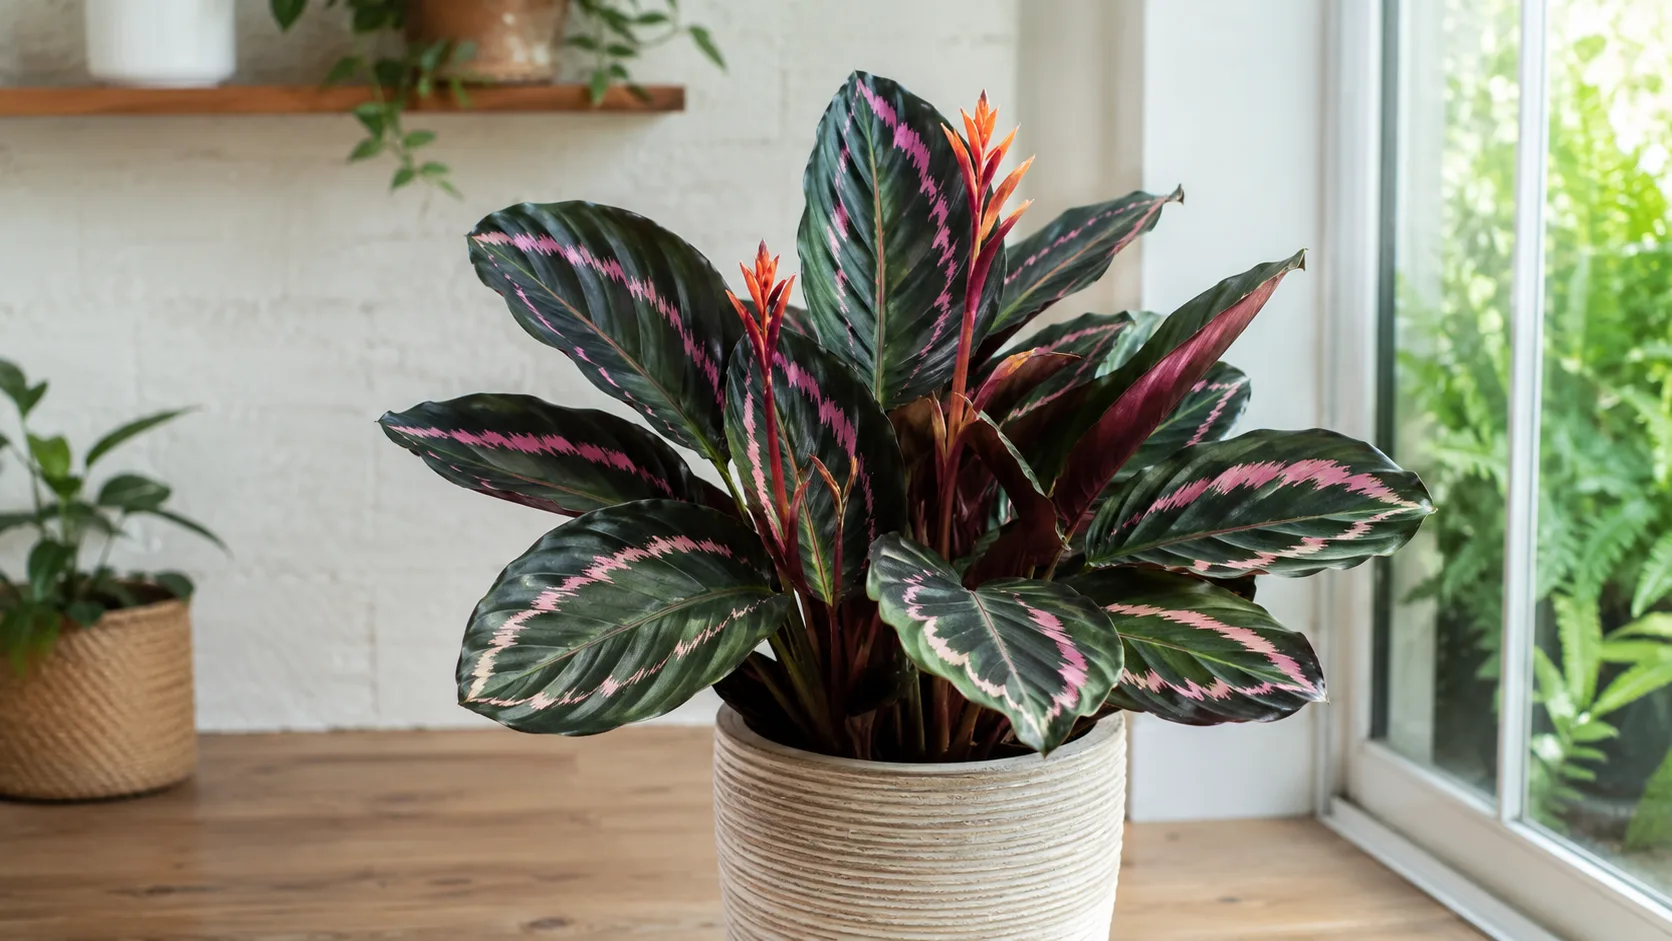
Rose Painted Calathea-sold under cultivar names such as Medallion, Dottie, and Rosy-is a prayer plant in the family Marantaceae, native to the shaded, humid understory of tropical forests in Brazil and Colombia. In that environment it spreads slowly through rhizomes: horizontal underground stems that send up thin leaf stalks and anchor roots downward. Each visible tuft of rounded, painted foliage above the soil usually corresponds to a rhizome segment below. Propagation works when you respect that structure instead of treating roseopicta like a pothos or philodendron that roots from cut nodes.
For most indoor growers, division happens once every one to three years, usually combined with a scheduled spring repot. A single well-grown Rose Painted Calathea can become two or three full clumps without buying another pot. The trade-off is patience and restraint: division is straightforward, but recovery is measured in weeks, and the plant punishes rough handling with curled leaves, brown edges on the painted bands, and stalled growth. The goal is not maximum plant count-it is clean splits that each carry enough living tissue to restart without collapsing.
Why Division Is the Only Practical Method
Every reliable source on Calathea roseopicta propagation agrees: division during repotting is the method that works. NC State Extension lists division of rhizomatous roots as the best propagation method for Goeppertia roseopicta. The Royal Horticultural Society similarly recommends dividing the clump in spring when repotting.
Division succeeds because each new piece keeps rhizome, roots, and leaves connected the way the plant evolved to grow. You are redistributing pieces the plant already formed-not asking severed tissue to regenerate an entire body. That is why propagation belongs at repotting: you need to see the rhizome network and confirm each division has roots before you commit to a cut.
Water propagation, stem cuttings, and leaf cuttings dominate social media content but fail on roseopicta, which lacks adventitious rooting nodes. Calathea roseopicta does not offer that pathway in home conditions.
Why Stem and Leaf Cuttings Fail
A Calathea Roseopicta leaf cutting-a beautiful painted leaf with its petiole stuck in water or soil-may stay green for weeks because the leaf tissue itself is alive. It will not, however, produce a new rhizome, crown, or sustained root system under normal indoor conditions. The stems that hold roseopicta leaves are not lined with nodes that push roots when buried. Without rhizome tissue attached, the cutting has no growth center to organize new shoots.
Stem cuttings fail for the same reason: what looks like a stem is a leaf petiole emerging from the rhizome. Marantaceae species spread through rhizome division, not detached leaf regeneration. Accepting that saves you from the most common Calathea Roseopicta propagation mistake: weakening a good plant to test a method that will not work.
Understanding the Rhizome Before You Divide
Every division decision starts with what sits below the soil line. If you understand the rhizome, timing and technique become obvious, and most post-division failures become preventable. The rhizome is a modified underground stem-not a root-that stores energy, produces new shoots, and sends fine roots outward for anchoring and uptake. Leaves do not sprout randomly from potting mix; they arise from rhizome segments, each segment capable of becoming its own plant if it carries roots and enough foliage to feed recovery.
Rose Painted Calathea rhizomes are relatively shallow and spread horizontally. Over time, a mature plant forms several distinct clumps: groups of leaf stalks sharing one rhizome branch. Those clumps are your propagation units. The best divisions follow natural boundaries between clumps rather than forcing a geometric cut through the middle of active growth. On compact cultivars like Dottie, the visible mound may look like one tight crown, but at repotting you often find two or three rhizome branches that have grown close together rather than truly fused.
How Leaves, Stems, and Roots Connect Underground
Above soil, Calathea roseopicta shows thin leaf stalks supporting rounded leaves with painted pink, cream, or burgundy markings depending on cultivar. At night the leaves fold upward-nyctinasty-exposing contrasting undersides. Below soil, each stalk attaches to the rhizome. Fine, fibrous roots extend from the rhizome into the surrounding mix. They are delicate compared with the thick roots of a peace lily or monstera, which is why roseopicta responds badly to bare-rooting, aggressive teasing, and repeated disturbance.
When you divide, you want each section to include rhizome plus roots plus at least two to three leaves. The leaves are the energy source during recovery. The roots absorb water once the division is potted. The rhizome holds the meristematic tissue that will push the next leaf roll-the tightly furled cylinder that unfurls to reveal fresh patterning. Remove any one pillar severely enough and the section stalls or rots. A division with strong roots but only one small leaf may survive in expert hands but fails often in average home humidity.
The crown-the point where leaf bases meet rhizome-must stay at the same soil level after repotting, not buried deeper. Burying the rhizome restricts oxygen, traps moisture against tissue that expects airy rainforest litter, and invites fungal problems. That rule matters twice as much on fresh divisions with open wounds. Roseopicta is less forgiving of crown burial than some hardier houseplants; edge damage on the painted bands shows within days when the base stays too wet.
When Your Rose Painted Calathea Is Ready to Divide
Timing separates confident propagation from unnecessary stress on a sensitive plant. Divide Calathea Roseopicta when the root ball has developed enough mass that each resulting section can meet minimum survival requirements without stripping the parent bare. NC State Extension notes that dividing clumps can restore vigor in older plants. Wait until the plant is mature enough that natural clumps are visible when you remove it from the pot - a full, bushy Rose Painted Calathea with many leaf stalks usually indicates multiple rhizome branches below. Roots circling drainage holes or a pot that feels tight when you squeeze the sides suggest repotting-and possibly division. If the plant is still small with only a handful of leaves from one cluster, wait. Calathea roseopicta fills pots slowly compared with faster tropicals; repot every one to two years rather than dividing every season. One strong display plant with clean painted leaves often looks better than three struggling halves with dull patterning.
Minimum Leaf Count and Root Mass for Each Section
The widely repeated safe standard for Calathea roseopicta division is at least two to three healthy leaves plus a functional root system on every section. Multiple Calathea propagation guides cite that range. Each leaf is photosynthetic surface; with only one leaf, a division has almost no margin if that leaf curls, crisps, or yellows during transplant shock-and on roseopicta, edge burn on the colored bands is especially visible and permanent on that leaf.
Root mass does not need to be dramatic, but each section should have visible fibrous roots attached to its rhizome segment, not a bare rhizome chip with leaves glued on by hope. When you expose the root ball at repotting, look for white or tan, firm roots. Mushy, black, or sour-smelling roots should be trimmed before division, and severely affected sections should not become propagation material.
If natural separations only produce one strong clump and one weak side shoot, take the strong split and leave the remainder intact rather than forcing two equal halves. Uneven division is acceptable when both pieces remain viable. Forcing symmetry that leaves one section root-poor is how propagation attempts turn into dual losses-and on a pattern-focused plant like roseopicta, losing half your display to a failed split hurts twice.
Best Timing for Division at Repotting
The best time for Calathea Roseopicta propagation is spring through early summer, when the plant enters active growth and can repair root damage. The Royal Horticultural Society recommends dividing Calathea in spring. Penn State Extension notes that spring, when houseplants resume active growth, is the ideal time for repotting and division.
Combining division with repotting is the correct workflow-you need the plant out of the pot to see rhizome architecture and fresh mix ready for each section. Avoid division in late fall and winter unless severe root rot on Calathea Roseopicta forces immediate repotting. Cooler temperatures and dry indoor air slow recovery; if spring is weeks away and the plant is healthy, wait. Roseopicta already slows in winter; adding root disturbance on top of seasonal dormancy extends shock unnecessarily.
Water the plant one to two days before repotting and division. Pre-watering is widely recommended because moist roots and mix hold together better, reducing breakage when you slide the root ball out. Soggy, freshly flooded soil is not the goal; evenly hydrated is. If the mix is bone dry and pulls away from the pot walls, a light pre-soak helps the root ball release as one piece rather than crumbling.
Tools and Pre-Division Preparation
You need simple, clean equipment. Gather a sharp knife or pruning shears, isopropyl alcohol or flame for sterilizing blades, a hand trowel, fresh well-draining potting mix, new pots with drainage holes sized to each division’s root mass, and optionally a clear plastic bag or humidity dome for the recovery period. Lay down newspaper or a tray because working with roseopicta roots is messy, and you will want good light to inspect rhizome boundaries and spot any pest hiding on undersides.
Sterilize cutting tools before you touch living tissue. Calathea rhizomes are soft compared with woody stems; a dull blade crushes instead of slicing, leaving ragged wounds that heal slowly and invite infection. One clean cut through an unavoidable rhizome bridge heals faster than torn tearing by hand when clumps refuse to separate gently.
Prepare pots before you split. Each container should be only slightly larger than the division’s root ball-roughly one to two inches (2.5–5 cm) wider in diameter than the section you plan to place in it. Penn State Extension recommends moving houseplants into a container only slightly larger than the current one. Oversized pots hold excess wet mix around small root systems, the classic setup for post-repot rot on Calatheas. Plastic or glazed ceramic with drainage holes is usually safer for recovery divisions that need even moisture than unglazed terracotta, which wicks moisture outward per Missouri Botanical Garden indoor culture guidance.
Fill pots partway with moistened mix so you can seat divisions at the correct depth quickly and minimize air exposure time for fine roots. Choose a work surface at comfortable height with bright ambient light-not direct sun on exposed roots. If your home is dry, run a humidifier nearby or plan to cover divisions after potting. The preparation phase is short, but rushing it shows up later as curled leaves and stalled new growth on painted foliage.
How to Divide Calathea Roseopicta Step by Step
Calathea Roseopicta propagation by division follows a straightforward sequence once the plant is mature and the season is right. Pre-water. Remove the plant. Inspect and clean roots. Separate at natural clumps. Pot each section. Provide humid, bright indirect conditions. Wait for new leaf rolls before resuming normal care intensity.
- Slide the plant out. Tip the pot gently and support the foliage with one hand while easing the root ball free. If roots exit drainage holes, loosen them first rather than ripping. Roseopicta leaves bruise easily; avoid grabbing painted blades.
- Remove excess soil. Crumble or rinse away old mix until rhizome segments and root directions are visible. Work slowly; fine roots break easily. A gentle rinse under lukewarm water can help on compacted nursery mix.
- Identify natural divisions. Look for distinct clumps of leaf stalks sharing one rhizome branch. Map where gentle pulling might separate them without cutting.
- Separate by hand first. Many mature Rose Painted Calatheas offer clear offsets you can tease apart with fingers. Only use a sterilized knife when rhizomes are genuinely fused.
- Inspect each section. Confirm two to three leaves minimum, firm rhizome, and healthy roots. Trim black or mushy root tissue with sterile tools.
- Pot immediately. Center each division in its prepared pot, fill with fresh mix, settle soil lightly, and water until a little drains from the bottom.
If the parent was thriving before division-steady new leaves with strong contrast on the painted bands, no active pest outbreak, no chronic crisping from severe underwatering on Calathea Roseopicta-each section should recover after a settling period. If the parent was already stressed, stabilize it first or accept that propagation multiplies problems rather than solving them.
Where to Split and What Each Division Needs
The best split location is a natural gap between rhizome branches where two clumps have grown slightly apart. Each resulting plant should stand on its own root mass with leaves radiating from a single rhizome center. Avoid cutting through the middle of an active leaf cluster or slicing a rhizome so thin that neither side retains adequate roots.
When a knife is necessary, cut once, cleanly, through the minimum rhizome bridge required to separate two viable sections. Do not saw back and forth. After cutting, both faces should show firm, pale interior tissue-not mush. If you expose softness, trim back to firm rhizome or discard that section.
Each division needs at least two to three leaves, attached fibrous roots, and firm rhizome planted so the crown sits at the previous soil level. Label pots if you are dividing multiple Calatheas the same day; roseopicta divisions look similar in the first weeks regardless of cultivar. Position divisions where they receive Calathea Roseopicta light guide-the same quality the parent tolerated, not brighter sun to “encourage growth.” Direct sun on a recovering Rose Painted Calathea browns the colored bands first and accelerates leaf curl.
Potting Mix and Container Choices
After division, Calathea roseopicta needs a mix that holds even moisture without staying waterlogged. A peat-free or standard indoor potting base amended with perlite, orchid bark, or coco coir matches what this species prefers: light, airy, and retentive enough that roots never dry to dust between waterings but never sit in swamp conditions. Target a roughly neutral pH range around 6.0–7.5, consistent with general houseplant guidance for prayer plants.
Do not reuse old mix-it may be compacted or carry pests. Fresh medium gives fine roots a clean interface. Drainage holes are non-negotiable for divisions; empty saucers after watering. Choose pots proportional to root ball size, not leaf spread width. Roseopicta leaves can extend well beyond the pot rim; a shallow, appropriately sized container beats a deep oversized one that holds wet soil the roots never reach.
Aftercare: Watering, Humidity, and Light
After division, the job shifts to stability and observation. Newly potted Calathea Roseopicta divisions need steadier humidity, slightly guarded watering, and no fertilizer until you see evidence of new growth. They do not need a different climate zone-they need the same conditions the species already demands, held more consistently while wounds close and roots re-establish contact with fresh mix.
Water the first time thoroughly so mix settles around roots, then let the top inch dry slightly before the next watering. Divisions with fewer roots absorb water more slowly than the parent did in its old pot. The classic post-division error is watering on the old schedule because the leaves look droopy, when the real issue is transplant shock rather than dry soil. Check moisture with a finger or skewer at root depth, not by leaf posture alone. Roseopicta leaves curl when underwatered and when overwatered; moisture at root level is the only reliable signal.
Humidity above 60% materially improves recovery per NC State Extension, and many growers target 70% or higher during the first month after division. A humidity dome or clear bag propped on stakes raises local humidity without soaking soil-refresh air every few days to prevent mold. A pebble tray, grouped plants, or a room humidifier all help. Light should remain bright and indirect; avoid darker corners or brighter sills that extend downtime. Keep temperatures in the 65–80°F (18–27°C) range away from drafts, air vents, and radiators. Roseopicta is sensitive to tap water minerals; filtered, distilled, or rainwater reduces edge browning on recovering leaves.
Hold fertilizer for at least four to six weeks, often longer until a new leaf unfurls. Fresh roots are sensitive to salt burn, and the plant has no spare capacity to use heavy feeding while re-establishing. When you resume, use a diluted balanced houseplant fertilizer at half strength during active growth only.
First Three to Six Weeks Recovery Timeline
Week one often looks underwhelming. Leaves may curl slightly, older edges may crisp a bit on the painted bands, and nothing appears to happen above soil. That is normal if rhizomes feel firm and mix moisture stays even. Do not repot again, do not divide further, and do not pull divisions to inspect roots. Disturbing roseopicta during this window resets recovery.
Weeks two to four are when white root tips may appear against pot sides if you use clear containers, or when the division feels slightly more anchored when you tug gently on a leaf base. Some plants push a new rolled leaf during this window; that unfurling cylinder is the most reliable success signal on roseopicta. When the new leaf opens with clean patterning-strong contrast between pink or cream markings and green background-you can begin easing toward normal care.
Weeks four to six consolidate establishment. If a new leaf has opened and older foliage looks stable-not perfect, but not collapsing-you can gradually reduce humidity domes and approach normal Calathea Roseopicta care rhythms. If after six weeks the division has only worsening yellowing, sour-smelling mix, or collapsing stems, treat it as failure, inspect roots, trim rot, repot into fresh mix in a smaller pot, and adjust humidity-rather than assuming slow means successful.
Recovery timelines stretch in cool, dim conditions and compress in warm, humid, bright-indirect setups. Roseopicta is not fast; it is consistent when conditions stay steady.
Common Division Mistakes and How to Fix Them
The same mistakes recur in Calathea Roseopicta propagation threads: dividing too small, dividing too often, bare-rooting aggressively, overpotting, overwatering on Calathea Roseopicta, bright-sun recovery, and attempting division on a sick parent. Each is fixable if caught early, but prevention costs less than rehab-especially on a plant where leaf damage is permanent on the affected blade.
Divisions too small-one leaf, tiny rhizome, few roots-stall or rot. Fix: next time keep larger sections; for current weak pieces, use smallest pots possible, maintain high humidity, and accept that some fragments will not make it.
Overwatering after division keeps mix soggy while root mass is reduced. Fix: let top layer dry slightly between waterings, ensure drainage, and discard saucer water. If mix smells sour, repot into fresh dry-ish mix and trim mushy roots.
Overpotting surrounds small root systems with unused wet soil. Fix: downsize to a pot fitting the root ball with only an inch of new space around it.
Too much direct sun during recovery burns painted bands and green margins that cannot yet support repair. Fix: move to bright indirect light; remove only fully dead leaves, not partially damaged ones the plant still uses.
Dividing unhealthy stock spreads pests, rot, or chronic dehydration into every new pot. Fix: stabilize the parent first-resolve spider mites, root rot, or severe dryness-then propagate from clean tissue only.
Using leaf or water cuttings after reading generic propagation advice. Fix: stop the experiment; refocus on division at repotting when the plant is mature.
Over-Dividing and Transplant Shock
Over-dividing means splitting a plant into more sections than its root and leaf mass can support-four tiny pieces from a medium pot, for example. Each piece enters recovery underfed and overstressed. Transplant shock on Calathea shows as leaf curl, droop, halted new growth, edge browning on painted bands, or yellowing lower leaves. Mild shock for one to two weeks is normal. Shock that worsens beyond three weeks usually indicates watering error, low humidity, rot, or sections that were too small.
If shock is mild, maintain stable humidity and correct watering without moving the pot again. If shock is severe with soft stems, repot into fresh mix after trimming dead roots, reduce leaf load only by removing fully yellow leaves, and cover with a humidity tent for two weeks. Do not fertilize into shock; salts compound the problem.
The parent plant also experiences shock after division, even though it kept the largest share. Treat it with the same guarded watering and humidity until it pushes new growth.
When Not to Propagate Your Rose Painted Calathea
Do not propagate Calathea roseopicta as a first response to every problem. If the plant has active spider mites, mealybugs, or root rot, dividing spreads infested or infected tissue into multiple pots and makes treatment harder. Stabilize health first, then divide from clean sections if you still want more plants.
Do not divide immediately after shipping or a major environment change. Newly arrived Rose Painted Calatheas need acclimation weeks before root disturbance. Do not divide during peak winter in dim, dry rooms unless emergency repotting demands it. Do not divide purely because a leaf has brown tips; edge crisping is often humidity, water quality, or inconsistent watering-not a signal to split roots.
Do not divide when the plant is still immature-a recent nursery pot with one rhizome cluster and four to five leaves total. Wait until natural offsets appear and roots fill the container. Do not divide because social media suggests “propagation season” for all houseplants regardless of species method. For Rose Painted Calathea, if you cannot see multiple clumps at repotting, there is nothing meaningful to propagate yet.
Propagation is a reward for good long-term care, not a rescue tool for neglect. The best divisions come from plants you would be happy to keep undivided.
Maintaining Multiple Calathea Roseopicta Plants Over Time
Once divisions establish, long-term care matches any mature Rose Painted Calathea: filtered light, even moisture, high humidity, gentle water, and repotting every one to two years when roots crowd. Re-evaluate division only at repotting-not on a fixed calendar. Sibling divisions from the same event may dry at different rates or show different crisping if they sit in different microclimates; repot each on its own schedule when roots fill the container.
Cultivar character persists through division-a Dottie division remains Dottie, a Medallion offset stays Medallion. Group young divisions near each other to share ambient humidity, but give each pot its own saucer and watering judgment.
Conclusion
Calathea Roseopicta propagation is straightforward because the method is singular: divide at repotting, give each section rhizome tissue, healthy roots, and at least two to three leaves, then pot into fresh well-draining mix and hold humidity steady while the plant recovers. Stem cuttings, leaf cuttings, and water propagation are not viable paths for Calathea roseopicta indoors; pursuing them wastes time and stresses healthy plants.
Wait until spring or early summer, when active growth supports recovery. Pre-water, remove the root ball carefully, separate natural clumps by hand when possible, and cut only with sterilized tools when rhizomes truly fuse. Use pots only slightly larger than each division, water with restraint, skip fertilizer until new leaf rolls appear, and keep light bright but indirect. Expect meaningful recovery in four to six weeks, not days.
Avoid dividing weak, immature, pest-ridden, or winter-stressed plants. Avoid over-dividing and oversized pots. Done patiently, one well-grown Rose Painted Calathea becomes two or three without changing the species’ character-a humidity-loving prayer plant with rounded, painted foliage that rewards calm, consistent care more than aggressive intervention.
When to use this page vs other Calathea Roseopicta guides
- Calathea Roseopicta overview - Start here for whole-plant context before deep-diving this topic.
- Calathea Roseopicta problems hub - Jump to symptom-specific fix guides when this care topic does not resolve the issue.