Syngonium White Butterfly Propagation Guide
Syngonium White Butterfly Propagation Guide
Syngonium White Butterfly Propagation Guide
Syngonium White Butterfly propagation is one of the most straightforward multiplication projects in indoor plant care - if you understand one anatomical rule. Syngonium podophyllum ‘White Butterfly’, the silvery-variegated arrowhead vine sold under names like nephthytis and goosefoot plant, roots readily from stem sections that include at least one node: the jointed bump on the stem where leaves attach, aerial roots emerge, and new shoots activate. Cut below the node, keep that growth point in contact with moisture and air, supply Syngonium White Butterfly light guide and warmth, and the cutting will usually restart within weeks. Skip the node and you are left with a decorative leaf that may stay green for a while but cannot become a full plant.
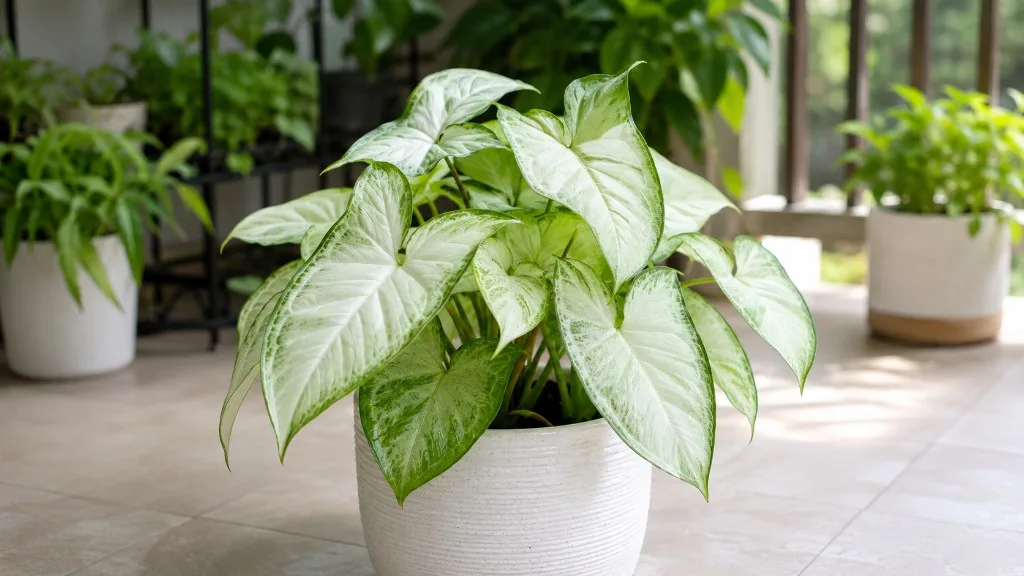
The White Butterfly cultivar is prized for its pale green leaves brushed with creamy white variegation, and stem cuttings preserve that pattern because you are cloning the parent genetically rather than growing from seed. That makes propagation especially useful when you want to share plants with friends, fill out a sparse pot, or rescue a leggy vine by turning one long stem into several compact starters. This guide covers the full workflow - node identification, timing, water and soil methods, aftercare, and the failures that actually cause rot - so you can propagate with confidence instead of guessing.
If symptoms persist, see the Leggy Growth on Syngonium White Butterfly guide.
Why Stem Cuttings Work Best for This Arrowhead Vine
Syngonium podophyllum is a climbing aroid native to tropical forests from southern Mexico through Central and South America. In the wild it ascends tree trunks using adventitious roots that emerge from nodes along the stem, a strategy that gives the plant access to brighter canopy light while staying connected to moist, organic debris around the base. Home propagation mirrors that biology: sever a stem section, activate the node, and roots form from undifferentiated cells in the nodal tissue when warmth, light, and balanced moisture align.
The University of Florida IFAS Extension notes that commercial syngonium production relies on nodal cuttings - single-node or single-eye sections placed directly into rooting media under mist - because the method is reliable, fast, and scalable. You do not need a propagation greenhouse to apply the same principle at home. Stem cuttings outperform division for most White Butterfly pots because the plant often grows as one or a few trailing vines rather than a dense clump of separable crowns. Division works when you are Syngonium White Butterfly repotting guide a mature multi-stem specimen, but day-to-day multiplication almost always means taking cuttings from an actively growing vine.
Compared with seed propagation - which is slow, genetically variable, and rarely used for named cultivars - stem cuttings give you a predictable copy of the parent plant. That matters for White Butterfly specifically: seedlings or tissue-culture variants may not match the variegation pattern you bought. A rooted cutting from a well-variegated stem carries the same coloration forward, assuming you propagate from healthy tissue in good light.
What Nodes Actually Do on an Aroid Stem
A node is the growth point on a syngonium stem - the slightly swollen ring where a leaf petiole attaches and where aerial root initials often appear as tiny pale bumps. The smooth stem section between two nodes is called an internode. New roots and new shoots both originate from nodal tissue, not from leaf blades alone. That is why the most common propagation failure - taking a beautiful leaf with a short petiole but no attached node - produces something that roots never develop on, no matter how long it sits in water.
On a healthy White Butterfly vine, nodes are usually easy to spot once you know what to look for. Hold the stem upright and scan along its length: each leaf connection marks a node, and you may see small aerial roots already forming on older vines, especially if the plant has been climbing a moss pole or trailing where humidity is moderate. IUCN GISD notes that Syngonium podophyllum reproduces almost entirely vegetatively and can reproduce from a single node. UF/IFAS describes that in most environments each syngonium node can produce adventitious roots, which is why even a single-node cutting has a high success rate when conditions are right.
The practical rule is simple: every viable cutting needs at least one node, and two nodes give you a backup growth point if the lower one stalls. A leaf without a node may photosynthesize and look alive for weeks, but it has no meristematic tissue capable of building a root system or pushing new stems. When you make your cut, the node must end up on the piece you are propagating, positioned so it can contact water or moist substrate while the remaining leaves stay above the surface.
Water vs Soil vs Moss: Which Method Fits Your Setup
All three rooting media - water, soil-based mix, and sphagnum moss or perlite - work for Syngonium White Butterfly when the node is properly placed and environmental conditions are stable. The choice depends on what you want to observe and how much maintenance you prefer during the rooting phase.
Water propagation is the most visual method. You can watch roots emerge from the node in a clear jar, which makes it easy to judge when transplant is appropriate. Water rooting is forgiving for beginners because you are less likely to overwater - the risk shifts to stagnant water and submerged leaves rotting. Change the water weekly, keep only the node submerged, and plan to move the cutting to soil once roots reach two to three inches long.
Soil propagation skips the transplant step and often produces roots adapted to substrate from the start, which can reduce shock when you begin normal watering. The trade-off is visibility: you cannot see roots forming, so you rely on resistance on a gentle tug, new leaf growth, or careful peeking at the node level. Use a small pot with drainage, a lightly moist well-draining mix, and resist the urge to soak the medium.
Sphagnum moss or perlite sits between the two. Moist sphagnum wrapped around a node in a clear container offers both humidity and visibility; perlite alone in a small cup drains fast and resists compaction. Both are excellent when you want higher humidity around the node without fully submerging the stem. Many experienced propagators root syngoniums in moss before potting up, especially during cooler months when extra humidity speeds cell division at the node.
None of these methods rescues a cutting without a node or compensates for a cold, dark windowsill. Pick the medium that matches your habits, then focus on warmth, clean tools, and fresh growth on the parent plant.
When to Propagate Syngonium White Butterfly
Timing is less about a calendar date and more about whether the plant is in active growth. Syngonium White Butterfly pushes new leaves most reliably when temperatures are warm, days are longer, and light is bright but indirect. That usually means late spring through summer in temperate climates, though indoor growers with supplemental light may propagate successfully for more of the year.
Avoid taking cuttings when the parent is stressed - recently shipped, recovering from root rot, fighting a pest outbreak, or sitting in a cold draft. Propagation diverts energy into wound healing and root initiation; a weakened plant may fail to root cuttings and lose vigor on the remaining vine. Stabilize the parent first, then propagate from the healthiest new growth.
If your vine is purely cosmetic - leggy but otherwise healthy - propagation doubles as pruning. You can take several cuttings from one long stem, shorten the parent to a bushier height, and root the trimmings simultaneously. That is one of the most productive ways to refresh an older White Butterfly without buying new plants.
Best Season and Temperature Window
The strongest rooting response occurs when air temperatures stay roughly 70–80°F (21–27°C) and the cutting receives bright indirect light for most of the day. UF/IFAS commercial guidelines recommend air temperatures between 75°F and 95°F for propagation with root-zone warmth around 70–75°F, reflecting the plant’s tropical origin. You do not need bottom heat at home, but you should avoid propagating on an unheated windowsill in winter unless that spot stays consistently warm.
In spring and summer, roots often appear within two to four weeks, sometimes faster in warm, humid conditions. Fall and winter cuttings can still succeed indoors, but cell division at the node slows, water evaporation drops, and the risk of overwatering soil cuttings rises because the medium stays wet longer. If you must propagate in cooler months, favor water or moss methods where you can monitor the node directly, and accept a longer timeline.
Humidity in the 50–60% range supports White Butterfly without requiring a greenhouse tent. Very dry air below 30% can dehydrate cuttings that have no roots yet, especially soil-rooted ones with leaves transpiring freely. A clear plastic bag over a soil pot - propped so it does not touch leaves - or a small propagation box raises humidity cheaply. Remove the cover once you see new growth or roots, because stagnant humid air without airflow can invite fungal issues.
Signs Your Parent Plant Is Ready to Give Cuttings
A parent plant is ready when it shows firm new leaves with good variegation, stems that are not mushy or shriveled, and at least one vine long enough to yield a cutting with one or two nodes plus attached foliage. The best material is often the actively growing tip section and the nodes just behind it, where meristematic activity is highest.
If the plant has been recently fertilized heavily, wait a week before cutting so tissue is not overly soft. If you see pests - spider mites, mealybugs, aphids - treat the parent before propagation so you do not transfer infestations to new jars and pots. Check the stem for blackened nodes or sour-smelling soil; those indicate root or crown problems that should be resolved before you remove healthy tissue.
Leggy vines with long internodes are ideal propagation candidates. Instead of staking endlessly, cut the vine into sections, root each piece, and let the base resprout bushier side shoots. That is how many growers turn one sparse pot into a fuller display over a single growing season.
How to Take Syngonium White Butterfly Stem Cuttings
Taking cuttings is a short procedure with long consequences for success. Gather sharp, clean scissors or pruning shears, rubbing alcohol or flame for sterilization, a clear jar or small pots, and your chosen rooting medium before you cut. The less time a fresh wound spends open in a dusty room, the lower the infection risk.
Work on a stable surface with good light so you can see nodes clearly. If the vine is tangled, gently untangle it before cutting so you do not accidentally sever the wrong stem. Plan each cut so the propagating piece includes at least one node with one or two healthy leaves, and the parent retains enough foliage to keep photosynthesizing.
Choosing Healthy Stems With Visible Nodes
Select stems that are green, firm, and free of blemishes - not yellowing, not corky-brown with age unless no greener option exists. Follow the vine from the growing tip downward and mark each node where a leaf attaches. Ideal cuttings are four to six inches long with one to three nodes, though a shorter single-node piece with one leaf also roots well if conditions are warm.
Prioritize sections that already show aerial root initials as tiny bumps near the node. Those cells are primed for root development and often accelerate the timeline. On White Butterfly, younger leaves near the tip may be smaller and more arrow-shaped; older leaves lower on the vine are larger. Both are fine for propagation as long as the tissue is healthy.
Avoid the oldest, woody basal stems unless you have no alternative. They can root, but more slowly. If you are pruning a long vine, segment it into multiple cuttings rather than taking one enormous piece - smaller cuttings manage moisture balance more easily and give you more attempts if one fails.
Making a Clean Cut Just Below the Node
Position the stem so the growth direction points upward and identify the node where you want roots to form. Make a straight, clean cut one to two centimeters below the node - not through the node itself, and not so far below that you waste stem tissue that could become a second cutting. A clean perpendicular cut minimizes wound surface area; angled cuts are sometimes recommended for other plants but are less critical on syngoniums than sterility and node inclusion.
Sterilize blades between cuts if you are taking multiple sections from different plants to prevent disease transfer. One smooth snip is better than sawing, which crushes cambial tissue and slows healing. On the parent vine, the cut site will often sprout a new side shoot from a bud near the remaining node, so do not worry that pruning permanently stops growth - it usually redirects it.
If you accidentally cut above the node or split the nodal ring, discard that piece and try again higher on the vine. Partial node damage reduces rooting hormones and opens tissue to rot.
Preparing Cuttings Before Rooting
Once cuttings are separated, prepare them for the rooting environment within minutes. Syngonium stems are not as drought-sensitive as succulents, but open wounds still lose moisture, and leaves transpire without roots to replace water. The goal is to reduce water loss from foliage while exposing the node to the moisture it needs for root initiation.
Lay cuttings on a clean surface and inspect each node. Remove any brown leaf sheaths or dried stipules clinging to the stem - they can trap moisture and rot. If a cutting has more than three or four leaves, consider removing one lower leaf to balance transpiration, but keep at least one or two leaves so the plant can still photosynthesize lightly during rooting.
Removing Lower Leaves and Protecting Upper Foliage
Any leaf that would sit below the water line or buried in soil must be removed. Submerged leaves decay within days, fouling water and inviting bacteria to the node. Strip lower leaves cleanly at the petiole base without tearing the stem skin. Upper leaves should remain dry and above the surface.
For water propagation, only the node and a short stem segment below it should be submerged. For soil, bury the node one to two inches deep without covering any leaf petioles. Leaves that touch wet moss inside a humidity tent can develop fungal spots; trim or prop them away from the medium.
White Butterfly leaves are thinner than many succulents, so dehydration shows quickly as slight curling or softness. If that happens before roots form, increase humidity around the cutting or reduce direct airflow, but do not compensate by soaking the medium - wet soil without roots is the faster path to collapse.
Optional Rooting Hormone: When It Helps
Rooting hormone containing indole-3-butyric acid (IBA) is optional for syngonium cuttings, not required. These plants root readily without it when nodes are healthy and temperatures are warm. Hormone powder or gel can modestly shorten rooting time on slow winter cuttings or woody lower stems by concentrating auxins at the wound site.
If you use hormone, apply a thin coat to the cut surface and the node area before inserting into soil or moss. Shake off excess powder - a heavy crust can wick moisture unevenly. For water propagation, hormone is less common because it washes off immediately; it is more useful for direct soil or moss insertion.
Skip hormone if you prefer minimal inputs or if you are propagating very fresh green growth that roots quickly on its own. Save it for scenarios where you are pushing against cool temperatures or marginal stem quality.
Water Propagation Step by Step
Water propagation is the most popular home method for Syngonium White Butterfly because it is simple and transparent. Fill a clear glass or jar with room-temperature water - filtered or tap water left out overnight to dissipate chlorine works for most growers. Insert the cutting so the node is fully submerged while leaves rest above the rim. Place the jar in bright, indirect light, not direct sun, which heats water and encourages algae.
Within one to three weeks in warm conditions, you should see white root tips emerging from the node. Initial roots may look thin and fuzzy; they strengthen over time. Resist planting until roots are at least two inches long with several branches, because transplanting too early increases shock and setback.
Keeping Nodes Submerged and Water Fresh
Change the water every five to seven days even if it still looks clear. Fresh water replenishes oxygen at the root zone and limits bacterial buildup that turns stems mushy. When you change water, hold the cutting gently and pour out the old liquid, rinse the jar if slime is visible, and refill to the same level.
Top up between changes if evaporation lowers the level below the node. Roots that dry out even briefly stop elongating and may brown at the tips. If the water smells sour or the stem base turns black, discard that cutting and start fresh with cleaner material - salvaging rotting syngonium tissue rarely works.
Algae on jar walls is cosmetic unless it thickens enough to block light. Move the jar slightly farther from the light source or use an opaque sleeve around the lower portion while keeping the node area visible. Some growers add a drop of hydrogen peroxide to water; this is optional and not necessary if you change water weekly.
Multiple cuttings can share one jar if nodes stay submerged and leaves have air space. Do not crowd so tightly that leaves trap humidity and mold.
Soil and Moss Propagation Step by Step
Soil propagation suits growers who want to skip the water-to-soil transplant and who can maintain lightly moist, not wet, substrate around a buried node. Use a small pot with a drainage hole - two to three inches across is enough for one or two cuttings. Fill with a well-draining houseplant mix: standard potting soil amended with perlite or orchid bark in roughly a 70/30 ratio mirrors what White Butterfly prefers as a mature plant.
Insert the cutting so the node sits one to two inches below the surface. Firm the mix gently around the stem without compacting it. Water once until a little drains from the bottom, then wait. The first week is about keeping the node zone humid, not flooded. Stick a chopstick into the mix near the edge to check moisture: it should feel lightly damp at the node depth, never soggy.
Sphagnum moss propagation follows a similar logic. Moisten long-fiber sphagnum, wring until damp but not dripping, and wrap it around the node inside a clear cup or propagation box. Perlite alone in a cup also works - insert the node into the perlite and mist when the top layer dries. Both methods offer more oxygen at the wound than dense wet soil, which is valuable in cool homes.
Humidity Domes and Moisture Discipline
A clear plastic bag tent over a soil pot raises humidity and slows leaf transpiration while roots form. Prop the bag on stakes or chopsticks so plastic does not touch leaves, which can cause rot spots where condensation sits. Open the bag briefly every few days for airflow.
New roots on syngonium cuttings in soil typically develop in two to four weeks at warm temperatures. Test with a gentle upward tug after three weeks: resistance usually means roots have anchored. No resistance does not always mean failure - keep humidity steady and wait another week before assuming the cutting is dead.
Once new leaf growth unfurls or tug resistance is clear, begin treating the plant closer to a mature White Butterfly: slightly more light, careful watering when the top inch of mix dries, and no fertilizer for the first month. Fertilizing before roots are functional can burn tender tissue.
Aftercare Once Roots Form
The transition from rooting cutting to established plant is where many propagations stall. Water-rooted cuttings need a careful move to soil: prepare a small pot with drainage and moist mix, create a hole deep enough for roots without bending them sharply, plant so the node is buried at the same relative depth it had in water, and water lightly to settle the mix. Keep bright indirect light and high humidity for the first week - a bag tent helps - while soil roots grow into the new medium.
Soil- or moss-rooted cuttings already in substrate simply need graduated normal care. Increase light gradually if the plant was under a tent. Water when the top inch dries, the same rhythm you would use for the parent plant. White Butterfly prefers stable moisture without saturation; a tiny pot dries faster than a large one, so check daily at first.
Hold fertilizer until the plant has been in its pot at least four weeks and shows new growth. Half-strength balanced liquid feed once monthly during active growth is sufficient thereafter. Overfeeding a young root system produces yellowing and tip burn on variegated leaves.
If you rooted in water and want to keep the plant in water long term, it is possible for months - syngoniums tolerate extended hydroponic culture with regular water changes and occasional dilute fertilizer. Most growers move to soil eventually for easier long-term care and fuller growth, but water culture is a valid display option for a single rooted cutting in a clear vase.
Watch for pest transfer from the parent: isolate new plants for two weeks and inspect leaf undersides. The ASPCA lists Syngonium podophyllum as toxic to pets due to calcium oxalate crystals, so place propagated pots out of reach of cats and dogs that chew plants.
Common Propagation Mistakes and How to Fix Them
Most failures trace back to a short list of causes. No node on the cutting is the most common beginner error - a leaf floating in water looks hopeful but will never root. Fix: re-cut from a vine section that includes a visible node. Leaves submerged in water or buried in soil rot and infect the stem. Fix: remove all lower leaves and re-position the cutting.
Stale or sour water deprives roots of oxygen and encourages bacterial rot. Fix: change water weekly, rinse the jar, and trim any mushy stem tissue back to firm green before re-submerging. Cold, dim conditions slow or stop rooting entirely. Fix: move to a warmer bright spot; rooting on a north windowsill in winter often fails.
Overwatering soil cuttings keeps the node anaerobic. Fix: let the mix dry slightly nearer the surface while keeping only the node zone lightly damp, or switch to moss where drainage is automatic. Propagating a sick parent spreads pests and weakness. Fix: stabilize the mother plant, then take cuttings only from clean new growth.
Transplanting too early from water to soil shocks a cutting with only nubs for roots. Fix: wait until roots are two to three inches with branching. Ignoring aerial root damage during rough handling breaks primed tissue. Fix: handle stems gently and plant without crushing the node.
Yellowing on the oldest leaf during rooting is often normal as the cutting reallocates energy to roots. Yellowing on all leaves with a mushy stem means rot - discard and retry with better hygiene and warmer conditions.
Conclusion
Syngonium White Butterfly propagation succeeds when you treat the node as the entire point of the exercise. This climbing aroid evolved to restart from stem joints in humid tropical forest conditions, and your home setup only needs to approximate that basics: a clean cut below the node, warmth near 70–80°F, bright indirect light, and moisture that reaches the node without drowning the leaves. Water lets you watch progress; soil and moss skip a transplant step; both paths work when the parent plant is healthy and the season supports active growth.
Take four-to-six-inch sections with one to three nodes, strip lower leaves, change water weekly or keep soil lightly moist, and wait two to four weeks for roots. Transplant water-rooted cuttings when roots are two to three inches, then ease into normal White Butterfly care - drainage, indirect light, and watering when the top inch of mix dries. Avoid propagating stressed plants, leaf-only cuttings, and stale water, and you will rarely need a second attempt. One leggy vine can become several compact, variegated plants to keep, share, or rebuild a fuller pot without another trip to the nursery.
When to use this page vs other Syngonium White Butterfly guides
- Syngonium White Butterfly overview - Start here for whole-plant context before deep-diving this topic.
- Syngonium White Butterfly problems hub - Jump to symptom-specific fix guides when this care topic does not resolve the issue.