Best Soil for Spider Plant: Mix, Drainage & pH
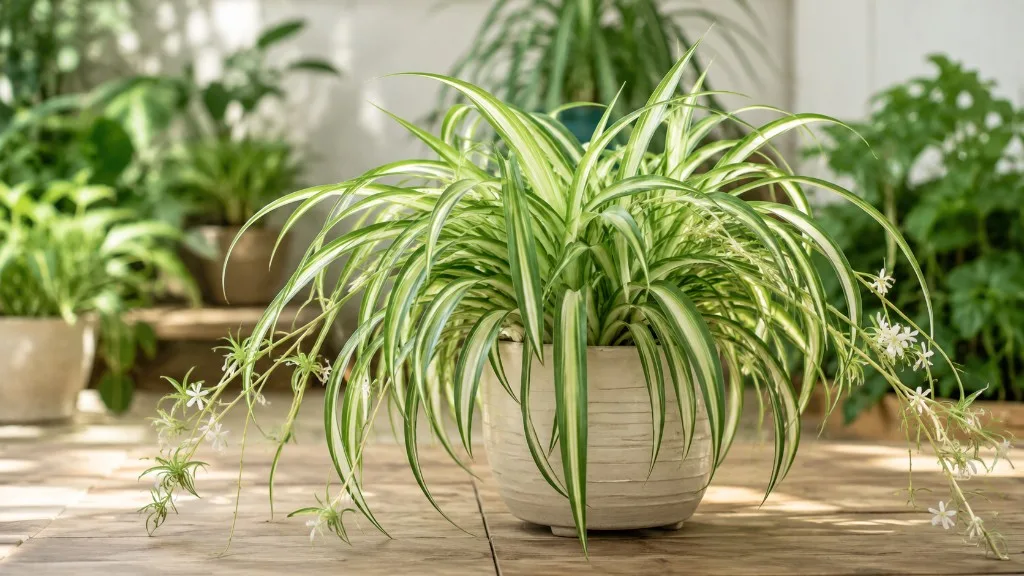
Best Soil for Spider Plant: Mix, Drainage & pH
Best Soil for Spider Plant: Mix, Drainage & pH
Spider plant (Chlorophytum comosum) is one of the most forgiving houseplants you can grow - until the soil underneath it stops working. A plant that looked lush and productive for two years can suddenly push out pale leaves, stall on plantlet production, or develop brown tips that spread faster than you can trim them. In most cases, the problem is not the plant’s reputation for toughness. It is the potting mix holding too much water around fleshy roots, compacting after months of watering, or accumulating salts and fluoride that burn leaf margins from the bottom up.
The best soil for spider plant growth indoors is a loose, well-draining, nutrient-rich blend that holds moderate moisture without going soggy. Spider plants evolved in the understory and forest edges of Southern Africa, where roots spread through open, organic debris rather than dense, waterlogged earth. Your living room is not a subtropical hillside, but the root biology is the same. Chlorophytum comosum needs a mix with visible air pockets, enough organic matter to buffer moisture between waterings, and a container setup that lets excess water exit freely after every pour.
This guide covers what spider plant roots actually need, how to build or amend a mix at home, when to choose perlite versus pumice, how to test drainage before you repot, and the container mistakes that undo even a perfect soil recipe.
What Spider Plant Roots Need From Soil
Soil for spider plants has one job: give fleshy, storage-capable roots a stable, breathable environment that dries down predictably between waterings. That sounds simple until you open a bag of standard indoor potting mix and realize it was formulated for dozens of unrelated houseplants, not for a fast-growing rosette whose thick roots rot quietly when oxygen runs low.
The three properties that matter most are drainage speed, aeration structure, and moderate moisture retention. Drainage speed determines how long the mix stays wet after you water. Aeration structure - the chunky gaps created by perlite, pumice, and bark - determines whether roots can breathe while the mix is still damp. Moisture retention keeps the plant from drying out so fast that you are watering every other day and stressing the root zone with constant wet-dry swings. Spider plants tolerate a wider range than fussier tropicals, but they still perform best when all three properties are balanced rather than maximized in one direction.
Fleshy Rhizomes and Why Drainage Matters
Chlorophytum comosum produces thick, fleshy roots and rhizomes that store water and nutrients - a survival adaptation for periods of uneven rainfall in its native range. According to the Missouri Botanical Garden, spider plants thrive in Spider Plant light guide, average household humidity, and well-drained potting mix - conditions that mirror their ability to root into loose, organic debris rather than dense, waterlogged earth.
Those roots spread outward from a central crown and send up arching leaves and long stolons bearing plantlets. In nature, the substrate is a mix of decomposed leaf litter, bark chips, and open pockets of air. Indoors, if you substitute straight peat-heavy potting soil with no amendments, the roots lose access to oxygen within days of a thorough watering. Anaerobic bacteria multiply in those low-oxygen zones, and root rot on Spider Plant follows - often before the arching leaves show more than slight dulling or a few yellow spots at the base.
Spider plants are famously forgiving, but forgiveness has limits. A plant sitting in soggy mix for weeks will decline even if you reduce watering later, because damaged roots cannot recover quickly enough to support the plant’s steady growth habit and prolific plantlet production. Prevention through soil structure is far easier than rescue after rot sets in. The useful checkpoint is simple: after a full watering, excess water should leave the pot within minutes, and the top 5 cm (2 inches) should dry within about a week in a typical indoor home.
The Moisture-Aeration Balance for Arching Foliage
The central tension in spider plant soil is holding enough moisture for steady growth and plantlet development while keeping enough air in the root zone that roots never sit in stagnant water. Pure peat or straight coco coir absorbs water beautifully but compacts and suffocates roots without coarse amendments. Pure perlite or pumice drains fast but dries so quickly that you end up watering constantly and the plant loses the stable moisture rhythm it prefers.
The goal is a blend that holds moisture in the middle and lower root zone while letting the top 5 cm (2 inches) dry within a few days and excess water exit from the bottom within minutes of a thorough pour. When you squeeze a handful of properly mixed spider plant soil, it should barely clump and fall apart easily when you open your hand - not form a tight mud ball and not crumble like dry sand.
Variegated cultivars like ‘Vittatum’ and curly-leaved ‘Bonnie’ are slightly less forgiving of moisture swings than solid-green forms, but all spider plants respond to the same soil principles. Pale new growth on an otherwise healthy plant sometimes traces to a root zone that swings between too wet and too dry. Stable moisture in a well-aerated mix supports the consistent nutrient uptake that keeps leaves bright and plantlets vigorous. If color has faded and you have already ruled out too much direct sun and nutrient deficiency, inspect the mix texture before reaching for fertilizer.
If your current soil either stays visibly wet on the surface for four or more days after watering in a typical indoor climate, or shrinks and pulls away from the pot walls within 24 hours, the balance is off. Adjust the recipe before you chase the problem with a stricter watering calendar.
Best DIY Soil Mix for Spider Plant
A reliable DIY mix is almost always better than unamended bagged soil for spider plants because you control the drainage channels yourself. You do not need exotic ingredients or a specialty nursery order. You need the right ratios, a few minutes of thorough blending, and a pot with a drainage hole.
Core Recipe by Volume
Here is a tested percentage-by-volume recipe that works well for most indoor spider plant setups in plastic, glazed ceramic, or hanging baskets with drainage holes:
- 50% quality peat-based or coco-based potting soil - structural base and nutrient anchor
- 25% perlite or pumice - primary aeration and drainage channels
- 15% peat moss or additional coco coir - moisture buffering (skip if your base mix is already peat-heavy)
- 10% pine bark fines or orchid bark - long-term structure; prevents compaction
For a single 6-inch pot refresh, that translates roughly to 2½ cups potting base + 1¼ cups perlite or pumice + ½ cup bark + ¼ cup extra coir if needed. Scale up proportionally for larger batches and store the extra in a sealed tub labeled with the date.
Simpler two-part ratio if you want the minimum effective blend: mix 2 parts quality potting soil with 1 part perlite or pumice (67% potting soil, 33% amendment). That matches a widely used baseline for spider plants and works well for most beginners in moderate indoor conditions. It is not as ideal as the fuller recipe above, but it is dramatically better than straight bagged mix and takes thirty seconds to combine.
Chunkier “experienced grower” variant for homes that run humid, for plants in lower light where evaporation is slow, or for growers who tend to overwater: use 40% potting soil, 30% perlite or pumice, 20% bark fines, 10% worm castings. You will water slightly more often because the mix dries faster, but the root zone stays safer in conditions where soggy soil is the main risk.
Avoid using cactus or succulent mix as the sole substrate. It drains too aggressively for a plant that evolved in moisture-rich forest debris and produces fleshy storage roots that expect some sustained dampness. You can borrow perlite or pumice from a cactus blend as an amendment, but do not pot spider plants straight into it unless you are prepared to water every few days and monitor closely.
How to Adjust the Mix for Your Home
No single recipe works in every room. The right blend depends on how fast your environment pulls moisture out of the pot. Increase perlite, pumice, or bark by 5–10% when the mix stays wet on top for more than 4–5 days, fungus gnats appear, or new leaves yellow while older ones stay green - common in humid bathrooms, low-light corners, and hanging baskets. Increase peat or coco coir by 5–10% when you are watering every 3–4 days in a moderate home, tips brown from dryness, or the plant sits in a bright warm window. Add 5–10% worm castings at spring repot if growth has slowed despite good light and you want gentle nutrition built into the mix. Label your storage tub with the ratios you used - that detail matters when you diagnose a plant that wilts after a normal watering six months later.
Perlite, Pumice, and Fluoride Sensitivity
Spider plants are among the houseplants most commonly cited as sensitive to fluoride, a compound added to many municipal water supplies and present in some soil amendments. Brown, papery leaf tips are the classic symptom, and while tap water is usually the larger fluoride source, some growers prefer to minimize perlite in the mix because expanded perlite can contain trace fluoride.
This is a nuanced topic, not a blanket ban. Many spider plants grow perfectly well in perlite-amended mix watered with tap water for years. Others develop persistent tip burn that clears up only when both water source and mix are adjusted. The practical approach is to know the sensitivity exists, watch for the symptom pattern, and adjust if you see it - not to avoid perlite preemptively in every setup.
Perlite remains the most accessible and effective drainage amendment for most growers. It is lightweight, inexpensive, widely available, and creates excellent air pockets. If your spider plant shows chronic brown tips despite good drainage, conservative feeding, and appropriate light, consider whether fluoride accumulation is contributing before you change everything else.
When to Choose Pumice Over Perlite
Pumice is a heavier volcanic rock that provides drainage and aeration similar to perlite without the same fluoride concerns. It also stays submerged in the mix when you water - perlite has a habit of floating to the surface over time, which reduces its long-term effectiveness in the root zone.
Choose pumice over perlite when:
- your spider plant has chronic brown tips that do not respond to flushing or reduced fertilizer
- you use tap water in a municipality with fluoridated supplies
- you want a mix that stays structurally stable longer in a hanging basket that gets frequent overhead watering
- you are building a perlite-free blend and need a 1:1 substitute by volume
A simple perlite-free spider plant blend used by experienced growers: 2–3 parts quality potting mix to 1 part pumice. That gives you drainage and aeration without perlite in the equation. Pair it with rainwater, distilled water, or filtered water if fluoride sensitivity is a confirmed issue in your plant - adjusting only the soil while continuing to water with fluoridated tap water often leaves the underlying problem in place.
If you stick with perlite and tap water and see no tip burn, there is no reason to fix what is not broken. The goal is a healthy root zone, not ideological purity about amendments.
Commercial Potting Mix Options That Work
A quality commercial houseplant potting mix works as a base as long as you amend it for drainage. Look for peat- or coir-based indoor mix with perlite, pumice, or rice hulls in the ingredients - texture should feel loose when squeezed, not sticky or clay-heavy. Avoid garden soil, moisture-control gels that stay wet too long, and unamended bags with no visible drainage amendment when you open them.
Amend store-bought mix by blending 1 cup perlite or pumice and ½ cup pine bark fines into every 4 cups of commercial soil before potting. That single step converts most bagged mixes into something spider plant roots can use long-term.
Container Drainage: Holes, Size, and Material
Soil is only half the system. A perfect mix in a pot with no exit for water becomes a root-rot trap within weeks. Container choice affects how fast your mix dries, how much air reaches the root zone, and whether you can flush accumulated salts effectively.
Drainage Holes and Saucer Setup
A drainage hole at the bottom of the grow pot is non-negotiable for long-term spider plant health. It lets excess water exit after watering and allows fresh air into the root zone as the mix dries from the bottom up. Decorative outer pots without holes are fine only if the plant sits in a separate inner nursery pot with drainage, and you empty any collected runoff within 30 minutes. Never let the root ball sit in standing water - spider plants tolerate brief drought far better than chronic wet feet.
Cachepot setup works well for spider plants because the arching leaves hide the utilitarian nursery pot inside a decorative sleeve. Lift the inner pot out to water, let it drain completely in the sink or bathtub, then return it to the sleeve. This is also the easiest way to flush salts monthly: water slowly until twice the pot volume runs from the hole, let it drain fully, then return the plant to its spot.
Hanging baskets need the same drainage discipline. Wire baskets lined with coco fiber or moss look attractive but dry unevenly and degrade quickly. A plastic hanging pot with drainage holes, optionally dressed in a decorative macramé hanger, gives you more control over soil moisture and is easier to refresh when the mix breaks down.
Matching Pot Size to the Root Ball
Spider plants tolerate being slightly root-bound and often produce more plantlets when roots fill the pot comfortably, as Wisconsin Horticulture Extension notes for mature specimens. That does not mean cramming a mature plant into a tiny container forever, but it does mean resisting oversized pots every time you see new growth. Choose a pot 2–5 cm (1–2 inches) wider than the root ball at repot - a 15 cm (6-inch) pot suits a medium specimen; a 20 cm (8-inch) pot handles a mature mother plant. Match depth to the spreading root habit rather than leaf span alone.
Oversized pots hold wet mix around roots that cannot use it yet, leaving the center soggy while the top dries. Undersized pots dry too fast and tip under arching leaves and dangling plantlets. Unglazed terracotta pulls moisture through walls and suits humid homes; glazed ceramic and plastic retain moisture longer and work better in dry, bright rooms.
Testing Soil Drainage Before You Repot
Do not wait until your spider plant shows stress to find out whether your mix drains. Two quick home tests take less than five minutes and prevent months of guessing.
The percolation test:
- Fill a clear cup or small pot with your blended mix.
- Saturate it thoroughly with water.
- Watch how long excess water takes to exit the bottom.
- Pass: water flows freely within 1–3 minutes and the mix looks evenly damp, not soupy.
- Fail: water pools on top for 10+ minutes, or the mix stays visibly saturated at the bottom after an hour.
The squeeze test:
- Moisten a handful of mix to field capacity (damp but not dripping).
- Squeeze firmly in your fist.
- Pass: the mix forms a loose clump that falls apart when you open your hand.
- Fail: it forms a tight ball that stays compressed, or it crumbles to dust with no cohesion at all.
If either test fails, adjust before you repot. Add more perlite or pumice for slow drainage. Add more peat or coir for mixes that crumble without holding any moisture. These tests cost nothing and save you from discovering a drainage problem when the plant is already stressed in its new home.
pH, Minerals, and Salt Buildup
Spider plants grow best when the potting mix stays in a slightly acidic to neutral pH range of 6.0 to 7.0. Most quality peat- or coir-based indoor mixes land in this range out of the bag, so pH is rarely something you need to micromanage unless you are building mix from unusual components or troubleshooting persistent problems.
What matters more in everyday care is salt accumulation. Fertilizer, hard tap water, and the natural mineral content of peat all leave soluble salts behind as water evaporates from the soil surface. Spider plants are particularly sensitive to high salt levels in the root zone, much like peace lilies and dracaenas. Brown leaf tips, stunted new growth, and a white or tan crust on the soil surface are common signals that salts have built up beyond what the roots tolerate.
Salt buildup appears as a white or tan crust along the pot rim and on the soil surface. A light crust after a year is normal. A heavy crust that returns within weeks of scraping means you should flush the pot - water slowly and deeply until twice the pot volume runs from the drainage hole - or refresh the mix entirely at the next repot.
Fluoride and chlorine in municipal tap water add another layer. Fluoride does not dissipate when water sits out overnight (unlike older chlorine treatments, which many municipalities have replaced with chloramine anyway). If leaf tips brown despite good drainage and conservative feeding, try rainwater, distilled water, or filtered water for a month and see whether margins improve. Monthly flushing also helps carry dissolved minerals out of the root zone before they concentrate to damaging levels.
Do not add lime or sulfur to adjust pH unless you have a test result showing you are out of range. Blind adjustment creates more problems than it solves in a container with a single plant.
When to Repot and Refresh the Mix
Spider plants outgrow degraded mix on a predictable timeline. Plan to refresh soil every 2–3 years, or sooner when roots circle the pot, water runs straight through hydrophobic peat, the mix smells sour, the surface stays wet for a week, or growth and plantlet production stall. Because spider plants tolerate slight root-binding, you can refresh mix in the same pot when the container size already works.
Repot in spring or early summer during active growth. Water lightly the day before, choose a pot 2–5 cm (1–2 inches) wider (or reuse the same pot), tease circling roots apart, trim only mushy rot, and keep the crown at the same depth to avoid crown rot. Water thoroughly until runoff exits the hole, empty the saucer, and skip fertilizer for 4–6 weeks while roots establish.
Common Soil Mistakes and Quick Fixes
Even experienced growers slip on soil basics because spider plants look fine until they suddenly are not. Straight bagged soil with no perlite is the most common error - fix by blending in 25–30% perlite or pumice and 10% bark, or replacing entirely. Oversized pots with no drainage hole trap water around fleshy roots; use an inner nursery pot with a hole inside any decorative sleeve and empty saucers after every watering. Bottom gravel layers do not improve drainage - they only raise the saturated zone. Remove gravel and add perlite to the mix instead.
Jumping three pot sizes after a flush of plantlets leaves wet unused soil around the roots; step up only 2–5 cm (1–2 inches) at a time. Riding degraded mix for years because stolons still produce babies leads to sour, hydrophobic substrate - refresh even in the same pot when the squeeze test fails or the mix smells off. Burying the crown at repot causes rot; keep the growing point at the same depth. Ignoring sour smell while leaves stay green means anaerobic rot is already active - repot immediately into fresh mix and trim mushy roots.
The ASPCA lists spider plant (Chlorophytum comosum) as non-toxic to cats and dogs (ASPCA - Spider Plant), which is one reason it is popular in pet-friendly homes. Soil and fertilizer are still not safe for pets to ingest.
How Soil Connects to Watering and Light
Soil does not operate in isolation. The same loamy blend that dries in five days under a bright east window may stay wet for ten days in a north-facing corner. Light intensity drives transpiration - how fast the plant pulls water from roots and releases it through leaves. Brighter, indirect light speeds dry-down and supports a slightly more moisture-retentive blend. Lower light slows the whole system and demands more perlite, pumice, or bark to compensate for slower evaporation.
Spider Plant watering guide should follow the mix, not a calendar. Check the top 5 cm (2 inches) with your finger or a dry chopstick before every pour, as Clemson HGIC recommends for indoor spider plants. If the deeper mix is still cool and damp, wait. If the top is dry and the pot feels light, water until runoff exits the drainage hole, then empty the saucer. A well-draining spider plant soil makes that check reliable because moisture distributes evenly rather than hiding a wet basement under a dry surface crust.
Spider plants prefer to dry slightly between waterings but not to the point of persistent wilting. In a quality mix, that usually means watering roughly every 7–10 days during active growth in a moderate indoor home - but the mix and your room conditions override any schedule. When troubleshooting yellow leaves or stalled plantlet production, inspect in this order: soil moisture and drainage first, then light level, then fertilizer. Most indoor spider plant problems trace to the root zone long before nutrient deficiency becomes the limiting factor.
Troubleshooting Brown Tips From the Root Zone
Brown leaf tips on spider plants are often treated as inevitable. They are not - tips brown when water quality, salt load, moisture stress, or light exceeds what the plant tolerates, and soil is involved in most of those pathways. Thin, papery brown edges on healthy leaves usually mean fluoride or salt accumulation - flush monthly, feed at half strength, and trial rainwater or filtered water for a month. Brown tips with yellow base leaves and sour smell point to overwatering and poor drainage - repot into a chunkier blend with a confirmed drainage hole. Crispy brown tips on dry leaves suggest underwatering or fast-drying mix - add organic matter and water thoroughly when the top inch dries. Bleached streaks with browning usually trace to direct sun, though hydrophobic compacted mix can worsen uneven moisture.
Check drainage and moisture rhythm first, then water quality and salt load, then light, then feeding. Fixing the root zone resolves more tip-burn cases than trimming ever will.
Conclusion
Spider plant soil succeeds when three elements work together: a loose, well-draining loamy mix with enough organic matter to buffer moisture, perlite or pumice (and ideally bark fines) to keep that mix open and airy through months of watering, and a container with real drainage sized close to the root ball. The baseline recipe - 2 parts quality potting soil to 1 part perlite or pumice, upgraded with bark and worm castings when you want a fuller blend - handles most indoor homes well. Push drainage amendments higher in humid or low-light rooms; add a bit more organic matter in bright, dry setups.
Test your mix before Spider Plant repotting guide with a quick percolation check and a squeeze test. Refresh the substrate every 2–3 years or when it smells sour, drains poorly, or collapses. Flush monthly if brown tips persist. Fix the root zone first when leaves yellow, growth stalls, or plantlets stop forming - not light, not fertilizer, not a bigger pot - because Chlorophytum comosum rewards good soil with the arching foliage and dangling babies that made it a houseplant staple in the first place.
When to use this page vs other Spider Plant guides
- Spider Plant overview - Start here for whole-plant context before deep-diving this topic.
- Spider Plant problems hub - Jump to symptom-specific fix guides when this care topic does not resolve the issue.
- Root Rot on Spider Plant - Escalate here when soil adjustments are not enough.