Best Soil for Peperomia: Mix, Drainage & Repotting
Best Soil for Peperomia: Mix, Drainage & Repotting
Best Soil for Peperomia: Mix, Drainage & Repotting
Why Soil Decides Peperomia Survival More Than Watering Schedules
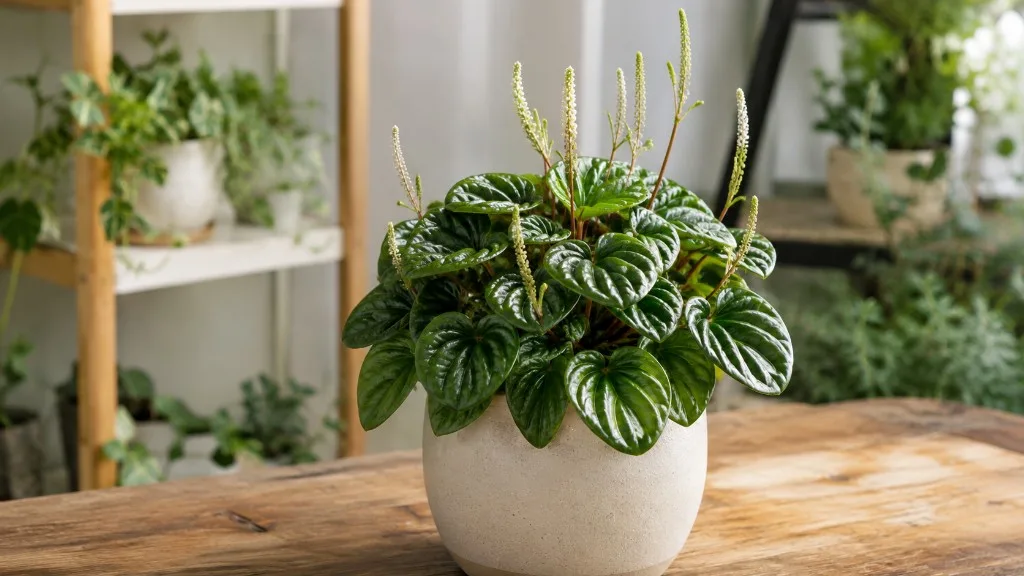
Peperomia (Peperomia spp.) is one of the most forgiving-looking houseplants on a nursery shelf - compact, pet-safe for most homes, and tolerant of the medium light found on desks and side tables. That reputation creates a trap. Growers focus on watering calendars and leaf firmness while ignoring the medium those shallow roots actually live in. Soil is not passive filler. It controls how fast water moves through the pot, how much oxygen remains in pore spaces after a thorough drink, how quickly the mix re-aerates between waterings, and whether a semi-succulent root zone can recover from a single overpour.
Most peperomia failures are not dramatic drought collapses. They are slow declines - soft stems, dull leaf texture, yellow lower leaves, and finally mushy crowns - caused by heavy, waterlogged soil that stays wet at depth while the surface looks merely damp. The best soil for peperomia is an airy, well-draining mix built around perlite, peat moss or coconut coir, and enough structural amendment to keep the root zone open for months. When that system is wrong, no watering app will save the plant.
If your peperomia wilts with wet soil, or leaves wrinkle while the pot still feels heavy, inspect the mix texture and pot size before changing light or fertilizer. A correctly built soil system makes every other care decision easier to read.
What Peperomia spp. Needs From Its Root Zone
Peperomia belongs to Piperaceae, the pepper family, with hundreds of species native to Central and South America and other tropical regions. Many popular houseplant cultivars - Peperomia obtusifolia (baby rubber plant), P. caperata (ripple peperomia), P. argyreia (watermelon peperomia), P. rotundifolia, and trailing types like P. prostrata - share a common root-zone profile even when leaf thickness varies. Clemson HGIC lists Peperomia among plants suited to porous, fast-draining soilless media. NC State Extension classifies species like P. obtusifolia as requiring well-drained media, consistent with epiphytic root biology.
University of Missouri Extension advises growing peperomias in a porous, well-drained potting medium, then improving commercial mixes by adding perlite and orchid bark to increase drainage while retaining enough moisture for the plant to thrive. Heavy garden soil, unamended all-purpose potting mix in oversized plastic pots, and mixes that have collapsed after a year indoors all work against peperomia architecture.
Shallow Roots and Epiphytic History
In nature, many peperomias grow as facultative epiphytes or understory plants on decomposing leaf litter and tree bark. Rain arrives frequently, but substrates drain rapidly and re-aerate between events. Roots are fine, thready, and shallow - often occupying only the top 5 to 8 cm (2 to 3 inches) of a container even when the pot is deeper (Missouri Botanical Garden). Because root volume is small, the soil surrounding it must dry and re-aerate quickly. When dense potting mix stays wet for many days, air pockets collapse and roots lose oxygen long before leaves show the full damage.
Semi-succulent species like P. obtusifolia store water in thick leaves and stems, which can mask underwatering briefly but does not protect roots from chronic sogginess. Thin-leaved species like P. caperata wilt faster when dry but rot just as readily when wet. The shared requirement is an open, oxygen-rich medium, not a swampy peat block.
Four Jobs Your Mix Must Do
Every ingredient in a peperomia soil recipe should serve at least one of four jobs. First, drainage and aeration: excess water must exit the pot quickly, and macro-pores must remain after watering so shallow roots can breathe. Second, modest moisture retention: the mix should hold a thin moisture film without staying saturated - peat or coir provides this buffer. Third, structure over time: the medium should resist compacting into an anaerobic mass within 12 to 24 months of indoor culture. Fourth, nutrient and pH compatibility: the mix should stay in a slightly acidic to neutral range and tolerate light feeding without rapid salt buildup on sensitive foliage.
If your current mix fails any one of those jobs, the plant may look acceptable for weeks and then develop soft stems, leaf drop, stalled new growth, or crown rot after a routine watering. Those symptoms overlap with cold drafts and irregular light, which is why checking how the soil actually behaves - not just how often you pour - matters so much.
Signs Your Current Peperomia Soil Is Wrong
Soil problems on peperomia often announce themselves indirectly. Water sits on the surface for minutes after you pour, then runs down the gap between the root ball and pot wall - usually a sign the mix has become hydrophobic from drying too hard or from peat breakdown. The pot stays heavy for days after a single thorough watering while the top inch looks merely damp, especially common in dense commercial mixes or oversized containers. Leaves soften and stems flop even though the soil feels cool and wet at depth - a classic root-stress pattern. A sour or stagnant smell from the drainage hole points to anaerobic conditions and possible root decline even before lower leaves yellow and drop.
On peperomia specifically, watch for wrinkled thick leaves paired with wet soil - roots may be failing while the plant still looks merely “thirsty.” Dark, mushy roots or a rock-hard root ball both call for fresh, airier mix rather than more water.
Best Soil Mix for Peperomia
The best soil for peperomia is a light, airy, well-draining potting mix with enough organic matter to hold a modest moisture buffer and enough coarse amendment to keep shallow roots surrounded by oxygen. The Royal Horticultural Society recommends combining two parts peat-free ericaceous compost with one part perlite and one part medium orchid bark as a standard peperomia blend. Clemson HGIC cites porous soilless media - including blends with bark, peat, and perlite - as appropriate for peperomia alongside Hoya and philodendrons.
You are aiming for a medium that feels light and crumbly when moist, not sticky mud or pure grit. When you squeeze a handful lightly, it should hold shape briefly and fall apart. If it forms a tight ball, add perlite and bark. If water runs through instantly and thin-leaved peperomias wilt within a day, you have gone too coarse or the pot is too small for the room’s dryness.
The Quick-Answer Recipe
A dependable peperomia soil mix you can blend at home:
| Ingredient | Proportion | Role |
|---|---|---|
| Peat-based or coir-based potting soil | 40–50% | Organic base, moisture buffer, starter nutrients |
| Coarse perlite | 30–40% | Permanent air pockets, fast drainage |
| Fine to medium orchid bark | 10–20% | Structural openness as mix ages |
A simplified high-drainage recipe many growers use successfully: 50% potting compost + 50% perlite, with pH roughly 6.0 to 7.0. For a chunkier epiphytic-style blend, use 50% coco coir, 30% coarse perlite, and 20% fine orchid bark - a ratio that targets high air-filled porosity similar to decomposed bark litter in native habitats.
An alternative equal-parts recipe aligned with extension guidance: 1 part peat moss or coco coir, 1 part perlite, 1 part orchid bark. For a plant that dries too slowly in a plastic indoor pot, shift to 35% base mix, 45% perlite, 20% bark. For a thick-leaved P. obtusifolia in terracotta that dries every two days, use 50% base mix, 35% perlite, 15% bark to slow dry-down slightly.
Moisten dry peat or coir slightly before blending so ingredients combine evenly. Dry peat can repel the first watering, creating the false impression of good drainage while the center of the root ball stays dry - a common reason new peperomias wilt right after Peperomia repotting guide.
Core Ingredients Explained
Understanding what each component does helps you adjust the recipe without starting from scratch every time a plant behaves differently in your home.
Peat Moss or Coconut Coir
Sphagnum peat moss is lightweight, holds moisture evenly, and supports the slightly acidic conditions peperomia tolerates well. The downside is compaction and hydrophobicity within 12 to 24 months in warm indoor culture - a hidden cause of root stress when the bottom of the pot turns dense and oxygen-poor while the surface looks acceptable.
Coconut coir is the leading peat alternative. It rewets more easily than aged peat, holds moisture without becoming as impermeable when dry, and typically sits near pH 5.8 to 6.5, comfortably inside the peperomia range. Choose low-salt, horticultural-grade coir; poorly rinsed coir can carry salts that accumulate in the root zone over a season of feeding. Coir alone can stay wet too long in cool indoor rooms; pair it with generous perlite rather than using straight coir.
For most growers, either peat-based or coir-based potting soil works as the 40 to 50% foundation as long as perlite and bark are added. The choice is often environmental preference and rewetting behavior, not a dramatic difference in plant health when the full recipe is balanced.
Perlite, Bark, and Other Amendments
Perlite is expanded volcanic glass. Its job is to create non-decomposing air space and drainage channels. Use coarse perlite rather than fine dust-grade material; larger particles resist packing through months of watering. Perlite stays rigid and pH-neutral for years, which makes it more reliable than vermiculite for peperomia - vermiculite retains more moisture and compresses over time, reducing aeration in a shallow root zone (Clemson HGIC).
Orchid bark - fine to medium grade, not large chunky fir bark used alone - keeps the mix structurally open as organic matter decomposes. It mimics the bark and leaf-litter substrates epiphytic peperomias encounter in nature. Pumice is a viable perlite substitute with similar porosity and slightly more weight, useful if perlite floats to the surface during heavy top watering.
Avoid sand as the main drainage amendment in small indoor pots unless you know your watering habits lean dry. Sand increases weight and can settle, reducing aeration without improving dry-down as much as perlite. Avoid garden soil entirely for container peperomia; it compacts, introduces pathogens, and rarely drains predictably in a pot. Avoid stones or gravel at the pot bottom as a drainage fix - they reduce usable root volume and can create a perched water table that keeps the lower root zone wetter, not drier (peer-reviewed container studies cited in extension literature).
pH and Fertilizer Compatibility
Most peperomias perform well in slightly acidic to neutral soil, roughly pH 6.0 to 7.0. Peat- and coir-based mixes with perlite typically fall in range naturally. You do not need a pH meter for every repot if you use a balanced commercial or homemade recipe, but if growth stays pale and leggy despite good light and careful watering, testing is worthwhile.
Peperomia is a light feeder compared with fast-growing tropical foliage plants. Soil interacts with fertilizer because salts accumulate in the shallow root zone over months of feeding, especially if tap water is hard. A white crust on the soil surface, worsening leaf edge burn after feeding, or stalled new growth all suggest flushing or repotting into fresh mix may help as much as adjusting the feed rate.
Flush the pot every four to six weeks in summer with plain water, then empty the saucer. Do not reuse salt-laden mix at repotting. A diluted balanced fertilizer every four to six weeks during active growth is sufficient for most peperomias in fresh mix.
Drainage Speed and Dry-Down Balance
Drainage for peperomia means excess water leaves the pot quickly while the mix retains a modest moisture film for shallow roots - not prolonged saturation. After a thorough watering, water should exit the drainage hole within minutes, not pool in the bottom for hours. The root ball should feel slightly heavier and evenly moist, not sodden.
Use this one-minute drainage check after watering: pour until water runs from the hole, then lift the pot. Excess should stop streaming within 30 to 60 seconds. If water keeps dripping for many minutes and the saucer fills repeatedly, the mix is too dense, the pot lacks sufficient hole area, or the plant sits in a cachepot that traps runoff. Empty saucers and cachepots after 15 minutes - roots should never sit in standing water overnight.
The top-inch dry-down rule describes target moisture between waterings for most peperomias. Stick a finger into the top 2 to 3 cm (about 1 inch). For thick-leaved species, let it feel dry to the touch before watering again. For thin-leaved types, water when the top inch is barely dry, not bone dry and not cool-wet. Deeper in the pot, the mix should not stay waterlogged for days. If the top is dry but the bottom is wet for a week, you have a density or pot-size problem, not a watering-frequency problem.
| Observation | Likely soil issue | First adjustment |
|---|---|---|
| Top dry, bottom wet for days | Dense or degraded mix; oversized pot | Repot with airier recipe; reduce pot size |
| Water beads on surface | Hydrophobic peat | Bottom-water once, repot, or pre-moisten mix |
| Wilting with wet soil | root rot on Peperomia from past overwatering | Inspect roots, repot into rescue mix |
| Wrinkled leaves with wet soil | Root damage; not underwatering | Unpot, trim rot, refresh mix |
| Wilting with hard dry soil | Underwatering or compacted mix | Rehydrate thoroughly; refresh mix |
| Salt crust on surface | Mineral/fertilizer buildup | Flush or repot; reduce feed strength |
Pot Choice and Shallow Root Zones
The same peperomia soil mix behaves differently depending on the container. Plastic and glazed ceramic retain moisture longer, which suits humid rooms and growers who forget to water. Terracotta breathes through the walls and pulls moisture from the mix, speeding dry-down - helpful for overwaterers, risky in very dry homes where thick-leaved species may wrinkle faster. Cachepots (decorative outer pots without holes) are fine only if the inner nursery pot drains freely and you never let runoff accumulate in the outer shell.
Every pot for long-term container care needs a drainage hole. University of Missouri Extension and Clemson HGIC both treat container drainage as standard for peperomia culture. A layer of gravel at the bottom does not fix poor mix; it reduces usable root volume.
Pot size is the most under-discussed soil factor for peperomia. Because roots occupy only the upper few inches, soil below and around a small root ball gets wet with every watering but dries slowly - roots are not there to pull moisture from that unused volume. The result is persistently damp outer soil that creates anaerobic conditions even when the recipe is well formulated. Match the pot to the root ball, not the leaf spread. When repotting, move up only 2 to 4 cm (1 to 1.5 inches) in diameter - roughly one pot size. The RHS notes that slow-growing peperomias can stay in the same container for two to three years before needing repotting.
Shallow pots can outperform deep decorative planters for peperomia because they reduce the unused wet zone beneath shallow roots. If you love a deep cachepot, keep the plant in a short nursery pot that drains freely inside it.
Commercial Mixes vs. DIY Blends
Commercial all-purpose or indoor potting soils can work if they are genuinely light and visibly amended with perlite. Read the label and feel the bag if possible. A good store mix contains visible perlite, feels springy, and does not clump into a brick when moistened. Many standard all-purpose potting soils are not adequate alone for peperomia. University of Missouri Extension explicitly recommends enhancing commercial mixes with perlite and orchid bark before use. Add at minimum 25 to 30% perlite by volume, plus a handful of orchid bark per small pot, before planting.
Can you use regular potting soil without amendment? Only temporarily, and only if you watch dry-down closely. Regular mix in a small plastic pot under moderate indoor light often stays wet too long for peperomia roots. If that is what the plant came in from the nursery, plan to refresh or repot within the first month rather than waiting for obvious decline.
Cactus or succulent mix alone suits thick-leaved types only when blended 50/50 with peat- or coir-based potting soil; straight cactus mix wilts thin-leaved species. Orchid bark mixes used alone are too fast-drying - use bark as a 20% structural component, not the entire volume. DIY mixing lets you tune aeration; commercial mixes save time but need perlite amendment and diluted feeding after the first month.
Adjusting the Recipe for Species and Home Conditions
No single recipe is perfect for every room and species. Adjust based on how fast the pot dries, not on a calendar. If the mix is still wet at depth after 7 to 10 days in spring and lower leaves yellow, increase perlite by 10% at the next repot or refresh. If thin-leaved P. caperata wilts every morning and the skewer comes out dry halfway down, increase the base mix fraction slightly or move to a plastic inner pot inside a decorative sleeve.
Thick-leaved semi-succulent types - P. obtusifolia, some P. clusiifolia cultivars - tolerate slightly more moisture retention but still rot in heavy soil. Thin-leaved or deeply textured types - P. caperata, P. argyreia - need faster dry-down and sharper drainage. Trailing species like P. prostrata and P. rotundifolia dry faster at the soil surface because of exposed top area; they may need a touch more coir or peat in the base fraction if leaf beads wrinkle between waterings.
Seasonal shifts change soil behavior indoors. In winter, lower light slows evaporation; the same mix that worked in August stays wet longer in January - water less often and hold major repotting until spring unless the mix is clearly degraded. In summer, check the top inch more frequently. High humidity slows leaf water loss but does not replace the need for an open mix; grow lights dry pots faster and may call for a slightly more retentive blend, never a dense one.
When to Refresh or Replace Peperomia Soil
Peat-based mixes decompose and compact over time, and even slow-growing peperomias benefit from fresh aeration every 12 to 24 months. Plan to refresh soil when performance declines, not only when roots circle the pot. Full repotting is not always required; top-dressing - removing the top 2 to 3 cm of old mix and replacing it with fresh aerated blend - can extend root-zone health between major repots when the plant is not yet root-bound.
Repot into entirely fresh mix when roots emerge from drainage holes or crowd the surface; when water runs straight through without absorbing because structure has collapsed; when the mix smells sour or looks muddy despite careful watering; when salt crust persists after flushing; or when new growth stalls with no other clear cause. Spring and early summer are the safest windows because peperomia can root into fresh medium quickly. Avoid winter repotting unless you are rescuing root rot or severe compaction.
Even if the plant still fits its pot visually, soil age alone justifies refresh on a plant that has been in the same peat-heavy mix for two years. Old mix loses pore space, holds water unevenly, and accumulates minerals. Peperomia rewards fresh medium with firmer leaves and steadier new shoots.
Repotting into Fresh Mix: Step-by-Step
Repotting is the practical moment when soil theory becomes root health. Done correctly, it solves compaction, salt buildup, and pot-size mismatch without shocking a compact plant that may already be putting out new growth.
Water lightly the day before so the root ball holds together and roots are flexible. Choose a clean pot one size up at most with a drainage hole. Prepare fresh peperomia soil mix and moisten it slightly. Slide the plant out and inspect roots: healthy peperomia roots are pale, firm, and white to tan, fine and shallow. Trim dark, mushy roots with sterilized scissors. If rot is extensive, repot into a rescue mix with extra perlite (see below) and reduce watering until new growth appears.
Loosen only the outer 1 cm of the old root ball - do not bare-root unless you are treating severe rot. Peperomia roots are delicate and shallow; aggressive teasing causes unnecessary damage. Place a thin layer of fresh mix in the pot, set the plant so the crown sits at the same depth as before (never bury stems or rosettes deeper), and fill around the sides with fresh mix. Tap the pot gently or use a chopstick to settle mix without compacting. Water lightly until drainage runs, empty the saucer, and place the plant in Peperomia light guide without harsh direct sun for one to two weeks. Hold fertilizer for three to four weeks so tender new roots are not burned.
After repotting, slight droop for a day or two is normal. Persistent yellowing after three weeks suggests the pot is too large or the mix is too wet - reassess before increasing water or feed. For a rescue mix on overwatered plants, use 30% base potting soil, 50% perlite, 20% orchid bark in a pot matched to the trimmed root mass.
Soil Mistakes That Damage Peperomia Roots
Root decline on peperomia is almost always prevention failure, not bad luck. The most common soil mistakes are easy to avoid once you know what they look like.
Using unamended dense potting soil in a large plastic pot is the top error. The mix stays wet at the bottom while the surface looks acceptable, so growers water again. Oversized pots multiply the problem by adding unused wet volume around a shallow root system. No drainage hole, or a plugged hole, traps water regardless of mix quality. Gravel layers give a false sense of security while reducing root space. Reusing old, compacted mix at repotting imports salt problems and poor structure into a fresh container. Burying the crown deeper at repotting places tissue in a zone that stays wetter longer and encourages rot at the stem base.
Another subtle mistake is repotting into fresh mix but trapping runoff in a cachepot, or treating all peperomias like succulents with straight cactus mix while thin-leaved types wilt, or like ferns with unamended peat blocks while thick-leaved types rot. If you suspect rot, unpot immediately, trim mushy roots, repot into airy fresh mix, and adjust watering to the top-inch dry-down rule. Hold fertilizer until stable new growth appears.
Conclusion
The best soil for peperomia balances two demands that sound opposite but are not: retain enough moisture for shallow fine roots and drain fast enough that oxygen never disappears from the mix. Build around 40 to 50% peat- or coir-based potting soil, 30 to 40% perlite, and 10 to 20% orchid bark, or use the simplified 50/50 potting compost and perlite recipe if you want a minimal starting point. Keep pH near 6.0 to 7.0, pair the mix with a drainage hole and correctly sized shallow pot, and refresh the medium every 12 to 24 months or when compaction, salt crust, or root crowding appears.
Peperomia will still need bright indirect light, careful watering, and light feeding in active growth - soil does not replace those needs. What good soil does is make watering readable, reduce root rot risk, and give the plant a stable foundation so compact foliage stays firm through ordinary indoor conditions. When in doubt, check the mix before buying another cultivar or moving the pot again. More often than not, the fix is airier, fresher, and faster draining - not more complicated.
When to use this page vs other Peperomia guides
- Peperomia overview - Start here for whole-plant context before deep-diving this topic.
- Peperomia problems hub - Jump to symptom-specific fix guides when this care topic does not resolve the issue.
- Root Rot on Peperomia - Escalate here when soil adjustments are not enough.
- Mold on Soil on Peperomia - Escalate here when soil adjustments are not enough.