How to Grow Chocolate Mint: Care and Harvest Guide
Grow chocolate mint with clear advice on containment, light, watering, pruning, propagation, winter care, and what its chocolate-mint flavor really tastes like.
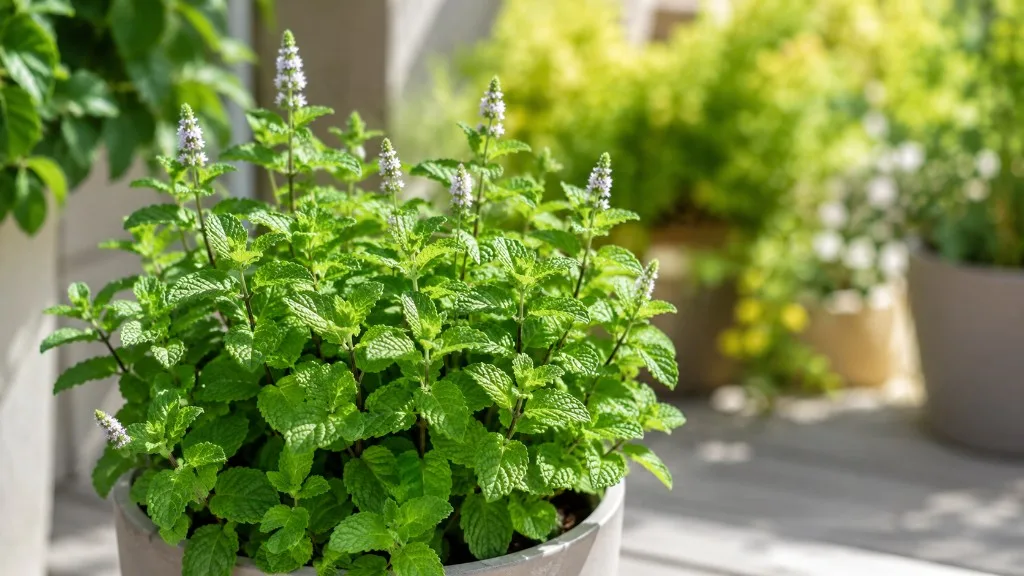
Chocolate mint is easy to grow when you give it two things from the start: steady moisture and a boundary its runners cannot cross. The leaves are useful in drinks and desserts, but the plant’s peppermint-family vigor matters more than its unusual scent. Grow it in a pot if you want a dependable harvest without a mint patch appearing beyond the place you planted it.
What Chocolate Mint Is—and What It Tastes Like
Chocolate mint is a named mint cultivar generally sold as Mentha × piperita f. citrata ‘Chocolate’ or chocolate peppermint. The Royal Horticultural Society lists the cultivar as a spreading perennial with dark green foliage and a minty-chocolate scent; sellers may shorten or vary the botanical label, so check the plant’s identity before buying if the cultivar matters to you. It is not a cacao plant, and the chocolate note describes the aroma rather than a reliable, sweet chocolate taste. (RHS chocolate mint profile)
Crush one leaf before you decide what to cook with it. Mint varieties can differ substantially in taste and smell, and the strength of chocolate mint’s aromatic note can vary among plants and harvests. Treat the label as a flavor direction, not a promise that every leaf will taste like a chocolate bar. If you want a particular scent, buy from a nursery that labels its stock clearly and sample a leaf when possible. (Utah State University Extension: Mint in the Garden)
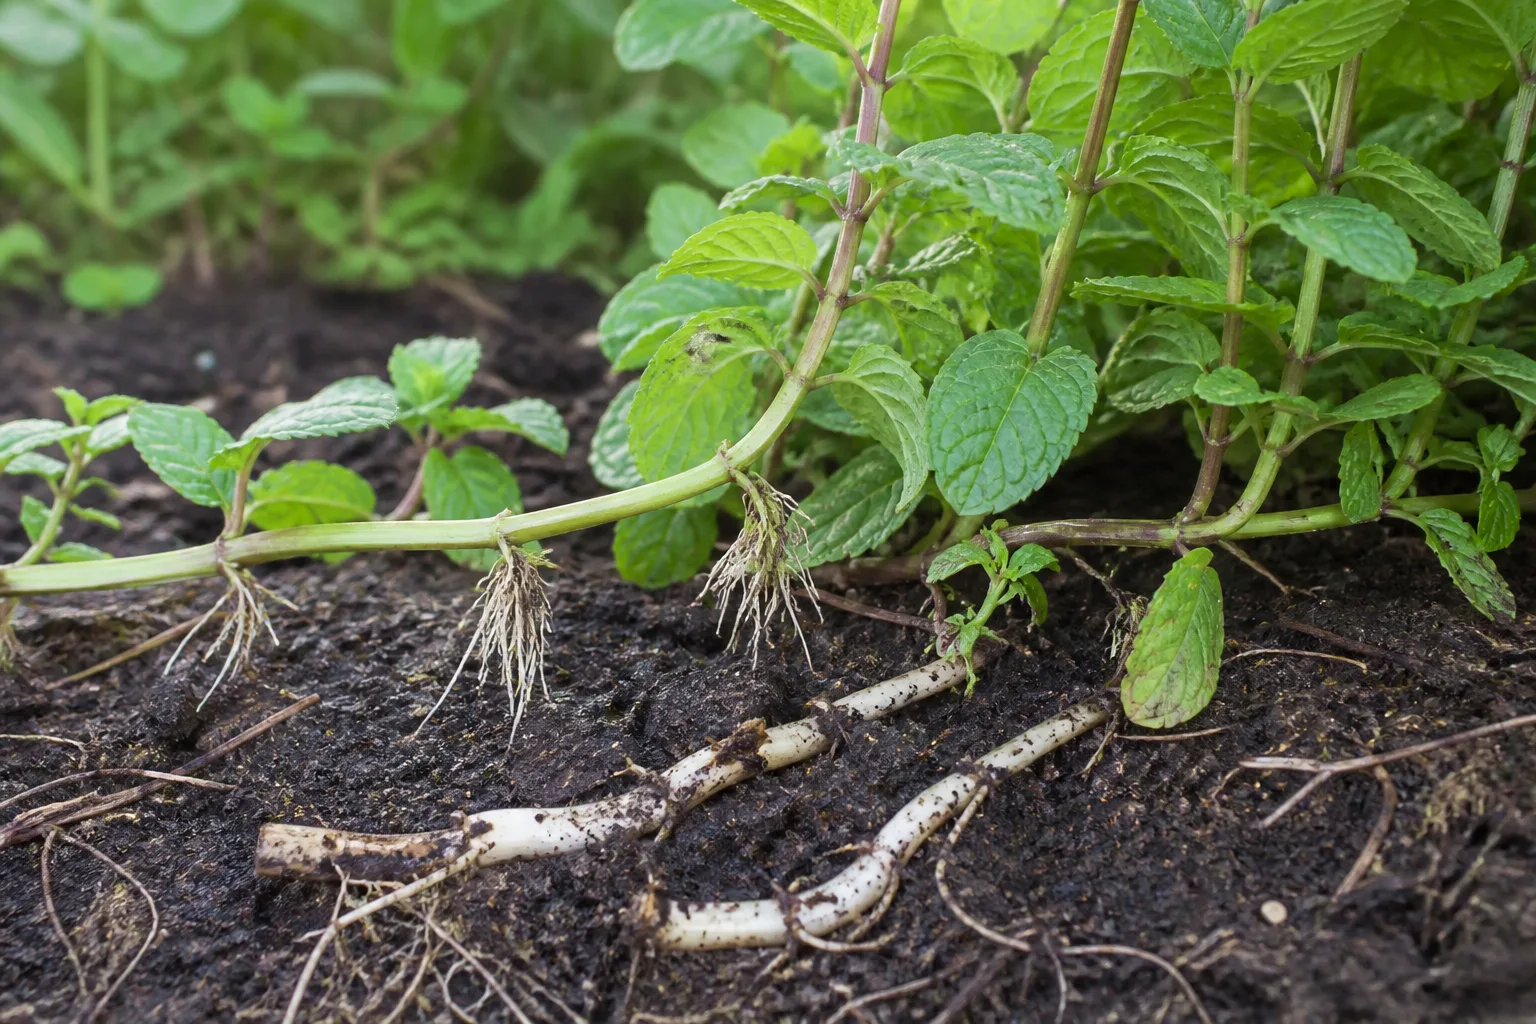
Chocolate mint shares the spreading habit of other Mentha plants. Underground stems called rhizomes travel away from the crown and can establish new shoots, while a stem resting on moist soil can root at a node. A compact-looking plant in a nursery pot can therefore become a broad patch if planted loose in a mixed border. Its small summer flowers are usually pink to lavender, and its foliage can show reddish or copper tones depending on conditions. (RHS chocolate mint profile)
Contain the Rhizomes Before You Plant
For most home gardens, a freestanding container is the simplest choice. Use a pot with open drainage holes and enough room for the root ball to expand; NC State Extension suggests a 12- to 16-inch-wide pot for peppermint, a useful starting size for this related cultivar. A medium-to-large pot is easier to keep evenly moist than a tiny herb pot, which can dry out between checks. Put it on a patio, balcony, or hard surface where stems cannot trail into soil. If the pot sits on bare ground, lift it occasionally and check for roots escaping through the drainage holes. (NC State Extension: Peppermint)
You can grow mint in a garden bed if you install a real barrier first. Utah State University Extension recommends confining mint and describes a buried-container approach with the rim raised above the soil; the visible rim helps prevent surface runners from rooting over the edge. A bottomless pot or root barrier can contain downward and lateral growth, but it is not a guarantee: inspect the perimeter and remove shoots as soon as they appear. (Utah State University Extension: Mint in the Garden)
Do not put chocolate mint into a shared pot with basil, parsley, or another slow-growing herb. Mint fills the root zone quickly and competes for water; separate pots make it easier to harvest and to adjust watering for each plant. The trade-off is that a pot needs more frequent moisture checks than an established bed, especially during hot, windy weather.
Match Light to Your Climate
Chocolate mint grows in full sun or partial shade. In a cool or mild summer, a spot with several hours of direct sun usually supports compact stems and steady leaf growth. In a hot-summer climate, give it morning sun and afternoon shade, particularly in a dark pot that heats up quickly. UF/IFAS Extension recommends light or partial shade for mint in Florida’s hot, humid conditions, while the RHS lists mint as suitable for full sun or partial shade; those recommendations fit different climates rather than conflict. (UF/IFAS mint guide; RHS mint-growing guide)
Let the plant show you when the placement is wrong. Pale, stretched stems with wide gaps between leaves usually point to insufficient light; move the pot brighter a little at a time or trim the stems back and allow compact growth to return. Scorched edges, a drooping plant that wilts at midday, or a pot that becomes extremely hot suggest too much exposure or heat stress. Move it into afternoon shade before watering more heavily, since extra water will not cool an overheated root ball if the soil is already wet.
Indoors, choose the brightest available window and rotate the pot so one side does not lean toward the glass. A bright east- or south-facing window may work, but short winter days can still produce weak growth; a grow light is more dependable when the plant becomes leggy. Keep the plant away from hot radiators and cold drafts, and expect slower growth indoors than in a bright outdoor spot.
Choose Soil That Holds Moisture and Drains
Mint wants soil that stays evenly moist without remaining waterlogged. In a garden bed, ordinary fertile soil amended with compost is usually suitable if water does not sit around the roots after rain. In a container, use a quality multipurpose potting mix rather than dense garden soil, which can compact and drain poorly in a pot. A container with drainage holes is more important than chasing a precise pH number.
RHS and extension guidance allows a broad range of soils, with the repeated practical requirement being moisture plus drainage. NC State gives peppermint a preferred pH range of 6.0 to 7.0, but a gardener with a healthy plant does not need to chase a narrow number or routinely test a container mix. If your potting mix dries into a hard crust or pulls away from the sides, rewet it thoroughly and consider refreshing the mix at repotting. If it stays slick and saturated for days, use a lighter mix and clear the drainage holes. Avoid filling the bottom with gravel as a substitute for holes; the pot itself must let excess water escape. (NC State Extension: Peppermint)
Water by Checking the Root Zone
Check the top inch of soil with a finger. If it feels dry, water slowly until the mix is evenly damp and a little excess drains from the base; empty a saucer so the roots do not sit in standing water. If the surface is still cool and moist, wait and check again later. This simple check adapts better than watering on a fixed weekday because pot size, wind, sun, rainfall, and temperature all change how quickly a plant uses water.
Mint in a bed can use Utah State Extension’s broad reference of about 1 to 2 inches of water per week during active growth, counting rain, but the amount should shift with weather and soil. A container may need water more often because it has little soil volume and no surrounding ground to buffer heat. In a heat wave, check daily; in cool, cloudy weather, watering less often is normal. (Utah State University Extension: Mint in the Garden)
Do not respond to every wilt by adding water. A plant with dry, light potting mix may recover after a deep soak; one with wet, sour-smelling mix may be losing roots. Water at the soil surface when practical, and avoid leaving leaves wet overnight in a crowded, still-air spot. That reduces the conditions that favor foliar disease and makes symptoms easier to read.
Plant a Start at the Right Depth
Plant in spring after severe frost risk has passed, or in early fall where the plant has time to settle before cold weather. Set a nursery plant at the same depth it grew in its pot; burying the crown deeply can trap moisture against the stems. Water it in, then keep the soil evenly moist while new roots settle. Chocolate mint is vigorous, so one starter is enough for a household pot; planting several close together creates a crowded root mass sooner.
If you use a buried barrier, leave its lip above ground and plant the mint inside it. Choose a sunny-to-partly-shaded site where the barrier can be inspected rather than hiding it under a dense perennial. The rim is a working part of the system: runners that reach across it can root in surrounding soil. For the lowest-maintenance setup, keep the plant in a container that stands above ground and remove any runners that touch nearby soil.
Feed Lightly, Not Frequently
Chocolate mint does not need a heavy feeding schedule. Mix compost into a garden bed before planting or refresh a pot with new potting mix when it becomes crowded. If growth is consistently pale and slow despite adequate light and moisture, apply a balanced fertilizer at the label rate during active spring growth; do not keep feeding simply because the plant is a mint.
Too much fertilizer can push soft, lanky growth and may reduce the aromatic quality gardeners want from mint. Utah State Extension advises against overfertilizing and notes that excessive water and fertilizer can reduce mint oil production and increase disease problems. Start with better light, sound drainage, and regular harvesting before adding more nutrients. (Utah State University Extension: Mint in the Garden)
Prune for Fresh Growth and Harvest
Harvesting is the easiest pruning routine. Once the plant is established and has several healthy stems, snip the tips regularly instead of plucking a few leaves from the bottom. Cutting above a pair of leaves or a stem node encourages side shoots, which helps the plant stay full rather than growing as a few tall, bare stems. The RHS recommends harvesting young shoot tips for strong flavor and to keep mint compact. (RHS mint-growing guide)
If the plant has become tall, sparse, or woody at the base, cut it back more decisively during active growth. Remove roughly the upper third at a time for routine shaping; a healthy, established mint can tolerate a harder cut, but leave green growth and give it time to recover. Clean scissors make a neat cut and reduce damage. Avoid shearing a stressed, dry plant in the hottest part of the day; correct the water or heat problem first.
Cut stems above a node
For a small harvest, follow each stem down to a pair of leaves and cut just above them. Take a few stem tips rather than stripping every leaf from one branch. Young leaves are tender, and whole tips are easier to rinse, dry, store, or drop into a drink than a pile of torn leaves. Harvest in the cool part of the day after surface moisture has dried, then refrigerate stems in a glass of water or wrap them loosely in a damp towel.
For a larger harvest, cut several stems while leaving enough foliage to support regrowth. If you plan to dry the leaves, pick more than you need for one meal, rinse off debris, and dry them in a well-ventilated, low-humidity place. UF/IFAS notes that mint’s tender leaves can darken or mold if dried in humid conditions; freezing chopped leaves in small portions is often simpler when your kitchen is humid. (UF/IFAS mint guide)
Decide Whether to Let It Flower
Chocolate mint can produce small summer flower spikes. Leaving some flowers gives pollinators a source of nectar and makes the plant more ornamental; flowering is not a sign that the plant is failing. If your priority is a steady supply of young leaves, pinch flower stems when buds appear or cut the plant back after flowering to encourage fresh shoots. The RHS recommends cutting mint back after flowering, and Utah State Extension describes harvesting or cutting back before bloom for leaf production. (RHS mint-growing guide; Utah State University Extension: Mint in the Garden)
You do not need to remove every flower on every plant. A useful compromise is to keep one or two stems flowering and harvest the rest. If a plant has already bloomed, cut back the tired stems and keep the root zone evenly moist while new shoots form. Avoid fertilizing heavily to force another flush; regular cutting and suitable light are usually enough.
Propagate the Cultivar You Like
The reliable way to preserve chocolate mint’s named traits is to propagate a piece of a known plant. Mint readily hybridizes, and seed-grown plants are not a dependable copy of a chosen cultivar. Utah State Extension recommends established plants, cuttings, or division when a specific variety matters; RHS explains that vegetative propagation produces plants like the parent. (Utah State University Extension: Mint in the Garden; RHS mint-growing guide)
Root a stem cutting
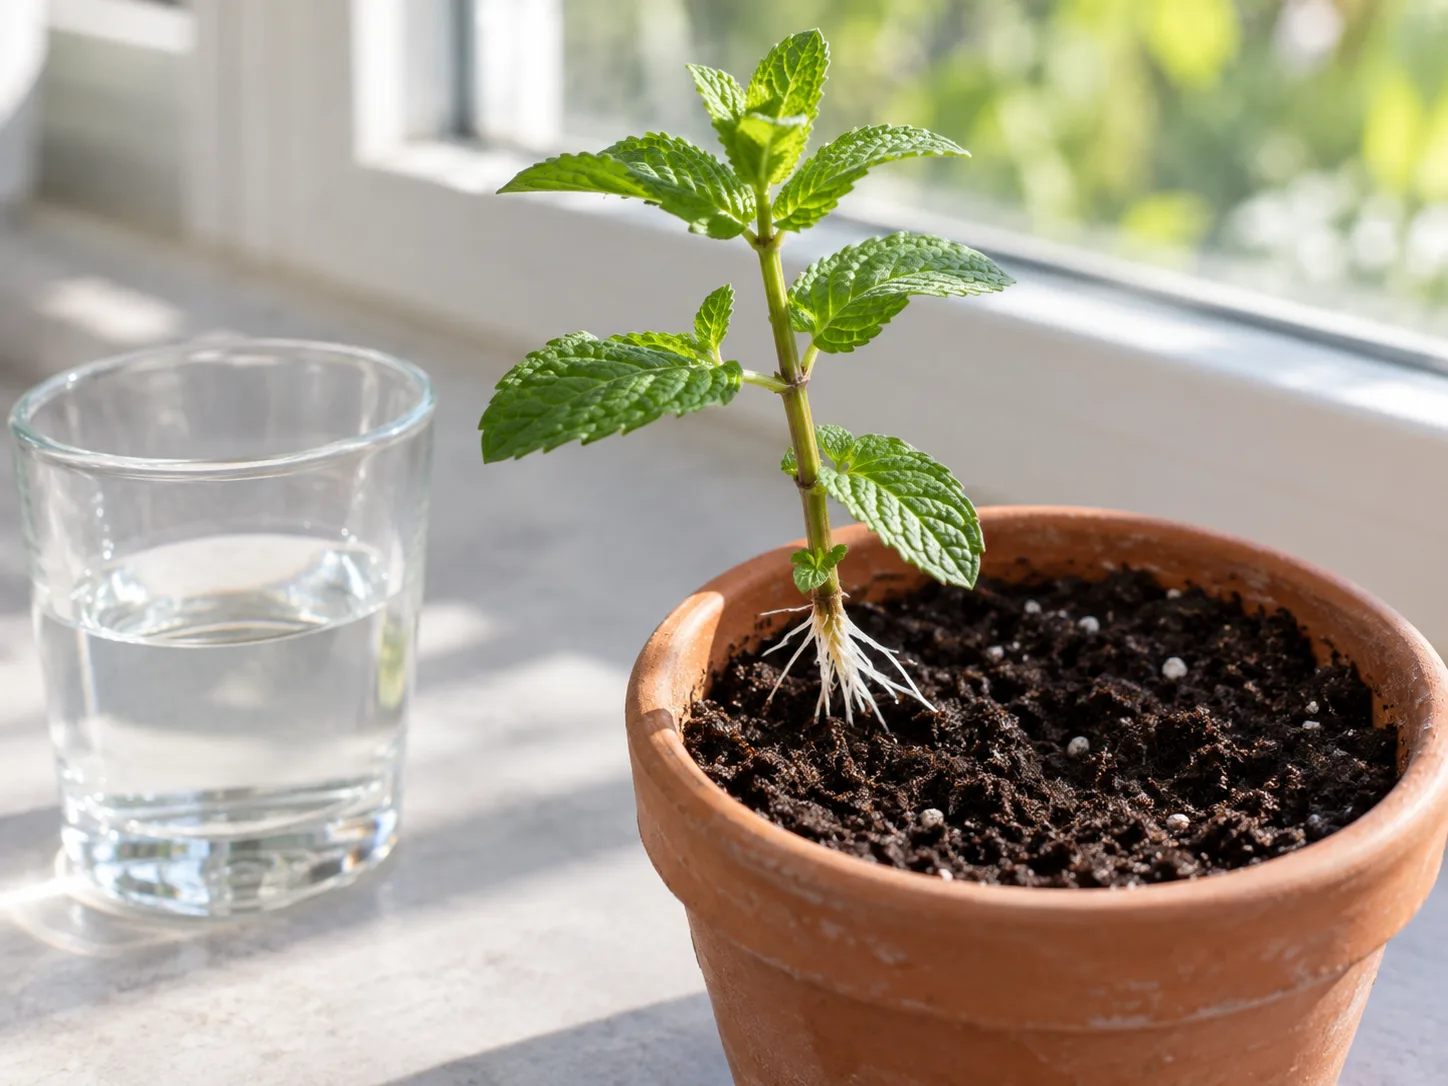
Choose a healthy, nonflowering stem and cut a 3- to 5-inch section just below a node. Remove leaves from the lower portion so none sit underwater or under the potting mix. You can place the cutting in a clean glass of water, keeping the lower node submerged and refreshing the water every few days, or insert the node directly into damp potting mix. Rooting directly in mix avoids a later transition from water roots to soil.
Set the cutting in bright, indirect light and keep the mix damp, not soaked. Once you see new leaves and gentle resistance when you tug very lightly, move it into its own draining pot or into the prepared garden barrier. Do not plant the new cutting in a free bed just because it is small: its growth habit is already built into the cutting. Epic Gardening’s peppermint guide also recommends taking a stem cutting at a node and notes that water-rooted cuttings need a gradual move into potting mix. (Epic Gardening: How to Grow Peppermint)
Divide an established clump
Division is useful when a pot has filled with rhizomes or the center looks tired. In spring or early fall, slide the plant out, loosen the root ball, and separate a section with healthy roots and several growing points. Replant that division at the same depth, water it in, and discard dead or diseased material rather than transferring it into the refreshed pot.
Do not save every division. A single healthy section can fill a container again; give extra pieces to another gardener only with a clear note that mint needs containment. The RHS recommends dividing established mint clumps in spring or autumn and refreshing container growth every few years. If your pot still has vigorous new shoots and drains well, you can wait rather than disturb it on a calendar. (RHS mint-growing guide)
Manage Winter and Indoor Growth
In a garden bed, established mint usually dies back above ground in cold weather and resumes from the roots when growth conditions return. Leave the bed marked so you do not mistake the dormant plant for a gap and dig through its rhizomes. A light layer of mulch can reduce freeze-thaw stress in exposed sites, but keep the crown from sitting under a wet, compacted pile.
Container roots experience colder temperatures than roots buffered by garden soil. In a region with hard freezes, move the pot against a sheltered wall, sink it into the ground for winter, or place it in a cold but protected space. Keep the mix just barely moist while the plant is dormant; do not keep it as wet as it is during summer growth. Exact protection depends on the cultivar, pot size, wind, and local winter minimums, so use local extension guidance for your area rather than assuming a zone label guarantees survival in a small exposed pot.
A potted plant can be brought indoors for winter leaves, but light is the limiting factor. Place it at the brightest window you have or use a grow light if stems begin stretching. Check for aphids or mites before bringing it inside, trim damaged growth, and reduce watering as growth slows. Mint may survive in a dim room but will not stay compact or productive there.
Troubleshoot Weak or Damaged Plants
Start with the root zone and recent weather before reaching for fertilizer or a spray. Mint can wilt because a small pot dried out, but the same droop can occur when roots are short of oxygen in saturated mix. Check moisture below the surface, confirm that the drainage holes are open, and look for new growth after correcting the actual cause. The University of Florida and NC State both describe mint as vigorous but still dependent on moisture and suitable drainage; a plant that struggles usually needs a care adjustment rather than a stronger feeding routine. (UF/IFAS mint guide; NC State Extension: Peppermint)
Leggy stems, wilt, and yellow leaves
Leggy stems and small leaves point first to low light, crowding, or a plant that has not been pinched back. Move it into brighter light gradually, remove the longest stems, and divide the root ball if the pot is packed tight. Avoid solving leggy growth with repeated high-nitrogen feeding; that can add soft stems without fixing the light problem.
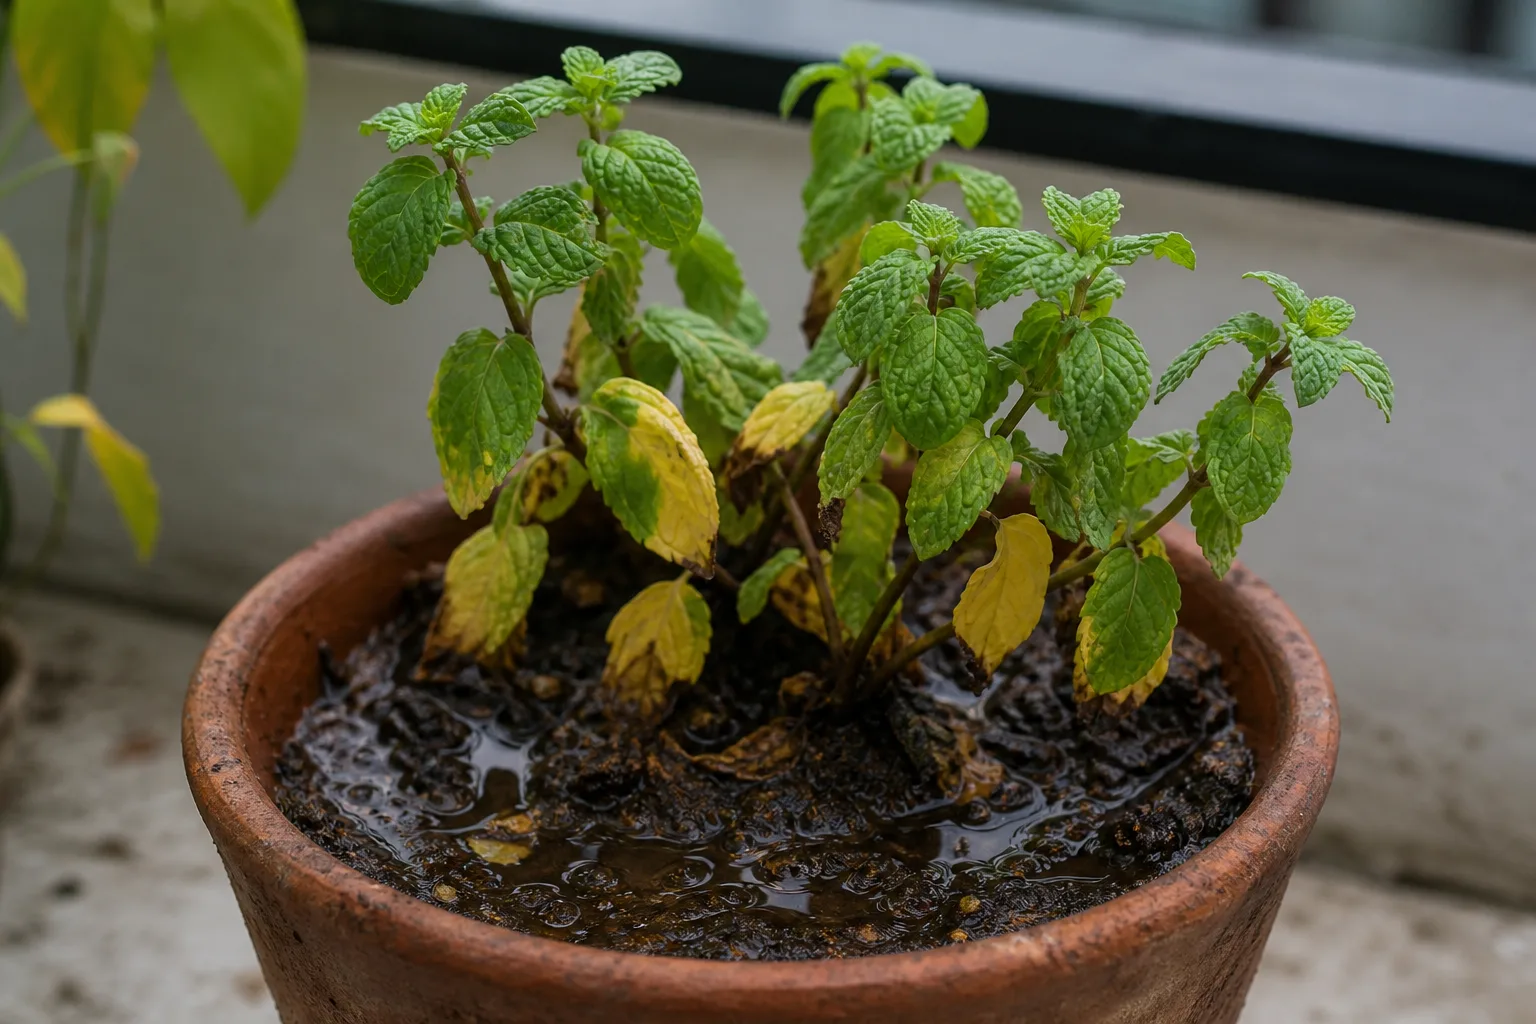
Wilt with dry mix calls for a thorough watering and a check that water is not running down a gap between soil and pot. Yellow, drooping leaves in wet mix call for better drainage, less frequent watering, and a root inspection if the plant continues declining. Black, soft roots indicate rot; remove damaged roots and move the healthy portion into fresh, free-draining mix. A pot without drainage holes cannot be corrected by careful timing alone.
Rust and chewing or sap-feeding pests
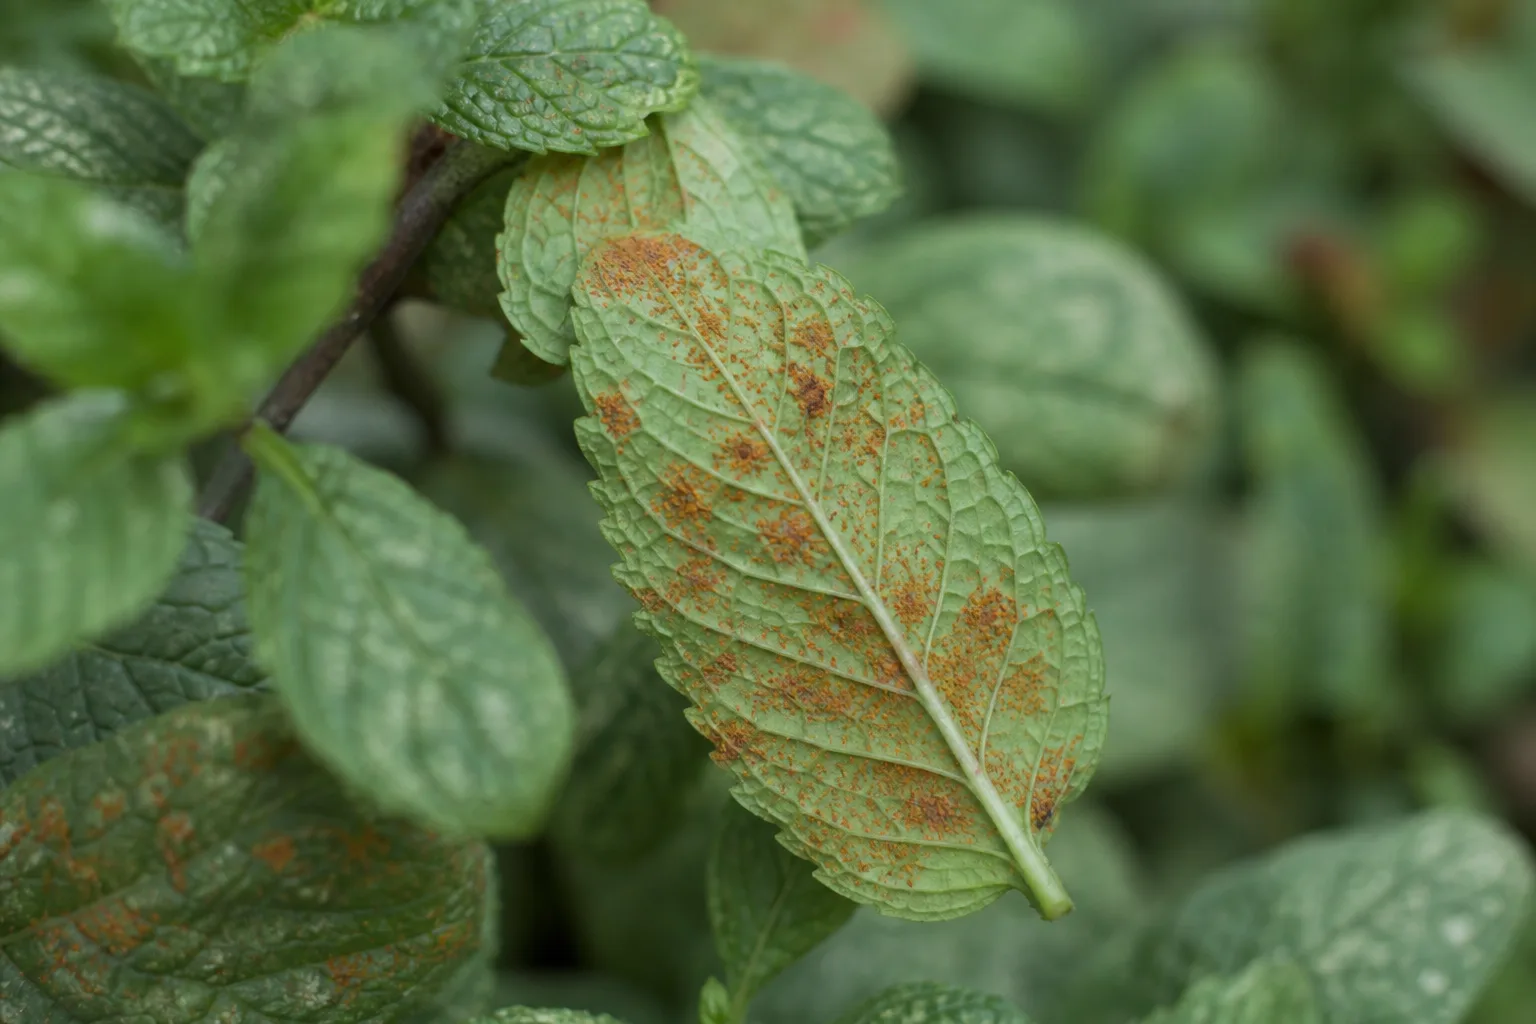
Mint rust appears as orange or rusty-brown spots, often on leaf undersides. Remove affected leaves and stems, thin crowded growth, and water at soil level so foliage can dry. Do not compost badly infected mint with the rest of your garden waste unless your local composting system reliably reaches disease-killing temperatures. Utah State Extension describes the rust spots and recommends avoiding wet leaves overnight; the RHS also lists mint rust as a common mint problem. (Utah State University Extension: Mint in the Garden; RHS mint-growing guide)
Aphids, mites, caterpillars, and other insects may leave curled, stippled, or chewed leaves. Inspect the undersides and growing tips, rinse off small pest clusters with water, and remove heavily damaged stems. If the problem persists, identify the insect and ask your local Extension office which control is appropriate for mint you plan to eat rather than reaching for a general ornamental-plant spray.
Conclusion
Grow chocolate mint as a contained, moisture-loving herb, not as a carefree ground cover. Start with a correctly labeled plant, give it sun with afternoon protection where summers run hot, use draining mix, and check the soil before watering. A pot is the most reliable choice for most gardens; if you plant in a bed, keep the root barrier visible and inspect for runners.
Harvest young tips often, keep a few flowers if you want to support pollinators, and propagate the plant by cuttings or division when you want to preserve its character. The leaves will smell minty with a possible chocolate note, but taste each harvest before choosing a recipe. Good containment and a realistic flavor expectation are what make this unusual mint easy to enjoy year after year.