30 DIY Wall Planter Ideas for Indoor and Outdoor Spaces
Make a wall planter that suits your room or yard. Compare 30 ideas, then plan for light, wet weight, drainage, safe mounting, and easy watering and upkeep.

A wall planter is most successful when it solves two jobs at once: it gives a plant the light and root space it needs, and it keeps water and weight under control. The best project for a sunny fence is not necessarily right for a painted bedroom wall, so start with the site and how you plan to water before picking a style.
The ideas below range from no-build pot displays to outdoor herb walls and sculptural one-pot holders. Each can be adapted, but live plants need a container or removable inner pot that drains, a secure support, and a place where you can reach them for care. If you want a larger system with climbing supports and other space-saving designs, see this guide to DIY vertical garden ideas. For climbing crops rather than potted displays, Growing in the Garden’s vertical-support ideas show how ladders and other found structures can add height; choose supports that suit a vine’s mature weight and wind exposure.
Choose the wall planter before you build
Check the wall, mounting point, and loaded weight
A planter’s empty weight tells only part of the story. Add the container, wet growing mix, mature plant, and any water reservoir to estimate the load the finished assembly will place on its brackets. A narrow pot of damp mix can become surprisingly heavy; several pots on one rail concentrate that weight on a few fasteners.
For drywall, locate structural framing and fasten a substantial rail or backboard into the studs when the design is heavy or projects outward. A small decorative planter may be within the rating of a correctly installed hollow-wall anchor, but use the anchor maker’s stated rating for the actual wall type and installation, and do not assume a rating for one anchor equals a safe rating for a whole row. For brick, concrete, or block, choose hardware rated for that substrate. Check for wiring and plumbing before drilling. If you rent, use a freestanding ladder, shelf, or a planter designed to hang over a balcony rail with the property owner’s permission.
Outdoor walls need a different check. Wind pulls on foliage and on the planter like a small sail, while repeated wetting can stain siding or accelerate rot. Keep boxes off the wall with a small air gap, use exterior-suitable materials and corrosion-resistant hardware, and avoid attaching a large planter to thin cladding alone. A fence can be easier to use, but mount to sound rails or posts, not a loose picket.
Plan drainage, light, and watering access
Live plants should not sit in a sealed decorative shell full of soggy mix. Use a growing pot with drainage holes, then choose a design that lets extra water escape without running down a wall or onto a floor. Indoors, the simplest solution is often a removable nursery pot placed inside a wall-mounted cachepot: take it down, water it in a sink, let it drain fully, and return it. If the container must remain attached, add a fitted liner or removable drip tray that you can empty; do not let the pot sit in standing runoff.
The Royal Horticultural Society notes that container plants need drainage and regular attention because the small volume of compost dries faster than garden soil; shallow containers dry especially quickly. That difference matters on a wall, where small pockets may heat up and dry from more than one side. A container watering guide from RHS is a useful reference when you’re choosing pot size and planning upkeep.
Observe the site at the time of day the plants will receive light. A bright room can still be low-light several feet from a window, and a south- or west-facing outdoor wall may bake in afternoon sun. Shelves and pocket rows can shade one another, so put sun-hungry herbs near the top or edges and reserve lower, cooler pockets for plants that tolerate less direct sun. Penn State Extension’s container gardening guidance recommends matching plants to the container’s sun or shade exposure and leaving room for mature size; use the same logic when arranging multiple pots vertically.
Choose where water will go before you hang the planter. A bathroom wall might tolerate a removable pot that drains into a sink, while a living-room wall needs a dry watering routine. Outside, direct drip onto paving, timber, neighbors’ balconies, or an entryway can be a nuisance even if it does not damage the wall. A removable inner pot is a useful design feature, not a compromise.
30 DIY wall planter ideas
The quickest way to narrow these ideas is by how much construction and watering they require. Repurposed pieces are good for a few small pots, while a frame or trough supports a larger display. A vertical wall of live plants takes more planning because the top and bottom can receive different light and water.
Repurposed containers for small displays
1. Hose-clamp pot board. Attach metal pipe clamps to a sturdy finished board, size each clamp to a removable nursery pot, and fasten the board into framing or an outdoor post. This makes it easy to lift individual plants down for watering; choose clamps with a smooth edge and tighten them enough to support the pot without crushing it.
2. Galvanized bucket rail. Hang small buckets from hooks screwed into a backboard for a farmhouse look that works on a porch or in a kitchen. Keep plants in plastic pots inside the buckets so you can remove them to water, and use buckets with drainage only if runoff can be directed safely outside.
3. Vintage mailbox planter. A retired wall mailbox can become a shallow display for seasonal annuals or trailing foliage. Line it with a removable growing pot rather than filling a metal box with soil; check for sharp edges, rust flakes, and an opening wide enough to reach the roots.
4. Painted metal pockets. Refinish lightweight metal wall cups in one color or a row of contrasting shades, then fit each with a small pot. Metal heats quickly in direct sun, so place it in bright shade outdoors or use it indoors where temperature is stable.
5. Wooden drawer box. A shallow drawer makes a ready-made frame for several small pots, especially when its handles and dovetail joints have decorative character. Secure it through the back into a stud or masonry-rated fixing, add a liner that can be removed, and avoid filling a delicate antique drawer with wet compost.
6. Tin-can herb strip. Clean food tins can hold small starter pots along a wood strip for an inexpensive kitchen-window display. Keep the cans as cachepots or add drainage holes and a catch tray; smooth or cover cut edges, and use new, known materials for edible herbs instead of containers with an unknown coating.
7. Hanging basket bracket board. Mount two or three short basket brackets to a backboard to create a layered display without building individual pot cradles. Check the bracket projection and fasteners against the fully watered basket, and leave enough space that trailing leaves do not block a walkway.
8. Repurposed towel-bar pot rack. Fix a sturdy metal towel bar to a board and hang handled pots from S-hooks. Use pots with handles made for the wet load and lock each hook so it cannot jump off when a plant is moved; this arrangement suits a patio better than a high-traffic indoor wall.
Frames, shelves, and modular pot holders
9. Picture ledge with nursery pots. Install a deep picture ledge and line up nursery pots in matching cachepots. This is one of the easiest indoor options because each plant lifts off for watering, but the shelf must be anchored for the full combined weight and kept away from hot radiators.
10. Triangle pot frame. Build or buy a simple triangular wooden frame with a lower crosspiece that supports a small pot. A removable pot keeps the frame light and makes cleaning easier; use a stable, broad base or a wall fixing so the geometry does not tip forward.
11. Grid of individual pot rings. Screw metal rings or short pipe straps onto a measured grid on a backboard, leaving room for foliage to grow between pots. The modular layout lets you rearrange colors and species, and one plant can be lifted without disturbing the others.
12. Three-tier floating shelves. Stagger narrow shelves vertically to make a living gallery rather than a single heavy planter. The open arrangement improves access to each pot and lets you group plants by light, but use a level during installation and keep the heaviest containers on the lowest shelf.
13. Ladder-style wall rack. Build a shallow ladder from two side rails and several crosspieces, then rest small pots on the rungs or attach them with clips. A rack screwed to the wall takes less floor space than a leaning ladder; renters can use a freestanding version and secure it against tipping.
14. Modular geometric concrete cups. Small cast-concrete pockets can be arranged as triangles, hexagons, or a loose cluster. Keep each unit modest in size because concrete is heavy even before it is filled, and use a removable plastic nursery pot rather than treating a porous decorative cup as a full-size planter.
15. Shadow-box succulent frame. Build a shallow wood frame with a mesh front and a planting medium suited to compact succulents. Mount it flat and let new plants establish before hanging it upright; this project is not a good choice for thirsty plants or a wall that receives water runoff.
16. Macramé wall cradle. Knot a compact plant sling and hang it from a hook fixed to a stud or suitable masonry anchor. A cradle is useful when floor space is scarce, but keep the pot near eye level so you can inspect the hanger and remove the pot for watering rather than pouring water overhead.
Outdoor walls, fences, and edible gardens
17. Fabric pocket panel. Hang a purpose-made felt or canvas pocket system over a rigid support with an air gap behind it. It can fit many small herbs or annuals, but pockets dry quickly and are difficult to water evenly; choose drought-tolerant, shallow-rooted plants and inspect each pocket rather than assuming the top row’s water reaches the bottom.
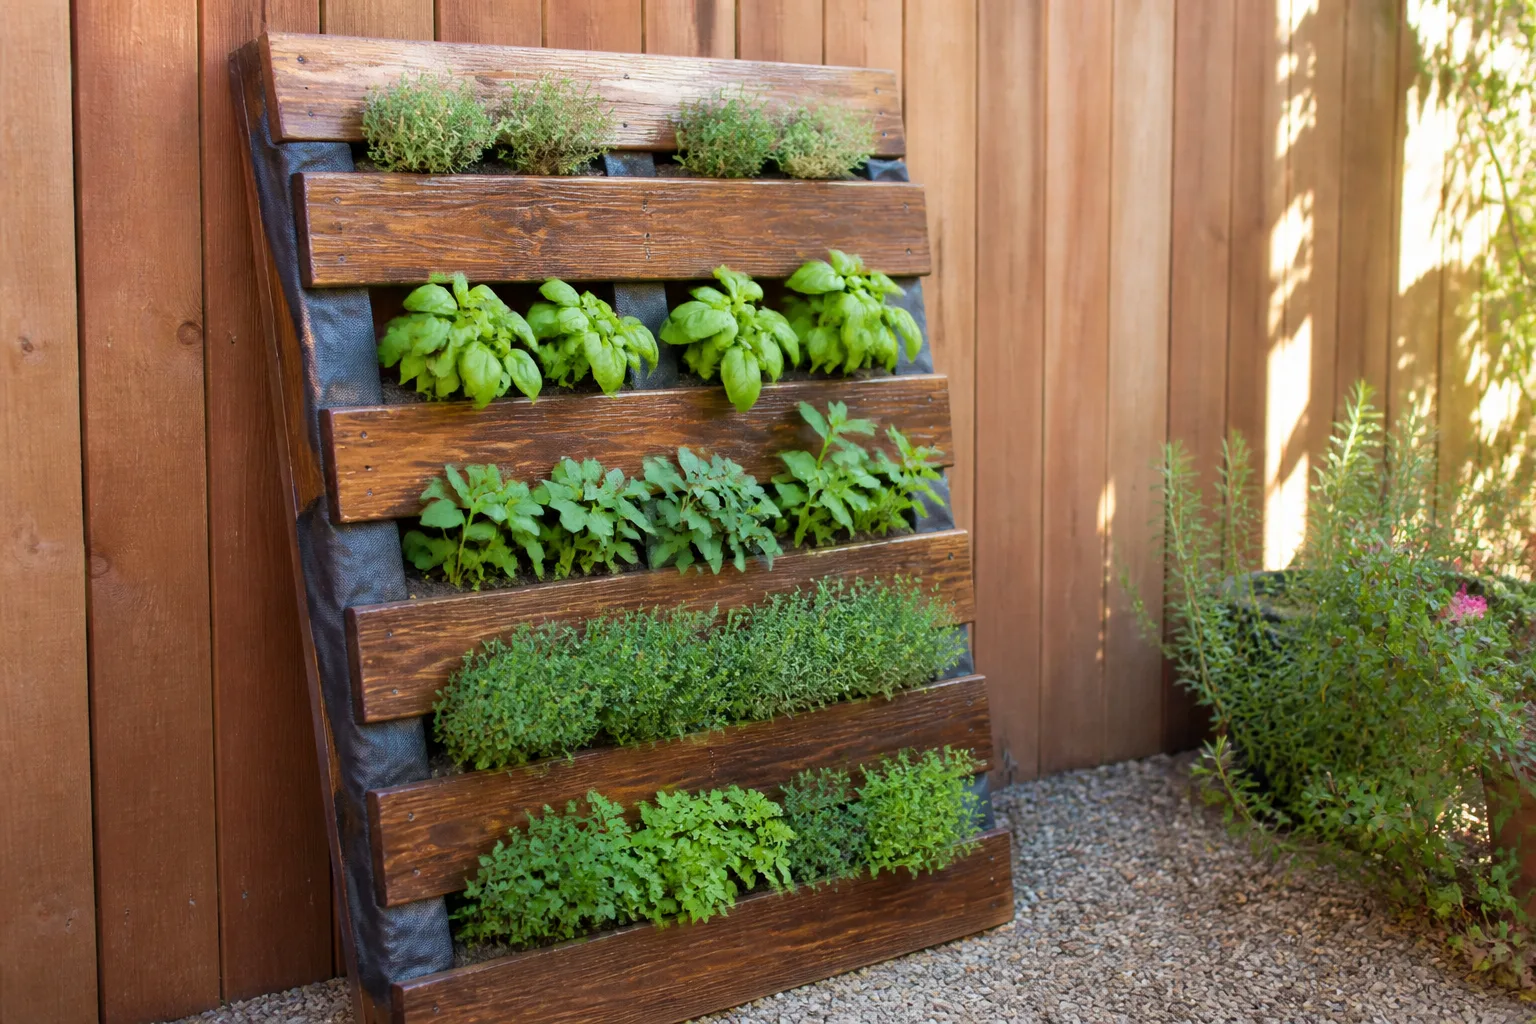
18. Pallet herb wall. A pallet can be adapted into a leaning or wall-mounted rack with fabric-lined planting slots. Confirm it is sound and clean, secure it against tipping, and use known untreated or food-garden-suitable materials for edible crops; if the pallet’s history is uncertain, use it for ornamentals or build the same layout from new lumber.
19. Rain-gutter herb troughs. Fasten short lengths of gutter to a frame with end caps and drainage holes, then plant compact herbs or salad greens. The trough is shallow, so it suits small roots, not tomatoes or large perennials; angle it slightly toward a safe outlet and make sure the water cannot run onto siding.
20. Downspout column garden. Cut staggered planting openings into a wide vertical pipe or downspout and set it in a stable base. This space-saving design needs an open top, drainage at the bottom, and a way to distribute water to lower pockets; test the water path before planting so upper levels do not stay soaked while the bottom dries.
21. Fence-mounted rail boxes. Hang a series of lightweight window boxes along sturdy fence rails, rather than fastening each box to a thin board. Use brackets rated for the boxes’ watered load, leave a gap for airflow, and plant trailing flowers over the front while keeping upright herbs accessible from above.
22. Balcony railing herb boxes. Use purpose-built railing brackets that fit the actual railing width and prevent the box from rocking. Confirm building rules and wind exposure, secure the box against shifting, and choose compact herbs; a box hanging over a public path or a neighbor’s space needs extra consideration.
23. Trellis with pot clips. Attach a trellis panel to posts or a frame, then add removable pot clips at selected intersections. The trellis can support climbing flowers while the clips carry light pots, but do not assume a decorative trellis can bear the weight of a full trough or large container.
24. Vertical strawberry pockets. Arrange small grow bags or troughs in a column on a freestanding frame or a substantial fence support. Strawberries are easy to reach at shoulder height, but every pocket needs its own root space and water; check the bottom row first because gravity does not distribute moisture evenly through a vertical stack.

Sculptural accents and living-art projects
25. Brass-plate cup display. Attach small metal pots to a decorative plate or slim backboard for a bright accent wall. Keep the pots removable and light, use fasteners that match both the metal and wall, and treat the plate as a decorative support rather than a watertight growing container.
26. Mosaic tile planter plaque. Create a mosaic panel around a secure pocket or pot holder, using outdoor-rated adhesive and grout if the display will face weather. The mosaic adds color, but the structure behind it must carry the planter’s weight; do not rely on decorative tile or grout as the mounting point.
27. House-number planter. Add a narrow box beneath a legible house-number plaque or build the numbers into the edge of a planter. Keep the number visible from the street, leave room for drainage, and choose compact plants that will not cover the address as they fill out.
28. Monogram flower frame. Build a letter-shaped frame with several small removable pots tucked into its wider sections. Letters with narrow strokes offer little root room, so use the frame as a seasonal display of small plants or cut flowers instead of planting large perennials directly into it.
29. Sconce-and-jar propagation wall. Repurpose a wall sconce as a holder for a clear jar of cuttings. Use it for propagation rather than permanent soil planting, clean the vessel regularly, and keep it where you can change the water and monitor roots without moving a heavy fixture.
30. Test-tube cutting gallery. Screw small test-tube holders onto a narrow wood strip for a tidy propagation station near a bright window. Individual tubes make it easy to compare root growth, but they are not planters for mature plants; replace the water and pot rooted cuttings into a container with drainage.
Build and mount a wall planter that lasts
Assemble and secure the support
First, mark the finished planter’s outer dimensions on paper or painter’s tape. Check that the widest leaves will not brush a door, curtain, heater, or walkway, and confirm you can reach every pot without standing on furniture. A full-size mock-up helps catch a layout problem before you drill.
Build the support on a flat surface. Sand splinters, seal outdoor wood with a finish intended for exterior exposure, and let finishes cure according to their labels before adding plants. Fit trays, liners, pot rings, and shelves before mounting; it is easier to test them on a bench than above a sofa or balcony rail.
Install the backboard or frame into a support appropriate to the wall. Keep the fastener type, length, spacing, and installation method within its manufacturer’s directions. If the wall material is unknown, the load is substantial, or the planter sits above a place where a fall could hurt someone, choose a freestanding support or consult a qualified installer rather than improvising.
Before planting, test the assembly with a modest load and check that it does not flex, pull away, or rock. Add empty pots first, then fill them in place or lift them out to plant on a bench. For a heavy wall system, a second person can steady the frame during installation, but never rely on a helper to hold a planter while you attach it.
Add pots, liners, and plants
Use potting mix formulated for containers, not dense garden soil that can compact in a small pot. Put each plant in a pot sized for its rootball and mature growth, rather than packing a narrow wall display with oversized specimens. Penn State Extension’s container guidance emphasizes choosing plants for the available sun and allowing room for growth; that keeps a wall arrangement from becoming crowded a few weeks after planting.
Think in layers. Put upright plants toward the back or center of a deeper box, compact fillers in the middle, and trailers at the front or edges. In separate pots, group plants with similar light and water needs so a thirsty basil does not share a care schedule with a drought-tolerant succulent. For a practical herb shortlist, Savvy Gardening’s container-herb advice discusses pot drainage and the different moisture preferences of herbs.
Keep a wall planter healthy and tidy
Water to the container, not the wall
Small pots can dry out faster than floor planters because they hold less mix and may receive more sun and moving air. Check the mix itself rather than watering on a fixed calendar: feel the top inch or two, lift the pot if it is removable, or use a simple moisture check that fits the plant. Penn State Extension gives a finger test as a practical way to judge whether container mix has dried; the exact interval still depends on plant, pot size, season, and exposure.
Water slowly enough that the whole root ball gets moist, then allow excess to drain. If water immediately runs out while the center remains dry, the mix may have shrunk from the pot’s edges or become difficult to rewet; take the pot down and soak it from the bottom briefly, then let it drain completely. If the soil stays wet for days, clear blocked holes, reduce watering, and check that a liner or saucer is not holding water against the roots.
Indoors, remove pots for watering whenever possible. If that is impractical, add a removable catch tray and empty it promptly. Outdoors, direct runoff away from siding, wood trim, electrical fixtures, and the floor below. The RHS guidance on container growing notes that plants in pots need regular watering and drainage to avoid waterlogging; a wall display makes those basics more important because runoff can affect both the plant and the building.
Inspect fasteners, plants, and finishes
Give the frame a quick check after storms, strong wind, or a hard freeze. Look for loose screws, rust, a bowed shelf, torn pocket fabric, clogged holes, and dark damp marks behind the planter. Catching a small shift early is easier than repairing a damaged wall or replacing a dropped container.
Rotate pots if one side grows toward the light, remove dead leaves that trap moisture, and trim trailing stems before they hide windows or numbers. Replace seasonal plants when they finish, and lift tender pots before cold weather if their roots would be exposed. Containers offer flexibility, but they also need more frequent watering and attention than plants rooted in the ground, especially in hot weather.
Common mistakes to avoid
The most tempting shortcut is to hang the empty planter first and discover its true weight only after filling it. Work out the load while the container is still on the ground, use fasteners selected for the actual wall, and test an assembled support before adding fragile pots. Avoid using an unknown reclaimed object as the sole structural bracket.
Another mistake is treating a liner as drainage. A liner protects wood from direct contact with damp mix, but if it seals the bottom, water still collects. Keep drainage holes open, use removable pots indoors, and plan where runoff will land before the first watering. Gravel at the base does not replace clear drainage holes or a suitable growing mix.
Finally, do not choose plants from appearance alone. A tiny pocket on a hot exterior wall is a poor home for a moisture-loving plant, while a deep shaded corner will not keep sun-loving herbs productive. Match plant, pot depth, light, and watering access as a group; a simpler design that fits those conditions will look better for longer than a crowded feature wall that is hard to maintain.
Conclusion
A good DIY wall planter starts with a workable site: a sound mounting point, a way to handle the finished weight, drainage that protects the wall, and enough light for the plants you want to grow. From there, the design can be as simple as removable pots on a picture ledge or as ambitious as a tiered herb wall.
Pick the idea that makes watering and inspection easy, not just the one that looks striking when newly planted. Build the support for its real load, group plants with similar needs, and leave room to take pots down. Those choices turn a blank wall into a useful display you can keep healthy season after season.