Neon Pothos Repotting: When, How, and Mistakes to Avoid
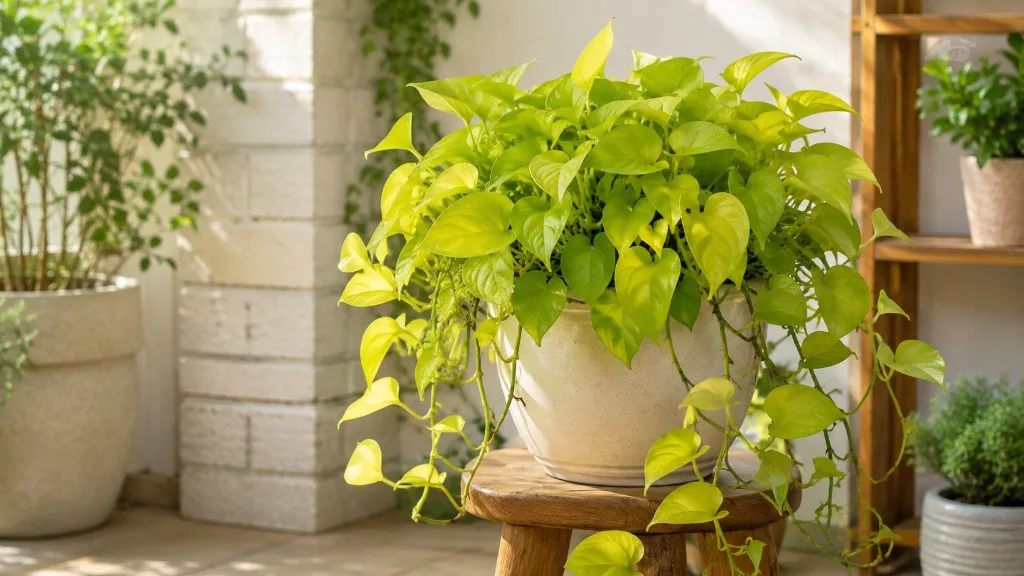
Neon Pothos Repotting: When, How, and Mistakes to Avoid
Neon Pothos Repotting: When, How, and Mistakes to Avoid
Neon Pothos (Epipremnum aureum ‘Neon’) is the chartreuse showpiece of the pothos world - a cultivar selected for its vivid lime-green leaves that glow in Neon Pothos light guide. Like all pothos, it is forgiving enough for beginners and fast enough to outgrow a nursery pot while you are still admiring the first long trail. In warm, bright indoor conditions it can reach up to 3 m of trailing vine, which means its roots often hit the walls of a container long before the foliage looks crowded from across the room. Repotting is not a cosmetic upgrade for neon pothos. It is the maintenance step that restores drainage, replaces depleted mix, and gives the root system room to support the electric foliage you bought the plant for in the first place.
Done at the right moment - ideally in spring, with a one-size-up pot and fresh, airy mix - a neon pothos repot is usually uneventful: an hour of careful work, a week of slight adjustment, and then new chartreuse leaves along the vines. Done at the wrong time, in an oversized container, or with a tangled hanging basket dropped onto the floor, the same operation can leave you staring at limp stems and worried the plant will lose its signature color. This guide walks through when to repot, how to handle root-bound plants, what to do differently in hanging baskets, and the mistakes that turn a routine upgrade into a recovery project.
Why Repotting Matters for Neon Pothos
Repotting solves three problems that show up as leaf symptoms if you ignore them: circling roots that cannot absorb water or oxygen efficiently, potting mix that has lost its airy structure, and salt buildup from tap water and fertilizer that burns fine root hairs. Neon pothos belongs to Araceae, the arum family, and like other aroids it hates stagnant wet soil - the exact environment an oversized pot creates. Repotting rebuilds that balance before decline becomes obvious.
What fresh soil and extra root room actually fix
Fresh mix restores structure: the air pockets, the organic matter, and the drainage speed that compacted old soil lost months ago. Extra root room lets new white root tips spread outward instead of spiraling, which directly improves the plant’s ability to take up water and nutrients after each watering cycle. You will notice the difference in how the pot behaves. A root-bound neon pothos often dries out in hours and then wilts dramatically between waterings, not because you are underwatering on purpose but because the root mat is so dense that water runs through channels without wetting the whole mass evenly.
A repot also gives you the only easy moment to inspect roots for root rot on Neon Pothos - brown, mushy, sour-smelling tissue that needs trimming before it spreads. Catching rot during repotting is far simpler than trying to diagnose it from yellow leaves alone, especially on a plant that naturally drops older foliage on long trailing vines. If roots are mostly white and firm, you are simply upgrading space and soil. If they are not, repotting becomes a rescue operation, and the steps below still apply, with more aggressive trimming and a lighter watering hand afterward.
How fast-growing neon pothos outgrows its pot
Most indoor neon pothos reaches roughly 2–3 m of trailing vine at maturity, though individual stems can grow longer with support or regular pruning. Growth is fast in warm, bright conditions and slows sharply in cool, dim winter months. That speed difference is why repotting advice for a snake plant does not transfer cleanly to neon pothos. A vigorous specimen in a 10 cm nursery pot can become root-bound within a single growing season, while a slow winter may mean the same plant sits comfortably for months without needing intervention.
As a working baseline, plan on a full repot every 1–2 years, or sooner if multiple root-bound signals appear at once. Neon pothos tolerates being slightly root-bound better than many houseplants, but chronic binding eventually stalls growth regardless of how tough it looks. The calendar is a reminder to check, not a command to repot regardless of what the roots look like.
Signs Your Neon Pothos Needs Repotting
The clearest sign is visual: roots emerging from drainage holes or circling the surface when you slip the plant partway out of the pot. Less obvious but equally reliable signals include water that runs straight through the pot without absorbing, a plant that wilts hours after a thorough watering, and growth that stalls even though light and feeding have not changed. When two or more of these appear together during the active growing season, repotting is usually the right move.
Do not repot simply because a leaf turned yellow. Yellowing can mean overwatering, cold drafts, low light, or natural aging of lower leaves on a long trailing vine. Repotting a plant that is already stressed for unrelated reasons adds another variable and often makes diagnosis harder. Confirm that the root zone is the bottleneck before you commit to the work. If the plant is dropping leaves from the base while the tips keep producing bright new chartreuse foliage, that may be normal vine aging rather than a root crisis.
Root-bound and drainage signals
Lift the pot and look at the bottom first. Roots peeking through holes mean the plant has used the volume it was given. Slide the plant out gently - if the root ball holds a perfect pot-shaped mold with little visible mix on the sides, you are looking at a classic root-bound situation. Circling roots at the bottom are not automatically an emergency, but they tell you the plant has been asking for space for a while. On neon pothos, the root mass can look surprisingly dense relative to the thin stems above ground, which is why checking the bottom matters more than judging by vine length alone.
Fast drainage sounds like a good thing until you realize the water is bypassing the root mass because the center is hydrophobic or the channels are too open. If you water thoroughly and the pot feels light again within an hour, the mix may be spent rather than the plant thirsty. Slow drainage combined with sour smell or mushy stems points to rot that requires immediate attention. A white crust on the soil surface often signals salt buildup - another reason to refresh mix at repot time rather than keep adding fertilizer to exhausted soil.
Growth and leaf symptoms tied to root stress
Stunted new growth is a late-stage root-bound signal. Neon pothos normally pushes fresh leaves regularly when light and water are adequate, often producing a new leaf every one to two weeks on active vines in bright indirect light. When the plant stops producing new nodes, or new leaves arrive smaller and more green than the older chartreuse ones, depleted or compacted soil is a prime suspect. Top-heavy wobble - where the foliage mass outweighs the root anchor - is another clue, especially if the plant tips easily despite being well watered. This is common in hanging baskets where the vine mass grows far larger than the relatively small pot at the top.
Pale or yellow lower leaves can indicate nutrient exhaustion in old mix, particularly if you have fertilized faithfully but the soil no longer holds nutrients effectively. Check moisture first, as overwatering produces similar colouring on pothos. If the top half of the mix dries on a normal schedule and yellowing persists on multiple vines, inspect roots. Repotting with fresh mix often resolves the colour issue within one to two new leaf cycles, provided light levels are appropriate. Brown, crispy leaf tips can also reflect salt buildup in old mix; flushing helps short term, but a full repot with fresh soil is the durable fix. Severe stress can push neon pothos toward greener reversion in new leaves - not always permanent, but a sign the root zone needs attention.
Best Time of Year to Repot Neon Pothos
Timing matters because neon pothos recovers fastest when it is already geared for growth. Spring through early summer is the safest window for most indoor growers, when Penn State Extension recommends potting pothos up annually into a slightly larger container. Rising temperatures and lengthening days trigger active root development, so the plant can colonize fresh mix quickly before heat stress or winter slowdown arrives. Repot on a mild day, avoid extreme heat or cold snaps, and provide ordinary indoor warmth with bright indirect light - not a greenhouse climate.
Spring and early summer windows
During active growth, neon pothos can start showing new turgid leaves within two to four weeks after a well-executed repot. Roots begin exploring fresh mix almost immediately if temperatures are warm and the soil stays evenly moist but not soggy. This is also the best time to combine repotting with pruning if you want a fuller plant, because the vine has the energy to branch from nodes near the soil after the move. If you are refreshing a hanging basket, spring gives you the longest runway before shorter winter days slow recovery.
If you missed spring, early summer is still workable. Avoid repotting during the hottest week of the year if your home lacks air conditioning and the plant sits in a sun-adjacent window. Heat plus transplant stress can produce more wilting than the same repot in moderate conditions. Shade the plant slightly for the first week after summer repotting, then return it to bright indirect light. Direct sun on a freshly repotted neon pothos can bleach the chartreuse leaves and compound shock.
When winter repotting is still justified
Winter repotting is a backup plan, not a default. Growth slows, days are short, and a disturbed root system sits in wet mix longer because the plant is not pulling water actively. That combination increases rot risk for any aroid, including neon pothos. Skip winter repotting if the plant is merely slightly tight but still growing a little and watering normally.
Repot in winter only when delay would clearly harm the plant: severe root-binding with repeated wilting, active root rot that requires trimming and fresh mix, or a pot that has cracked or become unusable. If you must repot then, use a modest size increase, keep temperatures above roughly 18°C (65°F), provide bright indirect light, and water more cautiously than you would in spring - let the top of the mix dry slightly further between waterings until new growth appears. Some growers repot in late winter as days lengthen; that can work if indoor conditions are stable and you disturb roots minimally.
Choosing the Right Pot Size and Material
The single most important pot decision is diameter, not aesthetics. Neon pothos wants one step up, not a mansion. Jumping from a 12 cm pot to a 20 cm pot feels generous, but the unused soil volume stays wet for days while the small root system catches up. That wet zone is where aroid roots struggle most, and neon pothos will show the problem as yellow lower leaves that look like a feeding issue but are really an oxygen issue at the root level.
Measure the current inner diameter and choose a new pot 2–5 cm (about 1–2 inches) wider, with the same depth profile or slightly deeper if the plant is top-heavy or sits in a hanging basket that dries quickly. For a neon pothos in a 10 cm nursery pot, a 12–13 cm pot is appropriate. From 15 cm, move to 17–18 cm. From a 15 cm grow pot to a 22 cm decorative pot is too large for most specimens. Repeat the one-size-up rule each time you repot across the plant’s life rather than skipping sizes to save future effort.
The one-size-up rule and why it works
The one-size-up principle matches what root biology predicts: roots grow into soil progressively, and until they do, excess mix is essentially a water reservoir with no uptake capacity. Clemson HGIC recommends containers with drainage holes and emptying excess water from trays after watering - advice that applies directly to neon pothos and prevents the chronic bottom wetness that oversized pots create. More soil without more roots means the lower half of the pot stays saturated while the upper half looks dry, which confuses watering checks and encourages rot.
The one-size-up rule also keeps Neon Pothos watering guide predictable after repotting. A modest increase in soil volume means you water slightly less often than before, but not so much less that the mix stays saturated at the bottom for a week. If you repot and find yourself waiting ten days before the top dries, the pot is probably too large or the mix too heavy. Resist the temptation to “give it room to grow” in one jump - neon pothos will fill a modest upgrade quickly in spring, and you can repot again next year if needed.
Drainage holes and pot materials compared
Every neon pothos pot needs drainage holes. No exceptions for long-term indoor care. Decorative cache pots without holes are fine only if the plant remains in a nursery pot that drains freely into a saucer you empty after every watering.
Plastic retains moisture longer, which can help in dry, bright environments but demands sharper attention to drainage and hole quality. Glazed ceramic sits between plastic and terracotta; weight adds stability for top-heavy hanging baskets. Terracotta breathes through porous walls and dries faster - useful if you tend to overwater or grow neon pothos in dimmer, cooler rooms, though the chartreuse cultivar generally prefers not to dry out as aggressively as succulents. Match material to your watering habits rather than to aesthetics alone. A beautiful pot that stays wet too long will cost you leaves faster than a plain nursery pot with excellent drainage.
Repotting Neon Pothos in Hanging Baskets
Many neon pothos plants spend their lives in hanging baskets, and repotting them adds a logistics problem on top of the usual root work. You are managing several feet of chartreuse vine, a pot suspended in midair, and often a root ball that has dried faster on the exposed bottom than a shelf-sitting plant would. The same one-size-up and spring-timing rules apply, but the workflow changes.
Start by lowering the basket to a stable work surface - a table or the floor - rather than trying to repot with the plant still hanging. Unhook the hanger and set the pot on its side only after you have bundled the vines. Attempting to wrestle a root-bound plant out of a basket while it swings is how healthy stems snap and how you end up with soil on the ceiling. If the basket is too high to reach safely, trim the hanger or use a step stool and a second pair of hands rather than yanking the plant down by its vines.
Handling long trailing vines without damage
Bundle the vines loosely before you touch the pot. Coil them in wide loops on the table and secure with soft plant ties or velcro tape - never tight string that can dent stems. Work from the base upward so you are not sitting on trailing growth. Once bundled, slide the pot out and proceed with the normal root inspection and teasing steps below.
Hanging baskets often use shallower pots than floor containers of the same diameter, which means neon pothos becomes root-bound faster because the soil volume is lower relative to the aggressive vine mass above. That is normal, not a sign you chose the wrong basket - but it does mean you should check hanging plants at least once a year even if they look fine from below. When upsizing a hanging basket, prioritize drainage hole quality over decorative shape. Many hanging planters have a single small hole that clogs; drill additional holes or use an inner nursery pot with a clear saucer you can see from below.
Weight is the other hanging-basket variable - saturated mix is heavier than dry, spent soil. Confirm your hook or ceiling anchor can handle the loaded weight, and leave the plant on a stable surface for 24–48 hours before rehanging. If the vine mass has far outgrown the basket, divide the root ball into two modest pots rather than jumping to an oversized container.
Best Soil Mix for Repotting Neon Pothos
Neon pothos wants well-draining, airy potting mix that holds moisture without staying soggy. The Missouri Botanical Garden describes Epipremnum aureum as preferring moist, organically rich, well-drained conditions - the same tension every good houseplant mix tries to balance. Target pH 6.0–6.5; standard peat- or coir-based indoor mixes land close enough that hobbyists rarely need to adjust pH unless tap water is extremely alkaline.
A reliable blend for repotting neon pothos:
- 75–80% quality peat- or coir-based potting mix
- 20–25% perlite, pumice, or coarse coco coir for aeration
That ratio drains within seconds of watering while holding enough moisture that neon pothos does not wilt hourly. Adjust upward on perlite if your home is cool, you tend to water heavily, or the plant lives in a hanging basket that dries quickly in dry air. A small amount of orchid bark - roughly 10% of the total blend - adds chunkiness for long-lived mixes without turning the pot into an ultra-coarse aroid-only substrate.
Mix ingredients in a tub before repotting - dry blending distributes perlite evenly. Avoid garden soil and unamended cactus mix. Full repot is appropriate when roots are bound, mix is compacted or sour, or you are correcting rot. Top-dressing - replacing the top 3–5 cm without disturbing roots - can buy time in early spring if the plant is not yet root-bound, but it will not solve circling roots at the bottom of a hanging basket.
Step-by-Step: How to Repot Neon Pothos Without Shock
Repotting neon pothos is straightforward if you prepare materials first and minimize root exposure time. Gather the new pot, pre-mixed soil, clean scissors, a chopstick or pencil, and a watering can. If the plant hangs, bundle vines first. Work on a surface you can wipe clean - neon pothos stems are brittle when bent sharply and can snap under a heavy root ball.
Step 1: Water the plant 24 hours before repotting. A lightly moist root ball holds together and slips out of the old pot more cleanly than a bone-dry or soggy one.
Step 2: Add a small mound of fresh mix to the bottom of the new pot. Do not create a thick “drainage layer” of gravel; it does not improve drainage and can create a perched water table.
Step 3: Turn the neon pothos on its side and slide it out, supporting the base of stems with your hand. If it resists, squeeze flexible nursery pots or run a knife around the inside edge of rigid pots.
Step 4: Inspect roots. Trim brown, mushy tissue with clean scissors. Tease circling roots at the bottom and sides gently with your fingers so they point outward.
Step 5: Set the plant in the new pot so the previous soil line sits about 1–2 cm below the rim. Pothos should not be buried deeper than it was growing; burying nodes invites stem rot.
Step 6: Backfill with fresh mix, working soil between roots with a chopstick while holding the plant centered. Firm lightly with your fingers - enough to remove large air gaps, not enough to compress the mix into concrete.
Step 7: Water thoroughly until excess runs from drainage holes. Empty the saucer. Place the plant in bright indirect light, out of direct sun, for 7–10 days.
Step 8: Hold fertilizer for at least three to four weeks while roots settle. Resume normal watering checks rather than a calendar schedule.
Preparing the plant and teasing circling roots
The goal of root teasing is to redirect growth, not to destroy the root ball. Neon pothos relies on fine root hairs for water uptake; bare-rooting by washing every particle of old soil away strips those hairs and extends recovery time unnecessarily. Keep most of the original root mass intact while freeing the outer circling layer.
If roots are densely matted, you may slice 1–2 cm off the bottom of the root ball with a clean knife - a standard nursery technique adapted for houseplants - to stimulate new white tips. Avoid removing more than one-third of the total root mass unless you are rescuing rot. Trim vines lightly if you trimmed roots aggressively so the plant is not supporting more foliage than roots can feed. For hanging specimens, check that the root ball depth matches the new basket height - shallow baskets sometimes need a slightly mounded center of mix under the ball so the plant sits high enough for the hanger to clear the rim.
Common Neon Pothos Repotting Mistakes and Recovery
Oversized pots top the list. More soil without more roots means chronic bottom wetness and yellow lower leaves that look like nutrient problems but are really oxygen problems. Stick to one size up even if you imagine the plant “will grow into it soon” - especially in hanging baskets where excess wet mix sits at the lowest point of the arc.
Bare-rooting or over-washing removes the fine hairs that absorb water. Keep the root ball mostly intact unless rot forces a wash. Tease, do not scrub.
Immediate fertilizing after repot burns tender new root tips in fresh, already nutrient-rich mix. Wait until you see new growth that matches the cultivar’s normal chartreuse tone and leaf size, then resume half-strength feeding if your neon pothos care routine includes fertilizer.
Repotting a sick plant for the wrong reason - repotting for yellow leaves caused by cold drafts, low light, or recent overwatering - adds stress without fixing the trigger. Diagnose first, repot when roots or mix are clearly the issue.
Using a pot without drainage holes turns repotting into a long-term rot trap. If you love a decorative hanging container, use it as a cover pot only or drill holes before planting directly.
Dropping or yanking hanging baskets during repot breaks stems and tears roots. Lower the basket, bundle vines, and work at table height.
Ignoring pet safety during the messy phase: the ASPCA lists pothos as toxic to cats and dogs via insoluble calcium oxalate crystals, causing oral irritation, drooling, and vomiting if chewed. Keep repotting debris and trimmed vines out of reach while you work.
Mild transplant shock shows as slight wilting or a pause in new leaves for one to two weeks - normal if the plant perks up after watering. Full root re-establishment takes four to six weeks in warm, bright conditions; new chartreuse leaves are the clearest success signal. Keep the plant in bright indirect light, not direct sun, during recovery. Wilting beyond three weeks suggests rot, an oversized pot, or buried stems - inspect roots rather than waiting indefinitely.
Conclusion
Neon pothos repotting comes down to reading the roots, choosing spring or early summer when you can, moving the plant one pot size up with fresh, well-draining mix, and handling hanging baskets with the same drainage discipline you would apply to a shelf pot - just with better vine management. The plant grows fast enough that checking every twelve to eighteen months is smarter than waiting for obvious distress, but never repot on autopilot when the real problem is light, water, or temperature.
Get the pot size and soil right and neon pothos rewards you with a quick recovery and a fresh burst of chartreuse foliage along the trails. Oversize the container, fertilize too soon, or wrestle a hanging plant while it is still suspended and the same vine will look punished for weeks. Watch roots, not just leaves, treat repotting as a targeted fix rather than a reflex, and you will rarely lose a healthy neon pothos to a routine upgrade.
When to use this page vs other Neon Pothos guides
- Neon Pothos overview - Start here for whole-plant context before deep-diving this topic.
- Neon Pothos problems hub - Jump to symptom-specific fix guides when this care topic does not resolve the issue.
- Root Rot on Neon Pothos - Escalate here when repotting adjustments are not enough.