How to Build a DIY Retractable Pergola Canopy: Steps
Plan a DIY retractable pergola canopy with a measuring method, fabric and track choices, a careful build sequence, and clear wind and load limits in your yard.
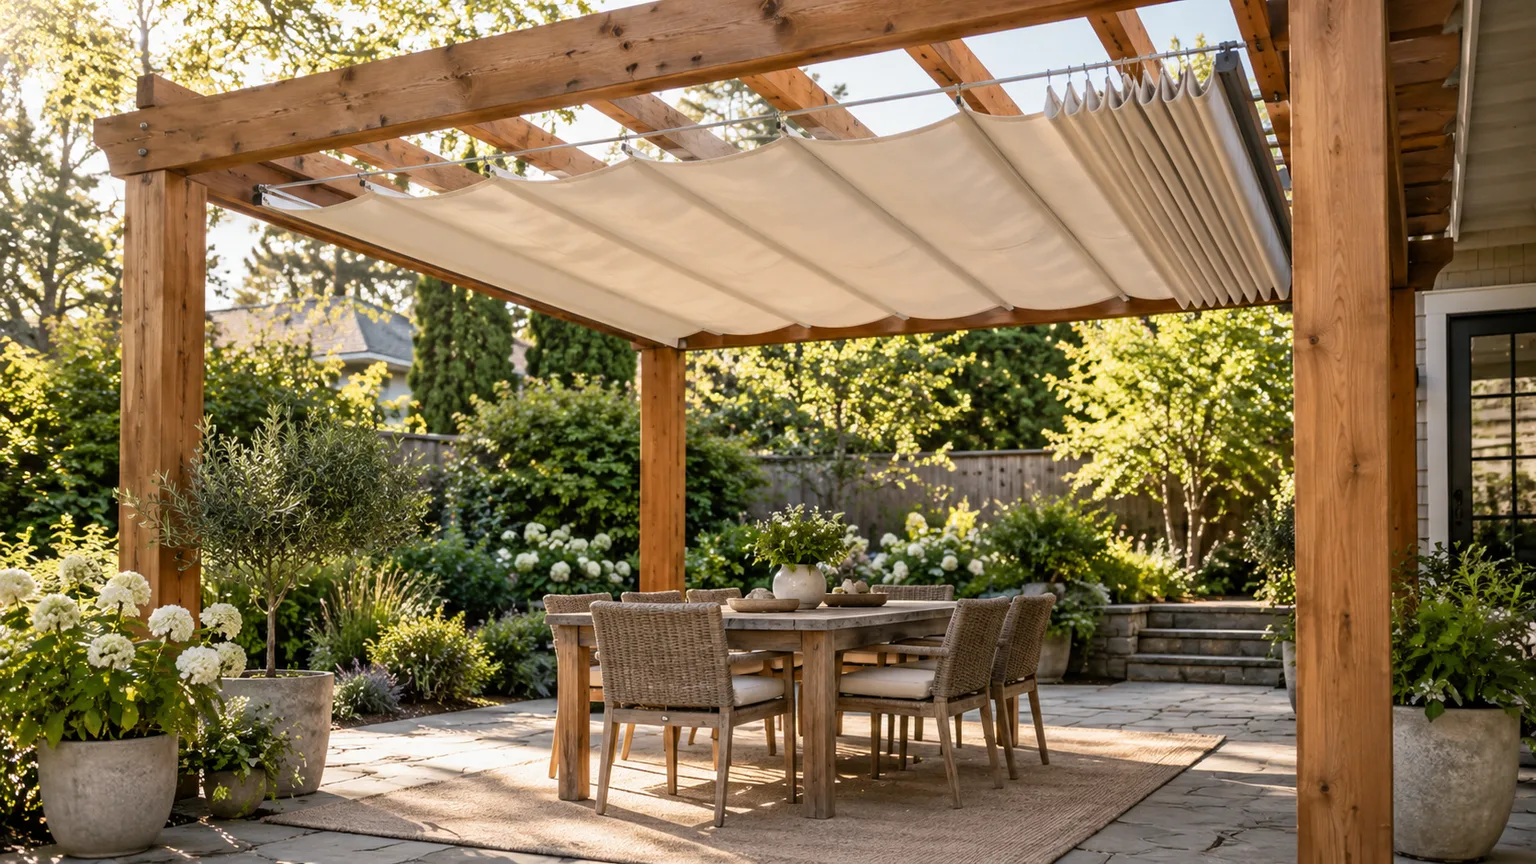
A retractable pergola canopy is a set of fabric panels that slides along wires or purpose-built tracks, giving you shade when you want it and open sky when you do not. The parts are straightforward; the hard part is making sure the pergola, attachment points, fabric, and moving hardware behave as one system.
This guide uses a slide-on-wire layout as the accessible DIY model, while explaining when a track kit or a different shade structure makes more sense. It is planning guidance, not a structural design: no generic cable diameter, eye bolt, turnbuckle, or screw size can be declared safe without knowing the span, wood or metal section, fastener engagement, frame connections, wind exposure, and local requirements.
Decide whether a retractable canopy fits your space
A sliding canopy is useful when the same patio needs both shade and sun. You can draw the fabric over a dining area during a hot afternoon, then retract it for winter light, container plants that need more sun, or stargazing. A fixed shade sail is simpler if you always want cover; a freestanding umbrella is easier to move if you only shade one small seating zone. A living option has a different timetable: Better Homes & Gardens includes pergolas and trellises as supports for climbing vines, while fabric gives adjustable shade as soon as it is installed.
The trade-off is that a retractable system adds moving parts and repeated pull forces. It is not a weatherproof roof, and it does not make a weak pergola stronger. If the frame sways, posts are not securely anchored, the beams are splitting or decayed, or the pergola is a lightweight kit with no published canopy instructions, do not use canopy tension to “stabilize” it. Choose a portable shade source or get the structure assessed first.
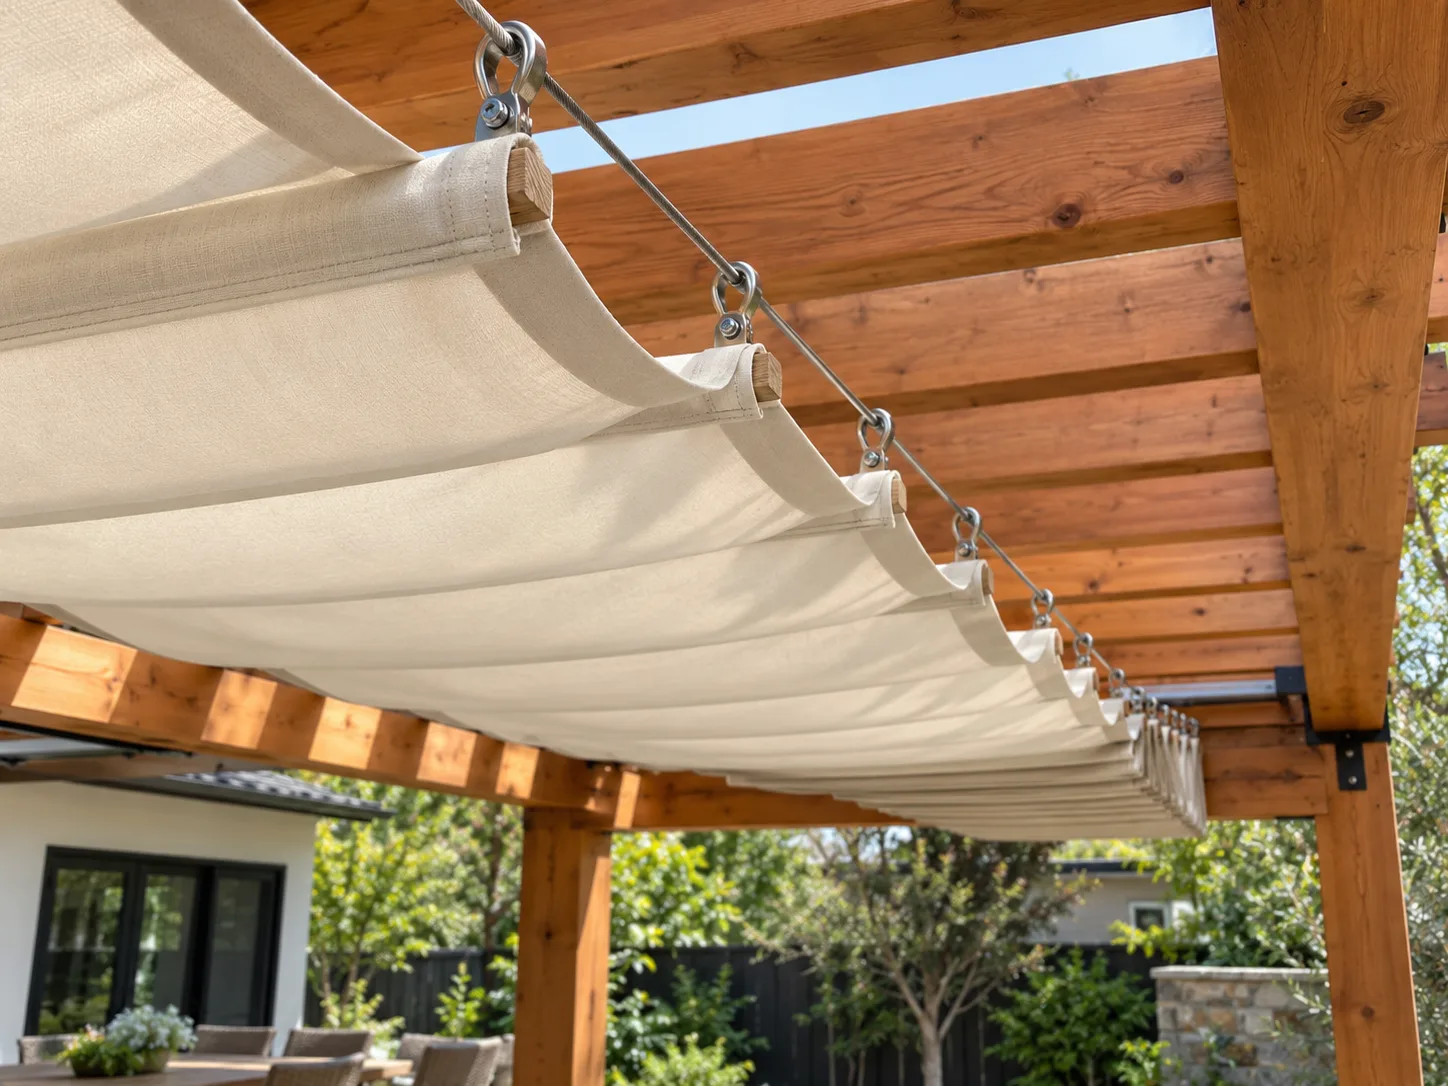
A slide-on-wire design uses parallel lines that run in the direction the fabric opens and closes. Small carriers or rings travel on those lines, while crosswise rods, battens, or sewn sleeves organize the folds. A track system uses purpose-built channels and glides. The Wonder Forest’s outdoor tutorial illustrates a simple wire-and-clip arrangement; treat any web tutorial as an example of motion, not as a load-rated plan for your exact pergola.
Inspect the pergola before adding hardware
Start at the supports, not the fabric aisle. Trace the load path: fabric pulls on rods or carriers; those load the wire or track; the wire end fittings transfer force to a beam; the beam transfers it through its post connections and into the footings or deck. The weakest part may be a hidden post base, a corroded connector, a shallow screw, or the deck framing below the pergola—not the cable itself.
Look for soft or split wood, loose bolts, rusted brackets, twisted members, water traps, movement at the post bases, and signs that the frame was meant only to carry a decorative lattice. Check whether an attached pergola’s ledger is actually connected to framing rather than siding, trim, or a hollow veneer. If the frame’s construction or anchorage is unknown, you cannot confirm capacity by tugging on a post or choosing a thicker eye bolt. A qualified builder or structural professional should review uncertain connections, long spans, wall attachments, and wind-exposed sites.
Also find out whether the work needs approval. Permits and zoning rules are local and can apply differently to a new pergola, an existing structure, or an added cover. For example, the City of Fort Worth’s residential permitting page says accessory structures may require permits and zoning review; that is a local example, not a rule for every city. Ask your building department and, if relevant, your HOA before drilling or adding posts.
Choose a slide-on-wire or track system
The simplest conceptual choice is between a wire-supported canopy and a track kit. With wire, cable lines span the direction of travel and rings, clips, or carriers move along them. The cross supports hold the fabric in repeated pleats. It can be adapted to an existing pergola, but the finished result depends on accurate parallel spacing, a smooth cable path, compatible carriers, and correctly designed anchors. Rings that fit the cable loosely can rattle; carriers that pinch the cable will bind.
A track system packages its channel, glides, and attachment method as a set. It usually costs more than improvised wire hardware, but the parts are designed to fit each other and may offer a cleaner retraction. Confirm that the kit is intended for outdoor use and your opening dimensions, support spacing, frame material, and weather exposure. Its stated span or wind limits apply only when the prescribed components and installation are used.
Do not combine an arbitrary track, household curtain rings, clothesline, eye screws, and turnbuckles because each part looks sturdy. Each connection needs to match its adjacent component, and the structure must still carry the combined forces. A practical vendor guide from KGORGE also distinguishes wire-hung and track-based systems; use supplier advice for system planning, then rely on the actual hardware maker’s instructions for fit and ratings.
Measure the opening and gathered stack
Measure the clear opening at several points instead of assuming the pergola is square. Record the inside width at the front, center, and back, then measure the travel distance along both sides. Check diagonals if the frame looks skewed. Use the smallest usable width and travel length as your planning limits, then mark obstacles such as lights, fans, gutters, brackets, and vines. The canopy must clear those objects through its full path, not only when fully extended.
Separate three dimensions on paper: the opening you intend to shade, the finished panel dimensions after hems and sleeves, and the raw cut dimensions before sewing. Fabric that moves in folds must include take-up for those folds; extra cloth is not simply “20 percent more” for every system. Set the fold depth and number of support battens or carriers, then account for the amount consumed by each fold, each side hem, rod pocket, end hem, and any shrinkage or seam allowance specified by the fabric maker.
Reserve a gathered-stack zone at the end where the canopy parks. If the space is tight, use fewer, broader panels or a smaller coverage area rather than letting the fabric pile block a light, scrape a post, or interfere with a door. Make a full-size paper or scrap-fabric mockup for one bay before cutting expensive outdoor cloth. This quick test exposes a dimension mistake while it is still cheap to fix.
Choose fabric for shade, airflow, and upkeep
Choose fabric by its rated outdoor use, not by how attractive a swatch looks indoors. Knitted shade cloth is usually breathable and lets rain pass through, but it provides partial shade and does not keep a patio dry. Purpose-made awning or shade fabric can offer better color and UV durability; product coatings and weave determine whether it sheds water, blocks more light, or traps heat. Read the maker’s technical sheet for UV performance, cleaning, seam construction, water behavior, and compatible sewing thread.
For an uncomplicated first build, breathable fabric is often easier to manage than an impermeable panel because it is less likely to form a water pocket. A water-repellent finish is not the same as a roof: seams, hems, sag, and the frame’s slope all affect runoff. Heavy fabric also makes a larger gathered stack and can require stronger supports. Lightweight indoor muslin, linen, or ordinary curtain cloth may look relaxed but is not made for continuous sun, wind, and wet-dry cycles.
Plan how the fabric will be attached before you buy it. A sewn sleeve around a removable batten, a reinforced hem with compatible clips, or a manufacturer’s carrier system can all work when designed for the selected cloth. A row of staples through exposed fabric is a weak serviceable detail: wind flaps the edge, staples can work loose, and the panel becomes difficult to remove for washing. If you do not own a machine that can sew the cloth cleanly, ask an awning or marine-canvas shop to hem it.
Plan attachment hardware around the load path
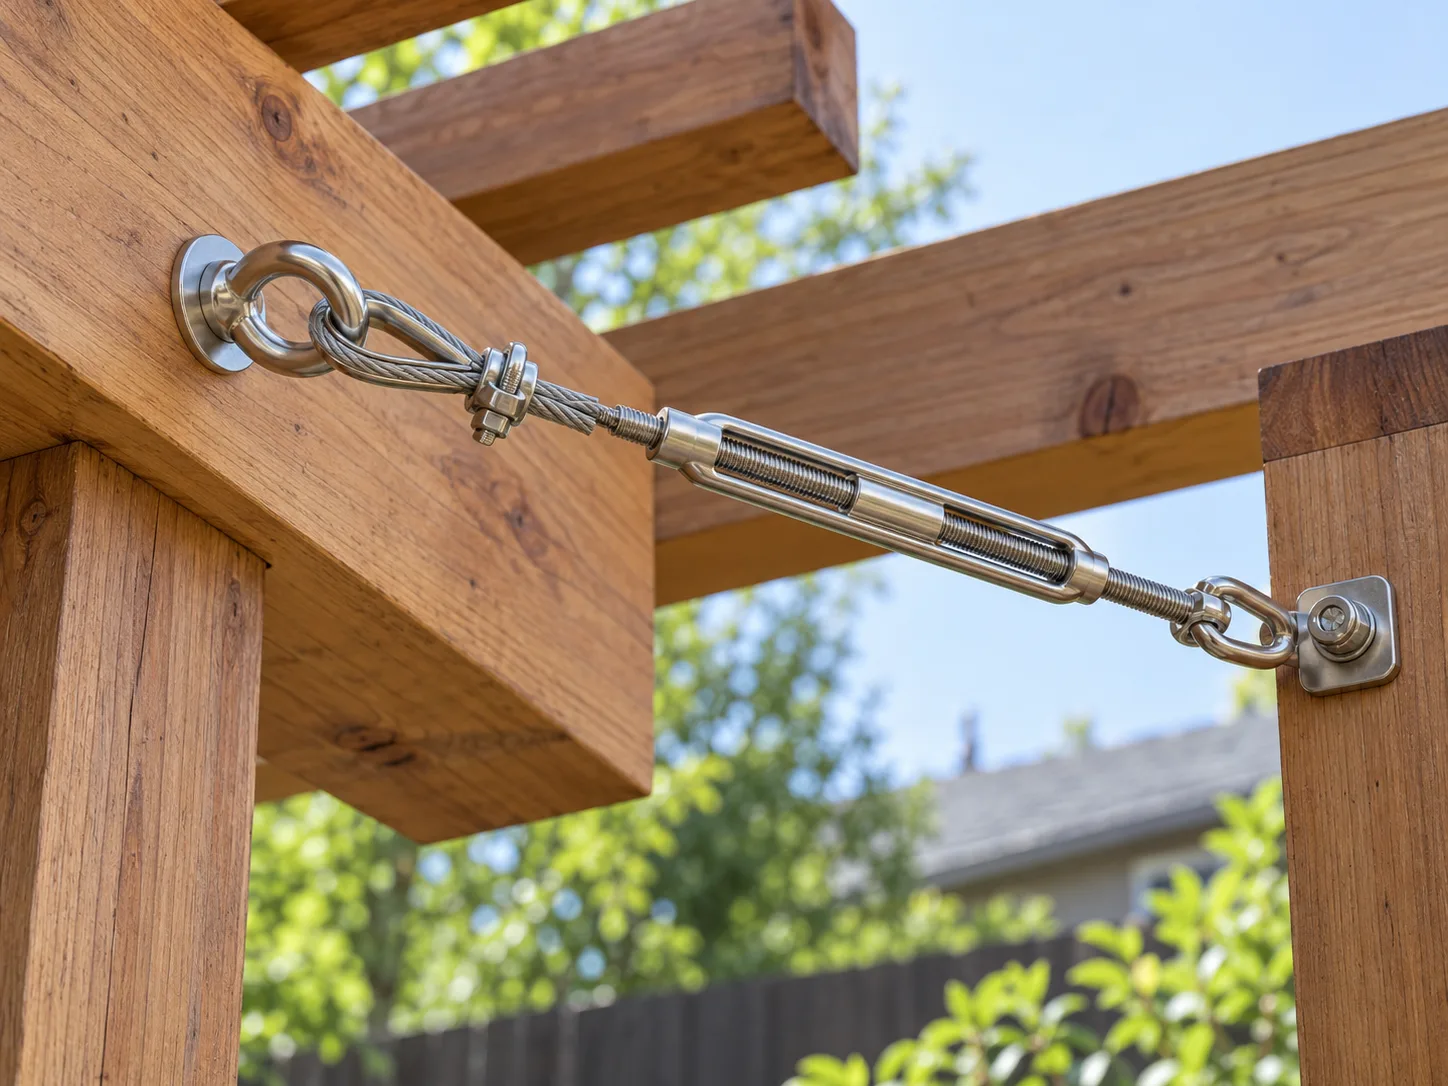
A canopy does not put force only straight down. Wind can lift and pull sideways on a wide sheet; cable pretension pulls the end supports toward one another; a wet or sagging panel adds weight. These forces cycle as the canopy opens, closes, and flutters. Small eye screws, light-duty clothesline fittings, or deck cleats are not automatically appropriate just because they fit the beam.
Use an outdoor-rated, corrosion-compatible system specified for the cable or track and the intended span. In a wire system, a compatible wire rope, terminations, thimbles, clamps, and adjustable end fittings must work together. Keep dissimilar metals from creating a corrosion problem where they touch, and follow the hardware maker’s assembly instructions exactly. Do not guess at an allowable load from the cable’s diameter alone: the termination, screw embedment, wood species and condition, edge distance, beam size, post joints, and foundation all matter.
Attach only to a structural member that the pergola maker or a competent reviewer identifies as suitable. A thin lattice slat or decorative rafter is not a substitute for a main beam. Do not over-tighten turnbuckles to make every cable look guitar-string taut; extra tension increases load without proving that the frame can carry it. If the correct attachment point or capacity is unclear, stop and get the frame and connections assessed before drilling.
Make a material and tool list
Once the design and frame are cleared, list materials by system rather than buying a handful of unrelated parts. A wire layout may need outdoor fabric, suitable battens or cross rods, compatible sliding rings or carriers, correctly rated wire rope and end fittings, protective end caps, and a pull rope or strap. A track layout needs its matched tracks, glides, stops, brackets, and operating hardware. Both need fasteners selected for the member and exposure, plus fabric thread and reinforcements that will tolerate outdoor use.
Useful tools include a tape measure, square, chalk line, drill and bits suitable for the frame, driver and wrench, safe access equipment, fabric scissors, sewing machine or a canvas shop, and a cable cutter made for the chosen wire. Wear eye protection and gloves when handling cut wire; even a small frayed strand can puncture skin. Keep ladders on firm, level ground and have a helper steady long pieces and support the canopy while it is threaded.
Budget for the finished system, not only the fabric. Include sewing, extra carriers, turnbuckles, stainless or coated fittings, replacement panels, storage, and possibly professional review. The lowest-cost line may be the least compatible with the frame or the canopy’s daily movement. Compare the total with a fixed shade sail, a removable umbrella, or a purpose-built pergola canopy kit before you start cutting.
Cut and finish the canopy panels
Lay the fabric on a clean, flat surface and mark the actual finished panel layout from the plan. Keep each cross support square to the travel direction so the leading edge does not skew as it moves. If your canopy will have separate strips, label the order and orientation before sewing; panels that look identical on the floor may not fit the same way once hems and sleeves are added.
Finish exposed edges with the seam and thread recommended for the fabric. Reinforce each location that carries a carrier, batten, or clip so the load transfers into the fabric rather than tearing one small patch. For a sleeve, test the finished pocket with the actual rod: it should hold the support but not clamp so tightly that the rod cannot be removed for repair. If the cloth needs multiple widths, use a suitable seam and place it where it will not rub against a beam or create a bulky obstruction at the gathered end.
Before you finish every panel, sew one sample section and test it on one support line or a temporary mockup. Check that the hem clears its brackets, the panel hangs at the intended depth, and the gathered fabric fits in the parking zone. A small sample also helps you judge shade density at midday. If the fabric blocks too much light or sags more than expected, changing the panel layout now is much easier than after installing the full run.
Install parallel cables or tracks
Transfer your plan to the pergola with a chalk line or a long straightedge. Mark matching anchor positions on opposite support beams and check the lines from end to end. Each run must be parallel, the same distance apart at both ends, and clear of lights, fan blades, wiring, and roof drainage. If the system has a required slope, follow its instructions; do not create a slope by tightening one cable until the frame twists.
For a track system, attach brackets into the specified structural backing, maintain the manufacturer’s spacing, and verify that the two sides are aligned before installing glides. For wire rope, build one correctly terminated sample end on the ground and check the clamp orientation, thimble fit, and protruding tail against the hardware instructions before repeating the assembly overhead. Attach the first end, install the cable or track, and add the adjustment fitting at the opposite end only as specified.
Tension incrementally and evenly. Watch the frame while adjusting: beams should not pull inward, posts should not lean, and joints should not creak, open, or shift. Stop if any movement appears. The goal is a smooth guided path that supports the canopy, not maximum tension. Check that a loose end, cable tail, or fitting cannot catch fabric or snag someone walking beneath the pergola.
Attach carriers and load the fabric
Fit each carrier, ring, or cross support to the system before lifting the complete canopy. A rod pocket must be oriented consistently, and every attachment point should line up across the panel. If you use battens, round and seal rough edges so they do not abrade the fabric; cap sharp metal ends. Keep fasteners out of the path that slides along the wire or track.
With a helper, thread the canopy from the parking end in the planned order. Move the first few carriers by hand and check whether the fabric rolls, bunches, or twists. Do not pull hard against a jam; a tight clip, crossed line, crooked batten, or mismatched spacing can tear a fresh seam. Correct those issues while only part of the canopy is loaded.
Secure the fixed end with the system’s intended stop or attachment rather than relying on the weight of fabric to keep it in place. At the open end, install a stop that prevents carriers from running off the track or wire. If the design uses a pull rope, keep its return path away from sharp edges, fans, lights, and walkways. The panel should park neatly without being compressed so tightly that trapped damp fabric cannot dry.
Add a pull line, stop, and tie-off
A pull line is a convenience, not a brake for wind. Attach it at the moving lead support or to the operating point specified by the system, then route it over a smooth, rounded guide that does not cut the rope. A simple strap may be easier to control than a long hanging cord. If the line runs over a beam, protect the contact point and make sure it will not rub through the fabric when the canopy travels.
Install a positive travel stop at both ends. Test the stop with the canopy moving slowly so the last carrier cannot strike a post or run off the support. If a cleat is used for the rope, mount it where a child will not treat it as a play handle and where the free end can be secured out of the way. Never leave a loose rope loop where it can catch a person, pet, chair, or swinging door.
Decide how you will secure the canopy in its retracted position. A gathered fabric stack can still flap in gusts, and a partly open canopy can load the frame unevenly. Use the system’s tie-back or retention strap; if the manufacturer says to remove the fabric during storms, make removal practical enough that you will actually do it.
Test travel before regular use
Before the first full operation, check every connection from the ground and again at the top of the frame. Confirm that clamps are seated, fasteners are tight to their instructions, no wire tails protrude into a hand or fabric path, the beams remain straight, and the posts and bases have not shifted. Never stand beneath a panel while tensioning cables or tightening hardware.
Move the canopy only a short distance at first. Watch the leading edge and each support as it moves; the fold pattern should remain even, and the panel should not drag on the pergola rafters, lights, plants, or gutters. Extend and retract it several times slowly. If it takes a sudden pull to start, stop and correct the alignment instead of adding a stronger rope or pulling harder. Friction is a signal to diagnose, not a reason to increase force.
After the first dry-weather use, inspect the anchors again and look for loosened fasteners, stretched hems, bent battens, or marks where fabric is rubbing. Recheck after the first rain or windy day and at the start of each season. This is not a structural test or proof that a particular wind speed is safe; it is a way to catch installation movement before it worsens.
Set limits for wind, rain, and winter
Treat an ordinary DIY canopy as fair-weather shade unless its designer and frame have a documented operating rating. The National Weather Service wind-safety guidance explains that high winds can blow objects around and pose a safety threat. That hazard guidance does not provide a safe wind limit for your canopy. Fabric area, frame geometry, fastening, gust direction, shelter, and wear all change the risk, so follow the canopy maker’s wind instructions and retract or remove the fabric before strong gusts or storms threaten.
Rain protection is a different design problem from shade. Breathable cloth lets water pass, which can still wet furniture below. A water-resistant sheet may shed light showers when installed with the specified slope, but a flat or sagging panel can collect water and load the beams and anchors. Do not create a low pocket and assume the fabric will drain itself. Unless the system is explicitly made and supported as a rain canopy, retract it before heavy rain and inspect it after any pooling.
Remove the fabric before snow, ice, or a long off-season if the instructions call for it. A thin cover can collect snow and freeze into a heavy mass; keeping a structure clear of winter load is more important than leaving the shade assembled. Clean it with the fabric maker’s method, let it dry fully, and store it loosely in a dry place. When storms are expected, the NWS pre-wind checklist also recommends preparing outdoor areas for strong winds; use that as a reminder to secure patio items in addition to retracting the canopy.
Troubleshoot binding, sag, and wear
If the canopy binds, first retract only as far as it moves comfortably. Check whether the support lines are parallel, the carriers are compatible and clean, a rod is crooked, or a fastener intrudes into the sliding path. Look for a fabric seam catching on an eye fitting or a post. Correct the obstruction; do not add lubricant unless the hardware maker permits it, because oily products can stain fabric or attract grit.
If pleats droop unevenly, compare the support spacing and panel length on both sides. A longer fold, stretched sleeve, loose clip, or sagging cable can make the leading edge turn. Tightening every line is not a universal fix: the frame may be flexing, or the original spans may need another designed support. If the fabric holds water, take it down and reassess the slope and fabric type instead of making a heavier patch.
Inspect the system at least at seasonal changeover and after notable weather. Replace frayed rope, cracked carriers, corroded fittings, loose battens, or fabric that has torn at an attachment point. If any beam, post, bracket, or base has moved, stop using the canopy until the frame is checked. A repair to fabric cannot restore a connection that has loosened or a support that has split.
Choose a freestanding alternative when needed
If you cannot verify the pergola’s frame or anchorage, choose shade that does not depend on its beams. A weighted cantilever umbrella can shade a table without drilling into a pergola, although the base still needs to be appropriate for the umbrella and its exposure. A portable umbrella is easy to reposition and store, but covers a smaller area and must be closed and secured in wind.
A fixed shade sail can cover a broad zone with fewer moving parts, but it still creates substantial pull at its anchors and should never be tied to weak fence posts or improvised eye screws. A freestanding shade structure can be designed around its own posts and foundations, but it may require permits, setbacks, and professional construction. The City of Fort Worth lists permits and zoning review for accessory structures in its local rules; check your own jurisdiction rather than assuming a movable fabric surface is automatically exempt.

The right choice is the one whose support system matches your site and the way you use the yard. If you want occasional shade and already have a sound, appropriately reviewed pergola, a retractable canopy can be a satisfying weekend project. If the frame is light, the area is exposed, or rain and wind protection are non-negotiable, a rated kit or independently supported shade is the more dependable route.
Conclusion
A DIY retractable pergola canopy works best when you plan the support structure, sliding path, fabric, and weather routine as a single system. Measure the opening in several places, leave room for the gathered stack, mock up one pleat, and use hardware designed for the material and span. Attach to suitable structural members rather than decorative lattice, and stop if the frame flexes or its connection to the house or ground is uncertain.
For a basic sliding-wire build, move slowly through layout, termination, threading, and commissioning; test for binding before pulling the full canopy. Use the maker’s instructions for wind and rain limits, retract or remove the fabric before strong gusts and winter accumulation, and inspect the structure after rough weather. If you cannot verify the pergola’s load path, do not try to solve that uncertainty with a thicker cable. A freestanding umbrella, fixed sail with designed anchors, or professionally specified system can provide shade without asking an unknown frame to do more than it was built to do.