How to Grow and Care for a Peanut Butter Tree
Get practical peanut butter tree care advice on light, soil, watering, pruning, berries, propagation, and the spreading behavior that catches gardeners off guard.
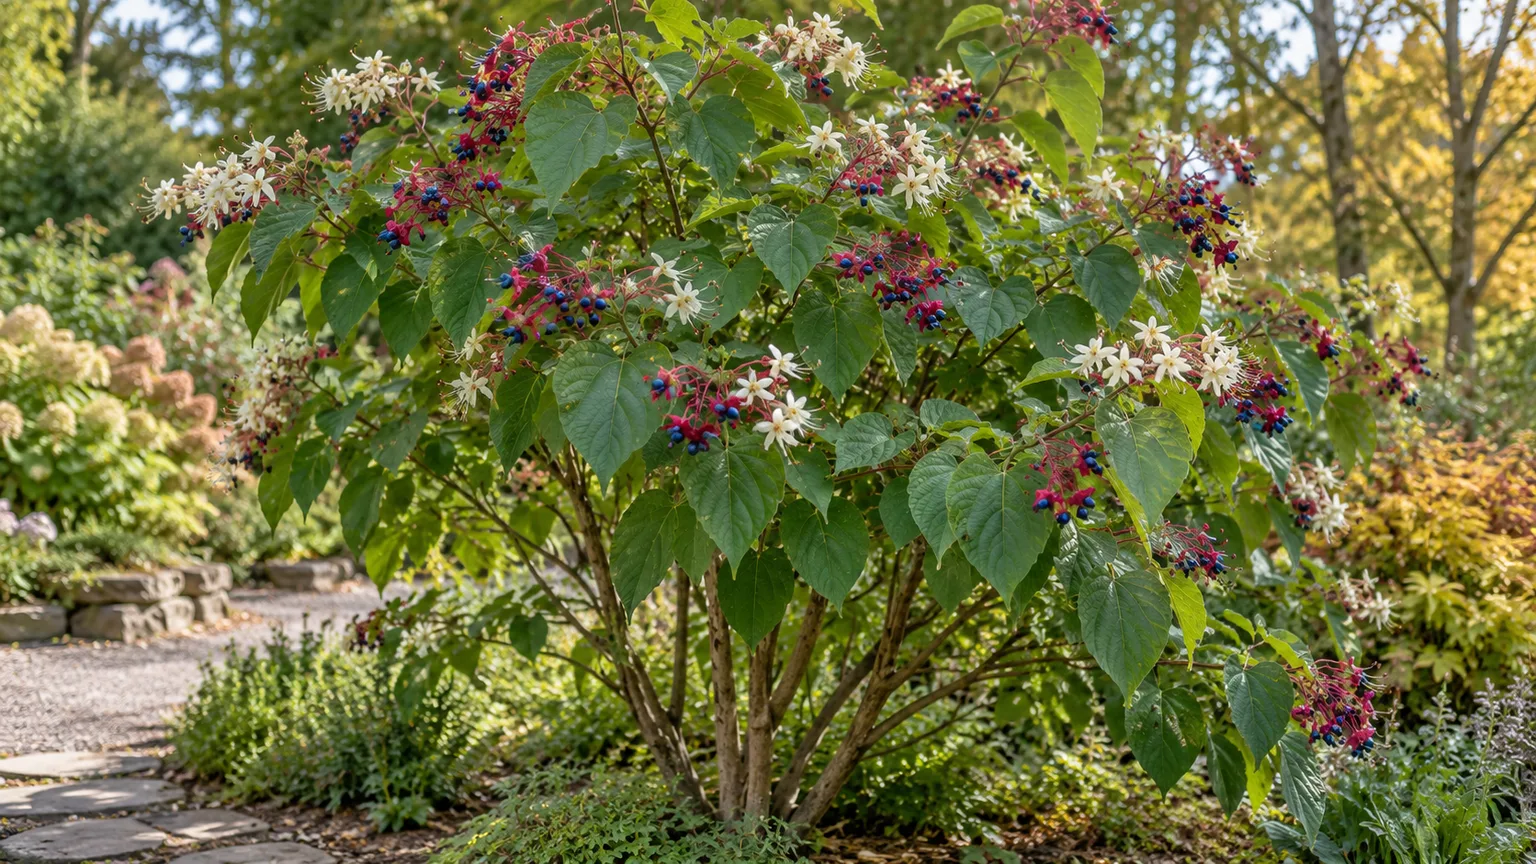
The peanut butter tree, Clerodendrum trichotomum, is a deciduous shrub or small tree grown for a sequence of late-season details: broad leaves that release a peanut-like scent when crushed, fragrant white flowers, then bright blue fruit framed by red calyces. It can be a memorable specimen in a spacious garden, but the same plant can become a maintenance problem where its roots send up shoots or birds scatter seed.
The right first question is not how often to fertilize it; it is whether you have a suitable place for a large, spreading shrub. Give it room, sun, and soil that drains, then manage moisture while it establishes. Before buying, also check local invasive-plant guidance: risk is not the same everywhere, and a plant that is acceptable in one region may be a poor or discouraged choice in another.
Know what you are planting
Harlequin glorybower is another common name for this East Asian species in the mint family, Lamiaceae. It usually grows as a broad, irregular, multi-stemmed shrub, though a gardener can train a young plant into a small tree by selecting a main trunk and removing competing stems. Mature dimensions vary with climate and conditions; university plant references put established plants in roughly the 10- to 20-foot range in height and spread, so allow for a plant that can occupy as much horizontal space as vertical space. NC State Extension and Oregon State University both describe its coarse, open habit and substantial size.
The leaves are opposite, broadly ovate to heart-shaped, and often softly hairy. Crush one gently to check the plant’s identity: the unusual scent is the source of “peanut butter tree,” although not everyone finds the odor pleasant. In late summer into fall, clusters of fragrant white flowers appear; after the petals fall, red calyces hold small, intensely blue fruits. The ornamental effect is strongest when the plant is in bloom and fruit, while its coarse foliage and loose form may look less polished for much of the season. Oregon State’s plant profile describes the seasonal flower, calyx, and fruit sequence.
Why this shrub can outgrow its boundaries
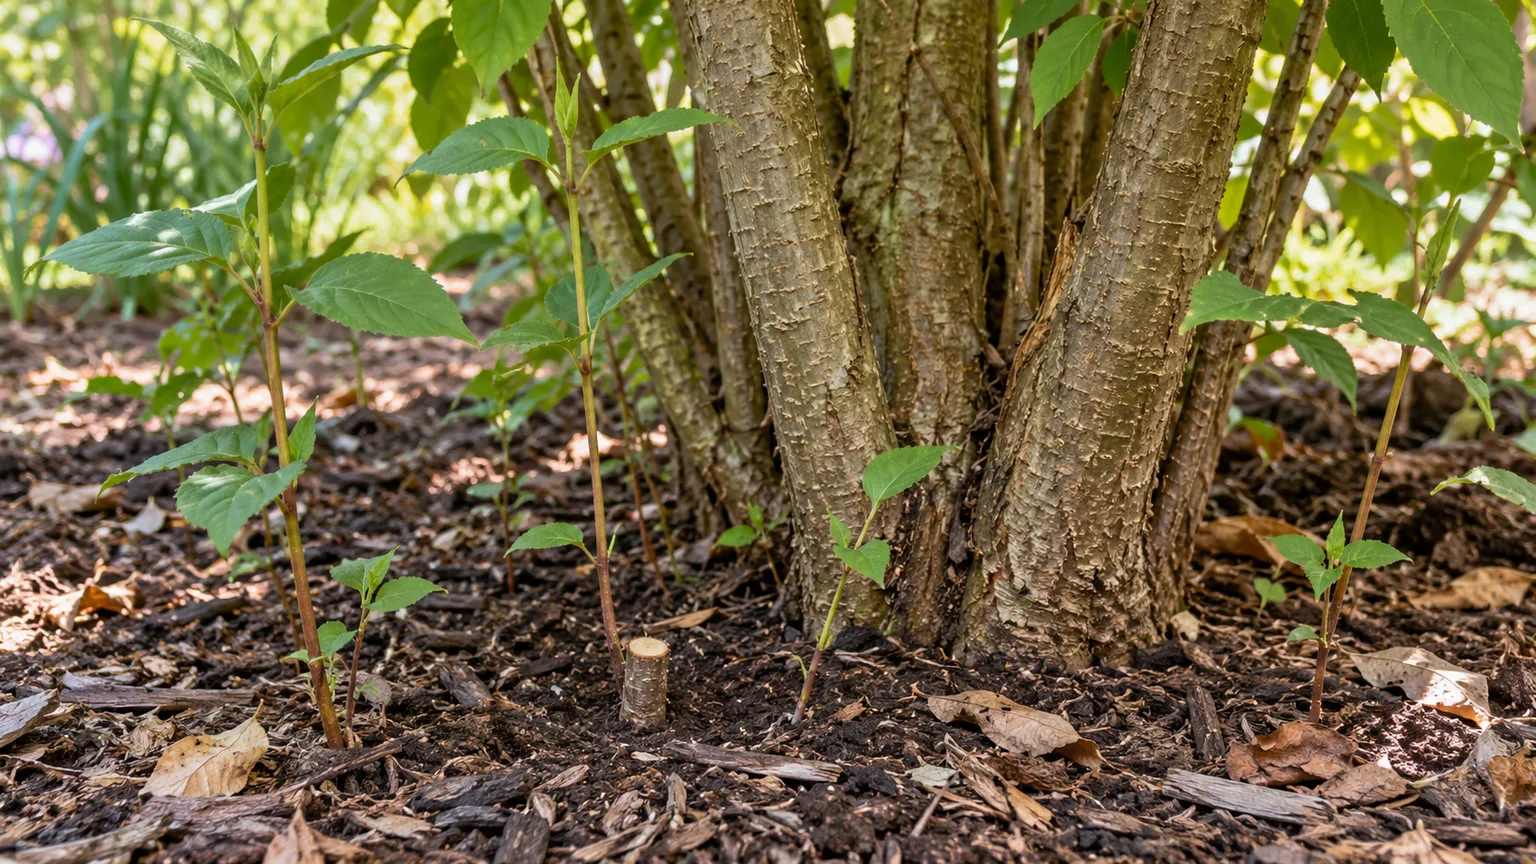
Two kinds of spread matter. The root system can produce new shoots beyond the original crown, and seeds may establish where birds carry the fruit. These are different problems: pruning the top does not stop shoots emerging from roots, and cutting visible suckers does not prevent seed from traveling to a new spot.
The shrub’s open shape and late flowers are attractive, but a tidy small-tree silhouette takes repeat attention. An informal shrub form is easier to maintain, although it still needs sucker checks. If you want a plant that stays within a strict footprint, does not send up shoots, or can be ignored after planting, choose a different species.
Check regional invasiveness before choosing a site
Do not treat one hardiness recommendation or one gardener’s experience as a universal verdict on whether to plant this species. The UF/IFAS Assessment currently rates C. trichotomum as high invasion risk and not recommended in North, Central, and South Florida, based on its predictive tool. That is a meaningful Florida-specific warning; it is not proof that the shrub is prohibited everywhere in the United States.
Before purchasing, search your state or regional extension service and official invasive-plant database for both the botanical name and common names. If your local authority discourages it, choose a native or non-spreading alternative rather than trying to contain it after establishment. Even where it is not listed as a concern, keep it away from natural areas, woodland edges, waterways, and a neighbor’s garden if you cannot monitor suckers and fruiting.
Oregon State notes that the species suckers freely, and an Extension horticulture instructor responding to a gardener’s report explains that each sucker signals a connected, established root system continuing to explore nearby soil. Horticulture writer Mary Snoddy also reports that birds can carry its seeds beyond the original planting, so removing root shoots alone does not address every path of spread. Repeatedly cutting shoots may keep them short, but it does not make that root system disappear. Oregon State University, the Ask Extension response, and Mary Snoddy’s garden report support treating spread as a long-term placement and management issue, not just an annual pruning chore.
Choose light, soil, and exposure for the best display
Choose full sun to light or partial shade, with the brightest position that does not expose a newly planted shrub to severe heat and drought. More sun generally supports better flowering and fruiting; in a hot-summer climate, light afternoon shade can reduce leaf stress. Deep shade is a poor choice if flowers and berries are the main reason for planting, and crowded shade can make the already open habit look thinner.
The species is commonly recommended for USDA zones 7 through 10, but hardiness references differ and individual plants can respond differently to exposure and winter conditions. NC State lists zones 7a through 10b, while Oregon State describes it as hardy to zone 7 or 8 and notes that it may freeze back in cold winters. Treat the lower edge as experimental: select a locally proven plant, give it a sheltered site, and protect its root zone rather than assuming a zone label guarantees an intact top every winter. USDA zones represent an average annual extreme minimum temperature over a 30-year period; they do not forecast the coldest temperature a particular garden will experience. NC State Extension, Oregon State University, and the USDA map guide clarify the range and the limits of zone labels.
Aim for soil that is fertile, humus-rich, and moist but well-drained. The plant can tolerate several soil textures and pH ranges, but standing water around the roots is a more important risk than fine-tuning the pH. Do not plant in a low pocket where rainwater collects or in compacted soil that stays saturated. If a drainage test or winter observation shows that a site remains wet, choose a raised area or another location instead of trying to fix a wet planting hole with a small amount of gritty material.
Leave room around the shrub for its mature spread and for access to remove suckers. Avoid squeezing it beside a walkway, small raised bed, or shallow foundation border. A sunny position with a background of taller trees or a fence can make the late flowers and blue fruit easier to see, but do not count a fence or root barrier as a dependable control for root shoots.
Plant for stable establishment
Plant in spring in colder climates so the roots can settle before winter, or during a mild fall in places with long, gentle autumns. Avoid planting into frozen, waterlogged, or very hot, dry ground. Water the nursery pot before planting, then dig a hole about two to three times the root ball’s width but no deeper than the root ball itself.
If roots circle the outside of the pot, tease a few loose gently rather than ripping through the whole root mass. Set the shrub so the top of the root ball sits level with or slightly above surrounding grade; burying the crown in wet soil can stress the plant. Backfill with the native soil, firm lightly, and water slowly to settle the root zone. Amend the entire bed only if a soil test or local extension recommendation supports a specific change.
Apply a broad layer of organic mulch over the root area to moderate soil temperature and reduce evaporation, keeping it several inches away from stems. Mulch is particularly useful in a colder site where roots need insulation, but it does not correct poor drainage. Mark the plant’s intended footprint and inspect the edges for shoots during the first growing seasons, when it is easiest to decide whether this location is manageable.
Water according to the root zone
Water a newly planted shrub when the root ball begins to dry, not simply because a certain number of days has passed. Check below the mulch with a finger or trowel; the surface can look dry while the root ball is still damp, or look dark after rain while the root ball itself remains dry. Apply water slowly over the original root ball and the adjacent soil, then let the excess drain before watering again.
During the first growing season, consistent moisture helps new roots move into surrounding soil. In hot spells, check more often, especially in sandy ground or near tree roots. After establishment, the plant is more tolerant of short dry periods, but prolonged drought can reduce flowering, stress leaves, and make recovery slower. A deeply watered shrub in well-drained soil is generally safer than frequent shallow sprinkling that keeps only the top layer wet.
If leaves wilt, look at the soil before adding water. Dry soil points toward a need for a slow, thorough soak; wet soil combined with wilting suggests root stress or poor drainage, and more water could worsen the problem. This check is more useful than an automatic weekly schedule because rainfall, soil texture, temperature, and root competition change how quickly the root zone dries.
Fertilize only when the plant or a soil test calls for it
Do not apply a high-phosphorus “bloom booster” automatically. A healthy peanut butter tree growing in suitable soil may not need routine fertilizer, and adding nutrients without evidence can waste product or create nutrient imbalance. Begin with a soil test if growth is unusually weak or leaves show a persistent problem that is not explained by seasonal change, drought, saturation, or pests.
If the test identifies a deficiency, use an appropriate product at the labeled rate and timing for woody landscape shrubs. Avoid fertilizing late in the growing season in a cold climate, when pushing tender growth close to frost can be counterproductive. Compost used as a thin mulch can support soil structure, but it should not be piled against the stems or treated as a precise nutrient prescription.
A plant that is producing abundant shoots is not necessarily hungry. In this species, vigor can mean more pruning and sucker management, so adding fertilizer to force faster growth may make the maintenance problem larger. Focus first on light, drainage, root-zone moisture, and the plant’s actual growth pattern.
Prune toward a shrub or trained small tree
Decide on a form while the plant is young. For a shrub, retain several well-spaced main stems and remove dead, damaged, crossing, or weak growth. For a small-tree form, select the strongest upright stem or a few permanent trunks, then remove competing shoots gradually as they develop. The plant will not become a naturally narrow, formal tree; its mature crown remains broad and irregular.
Keep routine pruning light. The RHS lists harlequin glorybower in pruning group 1, a category generally requiring little pruning apart from diseased, damaged, congested, crossing, or unwanted shoots. If substantial renovation is necessary, spread it over more than one season rather than removing most of the canopy at once. Make clean cuts just outside the branch collar, and avoid leaving stubs that die back. The RHS plant profile gives the pruning classification.
Late winter or early spring, before active growth, is a practical time to inspect the framework and remove dead or damaged stems. Take care not to shear off all the new growth: the plant’s late-season flowers form on shoots that develop during the growing season. If flowering is important, avoid repeatedly shortening every branch tip as summer approaches. Remove suckers whenever you find them, with the cut made as low as practical at the point where a shoot emerges.
Control root suckers before they spread
Check around the crown and just beyond it several times during active growth. A young sucker is easier to trace and remove than a woody shoot that has been mowed for years. Where it is safe to disturb the soil, follow the sucker down toward its connection and remove it with as much attached root as practical; avoid deep digging near desirable plants or utility lines.
If pulling a sucker would damage a nearby seedling or another plant’s roots, cut it close to ground level and revisit that location. It may resprout because the root remains. Keep a simple map or take a photo of where suckers appear; repeated shoots farther from the trunk indicate the spread zone is larger than the canopy. Extension guidance notes that exhausting established roots by repeated removal can take years, so prevention and early monitoring matter. Ask Extension describes both the persistent root system and the possibility of careful repeated removal.
Improve flowers and fruit with light and pollinators
A sunny position, a plant that is not water-stressed, and access for pollinating insects improve the chance of a strong late-season display. Flowers are fragrant and attract insect visitors; after bloom, the colored calyxes and blue fruit provide the most distinctive ornamental feature. Fruit may not form abundantly every year, particularly on a young shrub or where flowering and pollination conditions are poor.
If the shrub flowers but carries little fruit, first consider plant age, light, weather during flowering, and pollinator access. NC State’s profile notes that two plants are required to produce fruit, and a peer-reviewed study found that pollinator access contributed to reproductive success, with outcross-pollinated flowers performing better than self-pollinated ones. A second plant from a different source may improve the odds, but it does not guarantee a heavy crop; planting another specimen also increases the amount of fruit and potential seed dispersal. NC State Extension and the study on pollinator contribution to seed production support that more cautious interpretation.
Do not increase fertilizer just because flowers or fruit are sparse. Too much shade, late frost, drought, pruning at the wrong time, or low pollinator activity can be more relevant than nutrient supply. If fruiting is not wanted because of local spread concerns, remove spent flower clusters before fruit develops, then continue checking for suckers and seedlings; this reduces one source of seed but does not control the root system.
Use a container as a containment compromise
A large, stable container can limit root spread and let a gardener move a plant to a sheltered position, but this is not a low-maintenance way to keep a naturally large shrub. Choose a wide, heavy pot with multiple drainage holes and a free-draining potting mix. The pot should be proportionate to the root ball and stable enough that the leafy crown will not topple in wind.
Containers dry faster than garden soil and can become waterlogged if drainage holes are blocked. Check moisture below the surface during warm weather and water thoroughly when the mix begins to dry; do not leave the pot standing in a saucer of water. As roots fill the container, the plant may need a larger pot or careful root management, which can be difficult as the woody framework grows.
A pot will restrict size only to a degree, and a mature plant may still become awkward to move or maintain. In climates too cold for reliable in-ground survival, container growing can work if there is a bright, cool, protected place for winter dormancy. It is not an ideal permanent houseplant: the species is deciduous, reaches substantial size, and is best understood as an outdoor shrub or small tree rather than a compact indoor specimen.
Propagate only when you can manage extra plants
The easiest source of a new plant may be an established sucker with roots attached. In the dormant season, carefully trace a small sucker to its connection, sever it with a clean spade or knife, and lift it with a generous portion of root. Pot it into a well-drained mix or replant it promptly at the same depth, then keep it evenly moist while it establishes. Do this only if you have a suitable place for another plant; propagation multiplies the same spreading behavior.
The RHS lists root cuttings and semi-hardwood cuttings as propagation methods. For a semi-hardwood cutting, choose a healthy current-season stem that has begun to firm but is not brittle, make a clean cutting with several nodes, and remove leaves from the lower portion. Insert it into a clean, airy propagation medium, keep it humid and out of harsh sun, and wait for roots before potting it on. Rooting can be variable, so take more than one cutting if you need a backup, but do not treat a particular rooting timeline as guaranteed. The RHS propagation notes confirm these methods.

Seed is another possibility if you want genetic variation and can wait for seedlings to mature. Collect ripe fruit, remove the fleshy material, and sow clean seed in a potting medium kept lightly moist; germination and growth may be uneven. Seed-grown plants may differ from the parent, and seedlings can escape if fruit is left where birds can carry it. Do not distribute plants or seed into a region where the species is discouraged.
Prepare for winter and late frost
Expect this plant to lose its leaves after frost; it is deciduous, so autumn leaf fall is not automatically a sign of disease. In a borderline climate, mulch the root zone in fall and plant in a sheltered location. NC State Extension recommends heavy fall mulch to protect roots in colder conditions, while Oregon State notes that the top may freeze back in cold winters.
An early freeze can end the season before the red calyces and berries finish developing. A late frost may damage tender new growth after spring warmth, but repeated covering of a large shrub is rarely practical. Instead, use a protected microclimate, avoid stimulating late growth with fertilizer, and check for live buds before removing branches that appear dead. If stems die back but the roots survive, new growth may emerge from the base; wait until the weather is reliably mild before judging how much of the framework is lost.
A container plant needs protection from root freezing that an in-ground shrub may tolerate. Move the pot to a sheltered, unheated or cool protected place where it can remain dormant, and check the mix occasionally so it does not dry completely. Avoid bringing it into a heated living room for the entire winter; warm indoor conditions can disrupt dormancy and make the plant difficult to manage.
Diagnose symptoms before treating
Yellow or falling leaves: First check the season. Yellowing and leaf drop in autumn are normal for a deciduous plant. If the problem occurs during active growth, compare moisture at the root ball with the surrounding soil and inspect drainage. Dry roots can produce wilt and yellowing; persistently wet soil can damage roots and also cause yellow leaves. Do not add fertilizer until the water and root conditions make sense.
Wilting: If the soil is dry several inches down, water slowly and deeply, then reassess. If the soil is wet, pause watering and check whether rainwater drains away; wilting in wet soil is not a cue to add more water. Sudden wilt in only one branch may point to stem injury or dieback, so inspect the branch from tip toward its base before pruning.
Leaf spots or damaged foliage: Look at the pattern and the underside of leaves before choosing a treatment. Aphids, whiteflies, and other sap-feeding insects may cluster on tender growth, while leaf spots can have several causes. The RHS notes susceptibility to mealybugs, glasshouse red spider mite, and glasshouse whitefly, but those problems are more likely in protected or container conditions than on a healthy outdoor specimen. Remove badly affected material when practical, improve airflow, and identify the pest or disease before applying a product. Follow the label and local guidance for any pesticide; a generic dish-soap mixture can injure foliage and is not a reliable diagnosis-based treatment.
Few flowers or berries: Review sun exposure, drought during active growth, late frost, and recent pruning before reaching for a bloom fertilizer. If there are flowers but few fruits, consider pollination and whether a second genetically distinct specimen is present. If a mature plant continues to struggle despite suitable light and soil, a local extension service can help identify whether a regional pest or soil issue is involved.
Handle berries and prunings cautiously
The available pet-safety information is not a definitive toxicity study of Clerodendrum trichotomum fruit. Pet Poison Helpline says some Clerodendrum types are considered non-toxic while others may cause gastrointestinal upset after ingestion or skin irritation after contact; its information is at the genus level, not a clear species-specific ruling. Because ornamental berries are not food, do not taste them or allow children or pets to treat them as snacks. Keep prunings and fruit out of reach, and use gloves if you have sensitive skin. Pet Poison Helpline’s glory-chain guidance explains the uncertainty and symptoms.
If a child or animal eats berries or plant parts, remove any remaining material, note the plant’s botanical name, and contact a veterinarian, poison center, or local medical professional for advice. Do not induce vomiting or try a home remedy unless a qualified professional tells you to. The bright fruit is valuable as a garden feature, but it is not a reason to assume edibility or safety.
Conclusion
Peanut butter tree care is straightforward once the plant has the right site, but its spreading habit deserves a real decision before planting. Give it sun to light shade, moist but well-drained soil, space for a broad crown, and regular sucker checks; let the soil—not a calendar—guide watering. Keep fertilizer conditional, prune lightly toward a deliberate form, and treat its winter range as climate-dependent.
The best fit is a gardener who wants a late-season flowering and fruiting shrub and is willing to monitor its roots and seed. Check local invasive-plant advice first, especially in Florida, and choose another species if you need a strictly contained, no-spread plant. That choice matters more than any aftercare trick: the shrub is easiest to enjoy when its mature footprint matches the garden from the start.



