Hawaiian Pothos Care: Light, Water, and Growth
Grow Hawaiian pothos with the right light, watering, soil, and pruning. Learn how to protect creamy yellow variegation, root cuttings, and solve common problems.
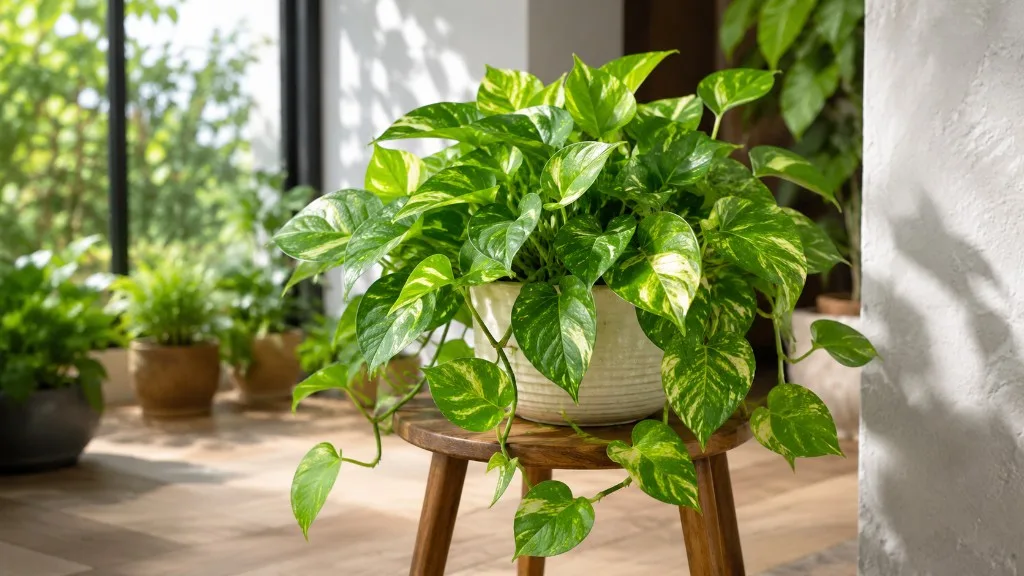
Hawaiian pothos is commonly sold as a bold, yellow-variegated form of Epipremnum aureum, the same species behind golden pothos. The name can be useful when shopping, but labels are not always consistent, and a large leaf by itself does not prove that a plant is a distinct cultivar. The most reliable approach is to grow the vine for the conditions it can use: bright filtered light, an airy potting mix, thorough watering after the mix partly dries, and room to trail or climb.
That approach also prevents the two most common disappointments: a plant that slowly loses its yellow pattern in a dim room, and one whose leaves yellow because its roots stay wet. Pothos is forgiving, but it is not indifferent to its environment. Learn to read the pot and the newest growth, and care becomes more predictable than following a weekly watering reminder.
Identify Hawaiian pothos without trusting the label
The plant usually sold as Hawaiian pothos has glossy, heart-shaped leaves with green and yellow or creamy-yellow areas. It is a climbing aroid: each stem has nodes, and small aerial roots may emerge near those joints. Indoors, long stems trail from a shelf or basket; with a rough pole or board to grip, the plant can climb instead.
A retail name is not a botanical test. The University of Florida IFAS lists Hawaiian pothos as a foliage-industry cultivar or common name and describes its pattern as similar to Golden Pothos but with a stronger yellow color (UF/IFAS cultural guidelines). That reference is useful, but the table reflects Florida commercial production in 2002, not a modern universal naming registry. There is no reason to assume every plant sold under the label is genetically or visually identical.
Hawaiian and golden pothos: what is known
Both labels refer to forms of E. aureum, rather than two separate species with radically different care. A bright, warm growing environment can produce larger leaves and stronger vines than a shaded, hanging houseplant, so size alone is a poor identifier. Compare the seller’s cultivar information, the pattern on several mature leaves, and the plant’s growth history; don’t rely on stem color or a single leaf as a definitive test.
This uncertainty has a practical upside: the basic care is almost the same. If your “Hawaiian” looks like vigorous golden pothos, give it the same light and root-zone care rather than forcing a difference in fertilizer, humidity, or watering that the evidence does not support. When you want a specific cultivar for a collection, buy from a grower who can explain how the stock plant was identified.
Give it light that supports variegation
Place the pot where the leaves receive bright, indirect daylight for much of the day: near an east-facing window, a few feet back from a bright south or west window, or behind a sheer curtain. A useful test is whether the area feels bright enough to read comfortably without a sharp beam of midday sun striking the foliage. Turn the pot a quarter-turn every week or two if growth consistently leans toward the window.
Pothos tolerates dimmer rooms, but “survives” is different from “keeps compact, colorful growth.” In low light, stems often stretch between leaves, new leaves may be smaller, and yellow patterning can become less pronounced. UF/IFAS notes that low indoor light can reduce both variegation and leaf size, while the RHS recommends bright indirect light and warns that deep shade may dull the pattern (UF/IFAS; RHS growing guide).

Direct afternoon sun through glass is a different problem. It can overheat a leaf, bleaching or scorching the pale sections first; those damaged patches will not turn green again. If you are moving a plant from a shaded room to a brighter one, shift it gradually over a week or two and check the leaves before increasing exposure further.
A grow light can help in a dark home, especially in winter, but keep it at the manufacturer’s recommended distance and use a timer rather than leaving it on around the clock. If fresh leaves continue to emerge small and mostly green after several weeks in brighter conditions, check roots, nutrition, and recent stress before deciding light is the only cause.
Choose soil and a pot that let roots breathe
Use a standard indoor potting mix that drains freely and does not collapse into a dense, waterlogged mass. A practical blend is two parts quality houseplant mix to one part perlite or fine orchid bark; the exact ratio matters less than the result after watering: the mix should absorb water, drain excess through open holes, and retain enough moisture that a normal-sized pot does not become bone-dry in a day.
Do not add a gravel layer to the bottom of a pot to “improve drainage.” It reduces the depth of usable mix and does not fix compacted soil or blocked holes. Instead, choose a container with drainage holes, empty its saucer after watering, and replace old mix if it stays soggy for many days despite a warm, bright room. Clemson Extension recommends an airy, well-drained medium for pothos, and the RHS likewise advises a moisture-retentive but free-draining mix (Clemson HGIC; RHS).
Choose a pot only modestly wider than the root ball. A very large pot holds a larger volume of wet mix around a relatively small root system, so it dries slowly and makes overwatering easier. Decorative cachepots are fine if the plant remains in a nursery pot with drainage, but tip out water that collects in the outer vessel.
Water by soil condition, not by calendar
There is no reliable universal interval for Hawaiian pothos. A plant in a warm, bright room in a small porous pot can use water much faster than one in a cool room, a large glazed pot, or a dense mix. Check the pot instead: press a finger 1–2 inches into the mix or lift the container to learn its dry weight; water when that upper layer has dried and the pot feels noticeably lighter, while the deeper mix still has slight residual moisture.
When it is time, water evenly over the surface until a little drains from the holes. Let the pot finish draining before returning it to a cachepot or saucer. This wets the full root ball more evenly than adding a small splash every few days, which can leave some roots dry while keeping the surface perpetually damp.
In winter, a plant may need water less often because light and growth slow. Do not compensate for drooping by watering automatically: both thirsty roots and oxygen-starved, waterlogged roots can make leaves sag. Check moisture and drainage first, then use leaf texture and the pattern of affected leaves as supporting clues. Clemson Extension recommends letting pothos soil dry between waterings rather than keeping it continuously wet (Clemson HGIC).
Read drooping and yellowing alongside the soil
A dry, light pot with limp leaves usually needs a thorough drink. If the mix has pulled away from the pot and repels water, water in two slow passes a few minutes apart so it can re-wet rather than running straight down the sides. A plant that perks up over the next several hours was likely thirsty; do not keep it standing in the runoff.
Yellow leaves in wet mix call for a different response. Stop watering until the upper mix dries, confirm the drainage holes are open, and inspect the roots if the smell is sour or stems near the soil line are soft. Healthy roots should feel firm; dark, mushy roots and a sour odor are stronger evidence of rot than one isolated yellow leaf. Older leaves can also yellow naturally as the vine grows, so look for a spreading pattern rather than treating every aging leaf as an emergency.
Keep temperatures stable; treat humidity as optional
A normal, comfortably warm room usually suits this tropical vine. Avoid cold drafts, direct contact with a cold window, heater blasts, and abrupt moves between warm indoors and chilly outdoors. UF/IFAS reports decline when temperatures are routinely too cold for commercial growth and brown patches after several hours of near-freezing exposure; for a home plant, the practical rule is to protect it from cold and sudden temperature swings rather than test its lower limit (UF/IFAS).
Average household humidity is generally adequate. Higher humidity can reduce crispy edges in unusually dry air, but it will not correct underwatering, root damage, or hot sun. If leaves keep crisping after light and watering are stable, measure room humidity before buying a humidifier; grouping plants or running a clean humidifier may help, while misting leaves gives only a brief effect and leaves wet foliage behind.
Feed lightly while growth is active
If the plant is putting out healthy new leaves in spring and summer, a balanced houseplant fertilizer used according to its label is enough. Start at the low end of the label’s houseplant directions if the potting mix already contains fertilizer, then observe new growth for several weeks. A regular calendar dose is not a substitute for light: more fertilizer cannot make a dimly grown vine compact or restore variegation that is limited by low light.
Skip feeding when the plant is stressed, recently repotted in a fertilized mix, or not actively growing in winter. Too much fertilizer can leave salt buildup in the pot and damage roots, especially if water is evaporating but salts remain behind. If you notice a crust on the soil or leaf-edge burn after feeding, flush the mix with clean water and pause fertilizer rather than adding a second product to treat the first.
Train, prune, and clean the vines
Decide whether you want a trailing plant or a climbing one before the stems get long. A trailing pothos looks full when several rooted stems spill over the edge of the pot; a climbing vine can attach to a moss pole, coir pole, or textured board with its aerial roots. Support does not guarantee huge mature leaves indoors, but it gives the plant a direction and keeps long stems from tangling behind furniture.
Prune a bare or overlong stem just above a node with clean scissors. A node is the joint where a leaf and potential root emerge. Cutting stimulates a dormant bud below the cut to grow, but one cut will not make a whole pot bushy if it contains only a single rooted vine. Root several healthy cuttings and plant them back around the edge of the parent pot when they are established for a denser look.
Remove dead or badly damaged leaves at the petiole, but do not strip healthy green leaves simply because they look older. Wipe dust with a damp cloth so the foliage is easier to inspect and light can reach it. Wear gloves if your skin is sensitive and wash hands after pruning; pothos sap can irritate, and the plant should not be chewed or handled casually by pets.
Propagate from stem nodes
You can propagate Hawaiian pothos from a healthy vine by taking a stem cutting that includes at least one node. A leaf without a node may stay green for a while but will not produce a new climbing stem. Choose a section with two or three nodes and a few healthy leaves, then cut just below a node using clean scissors.
Remove any leaf that would sit underwater or below the soil line. Set the cutting in bright, indirect light and keep it warm, out of direct sun. The new roots form at the node; once they are established, the cutting can grow into a separate plant. The RHS describes stem cuttings taken just below a leaf joint as a straightforward way to multiply epipremnums, while Clemson Extension confirms that pothos cuttings root in either water or soil (RHS; Clemson HGIC).
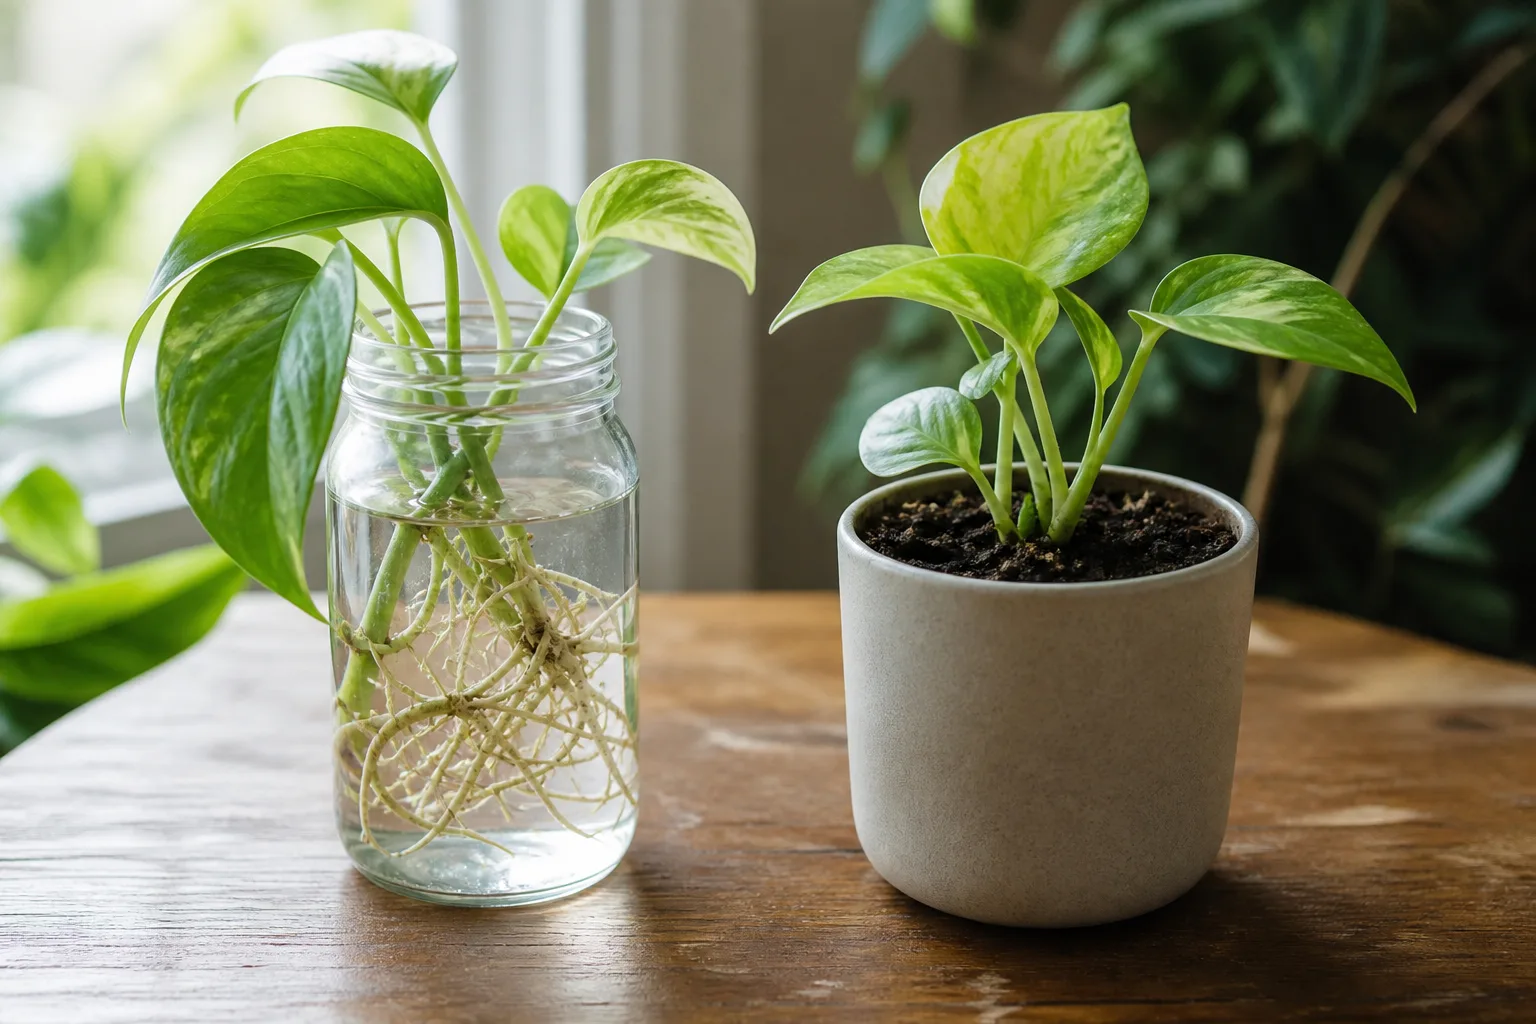
Choose water or soil rooting
For water rooting, place the node under clean room-temperature water, keep leaves above the waterline, and refresh the water when it becomes cloudy or depleted. Roots are easy to see, which makes this method reassuring for a first cutting. Move the cutting to potting mix when it has several roots roughly an inch or two long; very long water roots can be more prone to transition stress, so there is no advantage to waiting for a tangled mass.
For soil rooting, insert the node into a small pot of evenly moist, airy mix and keep the mix lightly moist while roots form—not saturated. New growth is a useful sign, but avoid tugging repeatedly to test progress; that can damage delicate new roots. Gardening Know How’s propagation guide also recommends keeping leaves out of water and using a clean, well-drained rooting medium (Gardening Know How).
Water-rooted cuttings sometimes pause or wilt after potting because their new roots are adapting to soil. Keep the pot small, the mix evenly—not constantly—moist, and the light bright but filtered. A short pause is not proof that the cutting has failed; blackening stems, a foul smell, or progressive collapse are more concerning.
Repot when roots or potting mix justify it
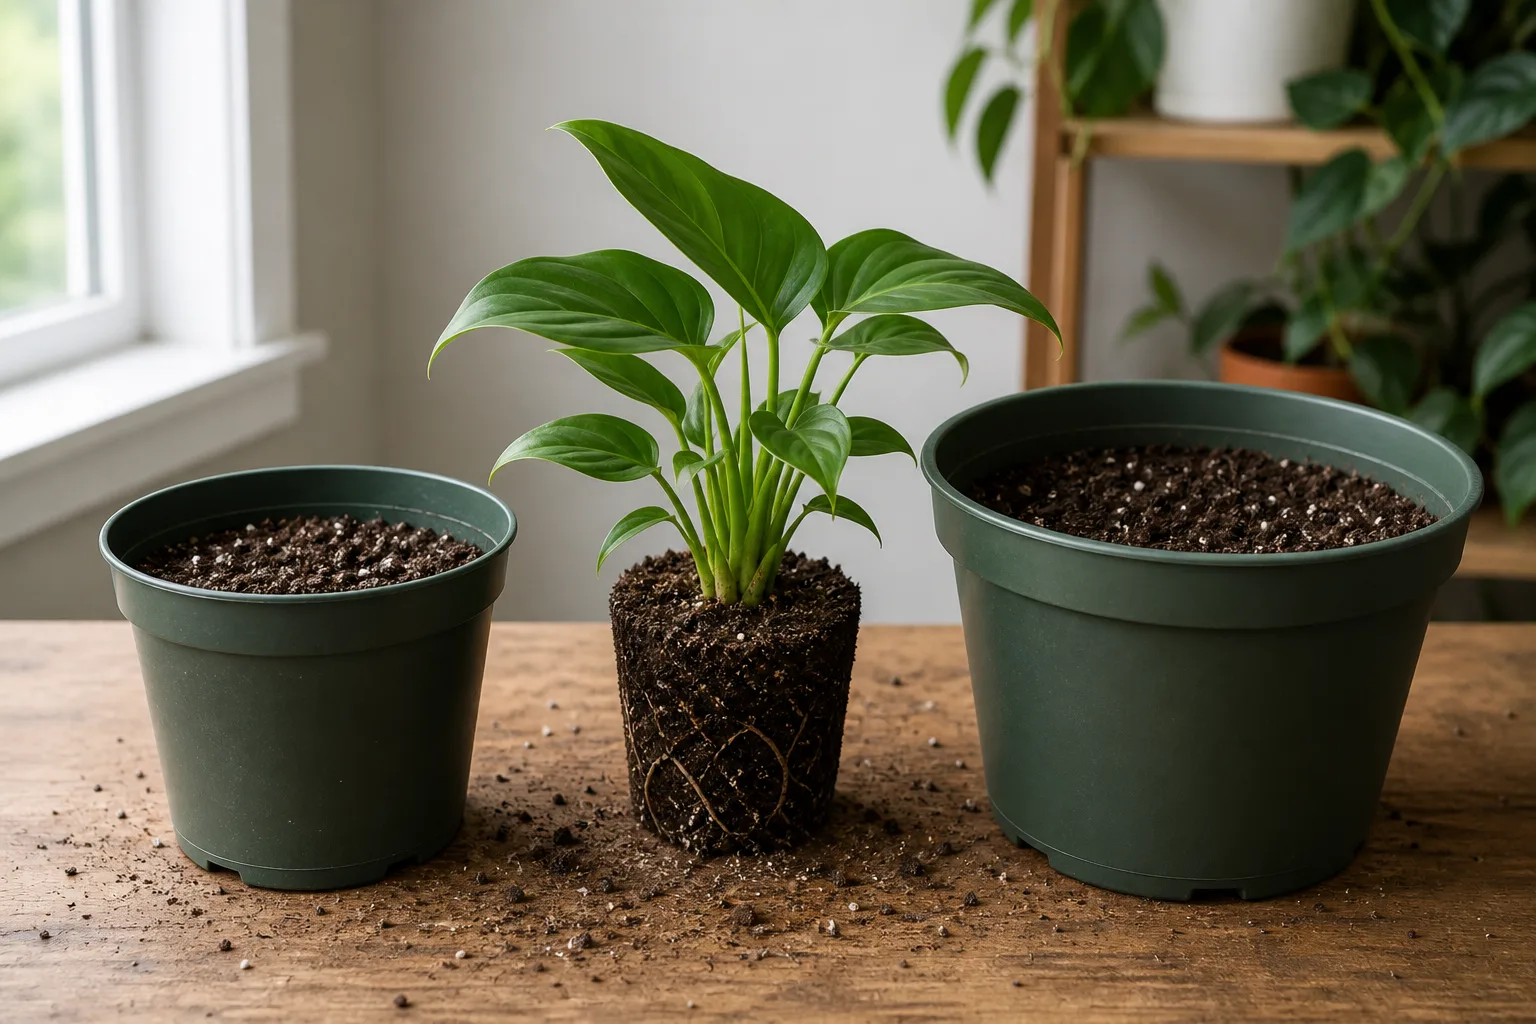
Repot when roots circle densely around the root ball, emerge repeatedly from drainage holes, or the plant dries unusually fast despite appropriate light and watering. A plant that has one root poking from a hole is not necessarily desperate; consider overall root density, how quickly water moves through the pot, and whether growth has stalled during the growing season. The RHS notes that epipremnums may remain in their pots for years and recommends a slightly larger container once roots become crowded (RHS).
Move up only one pot size, keeping the root ball at the same depth. Tease apart only roots that are circling tightly or visibly unhealthy, and replace loose soil around them without packing the mix hard. If root rot is present, trim mushy roots with clean shears and use fresh, airy mix in a clean pot; do not compensate by moving the damaged plant into a much larger container. Wait until it resumes growth before fertilizing.
Troubleshoot leaf and growth problems
Diagnose in a stable order: first note which leaves changed (old or new, near the soil or at vine tips), then check the light and temperature, then feel the mix and inspect drainage, and finally look closely for pests. Change one main condition at a time and give new growth time to respond. Existing damaged leaves rarely repair themselves, so judge a correction by the next leaves, not by expecting a scorched patch to disappear.
Yellow leaves, black spots, and soft stems
One yellow lower leaf can be normal aging. Several leaves yellowing while the potting mix remains wet suggest the roots are short of oxygen, especially if the pot lacks holes or the mix is compact. Let the mix dry partly, correct drainage, and examine roots if the decline continues. Conversely, a very dry mix and brittle vines point toward prolonged underwatering.
Black or water-soaked areas can follow cold exposure, sun damage, or prolonged wetness; color alone does not identify one cause. Move the plant away from cold glass or harsh sun, then check whether stems remain firm. Soft stems at the soil line and dark, mushy roots call for root inspection and removal of rot. Do not add fertilizer or pesticide before resolving the watering and temperature clues.
Brown edges, bare vines, and fading color
Crispy brown margins may reflect a long dry spell, very dry air, accumulated fertilizer salts, or a leaf that was scorched. Check how deeply the mix has dried and whether browning is limited to the side exposed to strong sun. If only pale patches are crisp, excessive direct light is a likely contributor; shift the plant back from the glass and allow new leaves to develop.
Long gaps between leaves and small growth usually mean the plant is reaching for more light, though root crowding or poor health can compound the problem. Move it to a brighter indirect location gradually, rotate the pot, and prune only after new growth resumes. More yellow variegation is not always a sign of improved health: the plant needs green tissue to photosynthesize, so a severely pale leaf pattern can grow more slowly.
Manage pests and protect pets
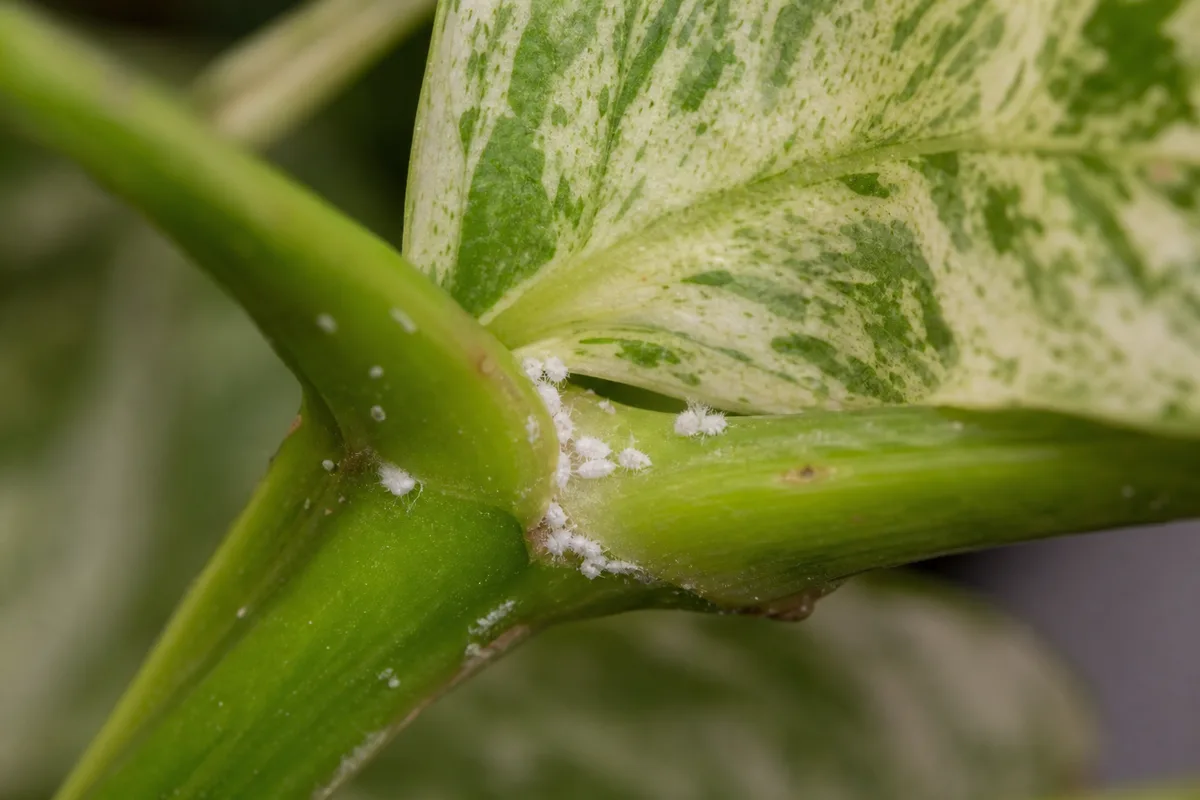
Inspect leaf undersides, nodes, and stem joints when bringing a plant home and whenever growth looks sticky, speckled, or distorted. Mealybugs may appear as small white cottony clusters; spider mites can leave fine webbing and stippling; scale insects resemble fixed brown bumps. Isolate an affected pot so pests do not spread to neighboring plants, rinse or wipe foliage where practical, then choose a labeled houseplant treatment appropriate to the pest and follow its directions. Avoid spraying in direct sun or applying homemade soap mixtures that may burn leaves.
Pothos contains insoluble calcium oxalate crystals and is toxic to cats and dogs if chewed or eaten. The ASPCA lists oral irritation, mouth or tongue swelling, drooling, vomiting, and difficulty swallowing among possible signs (ASPCA plant database). Place trailing stems beyond a pet’s reach only if the animal cannot jump or climb to them; a hanging basket is not a guarantee of safety. If a pet eats part of the plant or develops symptoms, contact a veterinarian or animal poison-control service promptly rather than waiting for symptoms to worsen.
Grow outdoors only with climate and containment in mind
Hawaiian pothos is not frost-hardy. It can spend warm weather outdoors in a container in a sheltered, bright-shade position, but acclimate it over several days and bring it back inside before nights become cool. Outdoor sun and wind can dry a pot quickly, while a sudden shift from indoor shade to direct sun can scorch leaves. Check for hitchhiking insects before moving it back indoors.
Do not treat “USDA zone 10–12” as permission to plant it in a landscape bed. Regional invasiveness depends on climate and local ecology, and some official assessments are strongly cautionary: UF/IFAS flags E. aureum as a high invasion risk in Florida and recommends keeping it contained (UF/IFAS Florida assessment; UF/IFAS Master Gardener guidance). A container, trellis, and regular trimming reduce escape risk, but check your local extension or invasive-species authority before growing it outdoors anywhere warm. Keep every trimmed stem and fallen node out of compost heaps or yard waste that could root where discarded.
Use a simple monthly care check
Once a month, look at the newest growth and the root zone rather than following a list of scheduled chores. Ask whether the newest leaves are an appropriate size and pattern for the available light, whether the pot drains freely, and whether the mix is drying between waterings. Turn the pot if growth is one-sided, and wipe the leaves if dust makes it harder to spot pests.
Prune when the vines no longer fit their space, not because the calendar says to. Feed only if the plant is actively growing and the mix is not already heavily fertilized. Repot only when roots or deteriorating mix justify the change. This small check catches real problems early while avoiding the common overcorrection of watering, fertilizing, repotting, and relocating a stressed plant all in the same week.
Conclusion
For steady Hawaiian pothos growth, start with a bright, filtered location and a pot with open drainage. Water thoroughly when the upper layer of mix dries, then let excess drain away; use new leaves, root condition, and the plant’s drying rate to adjust rather than relying on a fixed schedule. Prune or support vines to match your space, and propagate only from cuttings that include a node.
Treat the name as a useful retail label, not a promise that every plant will look exactly alike. Keep it away from pets, contain it if you move it outdoors, and judge your care changes by healthy new growth. With those habits, this adaptable vine can stay attractive without demanding a complicated routine.



