How to Grow and Care for the Devil’s Backbone Plant
Grow a healthy zigzag plant with clear advice on light, dry-down, repotting, propagation, common leaf problems and handling irritating Euphorbia sap.
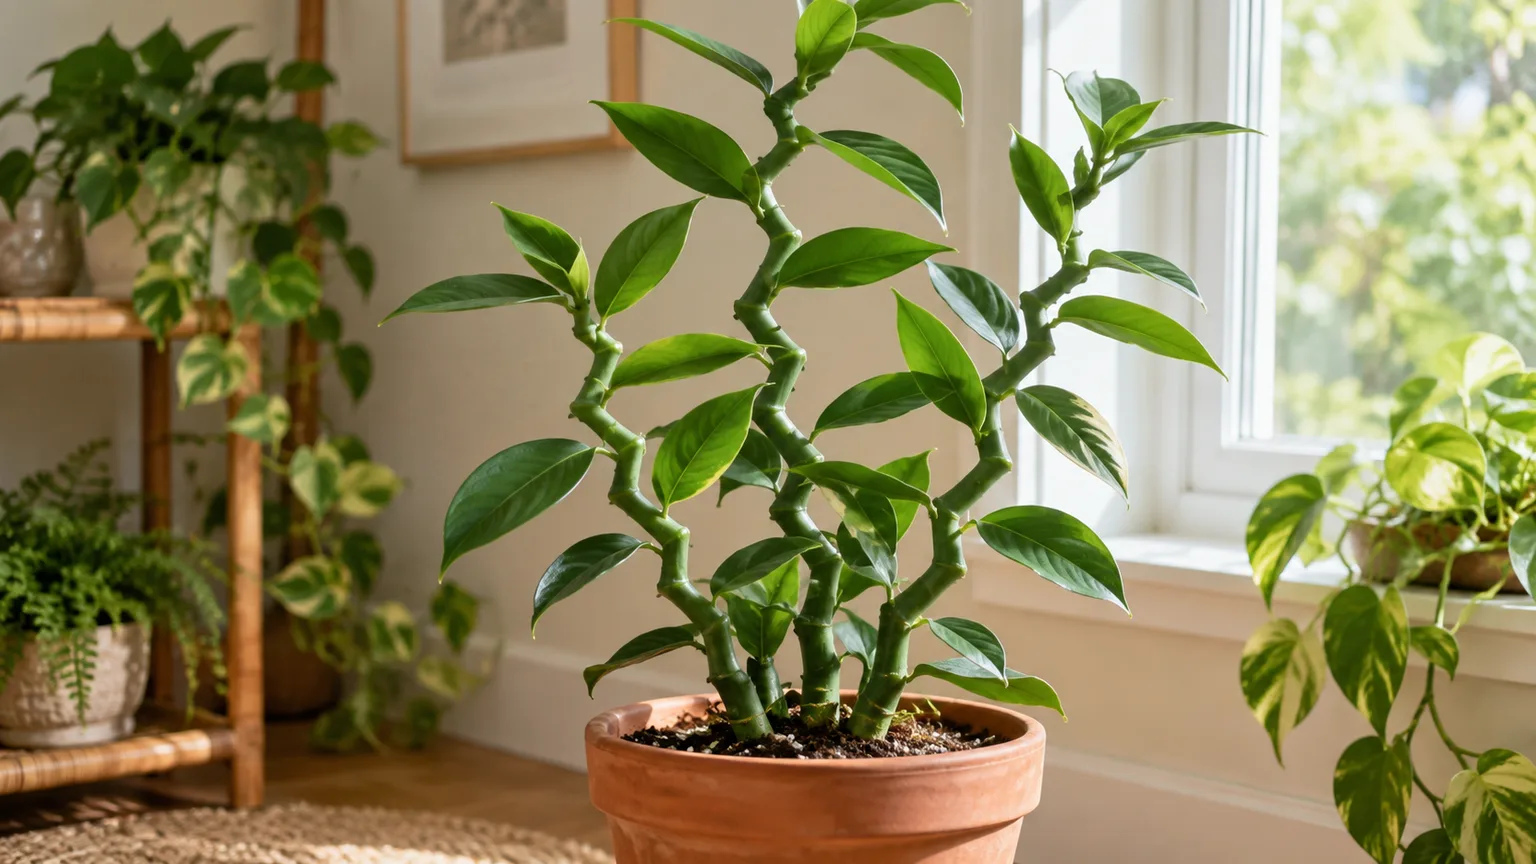
Devil’s backbone is an upright, branching succulent shrub with a sharply zigzagging stem and smooth, oval leaves that alternate from side to side. Give it bright light, a potting mix that drains quickly, and a full soak only after the root zone begins to dry; it is much easier to damage by keeping it wet than by missing an arbitrary weekly watering.
The plant also deserves more care around handling than many ordinary houseplants. Its cut stems release an irritating white latex, so decide where it will live before bringing it home, especially if curious children or pets share the space.
Identify devil’s backbone before choosing a care routine
The botanical name is Euphorbia tithymaloides. Older plant labels may say Pedilanthus tithymaloides, a former name now treated as a synonym; “zigzag plant,” “Japanese poinsettia,” “slipper flower,” and “redbird flower” are also used. The common name is not a care category: this is a leafy succulent euphorbia, not a cactus and not the poinsettia usually sold around winter holidays. North Carolina State Extension’s Plant Toolbox and Singapore’s NParks Flora Fauna Web record describe the same species and its former name.
Look for a fleshy green stem that changes direction at each leaf node, giving the plant its distinctive backbone shape. Leaves are smooth and usually oval with pointed tips; some selections have pale margins or pinkish tones in stronger light. When a mature plant blooms, the showy red structures are bracts surrounding much smaller flowers at stem tips, not oversized petals. In a pot, growth is usually more restrained than in a warm outdoor planting, where this shrub can become several feet tall.
Cultivar names matter most when you are comparing size and foliage. NC State lists ‘Nana’ as a dwarf form that can stay around a foot tall, while ‘Variegata’ can grow much larger and carries cream or white leaf edges. A compact name does not mean the plant needs less light, and a pale leaf edge is not automatically a nutrient deficiency; check the overall growth pattern before changing fertilizer.
Keep Euphorbia sap away from skin, eyes, children and pets
When a stem is cut or broken, devil’s backbone can release milky latex. NC State describes this species as having low-severity poisonous characteristics, while NParks flags sap irritation and toxicity if ingested. These labels are hazard warnings, not a prediction of what one touch or nibble will do; the amount, route of exposure and person or animal involved all matter. Treat fresh sap as an irritant and avoid contact rather than testing how sensitive you are.
The genus-wide evidence supports taking eye exposure seriously. Poison Control explains that spurge sap can irritate skin, eyes and the mouth, and recommends removing contaminated clothing and washing skin with soap and water. A small PubMed-indexed clinical case series on sap from several Euphorbia species reported eye inflammation ranging from mild surface irritation to more serious corneal inflammation; those cases do not quantify the risk from this one species, but they do support wearing eye protection when cutting and getting prompt help after an eye splash. See Poison Control’s spurge-sap guidance and the PubMed case series.
For routine pruning, wear disposable or washable gloves, long sleeves, and protective glasses if a branch could spring or drip toward your face. Use sharp shears, keep the cut end pointed away from you, and place the cutting directly on a prepared surface rather than carrying it through the room. Clean sap from the tool and work area with soap and water while wearing gloves, then wash your hands; do not touch your eyes or phone before cleanup.
If sap gets on skin, remove contaminated clothing and wash the area gently but thoroughly with soap and water. If it enters an eye, begin rinsing right away with clean lukewarm water for 15 to 20 minutes, hold the eyelids open if possible, and do not put soap in the eye; contact a poison center or medical professional, especially if pain, redness or blurred vision continues. If plant material is chewed, remove visible pieces and rinse the mouth, then call a poison center for advice rather than inducing vomiting or trying a home remedy. In the United States, Poison Control is available at 1-800-222-1222; elsewhere, contact your local poison service or urgent-care service.
Keep the pot and prunings out of reach of children and pets. NC State includes dogs and cats among the groups for which the plant is a concern, and the ASPCA notes that its database is not all-inclusive and that any plant material may upset a pet’s stomach. If an animal chews it, move the plant away, save a photo or label for identification, and call a veterinarian or animal poison-control service for case-specific advice instead of waiting for symptoms or assuming an online list settles the question.
Choose an indoor or outdoor growing spot
For most households, a stable indoor position near a bright window is the simplest option. Place the plant where it can receive several hours of strong filtered daylight, with enough space that stems do not brush people walking past. A shelf or stand can keep it away from pets, but choose a stable base: a tall, top-heavy plant is more likely to tip when its pot is light or crowded.
In frost-free climates, devil’s backbone can grow outdoors as a container plant or in a protected, well-drained bed. NC State lists it for warm hardiness zones, and NParks records it as a tropical plant; neither profile means a potted plant should be left outside through a cold snap. A container gives you a practical retreat plan: move it under cover when nights cool and bring it indoors before frost.
Acclimate a houseplant before moving it outside
A plant that has lived behind glass is not ready for all-day outdoor sun. Start it in bright shade for several days, then add a short period of gentle morning sun and increase exposure gradually over a week or two while watching leaf color and firmness. If the leaves pale, curl, develop dry patches, or feel hot in midday sun, move it back to brighter shade and slow the transition.
Wind and rain change the water routine too. Outdoor air can dry a pot faster, but repeated rain can keep dense soil wet for days; protect the container from standing water and check the mix before watering. Before bringing the plant back inside, inspect leaf joints and undersides for mealybugs or spider mites, rinse dust off if needed, let foliage dry, and isolate it briefly from other houseplants.
Give it bright light without sudden scorching
Bright, indirect light keeps growth compact and supports the variegated forms without exposing leaves to a sudden jump in heat. An east-facing window is often a forgiving starting point; a south- or west-facing window can work if a sheer curtain, a little distance from the glass, or seasonal shading softens the strongest afternoon rays. NC State recommends bright indirect light for this plant and notes that too little light can make it leggy while direct sun can burn foliage.
Judge light by what new growth does, not only by the direction a window faces. Long spaces between leaves, thin stems leaning toward glass, and smaller leaves suggest the plant is reaching for more light. Pale or crispy areas on the window-facing side suggest excess intensity or a quick change, not a need to move it into a dark corner. Rotate the pot occasionally so one side does not stretch toward the window, but avoid repeatedly relocating it to chase a perfect spot.
Use an airy mix and a pot with drainage
The roots need oxygen as well as water. Use a free-draining houseplant or succulent mix that does not compact into a dense, slow-drying block; if a commercial mix stays wet for many days in your room, blend in a coarse mineral ingredient such as pumice or perlite. An unglazed clay pot can dry more quickly than plastic, but the drainage hole and the soil structure matter more than the material. NC State recommends a well-drained succulent-type potting mix, while practical succulent guidance from BoDurtha’s Plant Parlor also stresses an airy medium.
Do not add a layer of gravel to the bottom as a substitute for a drainage hole. Water still needs a route out of the container, and a perched layer can leave the root ball sitting in wet soil above it. Choose a pot only slightly wider than the root mass; a very large pot holds extra wet mix around a small root system and can slow drying. Empty any saucer after watering rather than letting the pot stand in runoff.
Water after checking the mix, not the calendar
Let the upper inch or two of potting mix dry before watering, then soak the entire root ball until water exits the drainage hole. Empty the saucer, and wait for the mix to dry again before the next soak. NC State uses a similar soil check for this species, while Florgeous’s devil’s-backbone care guide notes that frequency changes with the season and growing conditions.
A “once a week” rule can overwater a plant in a cool room, a large glazed pot, or dim winter light; the same rule may underwater a plant in a small clay pot in a hot, bright space. Check moisture with a finger or wooden skewer near the root zone, not only the dusty surface. Lifting the pot before and after a thorough watering also teaches you how much it weighs when wet versus nearly dry. That quick comparison is more reliable than copying another owner’s schedule.
When growth slows in fall and winter, the soil usually takes longer to dry, so stretch the interval and keep watering based on the mix rather than forcing a monthly calendar. Do not give tiny sips every few days: they wet only the top layer and can leave the lower root ball unevenly dry. If the soil remains wet for a long time, pause watering and investigate drainage, pot size, root health and light instead of adding more water because leaves are limp.
Keep it warm and skip extra humidity
Normal warm indoor temperatures suit devil’s backbone. NC State gives a preferred range of about 60 to 85°F; protect the plant from frost, cold drafts, and direct contact with a winter-cold window. If you move a patio plant indoors, do it before temperatures drop sharply rather than waiting until leaves are already stressed.
Average household humidity is generally adequate. You do not need to mist the leaves or buy a humidifier for this plant; water sitting on stems and foliage does not fix a dry root zone or poor light. Keep it away from heating vents that blast hot, dry air and from doors that repeatedly expose it to cold drafts. If the room is comfortable for people and the plant is growing normally, leave the humidity alone.
Feed lightly during active growth
A plant growing in fresh, nutrient-containing potting mix may need little fertilizer for a while. If it is producing healthy new growth, use a balanced liquid houseplant fertilizer at half the label strength about once a month during spring and summer, then stop or sharply reduce feeding as growth slows. Gardeners who prefer not to use liquid feed can refresh the potting mix when repotting rather than layering on more fertilizer.
Do not fertilize a plant that is stressed, newly repotted, or sitting in wet soil with possible root damage. Extra salts cannot repair rotted roots, and a strong dose may scorch roots or create crusts on the mix. If new growth is pale, first check whether light has changed, the plant is cold, or the roots stay saturated; feed only after those basics are in order. Practical schedules vary among growers, so treat a mild feed as optional support, not a requirement for survival.
Prune for shape with sap precautions
Routine pruning is optional. Cut back a stem if the plant is too tall for its spot, has become lopsided, or needs to branch from a lower point; avoid removing a large share of leafy growth at once unless you are removing damaged material. A clean cut just above a leaf node preserves a natural shape and gives the plant a place from which new side shoots may develop.
The safety setup matters more than the season. Before cutting, put on gloves and keep children and animals out of the work area; use eye protection when stems are at face height or when a cut could send sap toward you. Put a tray or newspaper below the plant, make deliberate cuts with clean shears, and leave the fresh ends alone while the latex stops flowing. Do not wipe sap with a bare finger or cut multiple plants with a contaminated blade.
After the sap dries, discard prunings where pets and children cannot reach them; do not put a tempting fresh stem on an open compost pile if animals can get to it. Wipe the tools with soap and water, dry them, and wash hands and exposed skin. If a branch has snapped, you can use the same steps to clean up without rushing to apply a sealant or wrap the wound; air-drying is usually more useful than trapping moisture against the cut.
Propagate devil’s backbone from stem cuttings
Stem cuttings are the most practical way to make another plant at home. Choose a firm, healthy, pest-free stem with several leaf nodes rather than a soft tip or a branch with yellowing leaves; the cutting needs enough stored energy to remain alive while it starts roots. Spring or early summer is convenient because the parent plant is actively growing, but a warm bright room can support rooting at other times if you keep moisture under control.
The cut releases the same milky latex that makes pruning a safety task. Set up gloves, clean shears, a pot and dry mix before making the cut so you are not searching for supplies while sap is flowing. Fine Gardening’s cutting guidance notes that tougher or succulent stems often do well in aerated media; for this plant, soil is a simple route that avoids transferring delicate new roots from a water jar into a potting mix.
Root a callused cutting in a free-draining mix
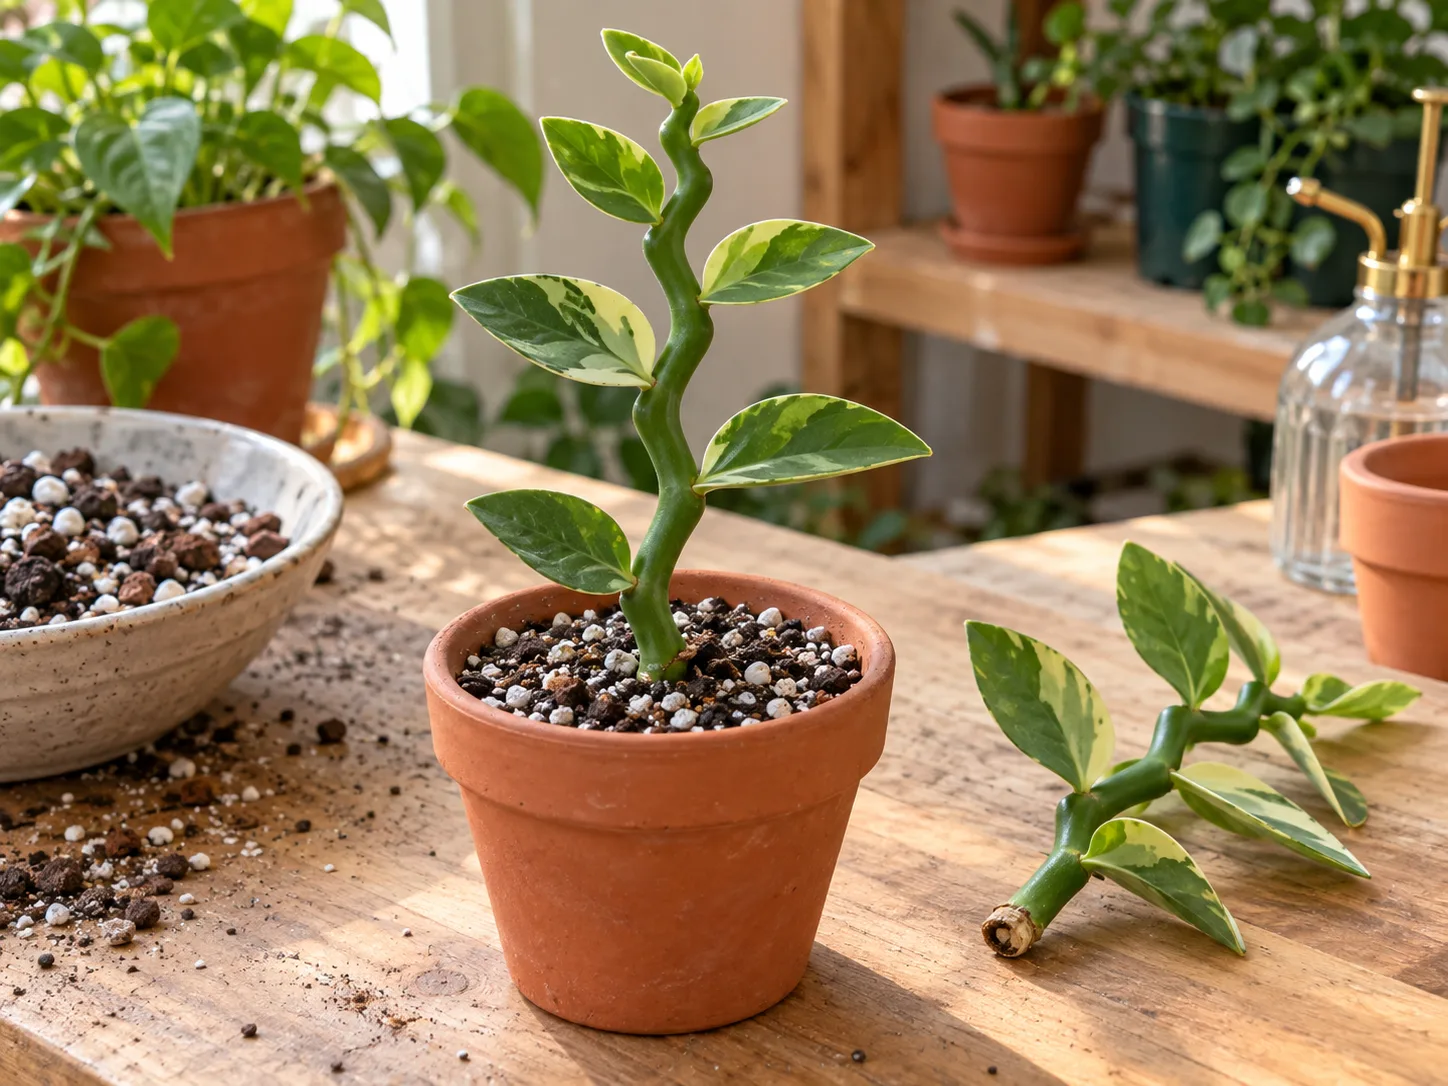
- Choose a healthy stem and cut a 4- to 6-inch section below a node with clean, sharp shears. Keep the cut pointed away from your face, and do not handle fresh latex with bare skin.
- Set the cutting aside on a clean, shaded surface until the cut end stops weeping and dries over. For a succulent stem, this may take a day or longer depending on thickness and room conditions; do not plant it while sap is still wet.
- Insert the callused end about an inch into a small pot of lightly moistened, free-draining mix. Firm the medium just enough to hold the cutting upright; burying several leaves or packing wet soil around the stem encourages decay.
- Place it in warm, bright indirect light. Keep the mix barely and evenly moist, not continuously saturated, and do not seal it under a plastic bag; BBC Gardeners’ World’s succulent-cutting method also lets cuts heal and avoids a propagator for succulent cuttings.
- Wait for evidence of rooting before increasing water or moving the plant into stronger sun. New growth is a good sign; a gentle tug that meets resistance can also indicate roots, but repeated tugging can damage them.
Rooting speed depends on cutting condition, temperature, light and mix, so do not assume a cutting has failed after a few days. If the base darkens, softens or smells sour, discard that piece and start again with a healthy parent stem, cleaner tools and drier, airier media. If it stays firm but has not grown, keep it warm and bright and resist the urge to dig it up every week.
Repot only when the plant needs more room or fresh mix
Repot when roots crowd the drainage hole, the root ball dries unusually fast, growth has stalled despite good light, or the potting mix has broken down and stays wet. A plant that is a little root-bound is not automatically in trouble; moving it too often can disturb roots and encourages growers to use oversized pots. Spring or early summer gives the plant time to resume growth after the move.
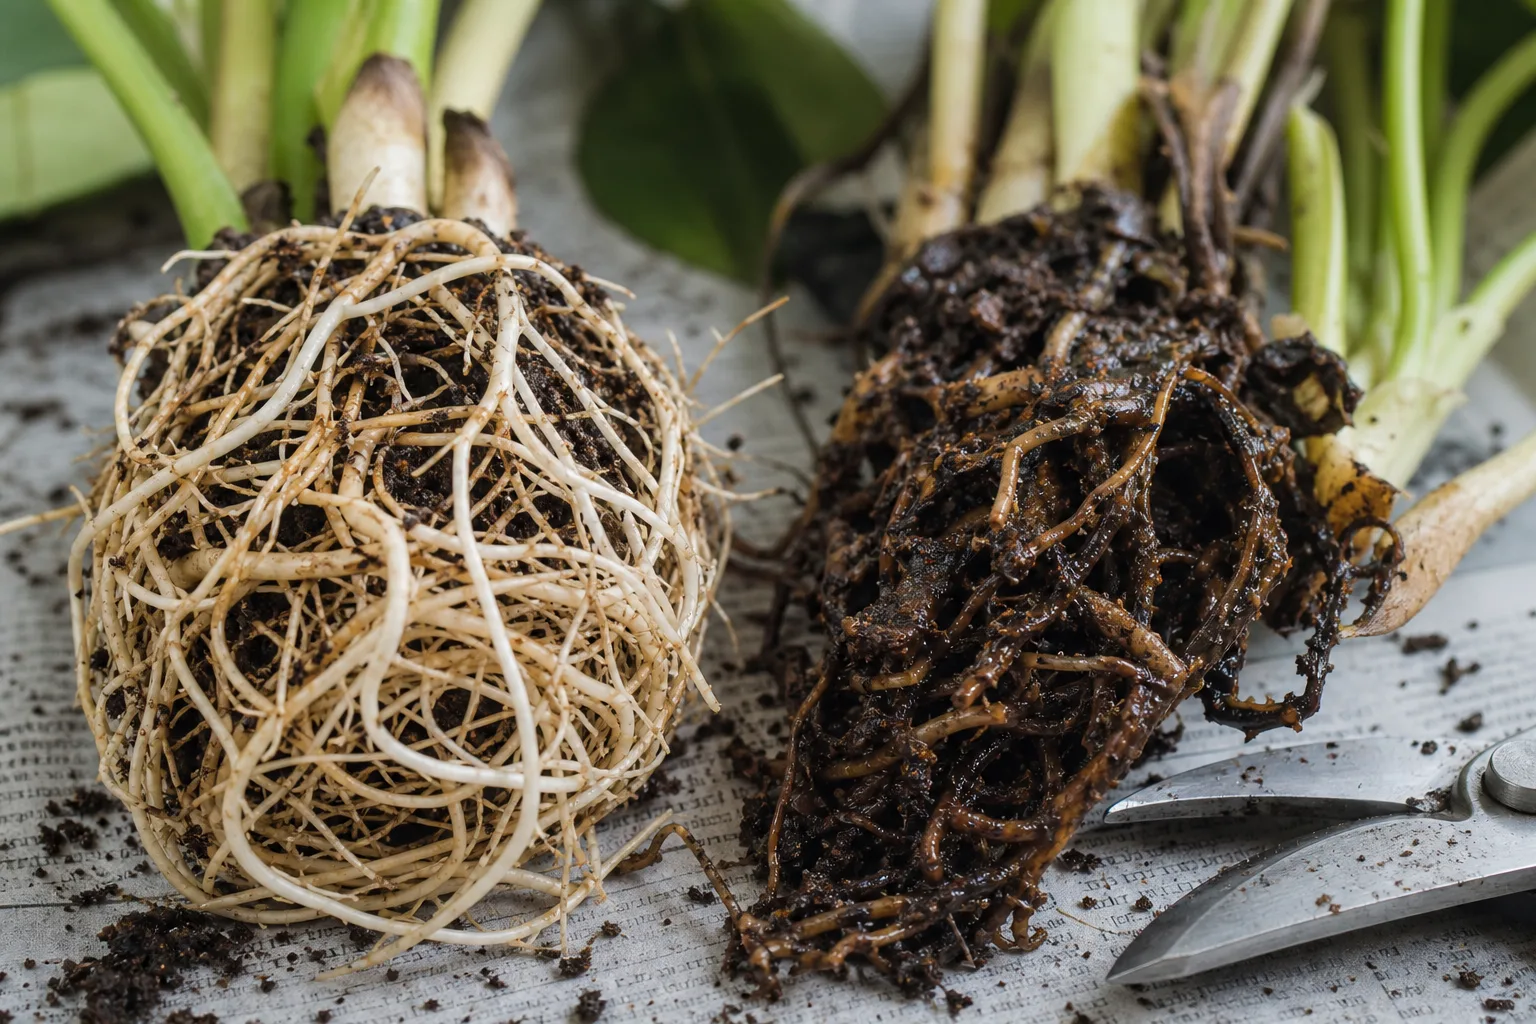
Choose a pot with a drainage hole only one size larger than the current container. Slide the plant out while wearing gloves, loosen only the outermost circling roots, and inspect for firm, pale roots versus dark, soft tissue that may be rotting. Set the root ball at the same depth in fresh, airy mix, then wait a short period before watering if roots were cut or damaged. The useful goal is a stable plant with enough fresh medium around its roots, not a dramatically larger decorative pot.
Adjust care through the seasons
In spring, check whether new growth has begun before increasing water and optional fertilizer. This is also a good time to prune, take cuttings or repot if the plant needs it. If it lives outdoors in summer, raise sun exposure gradually and monitor soil more often because warm air and wind can shorten dry-down time.
In fall, reduce feeding as growth slows and bring the plant inside before cold nights or frost. Indoors in winter, keep it in the brightest available spot, avoid cold glass and drafts, and allow more time for the mix to dry between waterings. Do not compensate for shorter days by keeping the soil constantly moist; the roots use water more slowly when light and growth decline.
Troubleshoot changes before treating
Look at the whole plant and its pot before acting. Note whether one branch or all stems are affected, whether the change began after moving the plant, how quickly the soil dries, and whether the roots or stem bases are firm. The table is a starting point for choosing what to inspect next, not a substitute for checking the plant closely.
| What you notice | First thing to check | Practical next step |
|---|---|---|
| Lower leaves drop after the mix has gone very dry | Root-ball moisture and stem firmness | Water thoroughly once, then return to a dry-down routine |
| Leaves yellow while the pot stays wet | Drainage, pot size and root condition | Pause watering; inspect roots if the mix does not begin drying |
| Stems stretch with wide gaps between leaves | Light direction and distance from window | Move gradually to brighter filtered light |
| Pale or crispy patches face the window | Recent exposure to direct sun or hot glass | Soften the light and avoid abrupt relocation |
| Fine webbing, cottony clumps or sticky residue appear | Leaf undersides and stem joints | Isolate the plant and identify the pest before treating |
Yellow or dropping leaves
A few older leaves can yellow and fall as a plant adjusts to a new room or as older foliage ages. A sudden pattern across many leaves needs a different response: check the root zone before watering. If the mix is bone-dry and the stems are still firm, give one thorough soak and let excess drain; if the mix is wet and leaves are yellowing, stop watering until you understand why the pot is not drying.
Repeatedly wet soil can deprive roots of oxygen and lead to root rot, but limp leaves alone do not prove that the plant needs more water. Slide the root ball out only if the soil smells sour, stays wet for an unusually long time, or the stem base is soft. Cut away only clearly dead, mushy roots with a clean tool, let the remaining roots dry briefly, and repot into fresh airy mix. NC State lists overwatering as a root-rot risk for this species; when the diagnosis is unclear, avoid trimming sound roots and seek help from a local extension office.
Leggy growth or scorched foliage
Long bare spaces between leaves usually mean the plant has been reaching for light. Move it closer to a bright window or add a grow light, but make the shift gradually; a plant that has stretched for months will not instantly regain a compact shape, and pruning may be needed after new growth strengthens. Turn the pot occasionally so the whole plant gets an even share of light.
Sun scorch looks different: the most exposed leaves develop bleached, tan or crisp areas after a sudden increase in direct rays. Pull it back from harsh afternoon sun or add a sheer curtain, then leave healthy damaged leaves in place until the plant replaces them. Avoid responding to pale foliage with fertilizer unless you have ruled out light stress and wet roots; a nutrient dose will not reverse burned tissue.
What to expect from flowers
Mature outdoor plants in warm conditions are more likely to flower than indoor specimens. The red slipper- or bird-shaped bracts are an interesting bonus at branch tips, but an indoor plant that stays leafy and healthy is not failing if it never blooms. NC State notes that flowering is rare indoors, so do not force stronger direct sun, extra fertilizer or smaller watering intervals just to chase flowers.
Steady warmth, strong filtered light and healthy new growth are sensible conditions for the plant to mature. If it does flower, keep handling precautions in mind when trimming spent growth, and do not confuse bracts with a separate plant or pest issue. The plant’s zigzag stems and foliage are its main ornamental feature.
Conclusion
A devil’s backbone usually thrives when you let its root zone dry between thorough waterings, give it bright filtered light and keep it warm in a pot that drains freely. Check the mix instead of obeying a calendar, adjust care when seasons change, and troubleshoot leaf problems by inspecting the soil and stems before adding water or fertilizer. Because it is an Euphorbia, plan every pruning or propagation session around its irritating sap and keep the plant and cuttings beyond children’s and pets’ reach.