How to Clean a Lawn Mower Air Filter
Learn how to clean a lawn mower air filter safely. Identify foam, paper, and dual-element filters, then clean, oil, or replace each the right way.

You can wash a lawn mower air filter only when the engine uses a serviceable foam element. A pleated paper cartridge should stay dry and is usually tapped gently or replaced, while a dual-element filter needs two separate treatments: service the foam pre-cleaner according to the manual and keep the paper cartridge dry.
Before opening the housing, find the engine model and its owner manual, shut the mower off, let it cool, and disconnect the spark-plug lead. Those four decisions matter more than any generic cleaning schedule: the filter type determines the method, and the exact engine determines the service interval.
The short answer
“Air filter” describes a job, not one universal part. Some small engines use a washable, oiled foam filter; others use a disposable pleated paper cartridge; and many pair a foam pre-cleaner with paper. The plastic or metal cover can look nearly identical across these designs, so do not choose a method by appearance of the housing alone.
If the filter is paper, do not wash it in water or solvent. If it is foam, check whether it is a foam-only filter or a pre-cleaner wrapped around a paper cartridge before reaching for oil. When the manual is missing or the media is hard to identify, pause and look up the engine model rather than experimenting.
Identify what type of filter your mower uses
The mower deck brand does not always identify the engine. A mower sold under one brand may have an engine made by another company, and the engine maker’s air-cleaner instructions control the filter method. Briggs & Stratton describes three common arrangements—paper, foam, and dual-element—and directs owners to identify the engine model and use its manual before ordering parts or servicing the assembly (Briggs & Stratton’s small-engine air-filter guide).
On most walk-behind gas mowers, the air cleaner sits near the engine under a small rectangular or rounded cover secured with a screw, knob, or clips. Before removing that cover, check the engine label or model stamping; it is often on the blower housing, near the starter, or on another visible engine surface. Honda’s official owner-manual library illustrates why matching the manual by series and model matters: even one mower family can have multiple manuals tied to specific model and serial-number ranges.
Foam-only filters
A foam-only element feels spongy and springs back when gently compressed. It may be yellow, gray, black, or another color, and it often has no pleats. Many foam-only filters are designed to hold a film of oil that catches fine dust; if the manual specifies an oiled filter, washing removes that oil, so the element must be fully dry and re-oiled before installation.
Foam that is brittle, torn, permanently compressed, crumbling at the edge, or no longer able to seal should be replaced. A foam filter that looks clean but has a split seam can still let unfiltered air pass around the damage.
Pleated paper filters
A paper element has accordion-like pleats, often held in a plastic frame or supported by a wire mesh. It is a dry filter. Water, detergent, solvents, brushing, and aggressive compressed air can deform or damage the media, so do not try to make a paper cartridge washable.
Some manuals allow gentle tapping or a specified low-pressure air method for removing loose surface dust. Other makers advise replacement rather than cleaning. If your manual does not explicitly allow a cleaning method, replace a dirty or damaged cartridge with the correct part.
Dual-element filters
A dual-element assembly has a foam sleeve or panel over a pleated paper cartridge. The foam is a pre-cleaner that catches larger debris before air reaches the paper. The pieces are not interchangeable, and their maintenance can differ: one foam pre-cleaner may be washed and dried, while another may need replacement or may be meant to stay dry.
Separate the foam from the paper before servicing. Do not oil the pre-cleaner unless the engine manual says to; oil can migrate into the paper element and restrict airflow. If the design, order, or orientation is unclear, take a photo before disassembly and check the model-specific diagram.
Gather supplies and make the mower safe
For a basic inspection, prepare a clean work surface, gloves, a screwdriver or the tool that fits the air-filter cover, lint-free cloths, and the exact replacement filter if the old one is damaged. For a washable foam-only filter, add a small basin, warm water, mild dish detergent, and the filter oil specified by the engine maker. Keep paper elements away from the wash basin.
Park the mower outdoors on a stable, level surface, set the brake if it has one, remove the key where applicable, and stop the engine. Let hot engine parts cool before touching them. Disconnect the spark-plug lead and position it so it cannot spring back onto the plug; CPSC lawn-and-garden safety guidance advises disconnecting spark-plug wires on gasoline-powered equipment before making adjustments or clearing jams near moving parts (CPSC safety guidance).
Do not work around a running engine, and do not reach below the deck for this task. If you need to tip the mower to access the filter, consult the manual first. A wrong tilt can move oil or fuel into places it should not be, and some mowers should remain upright for service.
How often to inspect, clean, or replace the filter
There is no safe universal interval for every mower air filter. Use the engine manual’s time or operating-hour schedule, then inspect sooner if you mow dry, dusty ground, cut frequently, or work where fine debris quickly coats the housing. A quick look before the season and periodic checks while mowing are useful, but visual inspection does not replace the maker’s interval.
Manufacturer schedules can differ by filter arrangement. Briggs & Stratton, for example, lists a 25-hour or three-month replacement interval for certain foam-only filters, while its dual-element guidance distinguishes a foam pre-cleaner from the paper cartridge and gives the cartridge a different interval. These are examples for applicable Briggs & Stratton designs, not a schedule to copy onto a Honda, Toro, or other engine. The manual for your engine wins.
As a practical reminder, BBC Gardeners’ World Magazine recommends checking the mower air filter monthly and replacing it when grimy in its general mower-maintenance guide. Gardening Know How also includes filter inspection in a broader lawn mower maintenance checklist, especially when dust is a concern. Treat these as prompts to look, not permission to clean a filter contrary to its manual.
Replace rather than clean any element that is torn, misshapen, oil-soaked when it should be dry, badly clogged, or unable to seal against its housing. A low-cost filter is not a good place to gamble with a fit that leaves a gap.
Step-by-step: remove and inspect the filter
- Find the engine model and procedure. Read the air-cleaner section of the manual, not just the mower’s general maintenance chart. Check whether the engine takes foam, paper, or both and note the part number if replacement may be needed.
- Shut down and cool the mower. Remove the ignition key if present, stop the engine, wait for moving parts to stop, and allow the engine to cool. Disconnect the spark-plug lead before opening the cover.
- Clean around the outside of the cover. Brush away dry clippings and dust from the housing exterior so debris is less likely to fall into the intake when the cover opens. Do not blow dirt toward an open carburetor or intake.
- Open the cover without forcing it. Loosen its screw or release its clips as designed. Set aside the fastener, and note the cover’s orientation.
- Lift out each element carefully. If there is foam over paper, keep the pieces separate and preserve their order. A quick phone photo can help you reinstall them the right way around.
- Inspect the element and seal. Look for tears, loose seams, collapsed pleats, oil staining, caked dirt, cracks, and a flattened gasket. Replace any damaged element with the exact compatible part.
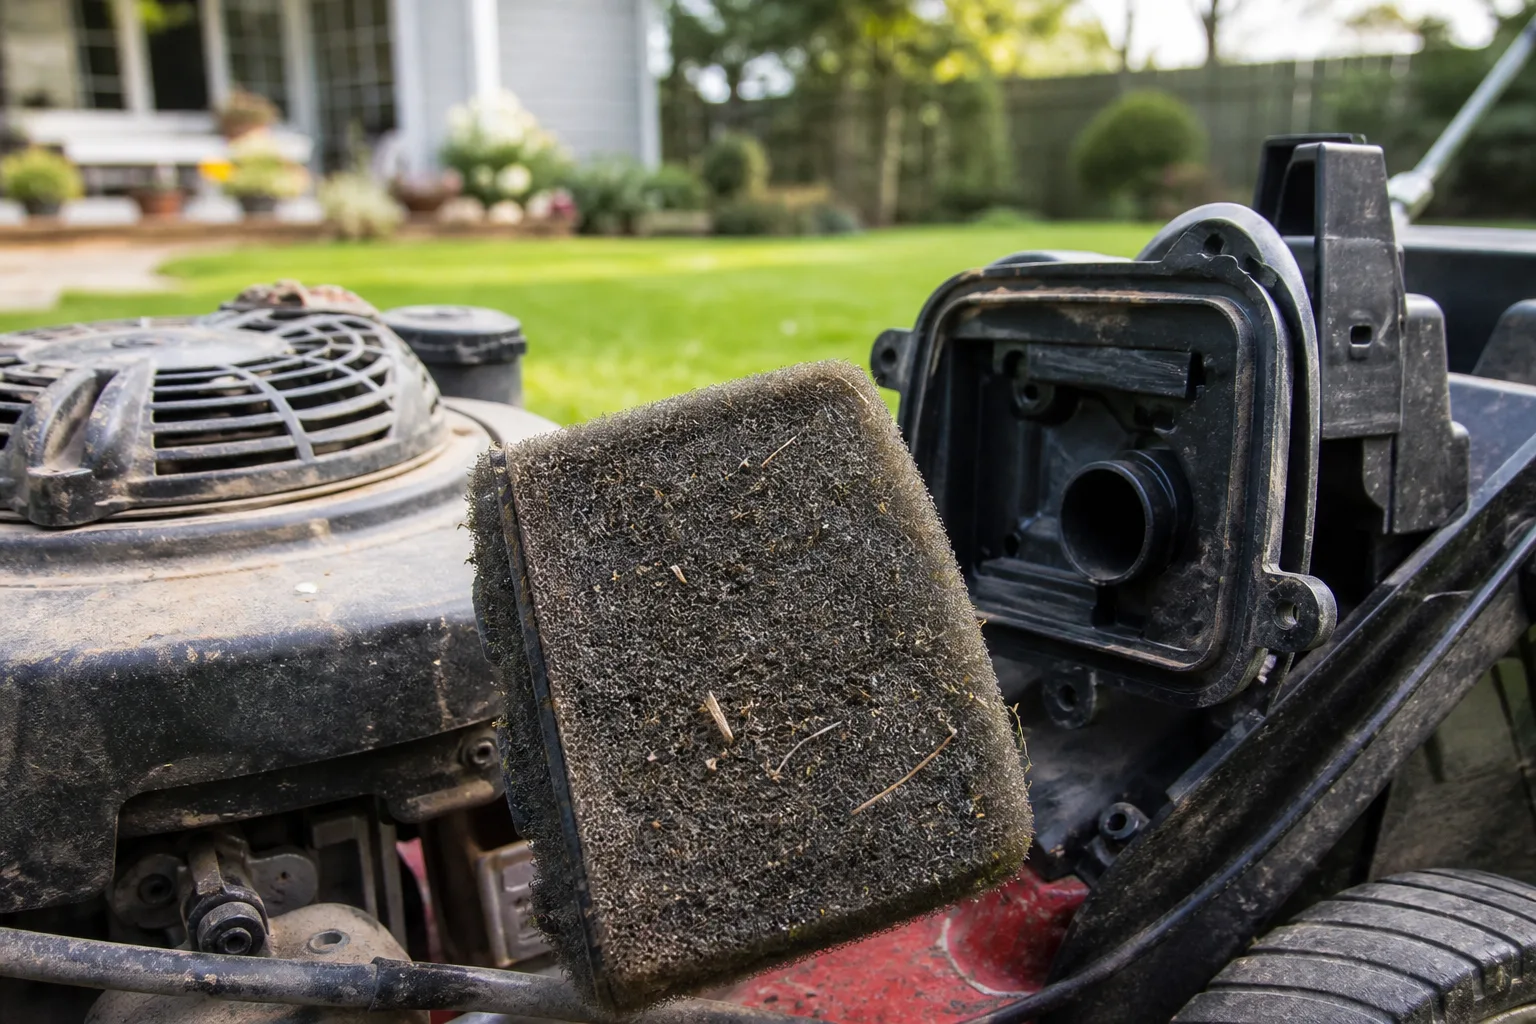
Keep the intake opening clean while the filter is out. Wipe dust from the housing with a clean cloth, working away from the intake rather than pushing debris inward. Do not leave a rag, tool, or loose material where it could be forgotten when the engine is restarted.
Clean and oil a serviceable foam-only filter
Use this procedure only when the manual identifies the element as washable foam. If the filter maker specifies a dedicated cleaner or filter oil, follow that product’s instructions instead of substituting household products. A foam filter with a torn seam or hardened surface should be replaced rather than washed.
- Remove loose dry debris first. Gently tap or brush off clippings without tearing the foam. Do this away from the open intake.
- Wash with warm water and mild detergent. Compress the foam gently in the soapy water to release dirt. Do not scrub it hard, stretch it, or twist it like a towel.
- Rinse thoroughly. Use clean water until soap and visible dirt are gone. Soap residue can interfere with the oil film on a filter designed to be oiled.
- Press out water. Squeeze the element between your palms or press it inside a clean cloth. Twisting can split the foam or its bonded seam.
- Air-dry completely. Leave it in a clean, ventilated place until it is dry throughout. A damp core is still damp even if the outside feels dry; do not speed the process with direct heat.
- Inspect again. Check the foam thickness, seams, edges, and fit. If the material crumbles or has a hole, replace it.

Oil the foam only when the manual calls for it
Some foam-only filters rely on oil in the foam to trap fine dust. If your manual specifies an oiled element, distribute the recommended filter oil evenly across the fully dry foam, then press it with a clean cloth to remove excess. The foam should be evenly treated without dripping or pooling oil in the airbox.
Do not guess an amount from another mower. Foam size and engine design vary, and using too much oil can choke airflow or transfer oil to nearby parts. If the manual calls for a dry foam pre-cleaner, leave it dry even if another engine’s foam-only filter is oiled.
Treat a foam pre-cleaner and paper cartridge separately
A dual-element unit needs a two-part inspection. Remove the foam pre-cleaner from the paper cartridge without shaking dust into the airbox. If the foam is washable according to the manual, wash and dry it as directed; if it is not washable, replace it. Do not soak, oil, or tap the paper cartridge as if it were foam.
Check the paper cartridge for plugged pleats, tears, crushed areas, oil staining, and a distorted sealing edge. Replace it at the manufacturer’s interval or sooner if damage or heavy contamination is present. If the manual allows gentle tapping, do that over a waste bin and stop when loose dust no longer falls; repeated hard impacts can deform the pleats.
Reassemble the pieces in their original order and orientation. Make sure the foam is seated evenly and does not cover a required sealing surface incorrectly. Never force the cartridge into a housing that is the wrong shape or size; an almost-fitting filter can leave a bypass gap.
What to do with a paper filter
Paper filter media is not washable. Do not rinse it, soak it, use dish soap, spray it with degreaser, brush between the pleats, or hit it against a hard surface. These methods can damage the media or push dirt deeper, even if the element looks cleaner afterward.
If your manual permits light dry cleaning, follow the exact method it describes. Some makers allow gentle tapping; some specify air pressure and direction; others say to replace the cartridge. Avoid compressed air unless the manual explicitly permits it, because a concentrated jet can tear or distort the filter and drive debris through the media.
Replace the paper element when the manual says to, when it is visibly damaged or oil-contaminated, or when the prescribed dry method does not clear the type of debris the manual says it can remove. Do not use a bright-light test as the only pass/fail measure; light transmission does not prove that the filter is structurally sound or sealing correctly.
Clean the housing and reinstall the filter
The housing and its sealing surfaces are part of the filtration system. Wipe loose dust from the interior with a clean, dry cloth, taking care not to push debris into the intake throat. Do not use gasoline, solvent, or aerosol cleaner inside the airbox unless the engine maker specifically instructs it.
Before closing the cover, confirm that the filter is dry if it was washed, properly oiled only if required, and seated in the correct direction. Check that the gasket or sealing lip lies flat all the way around. A folded edge or missing pre-cleaner can let unfiltered air bypass the media.
Set the cover back into its original position and secure its clips or screw without over-tightening. It should close normally; if it will not, remove it and check the filter orientation rather than forcing the cover. Reconnect the spark-plug lead only after the housing is closed and the work area is clear.
Start the mower outdoors. Listen for an uneven idle or unusual change in engine sound, and stop it if it runs poorly, smokes heavily, or leaks. A successful cleaning should leave the filter sealed and correctly installed; it is not proof that unrelated engine problems have been repaired.
Troubleshoot after filter service
If the engine starts and then stalls, first shut it down and recheck that the cover is secure, the filter is seated, and no cloth or loose debris remains near the intake. Confirm that you did not oil a dry pre-cleaner or reinstall foam before it dried. Correct an obvious installation error before trying to start again.
If the filter is installed correctly but the mower still has trouble starting, loses power, surges, or produces smoke, the cause may be elsewhere. A spark plug, stale fuel, fuel delivery, carburetor, or another engine fault can create similar symptoms. Cleaning the filter cannot fix a blocked fuel line or a damaged ignition part.
Do not keep running the mower to “burn off” heavy smoke or test a filter that is visibly damaged. Shut it down, let it cool, and use the manual’s troubleshooting section or have a small-engine technician inspect it. If you suspect oil or fuel entered the intake after tipping the mower, tell the technician how it was positioned.
Common mistakes that damage filters or engines
- Washing pleated paper: Water and scrubbing can damage the media. Replace a dirty cartridge unless its manual gives a specific safe dry-cleaning method.
- Oiling every foam piece: A foam pre-cleaner over paper may need to remain dry. Oil only when the exact engine instructions call for it.
- Reinstalling damp foam: Moisture can restrict airflow and trap dirt. Let the element dry completely before assembly.
- Using too much filter oil: Excess can pool, reduce airflow, or migrate into a paper cartridge. Apply only the maker-recommended product and amount.
- Opening a dusty housing carelessly: Grit can fall into the intake. Clean the outside first and work slowly.
- Using a substitute filter: A filter that is close in size may fail to seal. Match the engine model and specified part number.
- Starting the engine without the filter: Do not run it bare, even briefly. The filter protects the engine from dust drawn in with the intake air.
- Forcing the cover closed: Resistance usually means a filter is misoriented, not fully seated, or incorrect for the housing.
When to call a small-engine technician
Stop and get help if the filter housing, gasket seat, cover, or intake is cracked; if the carburetor opening is packed with debris; or if a fastener has fallen into the intake. Those conditions can compromise the seal or leave loose material where the engine will draw it in.
A technician is also the safer choice if the manual is unavailable and you cannot identify the filter, if fuel or oil is leaking, or if the mower still runs badly after a correct filter replacement. Persistent black or blue smoke, repeated stalling, backfiring, or a strong fuel smell calls for diagnosis rather than repeated cleaning.
Bring the mower’s engine model and serial information, plus the old filter if it is safe to remove. That helps a shop identify the correct replacement and determine whether the issue is the air cleaner or another engine component.
Conclusion
The right way to clean a lawn mower air filter depends on its material and the engine it belongs to. Wash only a serviceable foam filter when the manual allows it, dry it completely, and oil it only when the instructions call for an oiled element. Keep paper cartridges dry, treat foam pre-cleaners separately, and replace anything damaged or unable to seal.
Before the mower starts again, verify that the filter sits flat, the cover closes without force, and the spark-plug lead is reconnected after the job is complete. If the engine still runs poorly, move on to diagnosis instead of repeating a cleaning that cannot solve the underlying fault.



