How to Plant Iris Rhizomes Step by Step for Spring Blooms
Learn how to plant iris rhizomes, from choosing the best season and spacing to setting the fan, watering in, and preventing rot from deep planting in wet beds.
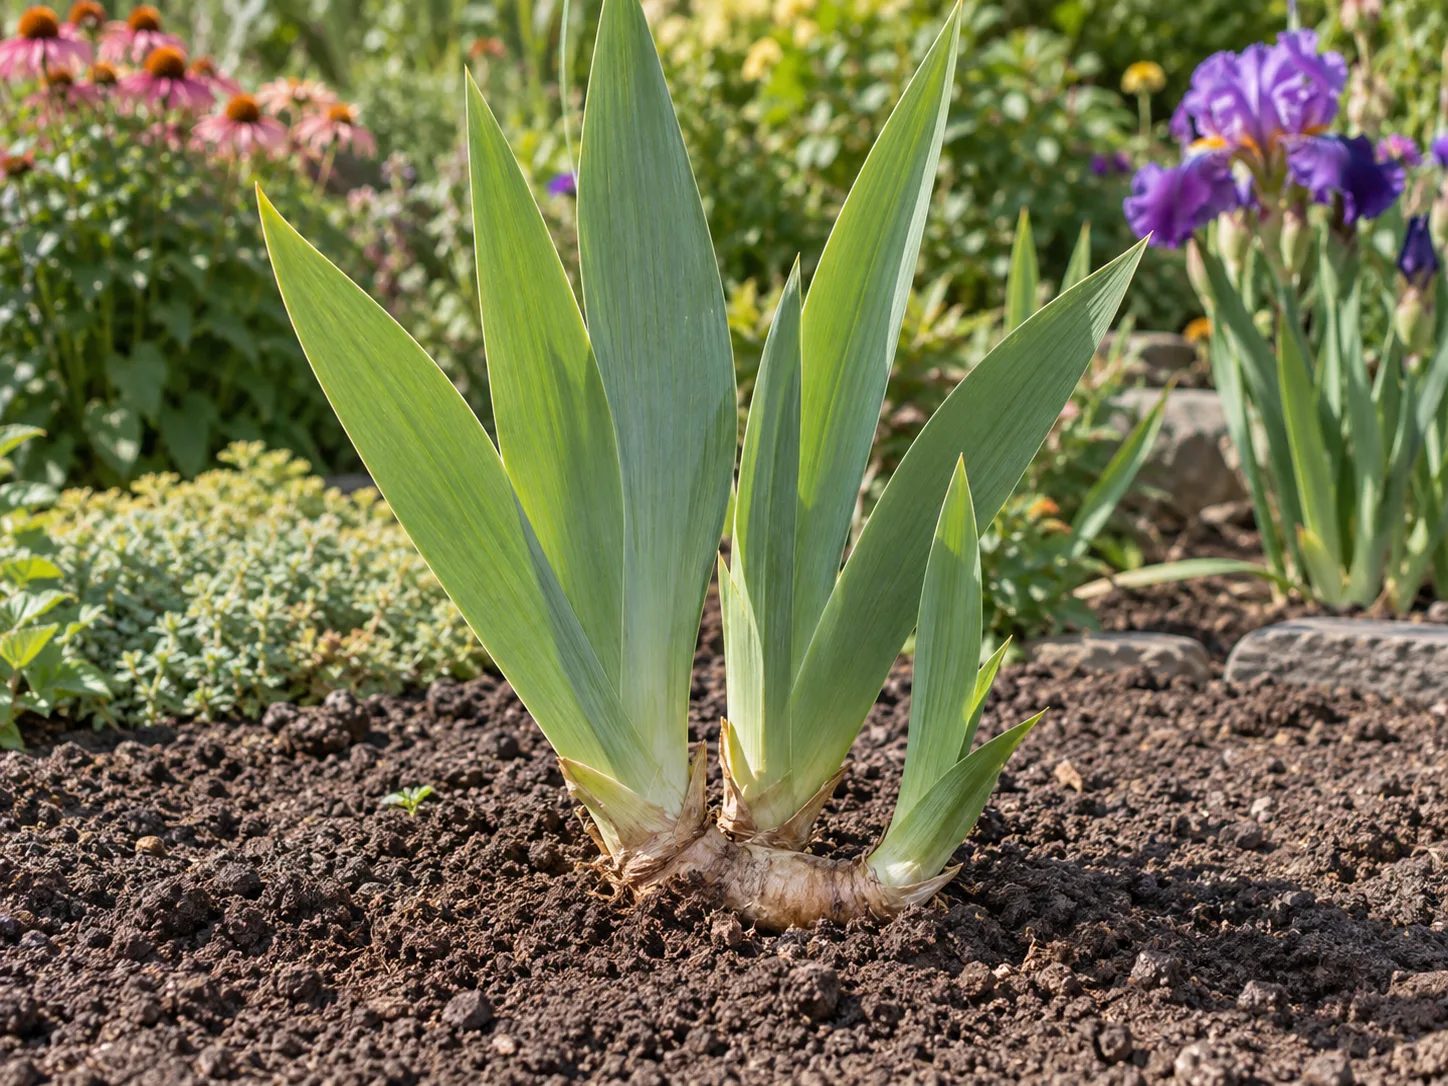
Plant bearded iris rhizomes in late summer to early fall, in a sunny bed where water drains freely. Set each fleshy rhizome horizontally at or just above soil level, spread its roots down and outward, and keep the leafy fan visible. Burying the rhizome like a tulip bulb or tucking it into wet, heavily mulched soil is a common way to invite rot and poor flowering.
These instructions focus on bearded irises, often sold as Iris germanica cultivars. Other irises may grow from true bulbs or have different moisture and depth preferences, so identify the plant before you dig. The key is not a perfectly measured hole; it is matching the planting depth, spacing, and watering to the specific iris and the way your soil handles rain.
Check which iris you have before digging
The word “iris” covers several kinds of plants, and garden centers sell them in different forms. Bearded irises have thick, horizontal, fleshy stems called rhizomes. Their roots emerge from the underside of the rhizome, and a fan of swordlike leaves grows from the top. A healthy piece usually includes a firm section of rhizome, some roots, and at least one live leaf fan.
The Royal Horticultural Society’s border-iris guide describes bearded iris as the familiar ruffled-flower type and explains that its rhizome is a swollen stem, not a conventional root. That distinction affects planting depth: the stem stays near the surface, while its roots go into the soil. The same guide distinguishes rhizome-grown border irises from bulb irises, which are planted according to the depth rules for bulbs.
Bearded rhizomes are not planted like bulbs
Dutch iris and reticulated iris are examples of bulbous irises; their bulbs go below the surface. A bearded iris rhizome is more like a horizontal stem resting on the ground. Do not assume that instructions for planting iris bulbs apply to the fleshy rhizome in your hand. Check the label or ask the supplier if the package simply says “iris” and does not identify the type.
Siberian and other beardless irises also have different growth habits and may prefer more moisture than bearded types. A water-edge planting plan that suits a Siberian iris can be a poor fit for a bearded iris rhizome. If you have a named cultivar, use its label and regional extension guidance; if you have a fan with a thick exposed stem, the shallow bearded-iris method is likely the relevant one.
Choose the planting window
For bare-root bearded iris rhizomes, late summer to early fall is the usual planting window. Planting after the hottest part of summer gives the rhizome time to begin rooting before winter while avoiding the damp, cool conditions that can keep a fresh wound or poorly drained bed wet. The Royal Horticultural Society’s growing guide lists July through October for new rhizomes in its UK guidance; local seasons differ, so use that as a seasonal pattern rather than copying the months into every climate.
The useful cue is a stretch of warm soil with less intense air heat, followed by enough time for roots to establish before severe cold. The Epic Gardening guide to bearded iris rhizomes recommends timing around local weather extremes and points out that warmer regions can plant later than colder ones. Late summer planting is not a guarantee of flowers the following spring: a small division may first spend its energy making roots and leaves.
Time planting around heat and the first freeze
In a cold-winter region, plant soon after the summer heat eases, leaving several weeks for roots to settle before the ground freezes. In a mild-winter climate, you may have a longer fall window, but avoid setting out bare rhizomes during peak heat if the soil dries rapidly. A local first-freeze calendar can help, but garden elevation, coastal weather, and unusual seasonal swings may shift the actual window.
If a shipment arrives at the right planting season, plant it promptly rather than leaving it in a warm garage or sealed plastic. If you cannot plant within a day or two, unpack the rhizomes, keep them cool and airy, and prevent the roots from drying completely. Do not keep them wet in a closed bag; that trades desiccation risk for decay. Ask the seller for storage instructions if the delay will be longer.
Spring planting is possible when that is when a healthy rhizome becomes available, but it is a compromise rather than the ideal. Cool, wet spring soil can be hard on a freshly planted rhizome, and the plant may prioritize foliage and roots over blooms. Choose a sunny, fast-draining location, avoid overwatering, and accept that flowering may be delayed until the next full cycle.
Choose a sunny site that drains well
Give bearded irises a site with at least six hours of direct sun when possible. They can grow with some light shade, but too little sun often means fewer flowers and slower drying around the rhizomes. Air movement also helps leaves dry after rain, especially in humid climates or crowded borders.
Drainage matters as much as sun. Bearded iris tolerates dry spells better after establishment than persistent wetness around the rhizome. NC State Extension’s Plant Toolbox recommends full sun and rich, well-drained soil and warns that heavy clay and excess moisture can contribute to rot. If water stands in the proposed spot after rain, do not solve the problem by digging a deeper planting hole; a hole in clay can collect water like a basin.
Fix a wet bed before planting
Check the site after a substantial rain. If puddles remain for hours or the soil stays sticky and saturated, move the planting to a better spot or raise the bed. A broad raised bed or low mound that sheds water is more useful than placing compost in one small hole. Amending only the hole can create a sharp change in texture that holds water around the roots.
For heavy soil, work organic matter through a wider planting area to improve structure, or plant on a raised ridge with the rhizome slightly above the surrounding grade. The Utah State University Extension iris guide notes that planting depth depends on soil texture and that rhizomes in heavier soil may sit at or a little above ground level. Avoid adding a concentrated layer of manure or fertilizer directly beneath the rhizome; concentrated nutrients can injure new roots, and lush soft growth is not the goal.
Do not use a thick blanket of mulch to compensate for a poor site. Mulch can keep moisture against the rhizome and shade the part that should stay near the surface. If the only available location stays wet through winter, choose another plant for that spot or use a properly drained raised bed.
Inspect the rhizome and leaf fan
Before planting, unpack each piece and check it in good light. A useful division feels firm, not spongy, and has intact roots plus a growing point or leaf fan. A trimmed or shortened fan is not automatically a problem; commercial rhizomes may arrive cut back to reduce water loss during shipping. A limp leaf fan can recover if the rhizome itself is healthy and firm.
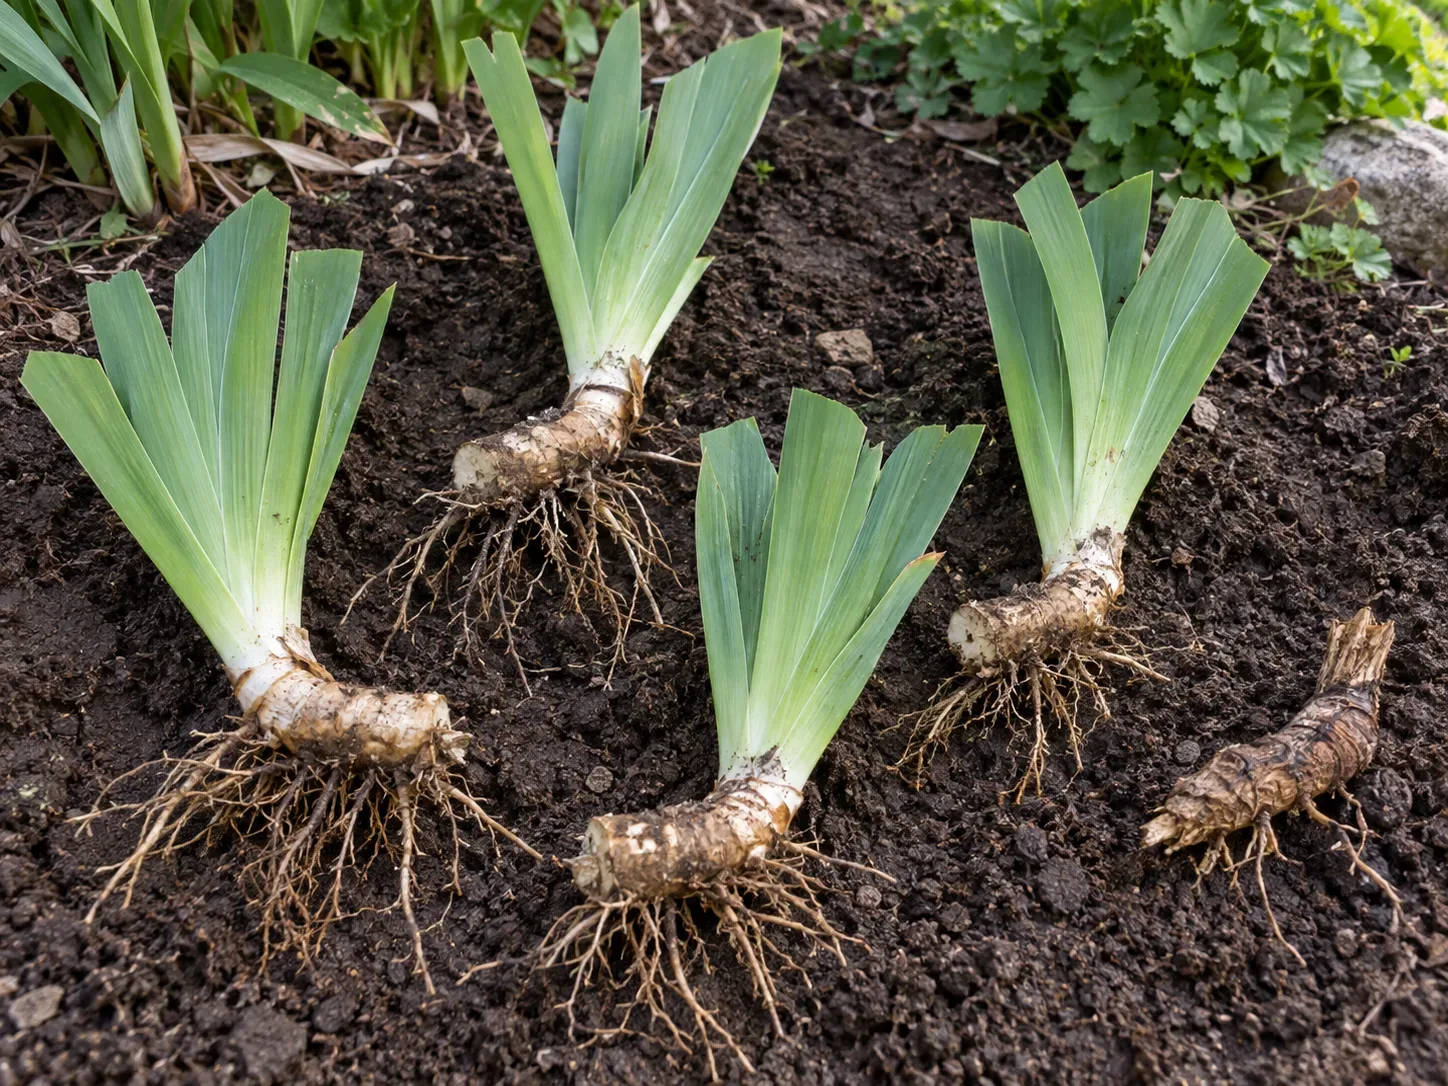
Keep firm divisions and discard damaged tissue
Reject a rhizome that is mushy, foul-smelling, extensively shriveled, or blackened through the fleshy stem. A dry surface or a small bruise does not necessarily mean the whole piece is lost, but soft rot can spread and should not be planted beside healthy divisions. If you are dividing an established clump, cut away visibly rotten material with a clean knife and keep only firm, healthy sections with roots and a fan.
The RHS division advice recommends selecting healthy young rhizomes with roots and leaf fans and discarding old or withered sections. If you divide your own clump, do the cleanup before moving to the next plant and disinfect the blade between suspect divisions. That limits the chance of dragging contaminated tissue from one rhizome to another.
Remove dried leaves and packing debris that would sit against the rhizome, but do not aggressively peel healthy outer tissue. Keep roots attached and shaded until you plant. If roots have become very long or tangled, separate them gently with your fingers rather than chopping them down unnecessarily.
Prepare the soil and plan spacing
Loosen the soil over the whole bed, not just a small hole, so roots can spread and water can move through the profile. Break up compacted clods and remove persistent weeds, especially grasses that can weave through the rhizomes. A sunny border with open air around the leaves will be easier to keep healthy than a crowded pocket between thirsty groundcovers.
Set larger bearded iris rhizomes about 12 to 18 inches apart as a practical starting range. The RHS recommends about 12 inches between larger border irises and 6 inches between dwarf types, while Epic Gardening suggests 12 to 18 inches for bearded rhizomes. Cultivar size, whether you want an immediate mass or a long-term bed, and your willingness to divide all affect spacing. Crowding can look full quickly, but it reduces airflow and means you may need to divide sooner.
For a small group, arrange three rhizomes in a triangle or loose fan rather than lining all the leaf fans toward the same central point. Point the fans outward so each plant has room to expand and the group reads as one patch. Mark the cultivar name and planting date before burying the label in the bed; colors and bloom times are hard to identify after the flowers fade.
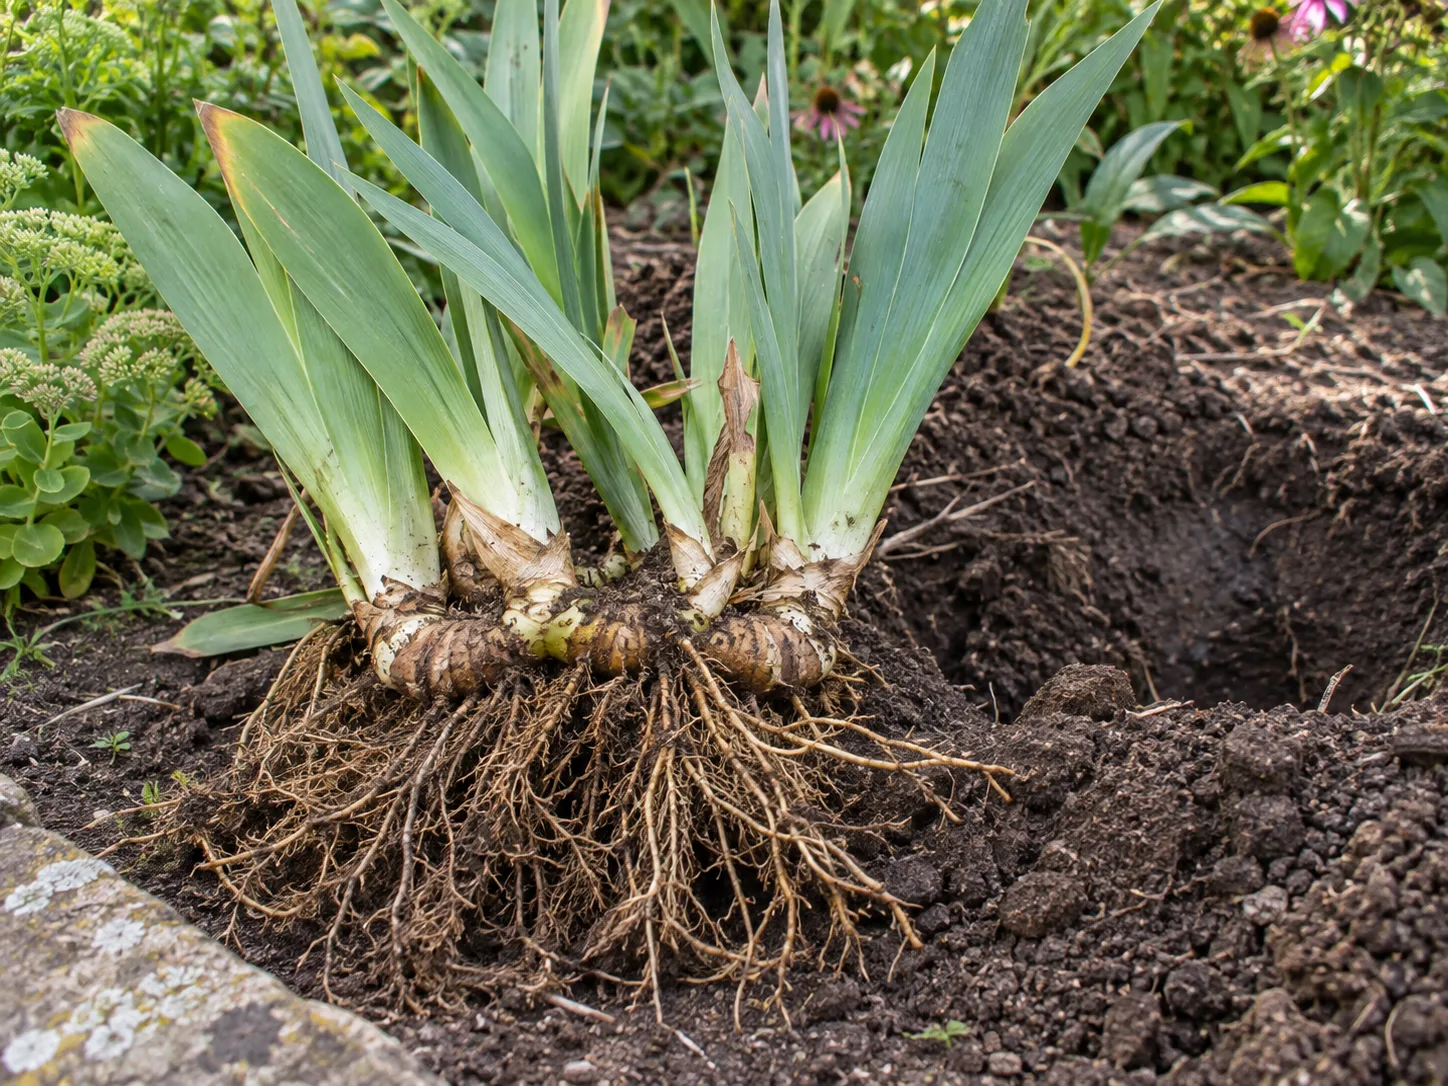
Plant the rhizome step by step
Lay out the rhizomes before digging all the holes. That lets you confirm spacing, fan direction, and the overall pattern while the pieces are still visible. Keep roots moist but not soaking as you work, and plant one group at a time so they are not left in direct sun or wind for an hour.
Build a mound and spread the roots
Make a shallow planting hole wide enough for the roots to fan out. Pull a small mound of soil into the center and rest the rhizome on top. The mound supports the fleshy stem while giving its roots a path down and outward rather than folding them into a tight bundle beneath the plant.
Spread the roots over both sides of the mound with your fingers. They can angle downward and outward; they should not curl upward, form a dense knot, or be pinched between clods. A useful check is to lift the rhizome slightly after arranging the roots: if they fall naturally around the mound, they are not bunched into one wad.
Set the depth and point the fans outward
Place the rhizome horizontally, with its fan upright and its top at soil level or just peeking above it. Backfill around the roots first, then press soil gently into place so the rhizome does not rock. The leaves should remain above ground, and the fleshy stem should not be buried several inches like a bulb.
Recommendations vary a little by soil texture. The RHS advises leaving the top part of border-iris rhizomes partially exposed, and NC State recommends soil level or a light covering. Utah State Extension varies its depth by soil, with a more exposed position in heavy ground and a shallow cover in lighter soil. The shared practical rule is shallow planting with good drainage; do not bury the whole rhizome, and use a higher position where wet soil is the greater risk.
As you fill, keep the leaf fan pointing away from the center of the group. If one piece has a natural new-growth end, let that direction face outward into open space. Finish by firming the soil around the roots—not by pressing hard on the rhizome itself. If the piece tilts or shifts, lift it and remake the mound rather than trying to wedge extra soil over the top.
Water and mulch the new planting
Water once after planting to settle soil around the roots and remove large air pockets. Then check the bed before watering again. If the surface is dry but the soil a couple of inches down is still cool and moist, wait; if the root zone is drying and no rain is forecast, water deeply enough to moisten it without leaving a puddle.
New roots need moisture, but a newly planted bearded iris is not a wetland plant. Rainfall, temperature, and soil texture matter more than a fixed schedule. Sandy beds dry faster; compacted clay can stay wet long after the surface looks dry. In hot, windy weather, inspect more often; in a cool rainy spell, withhold irrigation.
Keep ordinary mulch off the rhizome and the base of its fan. This is one of the few garden tasks where a bare, visible top is useful: sun and air reach the rhizome, and you can notice rot or movement before it becomes severe. NC State Extension cautions against mulching bearded iris because retained moisture can contribute to rot.
There is a climate-specific exception. Some cold-region extension advice recommends a loose winter cover after the ground freezes to reduce frost heaving for new plants. That is not the same as keeping a wet blanket over the rhizome all year. If your local extension recommends winter protection, apply it only after the soil has frozen, keep it airy, and remove it as temperatures rise in spring.
Care for iris through the first season
Check the planting after heavy rain and freeze-thaw cycles. If a rhizome has washed out or been pushed up so its roots are no longer in soil, reset it gently. If soil has settled over the top and buried the stem, brush some away. A shallow planting is not an invitation to leave all the roots exposed; the roots should be covered even when the rhizome top remains visible.
Keep weeds from competing with the young roots. Pull them by hand near the rhizome or cut them at the surface rather than chopping deeply with a hoe. The roots and rhizomes spread close to the surface, so rough cultivation can sever them. Do not feed heavily at planting. Once the plant is growing, use a light application of a suitable garden fertilizer only if a soil test or local recommendation indicates a need; keep granules off the rhizome and follow the label.
Newly planted rhizomes need water during prolonged dry periods in their first growing season. After they establish, bearded irises are relatively drought tolerant, but drought during active growth can still limit flower development. In spring, let the fan grow; the leaves produce energy for the rhizome and next year’s blooms. Cut away only fully brown or damaged leaves unless local disease advice calls for more.
What to expect the following spring
A healthy division may flower the first spring after late-summer planting, but there is no guarantee. Small pieces, late planting, a harsh winter, or a rhizome that spent the first season rebuilding roots may produce leaves without a flower stalk. That is not automatically failure. Keep the site sunny, do not bury the stem while tidying the bed, and allow the foliage to mature.
If the flowers are sparse, look at spacing, sun, and crowding before adding fertilizer. Bearded irises that are shaded or packed into a dense clump may produce leaves but fewer blooms. Established clumps often need division when flowering declines in the center; the RHS guide to dividing irises recommends dividing rhizomatous bearded irises every three to five years, usually after flowering, rather than disturbing new plantings each season.
Adjust for spring delivery or container planting
If a rhizome arrives in spring, you can still plant it. Choose a free-draining bed, avoid a low spot that stays cold and wet, and water only when the root zone begins to dry. It may produce leaves without flowering that season, so treat establishment—not immediate flowers—as the goal. If spring is unusually cold and rain-soaked, wait for a workable soil window rather than planting into mud.
For a container, choose a wide, heavy pot with drainage holes and enough room for the rhizome and roots to spread. A shallow, broad container is easier to manage than a tall narrow pot, and it should not stand in a saucer full of water. Use a free-draining potting mix and place the rhizome at or near the surface. Container soil heats and dries faster than a garden bed, so check moisture more often while still avoiding saturation.
Containers also expose roots to colder and hotter swings than in-ground plantings. In a severe winter, move the pot to a sheltered but unheated location or protect it according to local guidance; do not bring a dormant hardy iris into a warm room. In a very hot climate, afternoon shade for the pot may reduce overheating without placing the plant in deep shade.
If a bare rhizome has been out of the ground for several days, inspect it before planting. A slightly dry appearance is less concerning than a soft, wet, foul-smelling stem. Rehydrate dry roots briefly in clean water if they are brittle, then let excess water drain and plant promptly. Do not soak a questionable rhizome overnight or plant one with soft rot next to healthy divisions.
Troubleshoot rot, shriveling, and poor bloom
A rhizome turns soft or smells sour. Lift it and check whether rot is limited or has reached most of the fleshy stem. Remove a badly rotted piece rather than burying it and hoping it recovers; improve drainage before replanting nearby healthy pieces. Clean the knife between cuts, and avoid wet mulch against the remaining rhizomes.
The rhizome shrivels after planting. Check whether the roots are in contact with soil and whether the bed is drying too quickly. Water the root zone if it is dry, but do not keep the entire bed soggy. A little surface drying is not the same as a root system drying out.
The fan grows leaves but no flowers appear. The rhizome may still be establishing, or the plant may be shaded, crowded, or planted at the wrong depth. Check that the top is not deeply buried and that direct sun reaches the bed for much of the day. Give a newly planted division time through a full growth cycle before moving it again.
A rhizome is heaved up after winter. Freeze-thaw cycles can lift shallow plantings, especially in exposed beds. Press soil around the roots and re-seat the rhizome at the surface; do not bury it deeply to prevent a second heave. A light, loose winter cover after the ground freezes may help in regions where extension guidance recommends it.
The plant flops or the group looks crowded. Some tall cultivars need support while in bloom, but a persistently congested patch may need division after flowering. Do not divide a freshly planted rhizome simply because it has not bloomed once. Let it establish, then use reduced flowering or an overcrowded center as a signal to lift and divide the mature clump.
Conclusion: keep the rhizome shallow and settled
For bearded iris, choose a sunny spot with good drainage and plant in late summer or early fall when the weather gives roots time to establish. Spread the roots around a small mound, set the rhizome at or just above the soil surface, and keep routine mulch away from the fleshy stem.
The exact calendar date and amount of cover depend on climate and soil. If you remember one rule, make it this: cover the roots, not the whole rhizome. Water enough for roots to settle and grow, then let the plant’s first season establish the clump before judging its flowers.