Snowdrop Flower Care: Planting, Bloom Time, and Growing
Learn how to grow snowdrops, choose fall bulbs or plants in the green, time division, protect fading foliage, and site them for dependable early blooms.
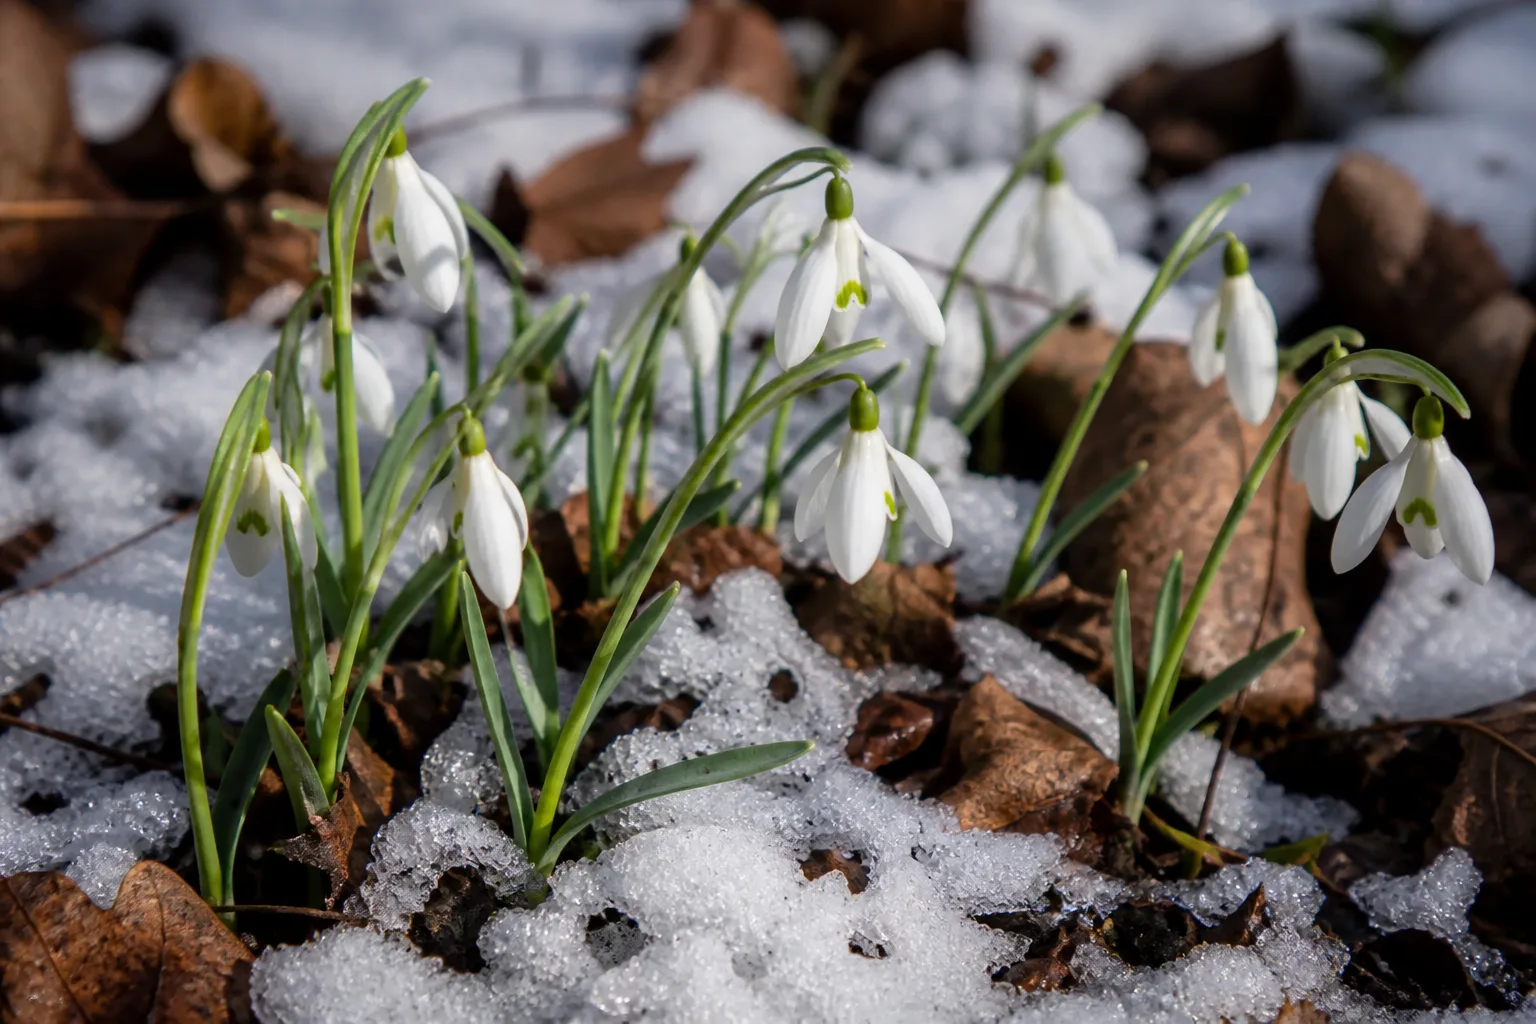
Snowdrops give a garden its first clear sign that the dormant season is loosening. Their white, nodding bells often open in late winter, sometimes beside old leaves or through a thin layer of snow, but the most important growing decision happens before that display: choosing bulbs or leafy plants that have not dried out.
The common snowdrop, Galanthus nivalis, is a small bulbous perennial that can naturalize under deciduous trees and shrubs. It needs cool-season moisture, soil that drains, and enough patience to let its narrow leaves finish feeding the bulb after flowers fade.
If you want a dependable patch, focus on healthy planting stock, a cool woodland-edge site, and the right moment to move or divide the bulbs. Fertilizer and pruning are secondary; premature drying, waterlogged ground, and cutting foliage too soon are more likely to set a planting back.
Snowdrop facts at a glance
| Growing detail | What to expect |
|---|---|
| Botanical name | Galanthus nivalis; other Galanthus species are also grown |
| Plant type | Bulbous perennial in the Amaryllidaceae family |
| Flower | Usually one nodding white flower per stem, with shorter inner tepals marked green |
| Typical size | Often about 4–6 inches tall for common snowdrop; species and cultivars vary |
| Bloom window | Late winter to early spring; local weather and species shift the date |
| Light | Partial shade, especially beneath deciduous trees |
| Soil | Humus-rich, cool, moist but well-drained soil |
| Spread | Gradual clump growth from bulb offsets and self-seeding |
| Maintenance | Leave foliage to yellow, water during active growth if soil dries, divide only when needed |
The Missouri Botanical Garden lists common snowdrop for USDA Zones 3–7 and recommends 2–3-inch planting depth, close spacing, and groups for a stronger display. Treat that zone range as a useful starting reference rather than a guarantee: summer heat, winter chill, soil moisture, cultivar, and local exposure also affect how well a patch persists. Missouri Botanical Garden Plant Finder
How to recognize a snowdrop
Snowdrops are not miniature white tulips. Each flowering stem carries a single, downward-facing bell with six petal-like parts, botanically called tepals: three longer outer segments surround three shorter inner ones, often with green markings at their tips. Two or more narrow, strap-shaped leaves rise from the bulb, and the whole plant stays close to the ground.
The botanical name Galanthus refers to the genus; Galanthus nivalis is the familiar common snowdrop. Flowers may have a faint fragrance, but the scent can be hard to notice outdoors in cold weather. Mature size also changes among species and selections, so a plant sold as “giant snowdrop” may stand taller and bear larger flowers than common snowdrop.
Snowflakes in the genus Leucojum are close relatives in garden catalogs, not another name for snowdrops. Their six tepals are more evenly sized, while Galanthus has the distinctive three-long, three-short arrangement; some Leucojum stems also carry several flowers. Check the botanical label if you are choosing plants for a specific height or bloom sequence.
When snowdrops bloom and how long flowers last
Common snowdrops generally bloom from late winter into early spring, but a calendar month is a poor predictor across regions. A mild coastal garden may see flowers earlier than a colder inland site, and a shaded, cool bed can lag behind a warm wall even in the same town. Missouri Botanical Garden notes that common snowdrop typically flowers from late February into late March around St. Louis, illustrating how local climate anchors the date.
Cold weather slows the display; a mild spell can make flowers open quickly and fade sooner. Each bulb’s flowering period is limited, so planting a drift rather than a few isolated bulbs creates more visible color, while combining early and later Galanthus selections can stretch the season if those cultivars suit your climate.
Snowdrops may push through frost or a light covering of snow, but they are not a promise of blooms at a fixed date every year. If your planting appears late, give it time before digging: shoots can emerge at different speeds, and new bulbs may spend a season establishing roots before they flower.
Where to plant snowdrops: light and shade
Choose a position that gets bright light in winter and early spring, then partial shade as deciduous trees leaf out. That seasonal shift suits the plant: the bulbs can photosynthesize while the canopy is bare, then rest beneath cooler cover during summer dormancy. Woodland edges, the north or east side of deciduous shrubs, and the front of a partly shaded border are reliable starting points.
Avoid both extremes: dense year-round shade can weaken flowering, while exposed, hot sites may dry the bulbs during their short active season or summer rest. Snowdrops can grow in full sun where soil stays cool and moist, but full sun is not the best default in regions with hot summers or fast-drying sandy ground.
Look at the soil as well as the light. A spot under a tree is useful only if rain reaches the ground and the bed does not become bone-dry; large tree roots can also compete for water. If the only available tree bed stays dry, improve it with organic matter and plan to water during prolonged dry spells rather than assuming shade alone will solve the problem.
Soil and drainage that support repeat blooms
Snowdrops favor humus-rich soil that stays evenly moist in the growing season but drains after rain. Leaf mold or finished garden compost improves soil structure and adds organic matter; work it into the bed before planting rather than piling it against emerging shoots. Their tolerance for soil texture is broader than “loam only”: clay or sandy ground can work if it does not remain saturated or dry out for long periods.
If puddles persist for a day or more after ordinary rain, choose a different site or raise the bed before planting. Bulbs and roots need oxygen as well as moisture, and standing water increases the chance of rot. In sandy soil, compost and leaf mold help retain moisture; in compacted clay, loosen the planting area and improve the bed broadly instead of mixing a little sand into a small hole.
Keep the site cool through summer. The Royal Horticultural Society recommends partly shaded soil that is moist but well-drained and cautions that snowdrops dislike very dry, sandy conditions, particularly in full sun. The practical target is not boggy ground; it is soil that does not bake dry while the bulbs replenish their reserves. RHS snowdrop growing guide
Choose bulbs or plants in the green
Snowdrops can be sold as dormant autumn bulbs or as actively growing plants with leaves still attached, called “in the green.” Either can work, but the choice affects risk. Snowdrop bulbs are small and can dry during storage or shipping, so buy dormant bulbs from a supplier with fresh stock and plant them promptly after arrival.
For a first planting or a small display you want to establish reliably, in-green plants are often the easier choice. You can see that they are alive, keep their roots intact, and plant them after flowering while the leaves remain visible; the trade-off is seasonal availability and the need to replant them soon after purchase.
If you choose dry bulbs, plant in fall when the soil is cool but still workable. Avoid buying them far in advance and storing them in a warm, dry shed, where a bulb can lose viability before it reaches the bed. The BBC Gardeners’ World Magazine profile notes that dry bulbs may take a season to settle before flowering, so a first-year gap does not automatically mean the planting has failed. BBC Gardeners’ World Magazine snowdrop profile
Planting snowdrops step by step

For dormant bulbs, follow the package depth when it gives a species-specific instruction. A common practical range is about 2–3 inches deep, with bulbs spaced roughly 2–3 inches apart; planting them in groups or generous drifts makes small flowers visible from a path. The Missouri Botanical Garden recommends groups of at least 25 for a mass effect, but a small garden can start with a smaller cluster and expand it over time.
Set each dry bulb with its pointed end upward if you can identify it. Cover it with soil, water once to settle the planting, then let rainfall handle routine moisture unless the bed dries during active growth. Mark the location so you do not dig into the bulbs later when the foliage disappears.
For plants in the green, preserve the root ball and set the clump at the depth it was growing before. A visible transition from pale stem tissue to green foliage can help you estimate the soil line; practical snowdrop planting guidance from Olivia’s Garden describes using this “tidemark” to avoid burying leaves too deeply or exposing roots. Olivia’s Garden snowdrop planting guide
Work quickly once an in-green plant is lifted or delivered. Keep roots shaded and damp, not submerged, and replant the clump the same day if possible; then water it in. Do not pull the bulbs apart into tiny pieces unless you are deliberately dividing a healthy clump, because needless root damage adds stress just when the plant is trying to rebuild after bloom.
Watering across the snowdrop year
Water newly planted snowdrops after planting and keep the root zone from drying while roots establish. Established patches in a temperate, rainy climate often need little supplemental water during spring, but a long dry spell while leaves are green can limit the food stored for next year’s flowers.
After foliage dies back, the bulbs enter a quieter summer phase. They are not actively thirsty in the way a leafy perennial is, but repeatedly hot, dry soil can weaken them; this is why deciduous-tree shade and humus-rich soil are useful even though the plant is dormant. In containers or hot, exposed gardens, check the soil occasionally and water lightly if it is bone-dry rather than keeping it constantly wet.
If your snowdrops struggle, adjust water based on the site, not the calendar. A cool, damp spring bed should not be watered on a fixed schedule, while a sandy border beneath a thirsty tree may need a deep drink during an unusually dry spring. Always let excess water drain; adding moisture to already saturated soil makes the problem worse.
After flowering: protect foliage and next year’s bloom
Let the leaves remain until they yellow naturally. While they are green, they capture energy and return it to the bulb, where next year’s growth is already being prepared; cutting, tying, or mowing them down early can reduce the strength of the patch. A tidy flower bed is not worth losing the plant’s short period of active growth.
Spent flowers can be left in place or removed while leaving every leaf intact. Deadheading is optional if you do not want seedlings, but it will not fix a poor bloom the following year; the leaves matter more. When foliage is fully yellow and loose, it can be cleared or allowed to break down with leaf litter.
As the leaves fade, make a note of where the bulbs are. A simple plant marker, map, or photo prevents accidental digging when the bed looks empty in summer. This is especially helpful below deciduous shrubs, where a later planting or edging project can otherwise slice through a hidden clump.
Fertilizer and mulch: keep both simple
Snowdrops rarely need a dedicated fertilizer routine in a bed with reasonable soil. Before planting, improve poor ground with compost or leaf mold; after flowering, a light organic top-dressing can replenish the surface without disturbing the bulbs. Avoid assuming that a high-nitrogen feed will compensate for dry soil, deep shade, or foliage removed too early.
Use a thin mulch of leaf mold or shredded leaves to protect soil structure and moderate moisture. Keep the layer loose enough that shoots can emerge and do not bury flowers under a thick mat of wet material. If tree leaves collect naturally, leave a modest layer where it will not smother the small shoots, and clear only dense, matted piles.
How to naturalize snowdrops into a drift
Snowdrops spread gradually by bulb offsets and, in suitable conditions, by seed. Instead of planting a rigid line, create irregular groups at the front of a woodland bed, around a deciduous tree, or beside a path where the small flowers are easy to see. A broad drift takes time; adding bulbs in several seasons is often more dependable than expecting a few bulbs to cover an area quickly.
Plant close enough that the flowers read as a group, but leave room for clumps to expand. The Missouri Botanical Garden suggests spacing individual bulbs 2–3 inches apart and planting at least 25 together for a sweeping effect; smaller groups are still useful near steps or a front border. A natural-looking distribution can be achieved by planting clusters of three to five bulbs across the area rather than spacing every bulb in a perfect grid.
Snowdrops also work in grass if you can delay mowing until the leaves have yellowed and released their stored energy. A lawn that must be cut very short in early spring is a poor site; choose an unmown edge or a tree ring instead. In beds, pair the bulbs with plants that emerge later, such as ferns or other woodland perennials, so their leaves can cover fading snowdrop foliage without competing during its brief spring growth.
The grower’s account at Talking of Plants recommends replanting divisions promptly and arranging groups irregularly when creating a naturalized drift. That practical advice fits the plant’s scale: small clusters repeated over several years look more convincing than one dense clump dropped in the middle of a lawn. Talking of Plants on naturalizing snowdrops
Divide established snowdrop clumps
Divide only when a clump is crowded, spreading beyond its space, or flowering less than it used to. There is no need to split every snowdrop patch every few years if it is healthy and still producing flowers. Division is also a useful way to move a small part of an established planting to a new location without buying more bulbs.
Two practical windows are used: shortly after flowering while leaves are still green, often called dividing in the green, or later in spring as the foliage begins to yellow. The Royal Horticultural Society recommends lifting and dividing as leaves turn yellow, while specialist growers also value the in-green window because the clump is easy to see and replant in place. Either way, work gently and avoid leaving the roots exposed.
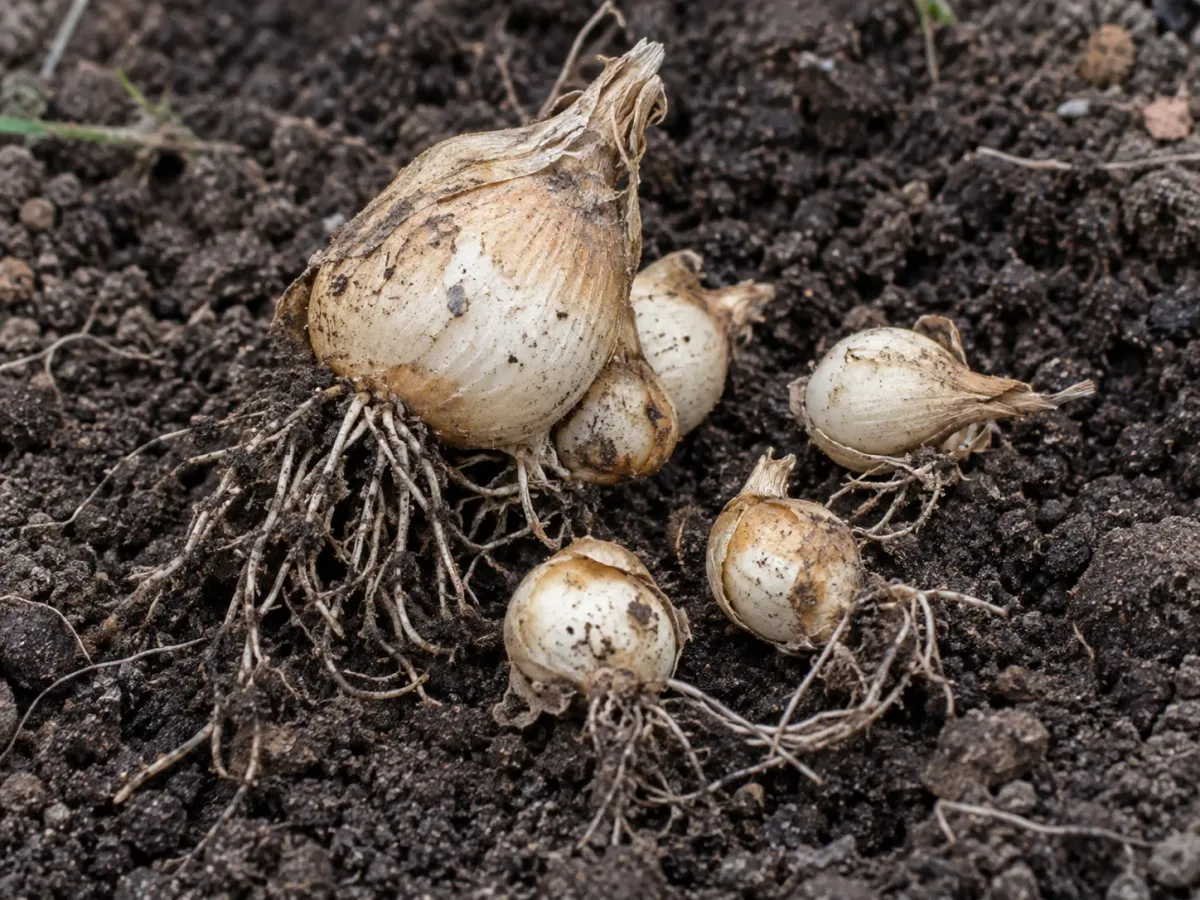
Water the bed if it is dry, then loosen soil around the clump with a hand fork rather than cutting directly down through it. Lift enough soil to keep roots attached, tease the clump into smaller rooted groups, and replant each group at its previous depth. Replant immediately, firm the soil with your fingers, and water once to settle it.
Do not divide a weak or newly planted clump just to make more plants. Let it establish for a few seasons first, and divide only part of a large patch if you are uncertain how it will respond. If you wait until all leaves disappear, mark the location beforehand; otherwise, it is easy to miss the bulbs or damage them while digging.
Growing snowdrops from seed
Seed is a slow route to more snowdrops, not the fastest way to fill a bed. NC State Extension notes that snowdrop seeds need a cold spell to germinate and that the plant may have a shorter lifespan in warmer climates; the Royal Horticultural Society advises sowing seed soon after it ripens. In a cool garden, natural winter conditions can provide the cold period without a complicated indoor treatment.
If you want to try, collect ripe seed when capsules are ready, then sow it promptly in a labeled pot of fine, well-drained mix. Keep the pot outdoors in a protected spot where it experiences natural seasonal temperatures, and keep the medium lightly moist rather than waterlogged. Germination may be uneven, and seedlings need several seasons to build a bulb large enough to flower.
Seedlings may not match a named cultivar exactly. Use seed when you enjoy the experiment or want to raise many plants over time; use bulb offsets or division when you want to preserve the appearance of an existing cultivar. If snowdrops have already naturalized in your garden, watch for seedlings near mature plants rather than disturbing the whole patch.
Snowdrop types and varieties worth knowing
The most familiar choice is common snowdrop, Galanthus nivalis, a compact species with white nodding flowers and green markings on the inner tepals. It suits woodland-style plantings and is widely cited as hardy in cold-temperate gardens, but actual performance depends on summer conditions as well as winter lows.
Galanthus elwesii, often called giant snowdrop, is typically larger, with broader foliage and larger flowers than common snowdrop. It can make a more visible accent in a mixed bulb planting, though “giant” is relative and labels should be checked for exact species or cultivar. Avoid choosing solely by a nursery photo; verify mature size and bloom period if you are building a sequence.
For a double-flowered look, Galanthus nivalis ‘Flore Pleno’ has additional inner segments. Other cultivars may have distinctive green markings or a different height and bloom window; specialist snowdrop growers often sell them under cultivar names, so keep labels if you want to remember which forms thrive in your garden.
If you want a plant that looks like a snowdrop but is taller or blooms later, compare it with Leucojum snowflakes before buying. Similar white bells do not guarantee identical timing, height, or flower structure. A mixed planting can be attractive, but label each bulb type so later care or division stays accurate.
Growing snowdrops in containers
Snowdrops can grow in a container if the pot has drainage holes and enough depth to protect bulbs from rapid temperature and moisture swings. Use a free-draining, humus-rich potting medium and plant a small cluster rather than one isolated bulb; close grouping makes the flowers easier to appreciate at eye level.
Set the container outdoors in a cool spot with winter light and partial shade later in the year. Water during active growth when the mix begins to dry, but do not leave the pot standing in a saucer of water. A container can dry much faster than a garden bed in spring and can overheat against a south-facing wall in summer.
After flowering, leave the leaves until yellow, then keep the pot somewhere shaded and protected from extremes while the bulbs rest. Containers may need dividing or refreshing sooner than an in-ground patch because space is limited, but do not split them automatically every year. If the bulbs become crowded or the compost dries too quickly, move the cluster into a bed after bloom or refresh the container carefully.
Why snowdrops fail to flower
Leaves appear, but there are no flowers. Newly planted dry bulbs may be settling in, especially if they were stored too long or planted late. Give them another season before digging; if a mature patch repeatedly produces leaves only, assess how much light reaches it in late winter, whether the soil stays moist through spring, and whether last year’s leaves were cut or mown early.
Nothing emerges after planting. The bulbs may have dried before planting, rotted in wet ground, or been disturbed by animals. Check the site only after the expected bloom period has passed, and dig one bulb gently rather than excavating the entire bed. If it is soft or decayed, improve drainage and replace only a small test group with fresh bulbs or in-green plants.
The patch flowers less each year. Summer dryness, dense shade, competition from weeds, or early foliage removal can weaken bulbs; persistent congestion can also reduce the display. Correct the underlying condition first, then divide a portion of the patch if clumps are clearly overcrowded. Feeding will not solve these problems by itself.
Leaves yellow before flowering. Some yellowing after bloom is normal, but premature collapse can indicate drought or root stress. Compare the timing with other bulbs in the same bed and check soil moisture and drainage before applying fertilizer or pesticide. If leaves show gray mold or lesions, remove badly affected material and improve air movement; seek local diagnostic advice if symptoms recur.
Snowdrops are often resistant to deer browsing, and their small size means they are not a major target for many garden pests, but “resistant” does not mean invulnerable. Animals can still dig bulbs up, and plant diseases can occur in damp, mild conditions. Start with healthy bulbs, avoid waterlogged sites, and inspect rather than treat on assumption.
Are snowdrops toxic to people and pets?
Treat snowdrops as ornamental plants, not edible flowers. NC State Extension classifies common snowdrop as a low-severity poisonous plant; eating a quantity can cause nausea, vomiting, or diarrhea. The Royal Horticultural Society also flags the plant as harmful if eaten by people, dogs, or cats, so place it where curious children and pets are less likely to chew flowers, leaves, or bulbs. NC State Extension Plant Toolbox
Wear gloves when planting or dividing, especially if you have sensitive skin, and wash your hands and tools afterward. The Missouri Botanical Garden advises gloves during planting to avoid possible skin irritation. Do not use the bulbs as food or make a home remedy from them; plant chemistry and medicinal research do not make garden bulbs safe to handle or ingest. If a person or animal eats part of the plant, contact a medical professional, veterinarian, or local poison service for case-specific advice instead of waiting for symptoms. Missouri Botanical Garden Plant Finder
Conclusion
Snowdrops are easiest to grow when you match the planting method to the plant’s season: use fresh dry bulbs promptly in fall, or choose leafy plants in the green after bloom for a more visible, low-risk start. Give them partial shade, cool soil that drains, and enough spring moisture to finish their short growing cycle.
Once a patch is established, let the foliage yellow, resist unnecessary digging, and divide only when the clumps need it. A small, thoughtfully placed group can become a lasting early-season drift, especially beneath deciduous trees where the flowers get light before the canopy fills in.