How to Find a Lawn Sprinkler Valve
Find buried lawn sprinkler valves with a safe, step-by-step search. Learn what controller zones, valve boxes, wiring, and 811 can tell you.

The quickest way to find a buried sprinkler valve is to identify the controller station that serves the problem area, then narrow the search with the system plan, visible valve boxes, and a short zone test. A wire or valve locator can help when those clues point to a section of the yard. Digging across the lawn at random is slow and risks cutting a pipe or control wire.
Start with observations that do not disturb the ground. Residential systems vary: several valves may share one manifold box, larger properties may have boxes spread across the yard, and older or altered systems may have a buried valve with no obvious box. There is no dependable distance from the controller, house, water meter, or first sprinkler head that identifies every valve.
Start with the symptom, not a shovel
Before looking for a valve, write down exactly what the system is doing. Is one section dry while other zones work? Do heads in one zone barely rise, spray unevenly, or continue running after the controller stops? Does the entire system fail to start? These patterns help identify which station to investigate, but they do not pinpoint the valve by themselves.
If one zone is affected and the others run normally, focus first on that station’s valve, wiring, and downstream pipe or heads. A controller output problem, loose connection, damaged wire, stuck valve, clogged filter, closed shutoff, or broken lateral can all produce similar symptoms. If every zone is affected, check the controller display, irrigation shutoff, water supply, and backflow assembly before assuming several buried valves failed at once.
Pause automatic schedules while you investigate. A scheduled cycle can start while you are near a box or handling a locator, and repeated long runs waste water if a valve is stuck open. Use the controller’s manual station test only when the system is in a safe condition; stop if water is flooding, flowing toward a foundation, or creating an electrical hazard.
Map the target zone at the controller
The controller is your first reliable reference because each automatic zone is assigned a station. The station wire at the controller operates the solenoid for a valve or valve group; the valve then admits water to a set of sprinkler heads. Your job is to match the problem area to a station before you search for its hardware.

Read the station labels and test one zone
Look for labels such as “front lawn,” “east bed,” or “drip,” but treat them as clues rather than a map. Handwritten labels may be wrong after a landscape renovation, and some systems have blank or duplicated station names. Compare the label with the schedule and the area that actually receives water.
If it is safe to run the system, use the controller’s manual mode to activate one station for a short test. Walk the yard and note which heads rise, which areas remain dry, and whether water comes from more than one separated area. Ask a helper to operate the controller while you observe the lawn. Record the station number and the visible heads before testing another zone.
Do not open the controller’s electrical enclosure or move wires just to identify a station. The front-panel controls are enough for this test. If the display reports a fault, the controller is wet or damaged, or you see exposed wiring, stop and have the equipment checked.
Know what a failed zone can and cannot prove
A nonworking zone is not automatically a bad valve. If the controller shows a station running but no heads respond, the cause could be an electrical connection, solenoid, valve diaphragm, water supply, or pipe problem. If the valve opens but a buried pipe is broken, the valve may be perfectly sound and still be the component you need to find to isolate the leak.
Likewise, if a zone will not activate at all, you may be dealing with a controller or wiring fault before the valve. A professional can test the low-voltage circuit and solenoid with suitable equipment. For a homeowner locating a box, the useful conclusion is narrower: confirm the station and affected area, then search for the valve that serves that station without assuming the symptom has identified the failed part.
Search the paperwork before the yard
Check the irrigation plan, installation invoice, warranty packet, inspection file, or notes left by the installer. An as-built diagram may mark valve boxes, the water supply entry, controller wiring routes, and the heads assigned to each zone. A plan can save hours, especially on a large property with remote valve groups.
Plans are not always accurate. Landscaping work, a patio addition, a broken pipe repair, or a replacement controller can change the original layout. Use the drawing to choose a search area, then compare it with a short zone test and visible clues. Rain Bird’s sprinkler-system installation guidance treats a layout plan and marked locations as part of installing a system; keeping the homeowner copy accessible makes later repairs easier.
If you cannot find a plan, contact the prior owner, property manager, irrigation contractor, or installer. A city or county permit file may hold an irrigation drawing for permitted work, although many routine residential systems have no detailed record on file. Ask for the most recent revision rather than relying on an old landscape sketch.
Inspect likely valve-box areas
With the target zone identified, make a visual search from the water source outward. Look around the outside wall where the irrigation line leaves the building, near the backflow assembly, along lawn edges, and at transitions between separate lawn or bed areas. These are useful starting points, not fixed rules: valves may be grouped near the service entry or placed remotely to serve different parts of a large landscape.
Treat the water meter and backflow assembly as landmarks
The water meter, main shutoff, backflow preventer, and irrigation control valves do different jobs. The meter measures household water use; the backflow assembly protects the potable supply from reverse flow; zone valves direct water to selected sprinkler circuits. They may be near one another, but a meter box is not proof that sprinkler valves are inside it.
Use the meter or backflow location only to understand where the irrigation service enters the landscape. Do not open, adjust, or dig into utility-owned meter equipment. Do not turn backflow handles or shutoff valves unless you know what they control and why the system needs them. If a valve is visibly leaking or the backflow assembly is damaged, stop the test and call a qualified irrigation or plumbing professional.
Look for lids hidden by turf, mulch, or soil
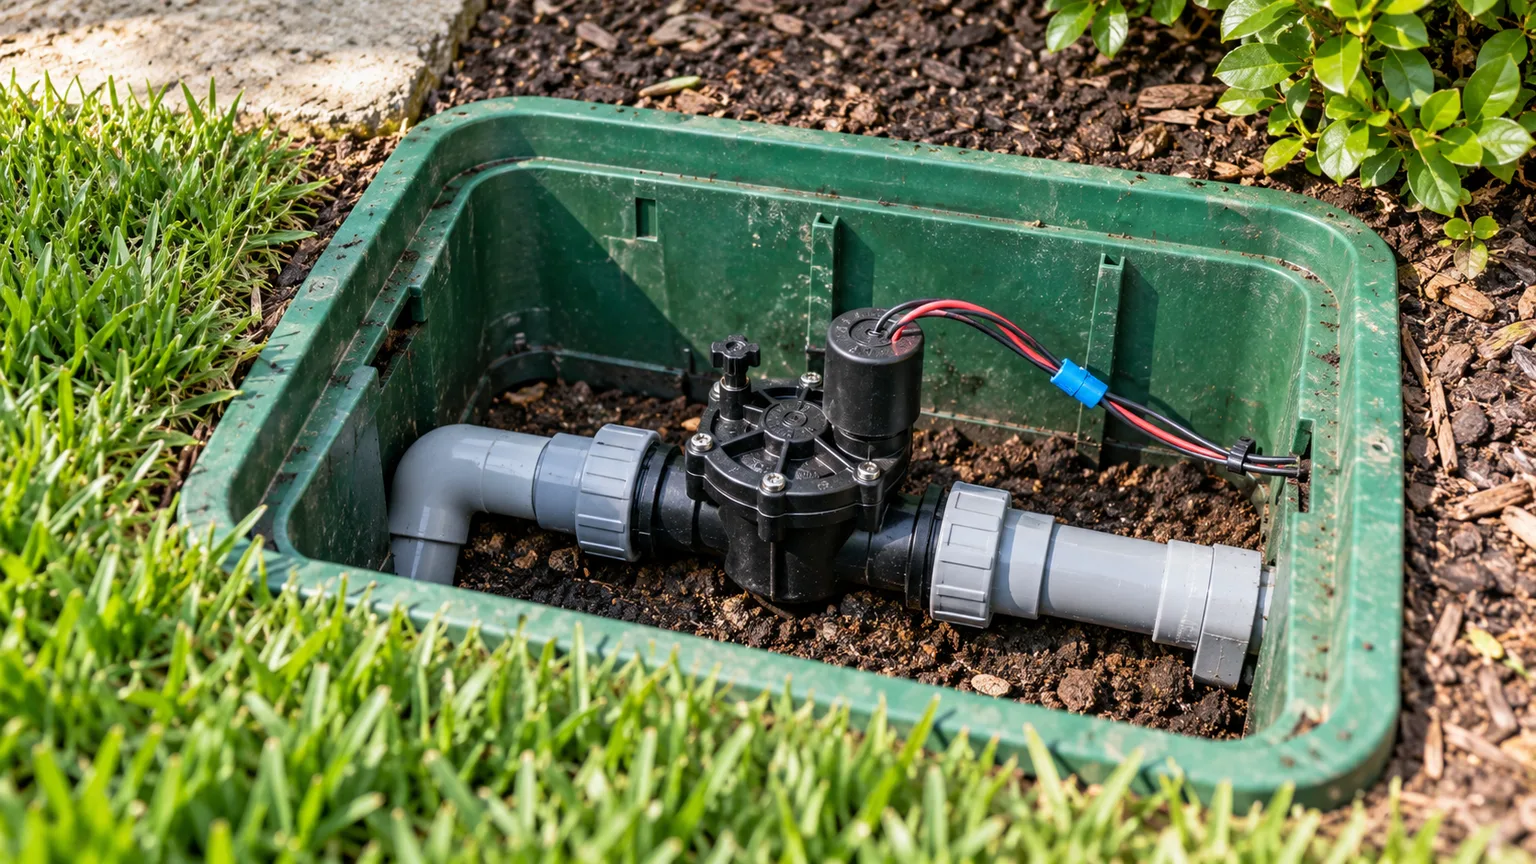
Valve boxes are often dark green or black plastic with a flat lid near ground level. Their edges can disappear under overgrown grass, leaves, mulch, or a thin layer of sediment. Walk likely routes slowly and look for a rectangular outline, a seam in the turf, a small depression, or a patch of grass that grows differently because water collects around the box. The Sprinkler Supply Store learning-center guide also notes that covers can be obscured by mulch and turf, a useful reminder to inspect the surface carefully before disturbing it.
Clear loose leaves or mulch by hand and brush soil from a suspected lid. Do not lever up an unknown cover with a sharp tool, and do not push a rod through the center of a suspected box: a solenoid, wire splice, or valve may sit directly below. A lid that is partly hidden can usually be exposed from its edges with a small hand tool once the location is confirmed and underground utilities have been addressed.
The number of boxes varies. A small system may have one box containing several valves; a larger property may have several groups, with one box near each zone cluster. The valves may also be below grade without a proper box, particularly on an older or modified system. If no lid is visible, move to the next evidence step rather than widening the search by digging.
Run a short, controlled zone test
A helper can make a zone test more useful. Have one person operate the confirmed station at the controller while the other walks the suspected area. Listen near likely box locations for a short solenoid click or a change in water sound, and watch for heads beginning to rise. Mark observations on a sketch instead of trying to memorize them.
Sound is a clue, not a locator by itself. Water can travel through pipes and soil, and pump, traffic, wind, and other zones can mask the noise. A clicking solenoid may be audible at the valve, but a valve that is electrically silent could have a failed coil, broken wire, or controller issue. Do not leave a malfunctioning zone running while you search; end the test promptly if you see pooling or uncontrolled flow.
Do not rely on which sprinkler head starts first to estimate the valve’s exact position. Head order depends on pipe routing, pressure, elevation, and system design, and nearby heads may rise almost together. The more dependable result is a confirmed boundary: which heads operate on the target station and which do not.
Trace the wiring and use a locator
The controller cable provides another path to follow. From a distance, note where the cable exits the controller and whether you can see a conduit or route toward the yard. The common wire usually connects to multiple valves, while a station wire serves a particular circuit, but color coding and splice layouts are not universal. Never assume a wire color or cut into a cable to identify it.
If the wiring is exposed at a serviceable control panel, match the station label to the controller’s own terminal labeling only if you can do so without removing covers or disconnecting anything. When the wiring route is buried, use a compatible irrigation wire or valve locator, or have an irrigation technician trace it. A locator sends a signal through a circuit and a receiver follows that signal; some tools can also help detect the solenoid’s response. Follow the equipment manual and do not attach leads to controller terminals unless the manufacturer’s procedure specifically calls for it.
Choose a wire or valve locator for the job
A dedicated wire/valve locator is more useful than a general metal detector when boxes are plastic. A metal detector may respond to a small metal component, but it cannot reliably identify the plastic lid and can also react to unrelated buried objects. Locator readings can be confused by shared or crossed wires, damaged cable, nearby landscape-lighting lines, or other buried systems, so confirm a signal from more than one direction. A field guide by irrigation-system owner Robert Maxvill describes using zone behavior, surface clues, and a wire tracker as complementary evidence; none replaces checking that a signal matches the station you mapped.
Not every locating tool does the same job. A wire tracer follows a signal along a cable; a valve locator is designed to help identify the solenoid or valve position; a chatter tool makes an energized solenoid easier to hear. Product names vary, so read the tool’s instructions and confirm its intended use before renting it. A tool that follows a wire route can take you close to a valve but may not tell you which branch or box contains the target when several valves share a manifold.
Some locators require the user to connect a transmitter to the station circuit or solenoid. That connection is the point where a simple search can become electrical troubleshooting. If you cannot confidently identify the correct conductors, cannot isolate the controller according to the manufacturer’s instructions, or see a damaged splice, stop and hire a technician rather than experimenting with live wiring. A rental tool is worthwhile only if you can use it correctly and interpret the signal.
Probe only after the location is narrowed
Probing is a last, limited confirmation step, not a way to survey an entire lawn. First reduce the search to a small area using the zone test, plan, visible service line, or locator. Then request an underground utility locate before any digging or soil penetration. In the United States, contact 811 or your state 811 center several business days ahead as required locally, describe the exact project area, and wait until every notified utility has responded. USA North 811’s homeowner instructions explain that utility marks need to be confirmed before work and that hand tools should be used carefully near marks.
Remember what the service does not do: utility locators mark the lines their participating utility operators own or maintain, not the layout of a private lawn irrigation system. Ask the local center what will be marked on your property and account for private electrical, water, lighting, and irrigation lines separately. If an unmarked private service may cross the area, have it located before you expose soil.

Protect utilities and irrigation parts during exposure
Once the area is cleared for work and a valve box is strongly suspected, begin at the likely box edge with a blunt, shallow hand probe or trowel. Work slowly through a thin layer of soil or turf and stop as soon as you meet a solid surface, wire, pipe, unexpected resistance, or moisture. A pointed screwdriver, long steel rod, pick, or powered auger can pierce a control wire or irrigation pipe before you realize what you have found.
Never probe near utility marks, a gas line, buried electric service, the water meter, or an unknown service trench. The 811 markings do not necessarily show every private line. Do not deepen a hole simply because the first few inches reveal nothing; valve-box depth depends on how the yard has changed and how it was installed. If you cannot confidently expose just the lid, stop and call a professional with locating equipment.
When you do uncover a lid, brush away soil and lift it gently. Do not pull on wires or twist solenoids to see which circuit responds. Take a photo of the box before moving anything, note standing water or damaged connections, and avoid touching waterlogged electrical splices. A flooded box, cracked manifold, or persistent leak needs repair, not just a map.
Know when to stop and call an irrigation pro
Bring in a licensed or insured irrigation technician when the system plan is missing and the search would require broad excavation, when the controller station or wiring is unclear, or when a locator signal crosses several circuits. A professional is also the right choice if a valve is under paving, a retaining wall, mature roots, or a utility-marked area; if wiring is damaged; or if the system is flooding, leaking, or affecting the foundation.
Call the relevant utility first if you suspect a gas, electric, communications, or water-service line is involved. Do not ask an irrigation contractor to dig through an unmarked utility route, and do not assume a DIY tool has distinguished a sprinkler wire from a different buried cable. If a water meter is turning when all known fixtures and irrigation zones are off, contact the water provider or a plumber to investigate a possible leak rather than searching blindly for a zone valve.
Map the valves once you find them
Record the box’s location from permanent references such as a foundation corner, fence post, path edge, or measured distance from a wall. Take a wide photo showing the surrounding yard and a close photo of the lid and valves. Note the zone numbers, the heads or beds served, and whether the box contains multiple valves; update the controller labels while the test is fresh.
Keep the plan with the controller or save a copy with household maintenance records. Mark each box on a simple sketch, distinguish the irrigation valve boxes from the water meter and backflow equipment, and note any locator results or uncertain routes. If you later move a valve or replace a cable, revise the map immediately. A clear record turns the next repair into a short inspection instead of another search.
Conclusion
Find the right sprinkler valve by moving from the affected zone to stronger physical evidence: controller station, system plan, visible boxes, a brief supervised test, and then a wire or valve locator. Use the water meter and backflow assembly only as landmarks, keep utility equipment closed, and do not treat sound or a station label as proof of an exact location.
If the search reaches soil disturbance, call 811 in the United States, wait for all required utility responses, and account for private irrigation lines that the service may not mark. Probe only a small, confirmed area with care; stop when the route or wiring is uncertain. Once the valve is exposed, map it and label the zone so the next person can find it without guesswork.