How to Grow Snap Peas: Sowing, Care, and Harvest Guide
Learn how to grow snap peas from seed, choose a compact or climbing variety, build support, water well, and pick crisp, sweet pods at the right stage.

The best snap pea harvest starts with timing. Sow the seeds while the weather is still cool, give the vines support before they reach for it, and keep the root zone evenly moist as flowers and pods form. Snap peas usually grow quickly, but a few small choices—especially variety, soil drainage, and harvest timing—decide whether they produce a handful of pods or a steady bowlful.
You can grow them in a garden bed, raised bed, or roomy container. Choose the variety first, because a compact 2-foot plant and a vigorous 6-foot vine do not need the same support, space, or container plan.
What Makes Snap Peas Different?
Snap peas are edible-pod peas in the species Pisum sativum. Their thick, rounded pods are harvested while the peas inside are still tender. Unlike shelling peas, you eat the pod as well as the seeds; unlike snow peas, snap peas are allowed to swell until the pod looks plump rather than flat. The Royal Horticultural Society describes sugarsnap pods as fleshy and rounded, while mangetout or snow-pea pods are flatter. RHS guidance on growing peas
That distinction matters at harvest. If you pick snap peas while the pods are still flat, they will be edible but less characteristic of the sweet, crisp crop you planted. If you wait until the pods are oversized and the peas bulge hard against the sides, they can become fibrous and starchy. The sweet spot is a glossy pod with peas beginning to fill its outline.
Snap peas are a cool-season crop, not a crop that enjoys a long, warm summer. They often grow from seed to harvest in roughly 50 to 70 days, depending on variety and weather, so they can fit before summer crops take over a bed. Count the maturity estimate from the point specified on the seed packet; some companies count from sowing and others from emergence.
Choose a Variety for Your Space
Read the seed packet for mature height, days to maturity, disease resistance, and whether the cultivar is a snap pea rather than a shelling or snow pea. Plant height is especially useful: it tells you whether the crop needs a tall, sturdy trellis or can work with shorter netting or twiggy sticks.
Compact options such as ‘Sugar Ann’ and ‘Snak Hero’ are practical for small beds and large containers. They still benefit from light support, but their shorter vines are easier to manage. ‘Sugar Snap’ and ‘Super Sugar Snap’ grow taller and need a solid structure; purple-podded ‘Sugar Magnolia’ and ‘Magnolia Blossom’ can add color but also require support matched to their full height. Variety descriptions and days-to-maturity estimates vary by seed seller, so use the current packet as the final reference. Savvy Gardening’s snap-pea variety guide
For a first planting, choose one compact cultivar if space is limited and one climbing cultivar if you have a fence or bed edge for a trellis. That simple split lets you see whether you prefer a space-saving crop or a longer vertical row without overcommitting to a variety that outgrows its support. The RHS profile for ‘Sugar Snap’ describes a climbing annual that can reach about 1 to 1.5 meters, while compact snap-pea forms stay much shorter; check the exact packet height before building the support. RHS ‘Sugar Snap’ profile
Time Planting by Soil and Weather
In most regions, sow snap peas in early spring as soon as the soil is workable and drains freely. They tolerate cool weather and light frost, but the seeds can rot when planted into cold, saturated ground. A soil thermometer is more useful than a fixed calendar date: peas generally germinate better once soil has warmed above the coldest early-spring range, while still staying cool enough for the crop to mature before hot weather. The RHS recommends waiting until soil is about 50°F (10°C) for outdoor sowing, while local seed guidance may allow earlier sowing in workable beds. RHS pea sowing guidance
Use your local last-frost date as a reference, not as a guarantee. In a mild coastal garden, peas may be sown weeks before the same date used in a colder inland valley. In a wet spring, a few extra days until the bed drains can protect a planting better than putting seed into mud just to hit a calendar target. If you can squeeze a handful of soil and it stays in a wet clump, wait; if it crumbles after you press it, it is more workable.
A fall crop can succeed where the late-summer weather cools quickly enough. Work backward from your expected first frost using the variety’s maturity estimate, then add a buffer for slow germination and short days. In hot climates, seeds sown during peak heat may struggle before the cooler window arrives, so shade the bed lightly during the hottest afternoon or sow in a protected spot only when temperatures are turning down. Fall sowing is a local opportunity, not a reliable option in every climate.
Choose a Site and Prepare the Bed
Give snap peas at least six hours of direct sun if you want strong flowering and a useful yield. In a hot-summer region, a little late-afternoon shade can reduce heat stress, but deep shade slows growth and leaves fewer flowers. Place the row where you can reach both sides to pick pods without leaning on or flattening the vines.
Drainage matters as much as fertility. Peas grow in many soils, but compacted or persistently waterlogged beds make germination and root health less reliable. Loosen the top few inches rather than turning the whole garden into fine powder, and mix in mature compost if the soil is low in organic matter. A soil test can clarify pH or nutrient problems; avoid correcting a number without knowing what the soil actually needs.
Rotate the crop if peas or beans grew in that spot recently, especially where you have seen root disease or poor growth. Rotation will not cure every soil problem, but it lowers the chance that legume-specific pathogens will remain concentrated around new seedlings. In a small garden where rotation is difficult, use fresh container mix or move the container to a clean spot.
Install Support Before Sowing
Pea vines climb with delicate tendrils that wrap around narrow supports. Put the trellis in place before sowing so you do not have to push stakes through a mat of roots later. The RHS recommends netting or wire supported by posts for taller varieties and shorter twiggy supports for compact types. RHS support recommendations
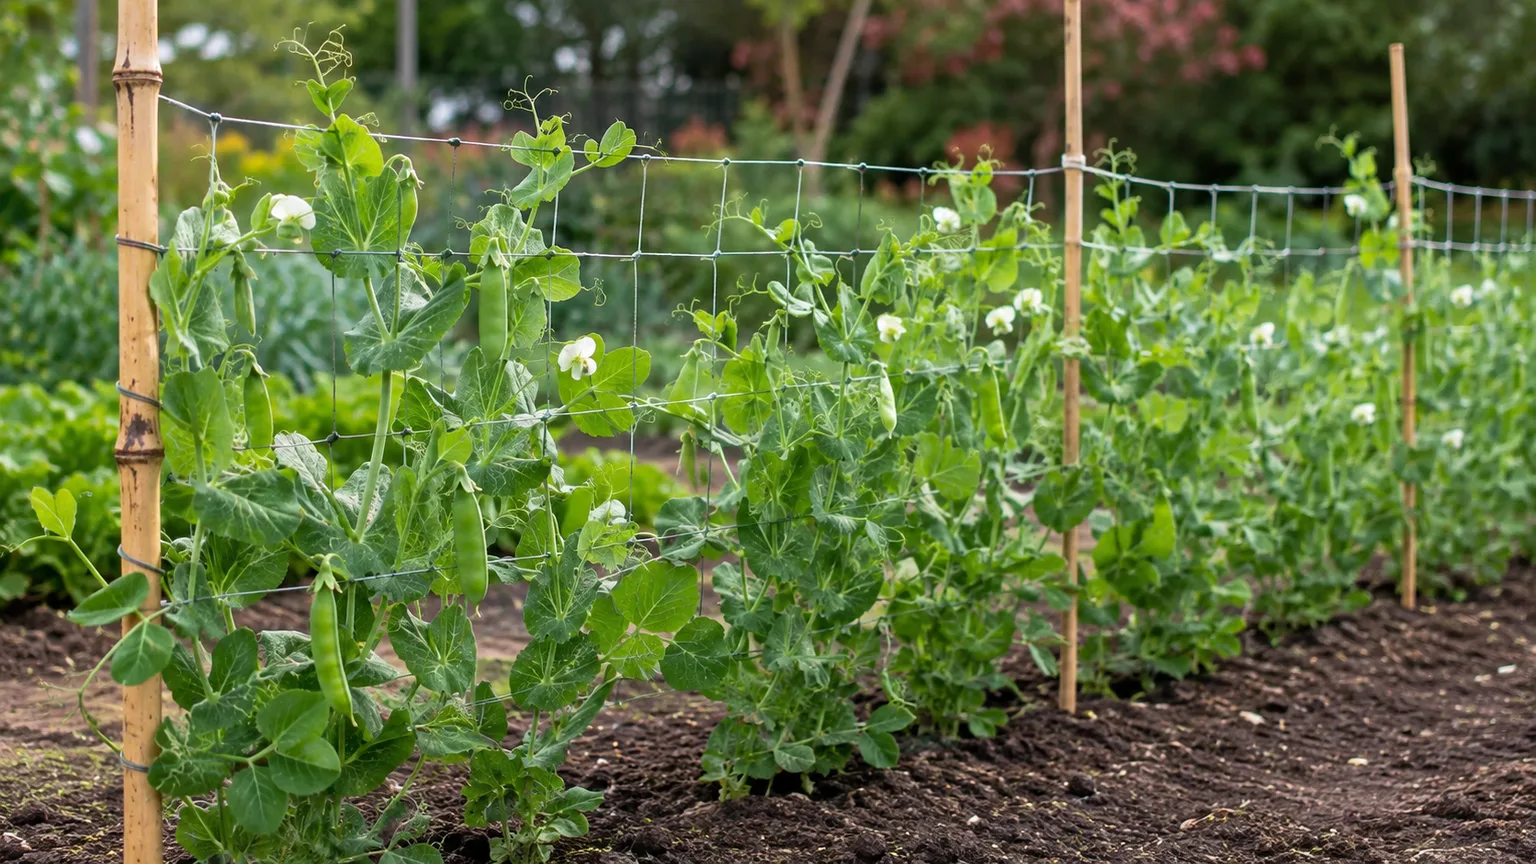
Choose the support based on the seed packet’s mature height and the weight of a full crop. A tall cultivar can become top-heavy, particularly in wind, so anchor posts firmly and use taut netting or mesh with openings the tendrils can grasp. A fence can work if the surface is not too smooth and the vines can reach the openings. Thin garden twine alone may not provide enough climbing points for a heavy row.
Compact plants do not always need a tall trellis, but a short net or twiggy branches can keep foliage and pods off damp soil. Upright growth makes harvesting easier and improves air movement through the row. It also makes it easier to spot pests before a dense mat hides them. Savvy Gardening’s snap-pea support guidance
Sow Seeds Directly and Protect Them
Direct sow snap peas where they will grow. Peas dislike root disturbance, and a seed planted in the bed avoids transplant shock and the extra step of hardening off seedlings. If mice, birds, or squirrels routinely remove seed from your garden, use a short length of row cover or a secure wire cover until seedlings are established; remove or raise it before it traps the young vines.
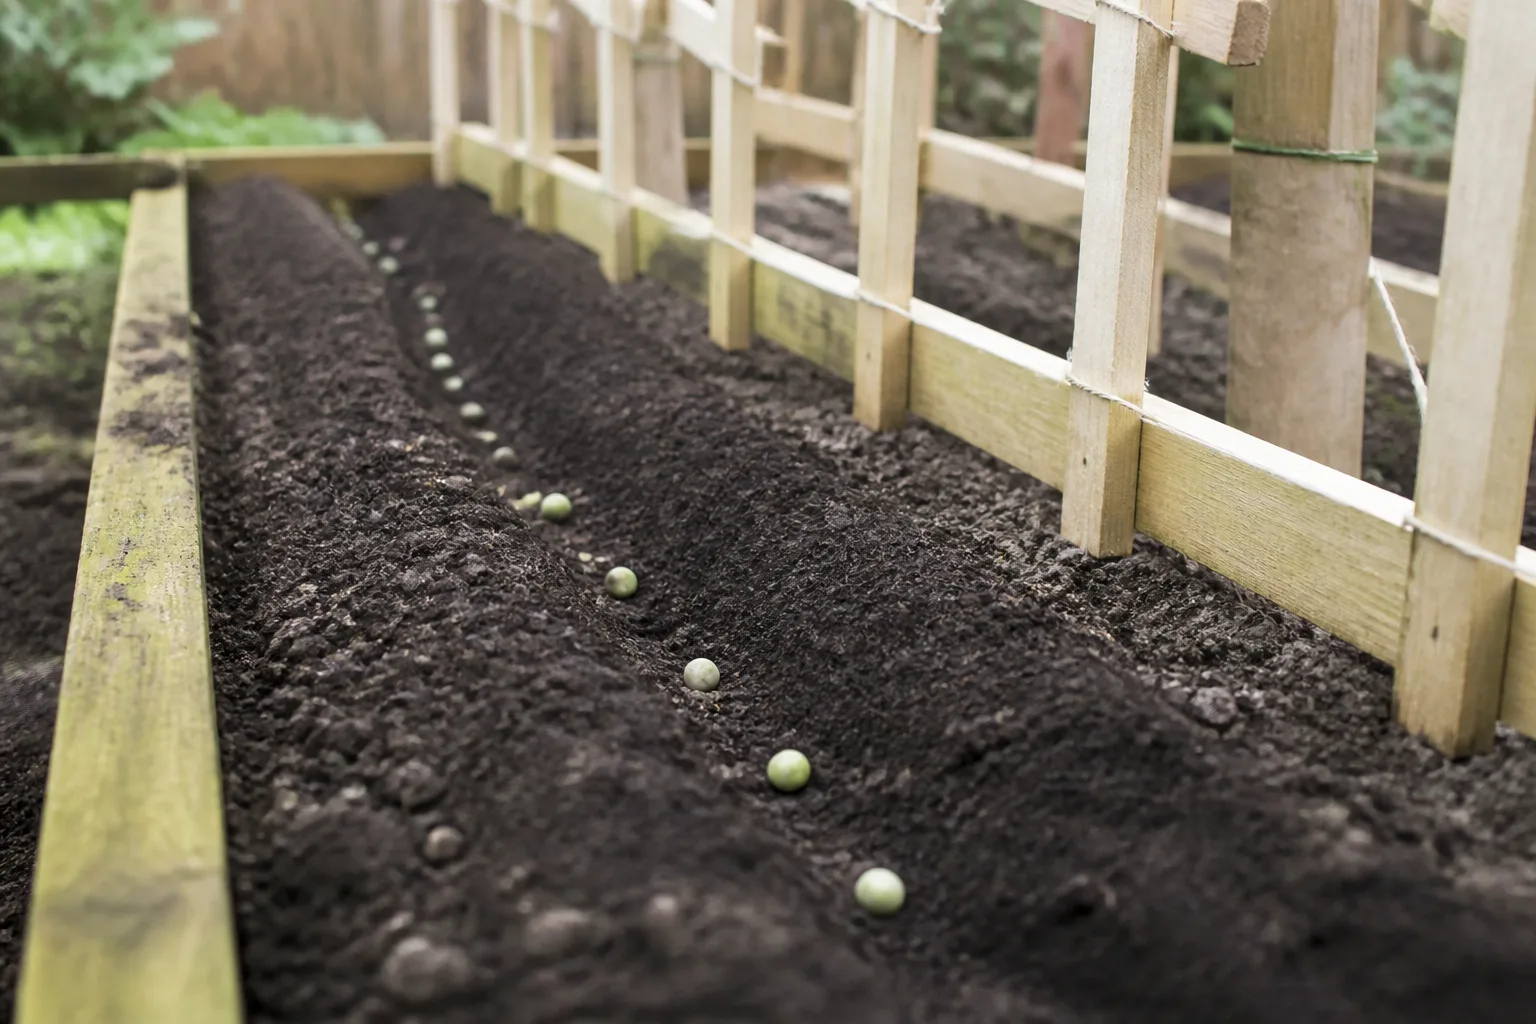
Make a shallow furrow, water it if the surrounding soil is dry, and sow seeds at the depth recommended on the packet. Cover with loose soil and water gently enough that you do not wash seeds out of place. The seed should stay moist while germinating, not sit underwater. Cold, saturated soil is the combination most likely to create a gap-filled row.
Depth and spacing that leave room to climb
For most snap-pea packets, seed depth is around 1 inch, but larger seed and local soil conditions can change the recommendation. Space seeds close enough to form a productive band while leaving air and light through the mature foliage; many gardeners use about 1 to 2 inches between seeds in a trellised row. Follow the packet if it differs, especially for a specific compact cultivar.
Use wider spacing between rows when you need room to reach the trellis, pick from both sides, or improve airflow. Thin only when plants are crowded or seedlings emerge in clumps; pulling out healthy neighboring plants can disturb roots, so snip extras at soil level instead. Mark the cultivar and sowing date so you can compare actual maturity with the packet estimate.
Grow a Smaller Crop in a Container
A container can produce snap peas, but it needs more than a few inches of potting mix. Choose a pot with drainage holes, at least about 12 inches deep, and as wide as your space allows. A wider container supports more plants and is less likely to dry out quickly than a narrow pot. The RHS suggests containers at least 18 inches wide for peas and notes that container crops need regular watering. RHS container-growing guidance
Select a compact variety for easier maintenance, but install a small trellis or netting before the vines need it. Fill the pot with fresh, well-draining potting mix; do not use heavy garden soil that compacts in a container. Sow seeds directly into the final pot instead of starting them in cells and transplanting a tangled root system.
Container peas need closer moisture checks than an in-ground row. The surface can look dry while the deeper mix remains moist, so check below the top inch before watering. In warm, windy weather, a pot may need water more often than a bed, but drainage holes should still release excess water freely.
Water for Germination, Flowers, and Full Pods
Keep the seed zone evenly moist until seedlings emerge. Once plants are established, water when the root-zone soil begins to dry, with extra attention when flowers open and pods start filling. Inconsistent moisture during pod development can result in smaller pods and uneven quality. The RHS recommends checking moisture while peas are cropping and watering the soil rather than repeatedly wetting foliage. RHS watering advice
A slow, deep watering is more useful than a light sprinkle that wets only the surface. Apply water at the base of the row in the morning when practical, then let leaves dry during the day. A thin layer of clean mulch can slow evaporation after seedlings are established, but keep it from pressing against stems or forming a soggy mat.
Do not use a weekly inch-of-water rule as a substitute for checking the bed. Rainfall, soil texture, wind, and container size all change how quickly the root zone dries. If leaves droop in the afternoon but recover by morning, heat may be part of the problem; if the soil is dry several inches down, water thoroughly and reassess the next day.
Feed Lightly and Understand Pea Inoculants
Peas can use nitrogen fixed by bacteria associated with their roots, so a rich nitrogen fertilizer is rarely the first answer to pale or slow growth. Too much available nitrogen can produce abundant foliage without a matching number of flowers and pods. Start with healthy soil and compost rather than routinely applying a high-nitrogen feed.
Pea inoculant is a live bacterial product sold for legumes. Some gardeners use it when planting peas in a new bed or soil with little history of peas and beans; others get adequate growth without it in established garden soil. It is optional, not a guarantee of a larger crop. If you choose to use one, buy a product labeled for peas, check its expiration and storage instructions, and apply it exactly as the label directs. Avoid claims that a seed coating can compensate for waterlogged soil, poor light, or excessive heat.
Container plants have a smaller nutrient reserve than a garden row, so they may benefit from a balanced, low-dose liquid feed once flowering begins if growth is weak and the potting mix is not already enriched. Follow the product rate and stop if plants are making lush leaves but few pods. A soil or potting-mix problem should be corrected before adding more fertilizer.
Keep Growth Moving With Succession Sowing
Snap peas mature quickly, but one planting often produces a concentrated flush rather than a season-long harvest. In spring, sow a small second row about two to three weeks after the first if your weather stays cool and you have room. This spreads the harvest and gives you a backup if pests or wet soil thin the first planting. The RHS recommends sowing batches every few weeks for a longer pea season; in a hot-summer climate, stop sowing before heat makes establishment unreliable. RHS succession-sowing guidance
You can also combine early and later-maturing cultivars so every plant does not peak at once. Plan the trellis space and future bed use before sowing: after the peas finish, a warm-season crop can follow, but avoid planting another legume in the same place if disease or root problems affected the pea row.
Harvest at the Plump, Tender Stage
Check the vines as soon as flowers fade and pods begin to appear. Snap peas are ready when the pods are glossy, feel firm, and have begun to swell with peas inside. They should look rounded but not so overfilled that the seed bulges hard against the pod wall. Many varieties make good eating pods around 2 to 3 inches long, but mature size varies; use the seed packet and taste a pod when the first crop is close. The RHS describes sugarsnap harvest at about 3 inches, when peas are just starting to develop. RHS pea harvest guidance
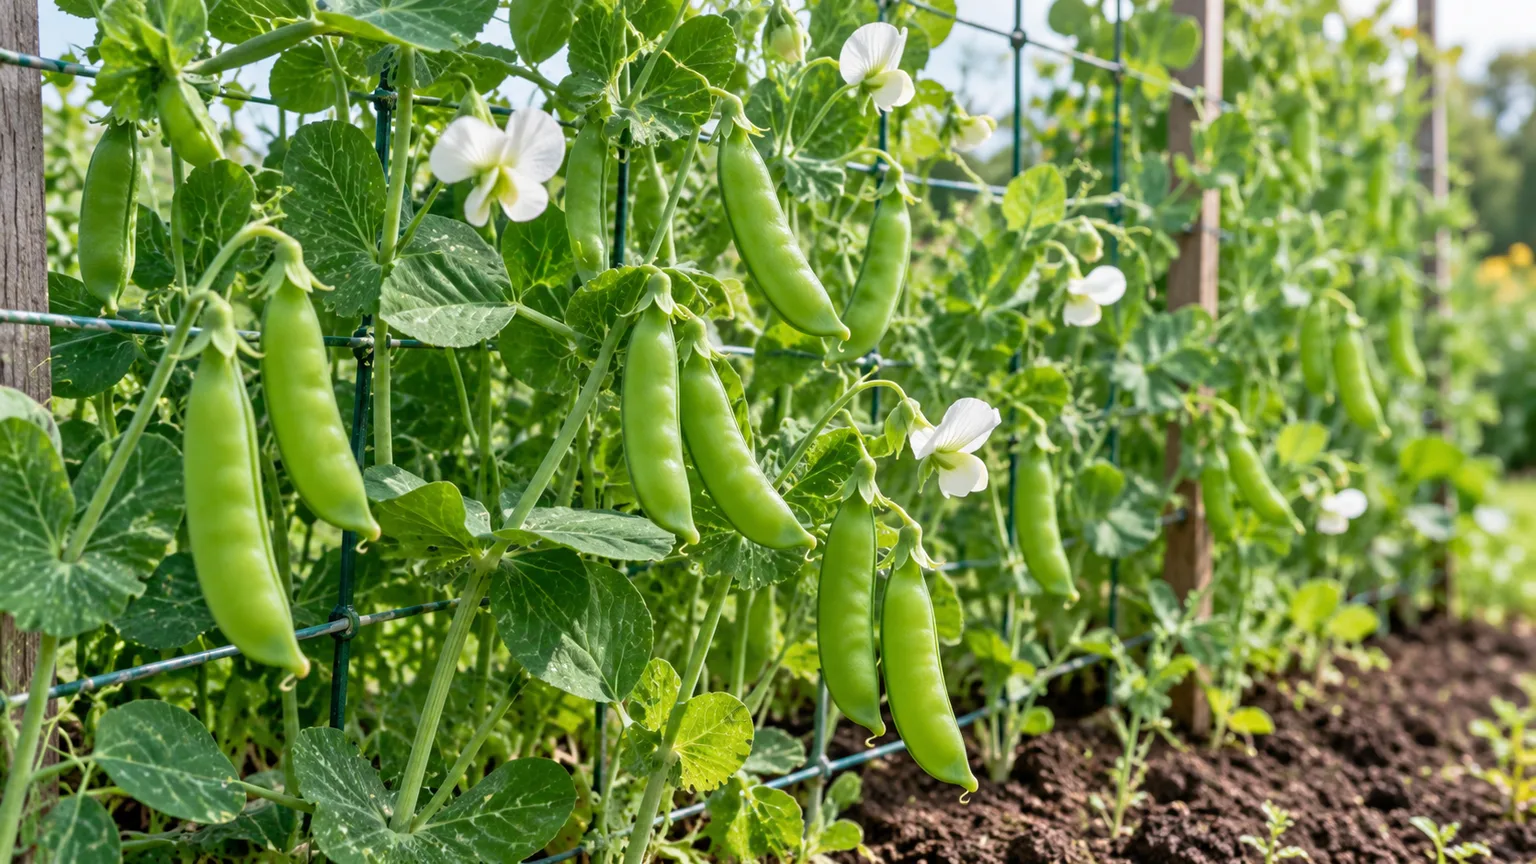
Do not wait for every pod on a vine to reach the same size. Lower pods often mature first, and checking every day or two during peak production helps you catch the tender stage. If pods have become tough or stringy, harvest them anyway and remove them from the plant so the vine is less focused on mature seed.
Pick without tearing vines and store promptly
Hold the vine with one hand and pinch or clip the stem above the pod with the other. Tendrils and stems are easy to tear when you pull a pod sideways, especially on a heavily loaded plant. A small pair of clean snips makes the job easier when the trellis is dense.
Fresh peas taste best soon after picking. Cool them promptly, keep them dry in a breathable or loosely closed container in the refrigerator, and use them within several days for the best crunch. If you have more than you can eat, blanch and freeze the extra rather than leaving mature pods on the vine. Regular picking encourages a continued crop while temperatures remain suitable. BBC Gardeners’ World pea-harvest guidance
Troubleshoot Weak Growth and Few Pods
A slow, patchy row usually points to the sowing conditions before it points to fertilizer. Check whether the soil stayed cold and wet, whether birds or rodents removed seed, and whether the row dried during germination. If seedlings emerge unevenly, wait until the surviving plants are clearly established before filling gaps; newly sown seed beside older vines may mature at a different time and need separate support.
If plants are tall and leafy but flowering poorly, look at light, heat, and nitrogen first. Dense shade, a hot spell, or excess nitrogen can delay or reduce flowering. If flowers open but pods do not hold, heat or moisture stress around flowering is more likely than a failure of pollination; snap peas generally set without gardeners hand-pollinating each bloom. Give the crop consistent moisture and shade from harsh late-afternoon sun if a brief heat wave is the issue, but recognize that prolonged hot weather usually ends a spring pea crop.
Yellow lower leaves can reflect normal aging near the end of the crop, but widespread yellowing from the base upward can also indicate waterlogged soil or root trouble. Check drainage and smell the root zone before adding feed. White powder on leaves suggests powdery mildew; improve spacing and airflow, avoid evening overhead watering, and remove heavily affected residue when the crop is finished.
Manage Pests and Disease Without Overreacting
Protect newly sown seeds and tender seedlings from birds and rodents if they have caused losses before. Fine mesh or a secure cover can help, but it must not press on the plants as they grow. Slugs may clip young shoots in damp weather, while aphids can gather on soft new growth. Inspect leaf tips and the underside of leaves before deciding whether any response is needed.
For a small aphid cluster, a firm water spray can dislodge many insects; repeat and check whether beneficial insects are already feeding. Avoid spraying open flowers or applying a product without confirming that it is labeled for edible peas and for the target pest. If you need a pesticide, follow the label’s crop, dose, re-entry, and preharvest instructions exactly.
Powdery mildew, root rot, and other pea diseases are easier to limit through prevention than rescue. Rotate peas away from other legumes, space and support plants so air can move through the row, and avoid letting the bed remain waterlogged. The RHS lists powdery mildew, pea and bean weevils, pea moth, birds, slugs, and snails among common problems for peas, and advises using appropriate barriers or monitoring rather than assuming every damaged leaf needs treatment. RHS pea problem-solving guide
Save Seed and End the Crop Cleanly
If you want seed for next year, leave a few healthy pods on the plant until they turn dry and papery. Save seed only from open-pollinated varieties; seed from hybrids may not grow true to the parent type. Let the seed finish drying indoors if damp weather threatens, label the envelope with the cultivar and date, and store it cool and dry. If you are unsure whether a variety is open-pollinated, check the packet or breeder before saving.
Once production is over or hot weather has stopped pod quality, cut healthy vines at soil level and leave sound roots in the bed to break down. Pea roots can hold nitrogen-rich nodules, but that does not mean the next crop can skip its own soil needs. Remove diseased vines instead of leaving them in place, and avoid putting suspect material into a home compost pile unless the pile gets hot enough to manage plant pathogens.
Snap peas are annuals, so the spring plants do not overwinter and restart the following year. A fall planting is a new crop from fresh seed, timed to reach flowering and pod set as temperatures cool. Save a clear label or note of sowing date and variety so you can adjust the next planting based on what your own weather and garden actually delivered.
Conclusion
To grow reliable snap peas, match the cultivar to your available space, sow into cool but workable soil, and install support before the vines need it. Keep the seed zone moist through germination, water consistently when flowers and pods are developing, and avoid unnecessary nitrogen fertilizer. Pick pods once they are plump and glossy but still tender, then keep checking the vines every day or two while they produce. Those simple checks—soil condition, plant height, moisture, and pod fill—are more useful than following a rigid planting date or waiting for every pod to look identical.